Category: Digital Signals

Wireless Analysis of 868 MHz Traffic with an RTL-SDR and the Traffic Detective Software

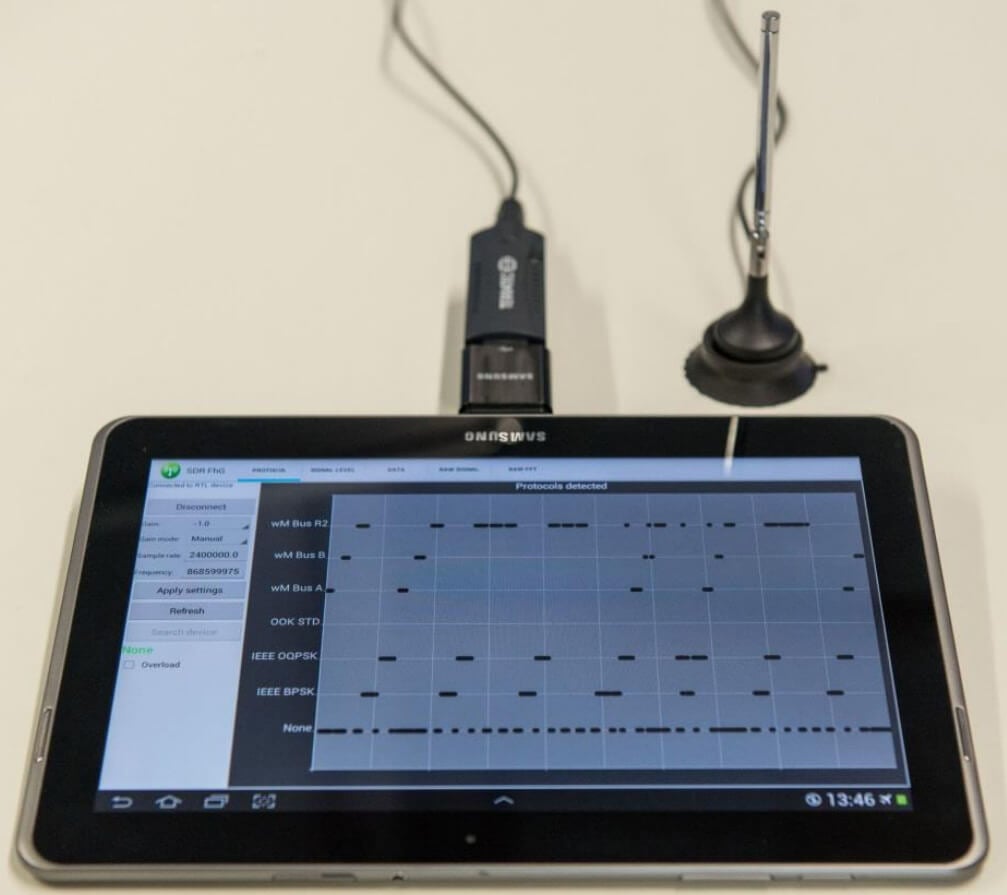
The Fraunhofer Institute for Integrated Circuits IIS has developed an Android app that allows you to analyze wireless traffic at 868 MHz using an RTL-SDR dongle. In Europe, many wireless IOT, metering and home automation radio standards operate in the 868 MHz band including ZigBee, M-Bus, KNX RF, EnOcean Radio Protocol and s-net.

The software can automatically detect and recognize the wireless protocol being received. It can then be used to catalog what protocols are operating in a network, what frequency they are on and how active they are. That information can then be used for frequency and spectrum planning for new network setups. It can also be used for error diagnosis, intrusion detection and detection of interference.

The Traffic Detective Tool

The promotional pamphlet (pdf) reads:

Numerous applications like smart metering, home automation, building automation, demand side management, ambient assisted living and industrial automation require reliable and cost effective technologies for wireless data transmission. For this purpose the license-free European 868 MHz Short Range Device (SRD) frequency band is prevalently used. Many different and incompatible communication standards and RF-protocols simultaneously occupy this part of the frequency spectrum. Possible negative effects could be interferences, over-occupancy, data collisions and as a result data loss. Special attention must be paid whenever wireless sensor networks are planned or operated. Therefore, network specialists need powerful and flexible tools that provide insights into the wireless data traffic for network planning, operation, fault detection and error diagnosis. The Traffic Detective is such a tool which is easy to use and does not need any knowledge of the different network protocols.

The 868 MHz Traffic Detective is a software-based solution with a user-friendly graphical user interface for monitoring wireless data traffic. A cost-effective and commercially available DVBT USB stick based on a Realtek RTL2832U receiver chip can be used as an analog frontend. In addition to a PC-based implementation, the monitoring software is also available as an app for Android-based mobile devices.

The researchers behind the software have also released an academic paper describing the technology used in the system.

Unfortunately it seems that the app is not actually available for public download yet as we could not see any download links, or find it on Google Play. If you are interested in the app your best bet may be to contact the researchers by email directly.

Reverse Engineering Traffic Lights with an RTL-SDR Part 2

Back in September 2015 we made a post about how Bastian Bloessl was able to use his RTL-SDR dongle to reverse engineer and decode the signals coming from portable wirelessly synchronized traffic lights which are commonly set up around road construction zones.

Recently Bastian noticed that a new set of wireless traffic lights had been set up at his University, so he got to work on trying to reverse engineer those. He found that these new lights use the same frequency band, but work using a different modulation and frame format scheme.

The reverse engineered wireless traffic lights.

To reverse engineer these new lights he made a recording of the signals in GQRX and then opened them up in Inspectrum, which is a very nice tool for helping to reverse engineer digital signals. Thanks to Inspectrum he was easily able to extract the preamble and decode the data in GNU Radio.

Bastian has also uploaded a video that shows him reverse engineering the binary frame format in the Vim text editor which may be useful for those wishing to understand how it’s done.

Reversing Frame Format with Vim

Once the frame format was reverse engineered, he was able to use the program he created last year which allows him to view the status of the lights remotely in real time.

Reverse Engineering and Reading Data from a Wireless Temperature Meter: Tutorial + Code

On GitHub user spenmcgee has uploaded a write up and Python software that decodes data from a Lacross TX29 wireless temperature meter. Spenmcgee’s write up goes into excellent detail about how he actually wrote the program and reversed engineered the transmitter.

First he explains how he used Python to extract the data from the RTL-SDR I/Q samples. From those samples he calculates the amplitude data, and plots it on a graph which shows the digital signal. He then decimates the signal to reduce the number of samples and figures out how to detect the preamble, data bits and packet repetitions. Then to decode the signal he explains how he does clock recovery, convolution and thresholding, and also the importance and meaning of those steps.

If you’re new to reverse engineering signals and don’t have a DSP background, then spenmcgee’s write up is an excellent starting point. It’s written in a way that even a layman should be able to understand with a little effort. If you have a Lacross TX29 wireless temperature meter that you just want to decode, then his code will also be of use.

Bits detected from the RTL-SDR data.

Wintelive: Tutorial and Updates to the Windows Telive TETRA Decoder Implementation

Earlier this month we posted about “cURLy bOi”’s release of his Windows port of telive. Telive is a popular TETRA decoder created by SQ5BPF which until recently only ran on Linux systems. TETRA is a digital voice radio system used in many countries other than the USA.

Now cURLy bOi has just updated his software adding new Windows GUI features and simplifying the install process. The software and text install instructions can be downloaded from his web server, and the code can be found on GitHub.

In order to show the new features and how to use the software cURLy bOi has also created a tutorial video up on YouTube, which is shown below.

Wintelive 0.2 demo

Experimenting with Broadcast FM RDS (TMC, RT+) and SCA Audio

A typical broadcast FM station can sometimes contain “hidden” subcarriers embedded within the main signal. The subcarriers contain data or audio services.

An example of a data subcarrier hidden within broadcast FM is the “Traffic Message Channel” (TMC). The TMC contains traffic data, and is used on GPS devices that advertise as having live traffic capabilities. TMC data is encrypted so that it can be sold, but is very easily broken. Another data service is RDS-RT+ data which transmits song information, for radios that can display it.

An example of a voice subcarrier (SCA/ACS) might be niche radio stations, such as ethnic stations, elevator music, music for doctors offices etc. Usually a specialized radio is required to receive a SCA channel. In a previous post we showed how a user was able to receive SCA on Windows.

Over on his blog Gough Lui has been investigating the broadcast FM subcarriers in his home town of Sydney, Australia. In his post he looks at TMC, RDS-RT+ and SCA subcarriers and explains a bit about what they are and how they work. He also goes on to receive and decode the subcarriers with an RTL-SDR, gr-rds and GNU Radio. While Gough doesn’t bother to decrypt the TMC service, he can still see when an event occurs and what the even was. Without decryption he just doesn’t know where the location on the event is. For SCA he wrote a GNU Radio program to extract the audio subcarrier and was able to decode audio from a local Indian station for migrants.

SCA GNU Radio Decoder

Identifying Transmitters with CTCSS Fingerprinting

Oona Räisänen is a RF hacker and enthusiast who has in the past brought us posts about decoding burger pagers in restaurants, decoding wireless bus signs and FM-RDS with SDR’s like the RTL-SDR. This time she has written an interesting post that shows how she can “fingerprint” radio transmitters by analysing their CTCSS transmissions. CTCSS is short for “Continuous Tone-Coded Squelch System” and is a low frequency tone added on to some transmissions used in handheld radio systems shared by several distinct groups. The CTCSS tone prevents users of a shared system from having to listen to other users talking if they are not part of the same group with the same CTCSS tone frequency. CTCSS provides no means for actually individually identifying a radio.

Oona wanted to see if she could fingerprint and thus identify individual radios by their CTCSS tone by looking at identifying features such as small variances in CTCSS tone power and frequency. The idea is that each radio will have minute differences in the exact tone and power produced by the CTCSS circuitry, due to differences in the crystal oscillators and component tolerances. Oona used an RTL-SDR to record CTCSS data from a conversation on a local handheld radio network. Then by plotting the frequency vs power data on a heatmap graph she was able to find 8 different clusters of points, which potentially identifies 8 individual handheld radios.

Frequency vs power heatmap identifying 8 different radios.

With the individual radios identifiable by their cluster centers, each cluster can be assigned a name. Now each subsequent transmission can be compared to each cluster center, and assigned to the closest matching cluster, thus matching a new unknown transmission with a known radio. This makes it easier for someone listening in with no context to follow a conversation. 

Assign names to each radio.
Assign names to each radio/cluster center.

TETRA Decoding on Windows with Telive

TETRA is a type of digital voice and trunked radio communications system that stands for “Terrestrial Trunked Radio”. It is used heavily in many parts of the world, except for the USA. Telive is a decoder for TETRA which is compatible with RTL-SDR dongles, and has been around and in use for almost 2 years now. If you have unencrypted TETRA signals available in your area it can be used to listen in on them.

Telive is dependent on GNU Radio, so it is normally installed and used on a Linux system. Previously we wrote a tutorial on it’s installation and use, and other users have also made bootable Linux images of telive available.

However, now a TETRA experimenter by the handle of “cURLy bOi” has released a new prototype of a telive modification that works on Windows systems. It makes use of the GNU Radio for Windows development. The telive Windows file can be downloaded from curly’s webserver. His reademe file shows how to install and use the software and it reads:

This has been put together as lowest-effort configuration
to run telive on Windows system. I have also optimized to process (for example adding the CQPSK block to GRC since the python code in the original telive package is IN FACT some unused part of GNU Radio)

Warning:
———
This package contains pre-compiled binaries that work on my 64-bit system. I have compiled them inside the M-SYS2 package. If you don’t trust me, you can follow the installation guide from telive docs, just be prepared you are going to need a lot of packages for the M-SYS2 (pacman -S gcc automake git wget, etc.)

Install:
———
1) Download GNU Radio for Windows from http://www.gcndevelopment.com/gnuradio/downloads.htm
and install
2) Copy contents of gnuradio_mod to c:\Program Files\GNURadio-3.7\
3) Download and install M-SYS2 from https://sourceforge.net/projects/msys2/ and install
4) Copy contents of msys_root to your M-SYS2 installation directory
5) Download FFmpeg for Windows (64-bit Shared) from https://ffmpeg.zeranoe.com/builds/
and extract everything from bin to usr\bin in your M-SYS2 installation directory
6) In M-SYS2 shell execute “pacman -S socat”
7) Get GNU Radio Companion (GRC) projects from original telive package at
https://github.com/sq5bpf/telive/tree/master/gnuradio-companion
(only udp or xmlrpc, pipes won’t work)
8) Open whatever GRC project you want to use and edit it:
– Delete the link between (all) Fractional Resampler and UDP Sink
– From the modules on the right (ctrl-f to search) drag CQPSK Demod to project
(If you don’t see CQPSK Demod then you have messed up #2)
– Connect Fractional Resampler -> CQPSK Demod -> UDP Sink
– Change UDP Sink Input Type to Float in its properties
– Save

Use:
——
1) Open GRC project of your choice (already with the CQPSK Demod box)
2) Use the Project/Execute to run the project from the GRC
– OR –
If you had headless (without GUI) project, use Project/Generate option
to generate top_block.py file in the GRC project directory.
Then open GNURadio Command Prompt from Start menu, the use this command
c:\Program Files\GNURadio-3.7\gr-python27\python.exe -u c:\path\to\grc\project\top_block.py
This will enhance performance.
3) Open new M-SYS2 shell for every channel in that project and execute
command “receiver1udp X” where X is the number of each channel in GRC project
4) Open new M-SYS2 shell, resize it to 203×60 and execute:
– cd /tetra/bin
– ./rxx OR ./rxx_xmlrpc (if you are using XMLRPC GRC project)
You can edit these files to match your preferences
5) That’s it, should work.

Note that we have not tested this out ourselves yet and can’t guarantee the file safety or that it works, but we have no reason to believe that it wouldn’t be safe or not work.

TETRA Decoding (with telive on Linux)

Introduction to Signal Analysis Baltimore-DC Course Live Stream and Recorded Videos

Earlier in the month we posted about the “Unallocated Space” free four week class on signal analysis taking place in the Baltimore-DC area. The course has now started and they are live streaming the lectures and saving them on YouTube. The first two classes have already passed, and two videos are uploaded.

The first class went over installing the RTL-SDR as well as showing a few examples of decoding some signals. The second class covers various modulation types and digital encoding schemes. They show how to learn how to identify various digital signals by listening to them and viewing them on the waterfall. The class slides are also available on links placed in the video description.

The third and fourth classes have not yet streamed. The third class will be live streamed on October 4, 7PM local time. Visit their YouTube channel for the videos. 

Introduction to Signal Analysis Week 1

Introduction to Signal Analysis Week 2