SDRSharp Users Guide

This is an excerpt from our book on RTL-SDR which we've decided to post given that many new users struggle to understand all the settings in SDR#.

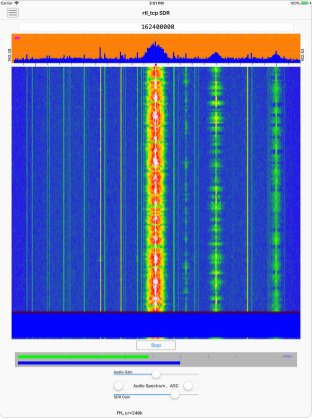
SDR# is currently the most popular SDR program used with the RTL-SDR. It's easy to set up and use. To install SDR#, go through our Quickstart Guide. Below we explain some of the settings and displays in SDR#.

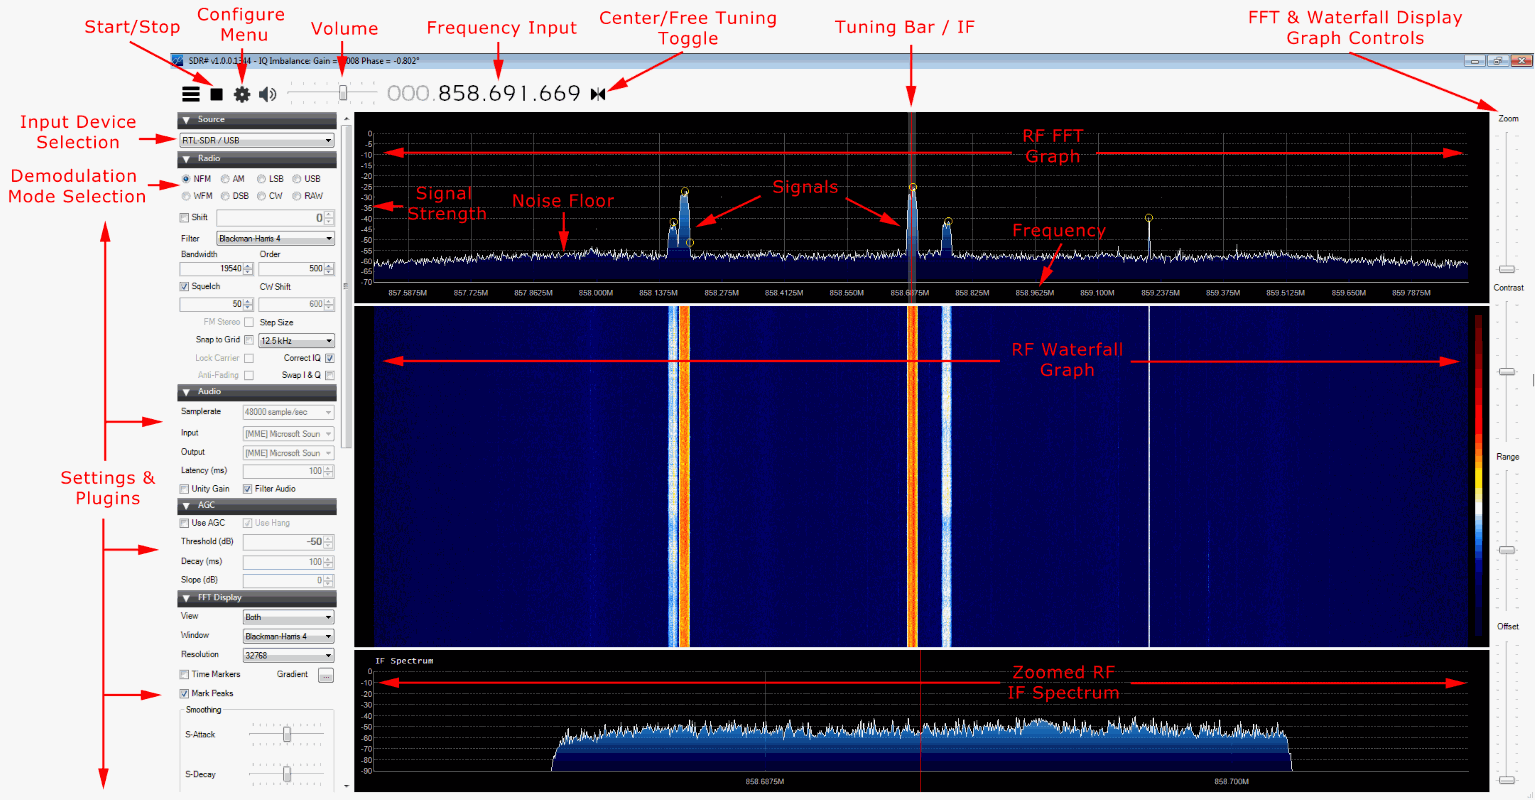
Upon opening SDR# you'll be greeted with the screen shown below. Here we have highlighted the main parts of SDR#

After opening SDR# for the first time, we suggest that you immediately remember to perform the following steps (if you don’t know what some of these steps are, continue reading further below for more information):

  1. Increase the RF gain from zero to a higher value in the configure menu.
  2. Reduce the range slider on the right of the SDR# window to about -70 (for RTL-SDR dongles).
  3. Enable the “Correct IQ” setting to remove the center spike if using an R820T/R820T2, or enable “Offset Tuning” in the configure menu if using an E4000/FC0012/13.
  4. Turn off the “Snap to grid” setting, or adjust the PPM offset accordingly.
  5. Set the 'Mode' to the correct setting for the signal that you are listing to.

Continue reading

Reading Household Wireless Utility Meters with an RTL-SDR and Plotting the Data in Home Automation Software

Over on YouTube Debashish Sahu has uploaded a video showing how he uses an RTL-SDR to capture and decode consumption data from his home electric/gas/water utility meters. He uses the rtl_amr software which already supports a wide range of meters such as Debashish's gas meter. Later in the video he shows a Python script that he's written which continuously grabs the data from rtl_amr, and passes it into the Home Assistant software using JSON. Then in Home Assistant the data is graphed, and he is able to determine points of interest, such as when appliances turned on or off.

Using RTL-SDR to read values from wireless electric/gas/water meters

Fixing Factory Defective FL2K Dongles

If you've recently purchased an FL2K-SDR to use as a cheap osmo-fl2k transmitter and found that it only works on USB 2.0 ports, or at very slow sample rates, then you may have received a defective unit. Over on his blog Yohanes Nugroho discovered that his FL2K-SDR was experiencing these issues. Upon opening it up he discovered that the wiring inside looked different when compared to the sample image found on the Osmo-FL2K website.

Looking further into it he found that the USB wiring was soldered on incorrectly. After resoldering the wiring Yohanes was able to get the FL2K-SDR working properly at high sample rates on USB 3.0 ports.

FL2K-SDR Rewired
FL2K-SDR Rewired

An Enhanced Version of Freqshow for Raspberry Pi’s with Touch Screens

The Freqshow software is an RTL-SDR compatible tool for Raspberry Pi devices that can render live spectrum and waterfall displays. It is designed to run on portable touchscreens that plug into the Raspberry Pi. We've posted about freqshow a few times in the past.

Recently Dan Stixrud has created an enhanced version of Freqshow. Over on the his post on the Adafruit forums, Dan explains the improvements as follows:

The additional features are many. Additional features include: Full resolution zooming, I and Q Swap, 9 different pre FFT windowing functions to choose from. Center frequency offset or shift. PPM correction for the RTL2832. FFT averaging or FFT peaking. Easy frequency up and down from main screen. Easy Scale adjustment from main screen.

On YouTube he's also posted a video that demonstrates the software in action when running on an Adafruit 2.8" and Pi Foundation 7" TFT capacitive touch screen. Dan uses the software as a panadapter for his ham radio.

An Osmo-FL2K Broadcast AM Band Frequency Marker Generator

Over on Hackaday.io Ted Yapo has written about his frequency marker generator which uses Osmo-FL2K. Osmo-FL2K is a recently released hack that allows cheap $5 - $15 USB 3.0 to VGA adapters to be used as an SDR transmitter. We have several posts on it available here. The FL2K-SDR frequency marker generator tool simply generates an AM voice that reads out the current frequency on all of the 118 US AM channels. He writes:

A frequency marker generator is a very useful tool for calibrating antique or experimental (even crystal!) medium wave (aka AM broadcast band) radios. While an RF marker can be as simple as a fixed frequency oscillator, that's not the most convenient way to calibrate multiple frequencies. This project provides a software-defined-radio solution for a deluxe marker generator using a cheap USB-to-VGA dongle. The output signal consists of 118 individual AM "stations" in the MW band - one for each assigned channel in the US - each announcing their own frequency in a synthesized voice.

In the future Ted hopes to be able to generate a full band of old radio shows that could be sent to an antique radio, which is sure to help in improving that authentic antique feeling.

If you're interested in Osmo-FL2K his hackaday.io page also has information on throughputs that he got from different USB interfaces on his PC, as well as a PCB breakout board to convert the FL2K-SDR VGA port into SMA outputs.

Osmo-FL2K Generating AM Band Frequency Markers
osmo-fl2k AM Voice Marker

RTL_TCP SDR: iOS Software Defined Radio App with Spectrum Display

In the post a few days ago about the newly released "SDR Receiver" app for iOS, we briefly mentioned that another iOS app called "RTL_TCP SDR" has just been released out of beta and put onto the Apple store as well.

"RTL_TCP SDR" is a little different to "SDR Receiver" because it contains a full spectrum analyzer and waterfall display, whereas "SDR Receiver" only allows you to listen via presets or manual tuning. Both apps can not access the RTL-SDR directly on the iOS device due to Apple limitations. An external server on a Raspberry Pi or PC running rtl_tcp is required. Programmer HotPaw writes about his App:

An RTL-SDR Software Defined Radio receiver for iOS devices (requires an external rtl_tcp server). Listen to VHF AM and FM radio signals. View a waterfall of the RF spectrum. Connect, via the rtl_tcp network protocol, to a networked RTL-SDR USB peripheral. 

iOS devices do not currently support the direct connection of USB devices such as an RTL-SDR. Thus, the use of this app requires network access to a server, such as a Raspberry Pi (or Mac), with an RTL-SDR unit plugged into its USB port, and running the rtl_tcp protocol at an TCP/IP network address accessible from your iOS device. The Raspberry Pi acts, essentially, as a USB port adapter for your iOS device. 

No support is provided for installing any of the software needed to use this app with a Raspberry Pi. Please do not download this app unless you are already familiar with Software Defined Radio, have an RTL-SDR USB device, and have already installed and tested rtl_tcp on your Raspberry Pi, Mac, or other server.

Over on his Reddit discussion thread he also mentions:

Since Apple's iOS doesn't allow an RTL-SDR to be plugged directly into a Lightning port (even with a USB adapter), an rtl_tcp adapter, such as a Raspberry Pi (or Pi Zero) server is required.

This app is an experiment in real-time DSP and SDR coding using Apple's Swift and Metal GPU-shader programming languages. It includes a spectrum waterfall, and supports demodulating FM, AM, and SSB. Also, includes beta test support for the AirSpy HF+.

HotPaw's "RTL_TCP SDR" running on an iPad.

PLSDR: A Python Based SDR App with RTL-SDR Support

Programmer P. Lutus has recently released a new Python based software defined radio application that he calls "PLSDR". PLSDR is a full receiver, with spectrum and waterfall displays, a frequency manager, and support for multiple modes such as AM/FM/SSB/CW. Being Python based PLSDR supports both Linux and Windows. Compatible hardware includes the RTL-SDR, HackRF and SDRplay, however Lutus notes that he could only get the SDRplay working on Linux.

The PLSDR download page also contains various bits of information about the DSP math behind designing the SSB demodulator. Essentially he found that no online examples of GNU Radio based SSB demodulators were correctly implemented, so he decided to research and implement his own design. He also notes that PLSDR was designed by initially prototyping each function in GNU Radio first, before moving it over to Python. This approach allowed him to easily check his fundamental design before optimizing it for Python. If you are interested Lutus also has a very useful page dedicated to explaining the DSP basics behind SDRs.

PLSDR is fully open sourced and available on GitHub. Exploring the code may be a good way to learn about SDR concepts.

PLSDR GUI
PLSDR GUI

Using the Airspy HF+ as a Power Meter By Calibrating it with a Resistor

Over on YouTube, Leif (SM5BSZ) has uploaded a video where he shows how the Airspy HF+ can be used as an accurate power meter for RF signals. Leif notes that if the noise figure (NF) or minimum discernible signal (MDS) of an SDR is known, then it is possible to use that SDR as a power meter by calibrating it with a resistor (dummy load) at room temperature. To determine power levels Leif uses the signal diagnostics plugin which is built into SDR#. He writes in the video description:

When the noise figure (NF) or minimum discernible signal (MDS) of a software defined radio (SDR) is known we can use that radio as a power meter just by calibrating it on a room temperature resistor. Here the Airspy HF+ is used to demonstrate the principles. Note that MDS depends on the temperature. Manufacturer data is for a warmed up unit. Cold units have significantly lower MDS. Note the observations on bad adapters and attenuators towards the end of the video. One conclusion is that the HF+ is EXCELLENT in keeping common mode currents on the USB as well as on the antenna cable outside. They do not enter the receiver provided that the nut holding the SMA connector is firmly tightened.

In another video Leif also tests out a pre-production version of a HF+ preselector currently being designed by Youssef (designer of the HF+) by measuring the filter responses.