A Review of the Soon to be Released Malahit-DDC Portable SDR

The Malahit DDC is the latest in portable SDR packages coming out of the Russian designer and manufacturer known as 'Malahiteam'.  In the past they released the hugely successfull Malhit-DSP. We want to thank Manuel Lausmann for sending us a video and review that comprehensively looks at one of the first Malahit DDC devices that have been received. Manuel writes:

Differences between Malahit DSP and Malahit DDC

The comparison results for the main characteristics are summarized in the table. The worst result of the comparison is marked in red, the best or neutral result is blue.

The comparison took into account the results from the DDC versions with two ADC versions - AD9649 and MDRA1A16FI.

1) the sensitivity is about the same, there is no difference.

2) The dynamic range blocking is a big difference in favor of DDC. It is caused by the properties of the radio reception path and not by the difference in the classes of radio receivers. This has the practical advantage that a radio receiver with large antennas can be used under difficult conditions, for example when it is necessary to receive a weak signal in the presence of a strong interfering one.

3) The dynamic range of third order intermodulation is a big difference in favor of DDC. It is caused by the properties of the radio reception path and not by the difference in the classes of radio receivers. The practical advantage of this is the lack of parasitic or false reception channels.

4) The frequency range is different. This is the difference to specific design solutions. And the DDC has to catch up with the DSP version due to the additional board developed with converters. The additional board is already under development.

5) The type of antenna input - everything is the same here, the receivers can receive signals with both the telescope and external antennas.

6) Band values ​​/ frequency values. The DDC version is the undisputed leader here. In addition, these figures have actually already been confirmed.

7) Side channels of reception. As mentioned above, these are better in DDC. The difference lies in the classes of radio receivers.

8) The capacity of the ADC. I will go into this characteristic in a little more detail. Very often the ADC bitrate is used as a marketing ploy that is misleading the user. It is logical that the more the better. But as we see, even with a 14-bit DDC, a better dynamic than 16-bit DSP. And that's why not only the ADC capacity is important for classic or analog SDRs, but also the properties of the ADC radio path. If you use 24- or 32-bit ADCs in the Malachite DSP series, the radio receivers do not get any better - MSI001 does not allow this, in which case it limits the connection. So, you need to carefully analyze the build of radio receivers and not trust misleading promotions - many bits are certainly good, but you shouldn't forget the location of the ADC either. The main properties of radio receivers are determined in particular by the first input stages.

9) Overall dimensions. Everything is the same here.

10) audio output. And everything is the same here.

11) PC connection. And this is where the big difference in favor of DDC lies. A faster type of USB interface is used, the quadrature width is increased to almost 2 MHz, and the QUISK program also has the option of viewing the spectrum up to 38 MHz against the background of radio reception.

12) Power consumption. The power consumption is not the strength of the DDC - the digital technology eats up a lot of energy. In comparison, there is one more characteristic - the prices. With the DDC, the price is significantly higher due to the more expensive components

From February you can also expect an optional additional board where reception on 6ghz is possible with additional filters. A 16 bit ADC will also be built into the Malahit DDC from February.

The video review below is in German, however you can use the YouTube autogenerated English captions below, or wait a little as Manuel indicates that English subtitles will be added soon. 

Malahit DDC in Gefahr Teil 1

Observing the NML Cygni Red Supergiant Star with an Airspy Mini SDR and Home Radiotelescope

Job Genheniau's projects have been featured several times on this blog in the past for imaging the Milkyway and other astronomical objects like supernova's and protostar regions with a 1.8m radiotelescope dish and RTL-SDR or similar SDR.

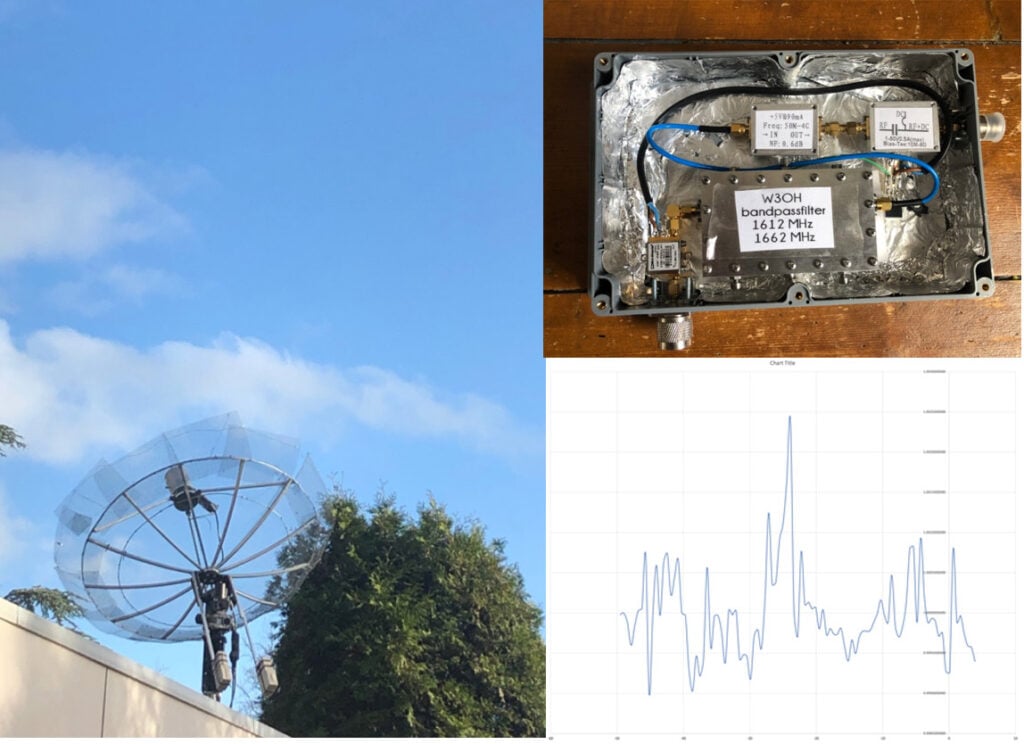
In his latest achievement Job has noted that he has had some limited success in observing  NML Cygni with his dish and an Airspy Mini SDR. NML Cygni is a 'red hypergiant' star situated within the Cygnus constellation, and it is one of the largest stars by radius known. Prior observations have found that it exhibits a spectral line at 1612.231 MHz.

Job's setup consists of his 1.5m dish (extended to 1.8m with mesh) on a rotor, a custom feed tuned for 1612 MHz, a 0.47dB NF low noise amplifier, an RF filter and an Airspy Mini SDR. Observations were made in SDR# and plotted with Excel.

The NML Cygni hypergiant is difficult for amateur's to observe, and Job notes that he is not aware of anyone previously observing it with a 1.8m dish. He notes that he had 20 failed attempts, but 5 recordings that stood out as possible successes.

However, ultimately Job has been unable to claim that the star was successfully observed, but his results to appear to show some possible success. He notes that some of the uncertainty stems from the fact that on some recordings he observed the peak at the expected -25 km's blueshift expected from the star, however other recordings had the peak at the wrong blueshift.

Job's full report on his observations can be found in this PDF document.

The NML Cygni Red Hypergiant observed with 1.8m dish and Airspy SDR.

An APRS Tracker with HackRF, WebUSB and WASM

Thank you to Radoslav Gerganov for writing in and submitting news about the release of his open source web-based APRS tracker named "aprs-sdr". The web based software turns a HackRF device into a mobile APRS beacon.

Most interestingly the software works via the WebUSB interface, which allows for USB devices like a HackRF SDR to connect directly to the software through USB via the Chrome web browser. So no external app or software needs to be downloaded, all you need to do to run the code is open the hosted aprs-sdr page at https://xakcop.com/aprs-sdr with a Chrome browser, and connect the HackRF to your device.

Radoslav writes further:

The tracker is using the HTML Geolocation API to fetch the device’s location and WebUSB to talk with the SDR. The code which generates the packets is written in C++ and compiled to WASM. You can find the source at https://github.com/rgerganov/aprs-sdr.

And now to some results. I have successfully transmitted packets from my home to LZ0DOE (15km away!) using my Pixel phone, HackRF and ANT500. I find it amazing given the low TX power of HackRF.

Radoslav also notes that in the future he hopes to add other SDRs as well. He also notes that the script seems to work best on desktop Chrome. On mobile Chrome there may be a bug which stops transmission after a few packets.

Using the aprs-sdr WebUSB application.

CaribouLite Raspberry Pi SDR Hat Gets Funded!

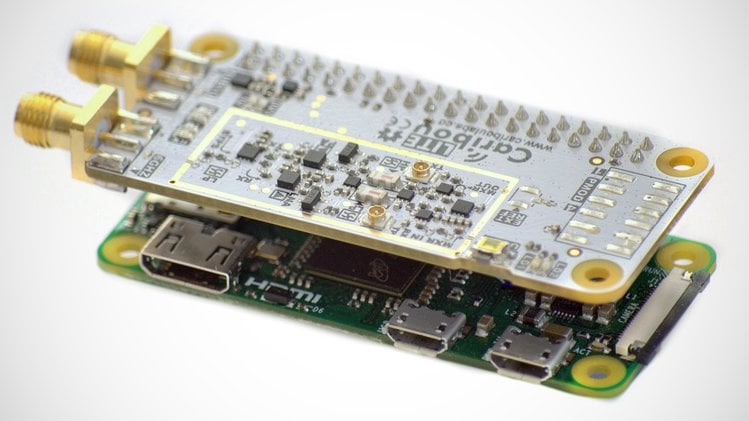
Earlier today the CaribouLite crowdfunding campaign on CrowdSupply successfully completed it's crowd funding phase with over 600 backers and $134,000 raise. The team have noted in the latest update that they are now moving on to the production stages with the estimated shipping date still indicated for May 25, 2022. Now that the campaign has ended the pricing has increased slightly from $119 + shipping to $138 + shipping.

The CaribouLite is a software defined radio HAT for the Raspberry Pi with a 30 MHz - 6 GHz frequency tuning range, 13-bit ADC, 2.5 MHz bandwidth and one TX and one RX channel.

The CaribouLite RPi HAT

Receiving X-Band Images from the Arktika-M1 Arctic Monitoring Satellite

Recently on Twitter @arvedviehweger (Arved) has tweeted that he has successfully received images from the Russian Arctic monitoring satellite known as ARKTIKA-M1, via it's X-band downlink at 7865 MHz. We've reached out to Arved and he's provided the following information on his setup and how he's receiving and decoding the images.


The Arktika-M1 satellite is a Russian weather satellite which operates in a HEO orbit. It was launched in February 2021 and has downlinks on multiple bands. The main payload downlink for the imagery is on 7865 MHz (which is also known as the lower X-Band). The satellite only transmits imagery on the X-Band at the moment, it is currently unknown whether it will ever transmit any image data on L-Band.

For Amateur reception that means having access to X-Band RF gear. It usually consists of a low noise pre-amplifier and a downconverter to convert 7865 MHz down to a lower frequency for easier reception with a high bandwidth SDR such as the LimeSDR, a USRP etc.

In my personal setup I use a surplus pre-amplifier made by MITEQ (around 36dB of gain, 1dB NF), my own self-made DK5AV compact X-Band downconverter and a LimeSDR-USB.

The L-Band gear is mounted on top (helix and the pre-amp behind it) and the X-Band gear is right below. From left to right you can see the feed, the downconverter (silver box) and the LNA (mounted to a heatsink and a fan). Recording is done with a LimeSDR-USB running at a sample rate of 50 MSPS. The satellite transmits every 15 minutes once it reaches its apogee, each transmission including the idle period lasts for about 10 minutes. Some pictures of the idle transmission and the actual data transmission can be found in this Tweet, [noting that Idle = more spikes, actual data looks weaker]:

Depending on the geographical location a rather large satellite dish is also required for Arktika-M1. Reception reports all over Europe clearly show that the satellite has a beamed antenna (similar to ELEKTRO-L2).

In my setup I can get away with a 2.4m prime focus dish (made by Channel Master) in North Eastern Germany. It produces around 9 - 10 dB of SNR in the demod of @aang254’s excellent SatDump software. Anything above 5dB will usually result in a decode but since the satellite does not have any FEC you will need more than that for a clean picture. (Image of SNR in Satdump)

Frugal Radio: Listening in to Live Theatre Wireless Microphones with an SDR

In one of his latest videos, Rob from the Frugal Radio YouTube channel gives us an interesting alternative way to enjoy a theatre show by demonstrating what he heard on his Airspy SDR when taking it to a Christmas theatre show. In a modern theatre show the actors and actresses typically wear hidden wireless microphones and earpieces, allowing their voices to be amplified and instructions from the producers and directors to be heard. If close enough, these devices can easily be picked up with a SDR and antenna.

In his video Rob explains what sort of radio devices and frequencies are used at the theatre, and despite a few set backs he manages to listen in on these devices from the lobby and from just outside the theatre complex. 

Some of the things he hears includes backstage instructions from the directors and production team and of course audio from the performers, including backstage conversations.

2021 SDR Guide Ep 12 : SDR Theatre fail with my AirSpy R2 and RTL-SDR dipole kit

A Comprehensive Beginners Guide to HRPT Weather Satellite Reception

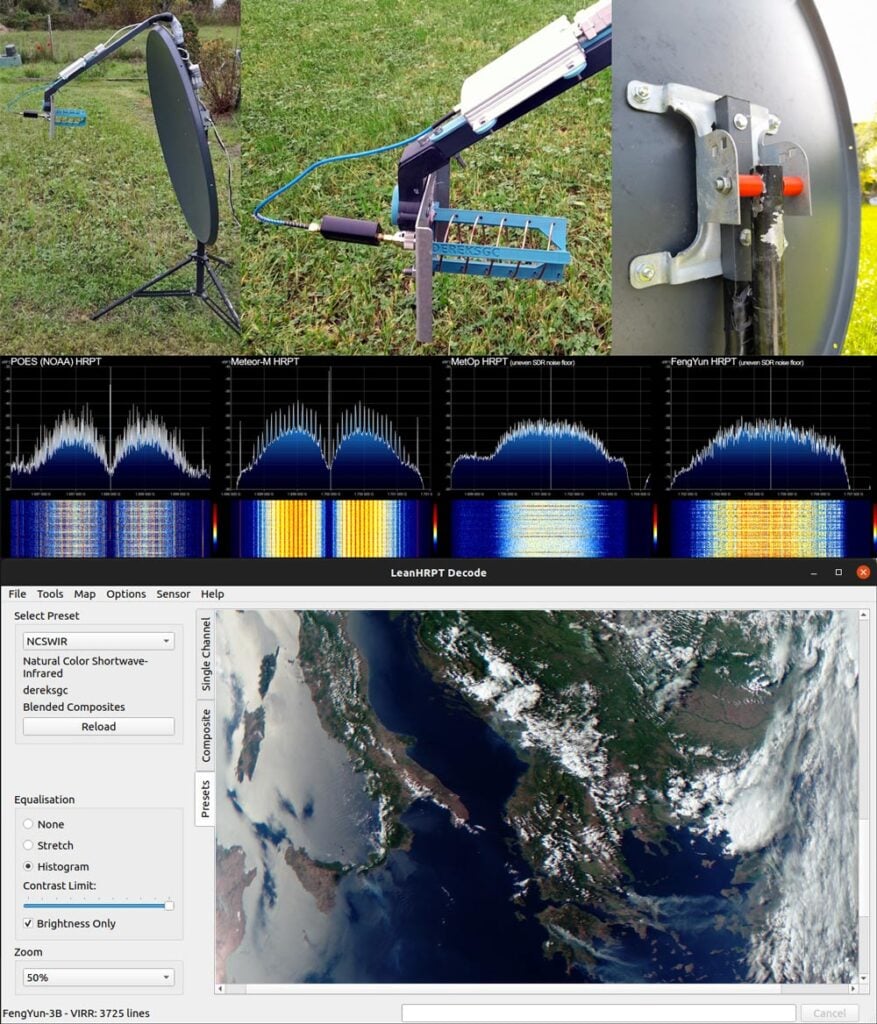
Over on his blog Derek (OK9SGC) has recently uploaded a very comprehensive beginners guide to receiving HRPT weather satellite images. HRPT reception can be a little daunting as it requires a good L-Band dish setup which involves choosing and building a feed, and importantly, a way to track the satellite with the dish as it moves across the sky. Tracking can be achieved manually by hand, but that can be very difficult and so a motorized tracking mount is recommended.  

This is unlike the much easier to receive NOAA APT or Meteor LRPT satellite signals in the VHF band which can be received by a V-dipole antenna, or the geostationary GOES HRIT satellites that can be received with a WiFi grid dish and LNA. Both of which do not require tracking.

The advantage of HRPT however, is that you end up with high resolution, close-up, and uncompressed images of the earth. For example Derek notes that NOAA APT gives 4km/px resolution, and Meteor LRPT gives much better 1km/px resolution but it is heavily compressed. Whereas HRPT gives peak resolutions of 1km/px uncompressed. There are also nine satellites in operation sending HRPT, so there are more opportunities to receive.

Derek has created a very comprehensive beginners guide that covers almost everything from purchasing and building the hardware, to finding and tracking the satellites, to setting up the software and decoding images. He notes that an RTL-SDR can be used as the receiver, and that a WiFi dish with GOES SAWBird LNA can work, although the difficult tracking requirements are still there so a smaller offset dish with custom helix feed might be preferred. Derek also provides useful tips, like the fact that the NOAA15 HRPT signal is quite a lot weaker than others.

Images from Dereks HRPT Guide

TechMinds: Testing the GA-450 Portable HF Active Loop Antenna

Over on the Techminds YouTube channel, Matt has uploaded his latest video which is a review of the GA-450 portable HF active loop antenna. The antenna costs between US$60-$80 + shipping and is available on Chinese market sites like Aliexpress and Banggood. It's advertised as covering 2.3 - 30 MHz, and uses a very portable and sturdy 20cm stainless steel loop. The active base amplifier is powered via a USB-C connector, and it even has a built in lithium battery for portable field use.

In his review Matt shows the antenna in action, noting that it's performance is quite a lot better than expected for it's small size, but it can't compare to his large half-wave end fed antenna. He notes that it appears to work best from 7 - 21 MHz, but not so well below 7 MHz. Overall he recommends it if you're looking for a small sized loop antenna.

GA-450 Portable Active Small Loop HF Antenna