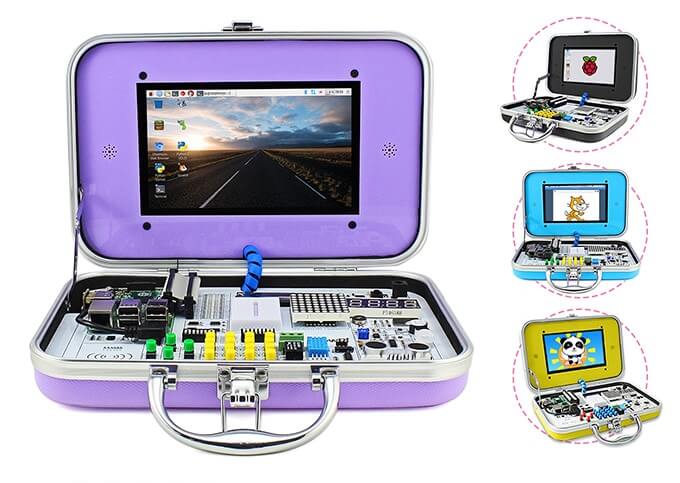
CrowPi is a Raspberry Pi all-in-one experimenters kit that is currently crowd funding on Kickstarter. The idea behind CrowPi is to combine a touchscreen, various sensors, actuators and interfaces into a clutter free kit mounted on a PCB in an easy to carry hard shell case. It's mostly intended to be used in STEM learning environments, however it could also be used for rapid prototyping of Raspberry Pi based ideas, or simply as a portable computer.
The CrowPi
The kit has 4 days left on Kickstarter and has already met its minimum goal. Pledging $1,169 HKD (~USD $150) gets you the basic kit which does not include a Raspberry Pi. Higher pledge levels (up to US$250) get you models that include a Raspberry Pi as well as extras such as a 5V power supplies, earphones, heatsinks, keyboards, game controllers etc. Shipping of the units is expected to commence in July.
Elecrow, the Shenzhen based company behind CrowPi kindly sent us a free kit for an honest review. While not directly related to RTL-SDR or RF, we thought that there might be several applications that might make the CrowPi kit useful for prototyping some simple low cost RF based ideas. For example:
Prototyping IoT based modules that use the RTL-SDR as a receiver. For example receiving a 433 MHz ISM signal and writing received information to the LCD/LED array or activating the relay.
Similarly, using FL2K-SDR or RPiTX to transmit a signal when a sensor is activated, or to transmit telemetry from that sensor (e.g. distance data from the ultrasonic sensor, humidity levels from the DH11 sensor, or light levels from the light sensor)
To get an idea of what's packed into the CrowPi, the kit includes the following modules:
Everything that came with our CrowPi Demo Kit (Except the Raspberry Pi)
1920 x 1080 Capable HDMI 7" Touch Screen
LCD Module
8x8 Matrix LED
Breadboard
4 character 7-seg LED
Vibration motor
Light Sensor
Buzzer
Sound Sensor
Motion Sensor
Ultrasonic Sensor
Servo Interface
Step Motor Interface
UART
Tilt Sensor
IR Sensor
Touch Sensor
DH11 Humidity Sensor
Relay
Matrix of buttons
RFID Module
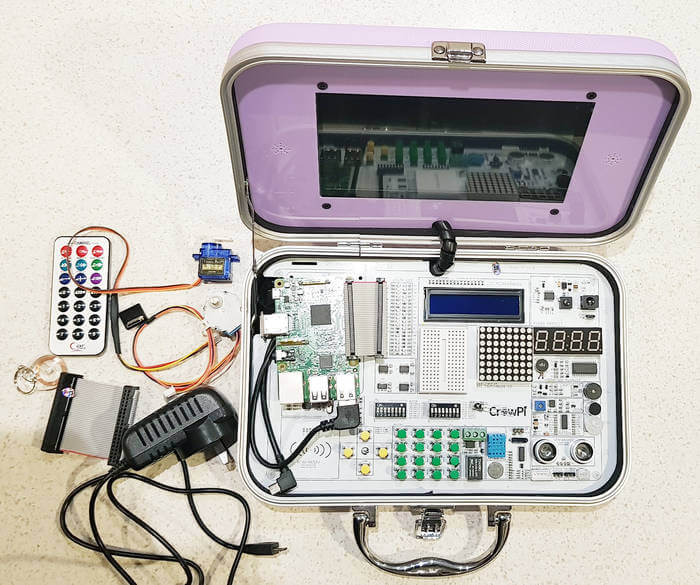
With our kit we also received:
2x GPIO Flex Cables
1x Stepper Motor
1x Servo
1x Charger
1x IR diode
1x NFC Tag
1x Mini HDMI for the Raspberry Pi Zero
1x IR Remote control
Setup, Initial Testing and Thoughts
Setup: Setup was simple and consisted of downloading their customized Raspberry Pi image onto an SD card, connecting the Raspberry Pi to the HDMI, USB and GPIO pins, and then powering it up using the power jack on the CrowPi Board. A user manual is available for download.
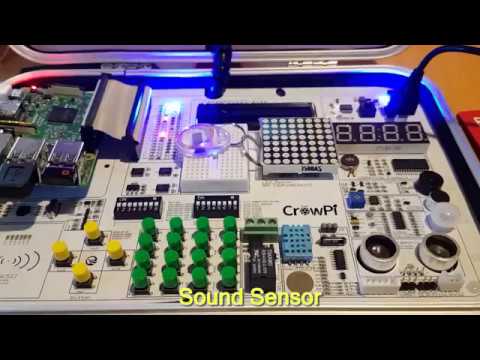
Initial Testing: CrowPi provide a set of lessons that show how to use each of the modules on the board. All modules also have Python code examples that are ready to run as soon as you boot up. Immediately after booting up we were able to run their demo code which allowed us to test all the various sensors, print text to the LCD module, activate the 7-seg display, and actuate a servo and stepper motor.
The tutorials are easy to understand and provide a good basic rundown of the sensors. You will need to have some basic Python skills to understand the Python code however.
Thoughts: The CrowPi is built sturdy, and is definitely easy to use. The touch screen is bright and clear. It is capable of running in 1080P mode, but is a bit too small and hard on the eyes to use at this resolution. We kept the screen in 720P mode. In order to use the Raspberry Pi, you'll need to plug in a USB keyboard and mouse which is not included in the basic kit. A wireless keyboard/mouse combo is ideal. There appear to be speaker holes next to the monitor, but it seems that our demo model is the basic model which does not include built in speakers. The kit is impressive looking and appears to be priced reasonably for what you get.
RTL-SDR and RF Testing
Unfortunately when it came to run the RTL-SDR we instantly ran into a problem. With the one 5V 3A power supply running the Pi, HDMI Screen and modules, it seems that there just isn't enough power budget left over to run the RTL-SDR which draws about 270 - 290 mA current. The RTL-SDR connects fine, but when trying to run GQRX, the Pi 3 shuts down. To get around this problem we have to connect a second power supply directly to the Raspberry Pi 3's input. After doing this the board and kit runs smoothly with the RTL-SDR. Using a powered USB hub would also work.
RPiTX is software for the Raspberry Pi that allows you to transmit RF signals directly via PIN12 or PIN7 from the GPIO ports. On CrowPi PIN12 is already connected to the buzzer, and PIN7 is connected to the humidity sensor. Using PIN12 causes the buzzer to sound, so we tried PIN7. Even though it's connected to the humidity sensor, it doesn't seem to mind the GPIO bit flipping going on. The traces within the board and cable radiate sufficiently to transmit signals strongly enough to use within a room, so no external antenna is needed. Use of PIN7 can be activated in RPiTX by using the "-c 1" flag.
Using our Replay Attacks with an RTL-SDR, Raspberry Pi and RPiTX tutorial, we copied the signal from the remote control of a 433 MHz alarm/door bell, and used RPiTX to replay the signal. Then by modifying some of the supplied CrowPi Python code we were able to get the doorbell to sound on a touch of the touch sensor, activation of the sound sensor and via activation the RFID sensor. We could see the CrowPi being used as a general tool for learning how to prototype simple IoT or home automatic devices. The video below shows a brief demonstration.
It would have been nice if these RPiTX GPIO pins could have been exposed, and not connected to a sensor, but the developers of the board had probably not heard of RPiTX as the goal is for a more general classroom application.
CrowPi Demo
Conclusion
If you're looking to get kids or STEM students/hobbyists interested in what Raspberry Pi's can do, then this kit couldn't make it simpler. The single board and briefcase design makes the whole thing very tidy and portable and the kit looks and feels sturdy and professional. If you know a kid interested in electronics, then this kit would make a great present.
You could probably purchase all the components cheaper individually, but at the end of the day an all-in-one kit just makes sense as it is a lot tidier, and much easier to get up and running quickly.
For RF experiments, it's possible to use the RTL-SDR with the minor annoyance of having to connect two power supplies or use a powered USB hub. RPiTX also functions fine on the device and can be used to transmit an RF signal on activation of any one of the sensor modules. This could easily be used to prototype simple home automation or IoT ideas.