RTL-SDR Blog V.3. Dongles User Guide
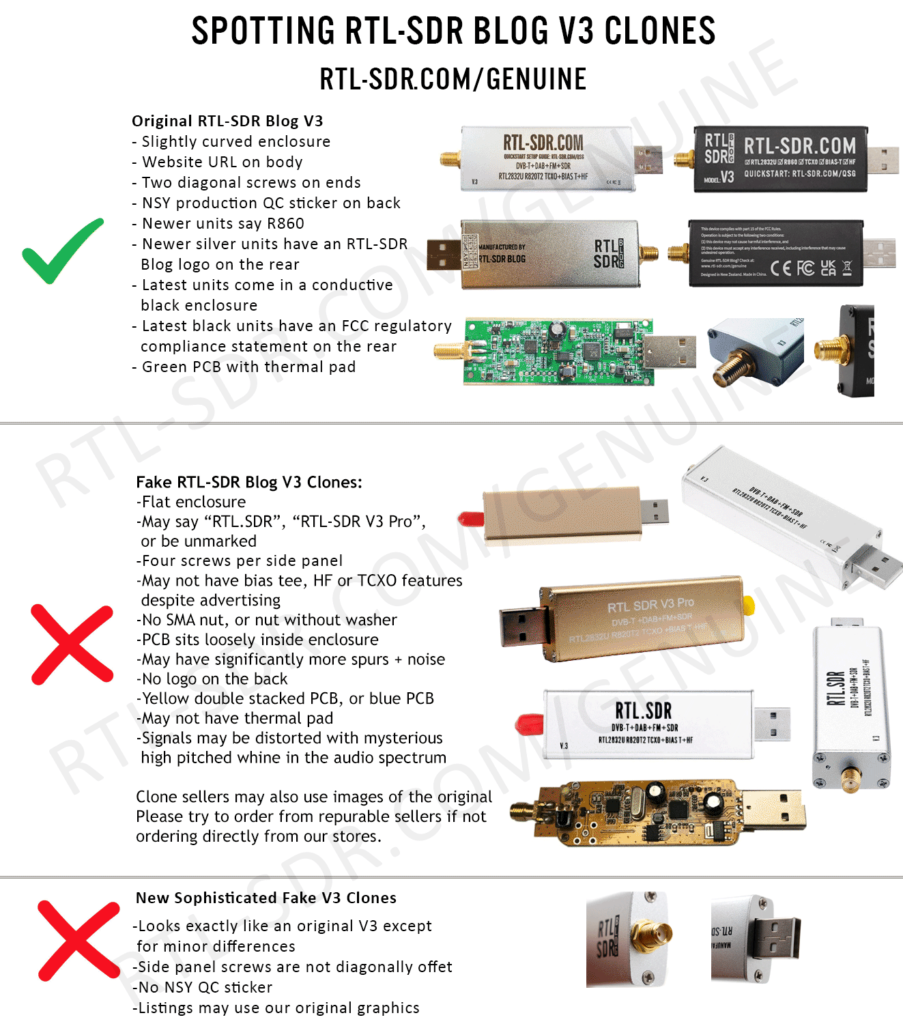
RTL-SDR Blog V3 Counterfeit Warning!
If you have purchased a counterfeit RTL-SDR Blog V3 device the features described in this guide may not work correctly, if at all. If you were tricked into thinking it was an original RTL-SDR Blog V3, please lodge a dispute with the marketplace platform purchased from.
Please purchase either directly from our store, or using the links on the store to official marketplace listings or resellers.
Version 3 of our customized RTL-SDR dongles brought out some new interesting features. In this guide we explain how to use those feature. If you are interested, we also have the V3 feature datasheet available here.
We reccomend using our RTL-SDR Blog driver fork here https://github.com/rtlsdrblog/rtl-sdr-blog. Note that SDR# already installs this driver by default when you run install-rtlsdr.bat as described in the quickstart guide.
Feature 1: Direct Sampling HF Mode
This feature allows you to listen to HF signals between about 500 kHz to 28.8 MHz.
To use direct sampling mode:
- If you are using our RTL-SDR Blog driver fork, there is nothing to do. Just tune down below 28.8 MHz, and direct sampling will automatically be activated.
For other drivers:
- Connect an appropriate HF antenna to the SMA antenna port (this is the same port where you connect your VHF/UHF antenna).
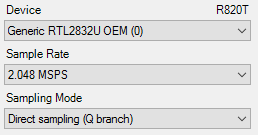
- In SDR# select the Q-branch in the configure menu (the cog icon next to the play button). (If it is greyed out make sure you stop the SDR first, by clicking the stop button in SDR#)
- Press Play and tune to 500 kHz - 28.8 MHz.
VHF antennas like small discones or short whip antennas will probably not pick up HF signals very well, if at all. If you have one of our dipole antennas, try connecting a long 5 meter or longer wire to the element connected to the coax center wire. To check which element is connected to the center coax you can open the lid on the black dipole base. Ideally you should use a 9:1 unun with the long wire antenna for optimal reception. Even more ideally you'd use an antenna tuner, though this is expensive.
We can also highly recommend the use of low cost active magnetic loop antennas like the MLA30+.
MW Attenuation Curve Note: In newer RTL-SDR Blog V3 batches the attenuation curve for direct sampling has been tweaked in order to provide greater attenuation in the MW band (below 2 MHz). The reason for this is that many users experience severe overload from strong broadcast AM stations which can cause problems with reception above 2 MHz.
The result is that reception of the MW broadcast AM band will be poorer, but reception above 2 MHz could be improved in many cases where overload was present before. However, reception on the MW bands with an appropriate HF antenna even with the attenuation is not usually a problem due to their extreme high power and local location.
HDSDR/GQRX and Other Software
Other software like HDSDR and GQRX can also support direct sampling. It may entail setting a device string, and for the Q-branch, the value should be 2 (or sometimes 3). In GQRX the device string would be "rtl=0,direct_samp=2" (without the quotes). In some installs that use different drivers it may be "rtl=0,direct_samp=3" instead. Make sure that there is no space after the comma. SDR-Touch on Android has a direct sampling option available in its settings page.
To go back to listening to frequencies above 28.8 MHz remember to change the sampling mode back to "Quadrature Sampling".
Note that this feature makes use of direct sampling and so aliasing will occur. The RTL-SDR ADC samples at 28.8 MHz, thus you may see mirrors of strong signals from 0 - 14.4 MHz while tuning to 14.4 - 28.8 MHz and the other way around as well. To remove these images you need to use a low pass filter for 0 - 14.4 MHz, and a high pass filter for 14.4 - 28.8 MHz, or simply filter your band of interest. (Note that that 28.8 MHz is downsampled on chip resulting in the 3.2 MHz bandwidth)
Modified rtl_tcp for direct sampling
The standard Osmocom version of rtl_tcp only allows for direct sampling on the I-branch, which is useless as we need direct sampling on the Q-branch. Please see our RTL-SDR-Blog Drivers for a version that includes a -D direct sampling flag. The Releases page has a Windows release.
Forcing Direct Sampling To be Always ON
This feature is now disabled and superseded by the feature that automatically activates direct sampling mode when the frequency is set below 28.8 MHz.
Feature 2: Software Selectable Bias Tee
V.1. and V.2. of our dongles included a bias tee which could manually be enabled by opening the case and soldering two pads on the PCB together. V.3. introduces a 4.5V bias tee that can be toggled entirely in software. The bias tee can continuously pull up to 180 mA of current.
WARNING: Before using the bias tee please ensure that you understand that you should not use this option when the dongle is connected directly to a DC short circuited antenna unless you are using an LNA. Although the bias tee circuit is dual protected against accidental shorts with a thermal self-resetting fuse and overcurrent protection on the LDO, short circuiting the bias tee for an extended period of time (days) could damage the LDO or fuse permanently. Only use it while connected to an actual powered device, like an LNA, active antenna or the SpyVerter.
To make things clearer: DC Short Antenna -> LNA -> Coax -> V3(bias tee on) is absolutely fine. What's not good and makes no sense anyway is DC Short Antenna -> Coax -> V3(bias tee on). DC Short Antenna -> Coax -> V3(bias tee off) is fine.
Note that the legacy DVB-T TV drivers will activate the bias tee by default. On Linux ensure that you have properly blacklisted the DVB-T drivers. More info on how to blacklist on the Linux section on the quickstart guide.
Optional Video: Bias tee tutorial by SignalsEverywhere available here.
To enable the bias tee in Windows:
- Download and extract all the files in this zip file to a folder on your PC. It contains two batch files that can be run.
- Make sure all SDR software like SDR#/HDSDR/SDR-Console etc is fully closed.
- Run the biastee_on.bat file to turn the bias tee on. It will run and open a CMD prompt that will briefly say "Found Rafael Micro R820T Tuner". The CMD prompt will close soon after upon success.
- The bias tee is now on. To turn it off repeat steps 2 & 3, but instead run the biastee_off.bat batch file. Alternatively, simply disconnect and then reconnect the SDR to turn the bias tee off.
If you have multiple dongles connected you'll need to edit the batch file to specify what dongle's bias tee you want to activate. Open the bat file with any text editor, like Notepad, and add the dongle selector "-d" flag. For example to activate the bias tee on the dongle that was plugged in second you'd need to change it to "rtl_biast -b 1 -d 1".
If you get a Smart Screen message, click on More Info, and then on Run Anyway. Also note that some versions of Windows may fail to run batch files due to misconfiguration or aggressive antivirus software. If you cannot fix these problems with Windows or your antivirus, run the command manually on the CMD line.
To run it manually on the CMD line first browse to the directory where the bias tee software is stored using "cd" (e.g. cd C:\SDR\bias_tee_folder), and then run:
- ON: rtl_biast -b 1
- OFF: rtl_biast -b 0
- If needed select a particular RTL-SDR device with the -d flag.
To enable the bias tee in Linux:
In Linux or MacOS download the source from git, compile it the same way you do the regular RTL-SDR drivers, and then run ./rtl_biast -b 1 to turn the bias tee on and ./rtl_biast -b 0 to turn the bias tee off. The procedure is:
git clone https://github.com/rtlsdrblog/rtl-sdr-blog
cd rtl-sdr-blog
mkdir build
cd build
cmake .. -DDETACH_KERNEL_DRIVER=ON
make
cd src
./rtl_biast -b 1
If you want to be able to run the bias tee program from anywhere on the command line you can also run "sudo make install".
If you have trouble running the bias tee check with a multimeter if there is 4.5V at the SMA port. Also check that your powered device is actually capable of receiving power. Remember that not all LNA's can accept bias tee power. We recommend Adam 9A4QV's LNA4ALL, as you can order this from his store with the bias tee power option enabled. If you need further help please contact us at [email protected].
Enabling the Bias Tee in PiAware
Please see this link for instructions, or see below to see how to force the bias tee to be always on.
Forcing the Bias Tee to be Always On
If you are using our RTL-SDR-Blog driver branch you can force the bias tee to be always on by setting a flag in the EEPROM. The rtl_eeprom command is "rtl_eeprom -b 1". Run the opposite command "rtl_eeprom -b 0" to disable the forced bias tee.
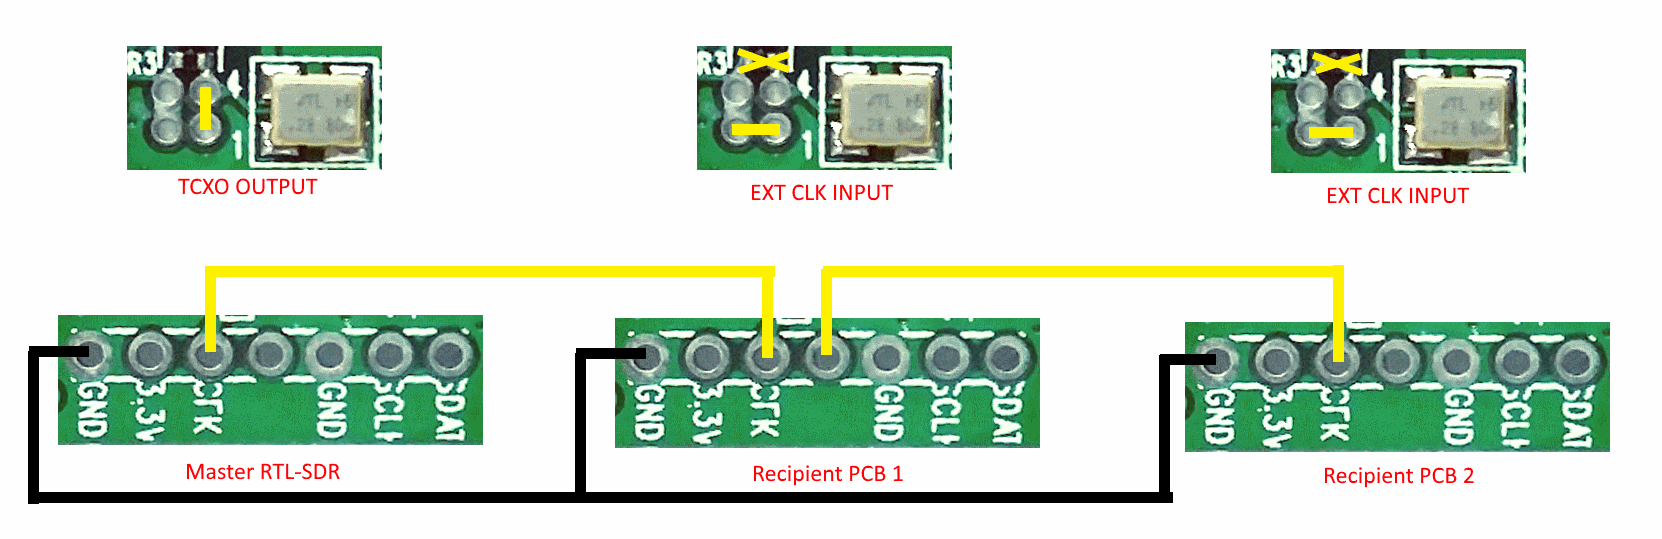
Feature 3: Selectable Clock & Expansion Headers
This is for advanced users who need to daisy chain clocks together for coherent experiments, or need to access other ports. You can either bridge the clock selector the directly with a solder bridge, or solder on a 1.27mm 2x2 header pin jumper.
To add a jumper to the CLK selector header.
- Carefully remove the 0 Ohm resistor.
- Very carefully solder a 1.27mm 2x2 header onto the clock selector pads.
- You can now select your clock input.
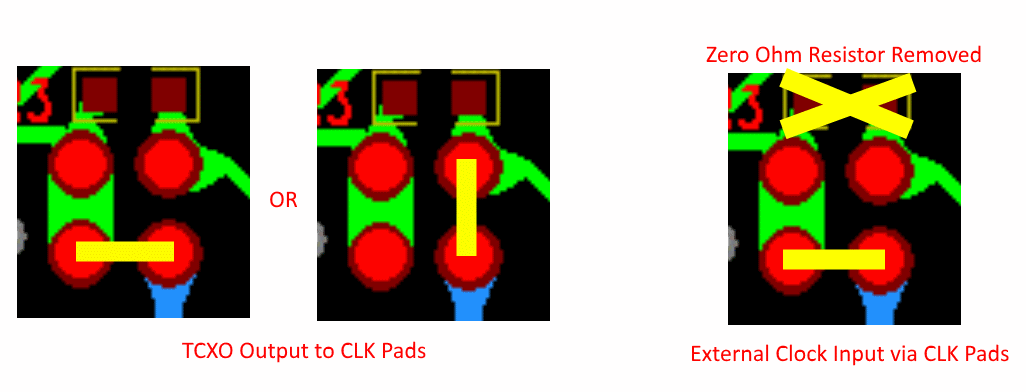
How to connect the CLK jumpers:
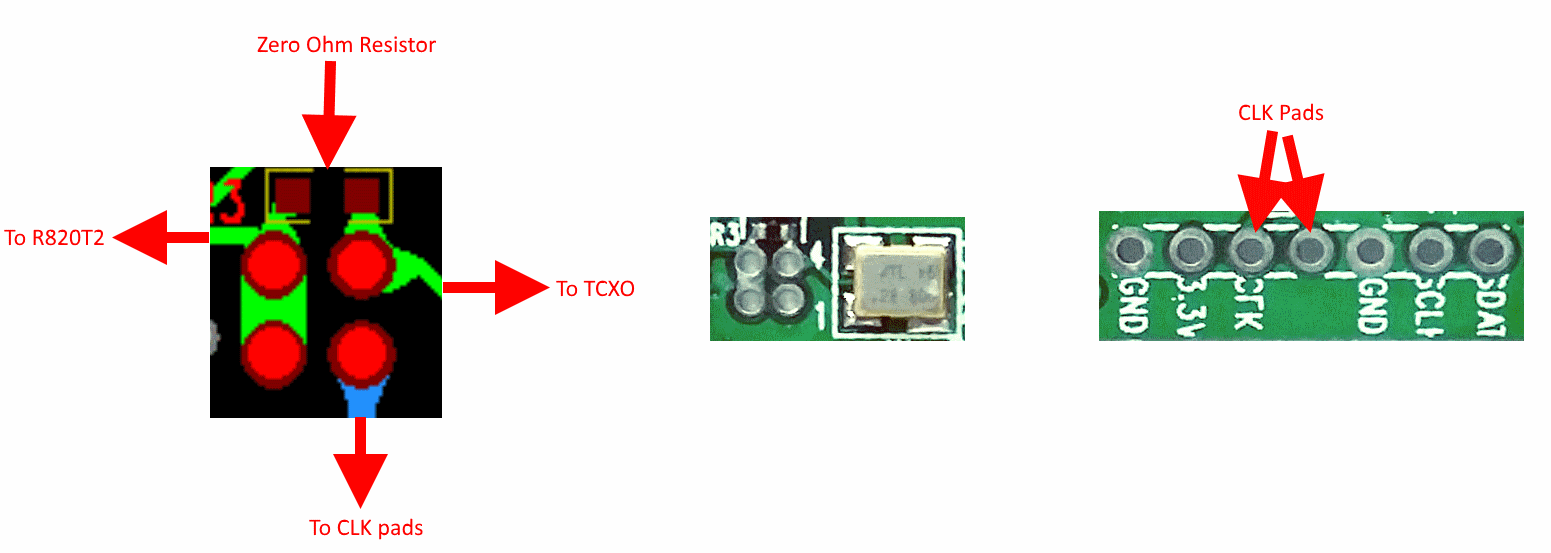
The first position allows you to output the dongles clock to the CLK pads. The second position allows you to input an external clock.
An example of CLK daisy chaining is shown below. One dongles TCXO is connected to two other dongles who have disconnected clocks.
Feature 4: Additional GPIO Ports
Please see the guide written by Rodrigo Freire here.
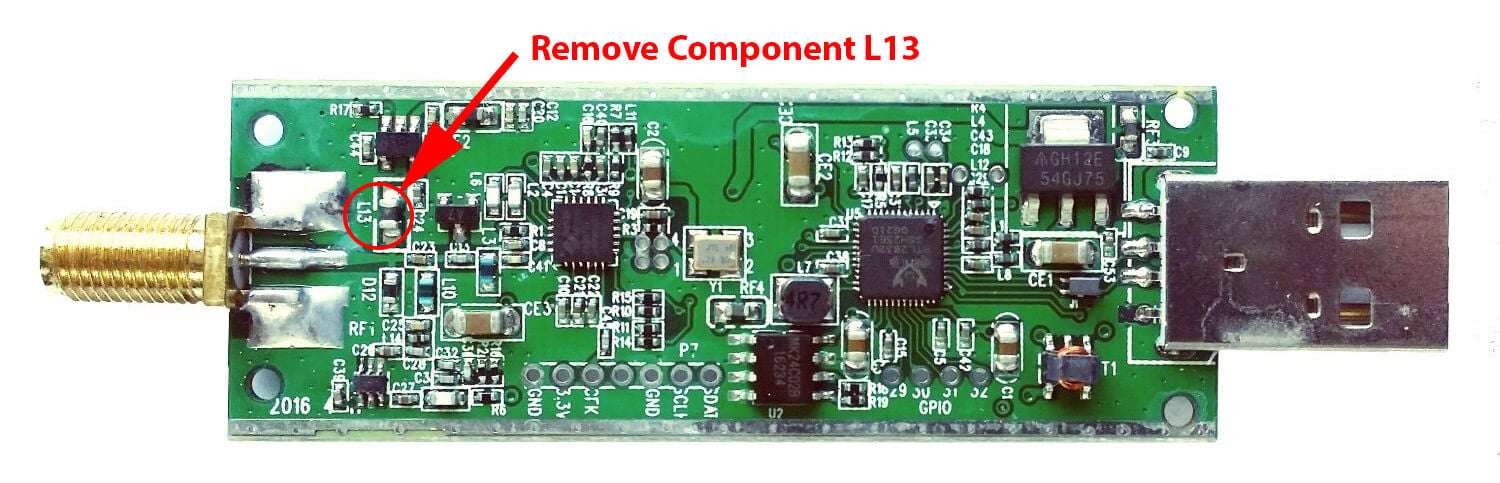
LF/MF Improvement / Bias Tee Disable Mod:
If you want to improve the performance at LF/MF (below 500 kHz) and do not require the bias tee, then you can remove the bias tee inductor at L13. Of course remember that if you are interested in VLF/LF, it might be a better idea to use an upconverter like the SpyVerter, which can be powered by the bias tee on the dongle.
Notes to be aware of:
I opened my RTL-SDR V3 dongle and found that the thermal pad has a small air gap between it and the enclosure, is this normal?
This is normal. The purpose of the thermal pad is to fix L-band VCO lock problem that are related to PCB heat build up. The RTL-SDR V3 only requires very minor heat sinking to overcome this issue, and a small air gap does not reduce the thermal transfer enough to cause issues. In fact the V3 PCB has already been redesigned to dissipate heat better, so the thermal pad is not strictly required, except in very warm climates.
My RTL-SDR V3 is getting hot.
Please remember that these units do get hot to the touch especially when used in warm climates. This is not an issue and is normal. The temperature will normally be about 20 - 25C above ambient. We have improved the thermal bonding and heat transfer between the chips and the metal case. This results in making the metal case hotter, but it keeps the chips much cooler, resulting in better performance. To lengthen the life of the dongle we recommend keeping the unit away from direct hot sunlight.
Current Known Issues:
We're constantly trying to improve our units and we always make note of what issues exist and how to fix them.
2019 Onwards:
No known issues.
2019 and earlier units (no longer shipping):
Note that the following problem has been fixed in newer batches with a new design.
0.2 - 0.3% of units may have a faulty RTL2832U chip. This is characterized by higher than normal USB currents (normal is 0.28A - 0.3A), and often random disconnections from the USB as well as increased heat. The same problem affects all brands of RTL-SDR.
2018/8 Batch (no longer shipping):
A small number of these units (~approx 300 units) had faulty bias tee LDO chips which caused the bias tee to be permanently on. The cause was bad silicon in the LDO chip. These units run normally in all other ways, except that the bias tee cannot be turned off. They can continue to be used normally, without the bias tee. The thermal fuse will protect against short circuits.
If you have one of these, feel free to contact us at [email protected] for a replacement, or if the bias tee is not important to you and you can solder, removing the L13 inductor will fully disable the bias tee.
Known V3 Batch 1 Issues (limited quantity batch, no longer shipping):
- Increased sideband noise on very strong narrowband signals. This should not be a significant problem as it only affects very strong signals. The hardware fix is to add about 100-220uF of capacitance on the 3.3V power line. Batch 2 will reduce this noise.
- The bias tee when turned on adds a large spur in direct sampling HF mode. This may be problematic only if you intend to use a bias tee powered HF LNA in direct sampling mode. This can be fixed by adding about 2.2uF of capacitance to the output of the LDO, before the inductor. Batch 2 will fix this.
- The bias tee can be damaged by accidentally short circuiting the output for a few seconds while it is on. This damage only occurs on USB3.0 and USB2.0 ports that can provide up to 1A or more or current. Batch 2 will add a resettable fuse to prevent damage.


no device ,several days worked properly i installed zadig also now day ago it not working error msg as no dive
co się dzieje z SDRConsole nie uruchamia się i brak portalu twórcy
Before I buy a rtl-sdr dongle has anyone got the system up and running on a Mac running Tahoe and how. Thank you.
I’m trying to get your RTL-SDR.com v3 dongle to work with GQRX on macOS 15.5 Sequoia, but on selecting the device it always returns “Failed to set default sample rate. Pease select another device.” and will not start up with play. Suggestions?
Hi, I’m using Mx linux (Debian) and i’ve this problem: with Gqrx switching from HF to VHF the dongle riceive nothing, I must restart the application directly in VHF to receive, but if I switch to HF (example 40mt) and then I switch to VHF (or fm broadcast) nothing to ear. The same with sdr++, when start with direct_sampling and switch this off to go on VHF, I must stop and restart directly in VHF with direct_sampling off. Same with sdrangel. There is a solution? A string to add? Than You.
I recently purchased a V4 rtl-sdr. I have a MacBook Pro (Apple M2, Sonoma 14.5). I successfully installed SDR++ as advised in the user’s guide. No problems with that whatsoever. However, I’m having problems with connecting the dongle to my laptop so that SDR++ recognizes it successfully. The USB on the dongle needs to be adapted correctly to the MacBook’s USB-c port. I have tried using an adapter that I purchased sometime ago, for connecting a CD/DVD player. That adapter works fine with my player, but will not work, apparently, with the dongle. The USB plug on the dongle does not go all the way into this adapter (about 1/8 inch remains exposed) when I try to connect. SDR++ doesn’t recognize the connection. I believe that the dongle’s USB plug is slightly different from the CD player’s USB plug. Also, there may be a problem with the issue of a “thunderbolt to firewire” adapter—-perhaps I can use this with my CD player but this doesn’t fit requirements for connecting the dongle? Can anyone give advice?
Hi, I would really love to get a copy of the EBook guide, but the link takes me to Amazon.com. I live in Canada and although I do have an Amazon.com account, it will not allow me to purchase, because I have a Canadian address and it isn’t available on Amazon.ca 🙁 Are there any other distribution channels that I can purchase from? I would be happy with whatever EBook format I could get my hands on.
Regards,
Dan
Amazon.com should be global. You can purchase on Amazon.com from almost any country including Canada. I’m not sure why it would be blocking you, but you might need to get in contact with Amazon support to find out why.
Who is the engineer for the sdr blogs series of dongles.? I have a very odd problem and i would like to get in contact with the engineer thanks
Email admin rtl-sdr.com
so I followed the install instructions for Windows and everything went fine and Airspy opened up. But it doesn’t seem to have actually downloaded the software. It doesn’t show up in my normal program list and the only way I can open it is by going to my downloads folder and opening the .exe file through that. What am I doing wrong? Have the same problem with SDR++
SDR# and SDR++ do not use installers, they are standalone installations. You are correct that you simply open them by clicking on the exe. You can create a shortcut to your Start menu or desktop if you want.
Please will you provide me with a few genuine suppliers. I live in Australia
Hi, please check out our store at https://www.rtl-sdr.com/store. We list resellers there, or you can purchase direct. Australian resellers: https://www.secomms.com.au/?s=rtl+sdr&post_type=product and https://hamshack.com.au/
so far so good wish me luck going in to activatebias T lol
my rtl sdr cannot monitor 40m band freq, how to fix it?
Are you running in direct sampling mode? Instructions to enable HF here: https://www.rtl-sdr.com/V3
What is the minimum distance required between an ADS-B transmitter and the RT2832U antenna for the ADS-B to be detected?
I was recently trying exactly that with the original “rabbit ears” antenna.
Seems like I only picked up flights within a 35-50km radius.
Perhaps
rtl_tcp -Thttps://github.com/rtlsdrblog/rtl-sdr-blog/issues/2
Tried that earlier hence the request here. -T is not recognised as an option either.
Trying to run the bias-t with rtl_tcp. When trying the rtl_eeprom -b y method, i get “-b invalid option”. I dont see it listed in -h either. Is there a work around please?
Does rtl_biast work?
https://www.rtl-sdr.com/getting-the-v3-bias-tee-to-activate-on-piaware-ads-b-images/
It works by itself but not in conjunction with rtl_tcp.