Tutorial: Replay Attacks with an RTL-SDR, Raspberry Pi and RPiTX
UPDATE: Version 2 of RPiTX renders this tutorial obsolete, as it is now very easy to copy and replay signals using the RPiTX GUI (or the "sendiq" command) and an RTL-SDR. This tutorial is still valid for the overall concept.
With an RTL-SDR dongle, Raspberry Pi, piece of wire and literally no other hardware it is possible to perform replay attacks on simple digital signals like those used in 433 MHz ISM band devices. This can be used for example to control wireless home automation devices like alarms and switches.
In this tutorial we will show you how to perform a simple capture and replay using an RTL-SDR and RPiTX. With this method there is no need to analyze the signal, extract the data and replay using a 433 MHz transmitter. RPiTX can replay the recorded signal directly without further reverse engineering just like if you were using a TX capable SDR like a HackRF to record and TX an IQ file.
Note that we've only tested this replay attack with simple OOK 433 MHz devices. Devices with more complex modulation schemes may not work with this method. But the vast majority of 433 MHz ISM band devices are using simple modulation schemes that will work. Also replay attacks will not work on things like car keys, and most garage door openers as those have rolling code security.
A video demo is shown below:


RpiTX
RPiTX is open source software which allows you to turn your Raspberry Pi into a general purpose transmitter for any frequency between 5 kHz to 500 MHz. It works by using square waves to modulate a signal on the GPIO pins of the Pi. If controlled in just the right way, FM/AM/SSB or other modulations can be created. By attaching a simple wire antenna to the GPIO pin these signals become RF signals transmitted into the air.
Of course this creates an extremely noisy output which has a significant number of harmonics. So to be legal and safe you must always use bandpass filtering. Harmonics could interfere with important life critical systems (e.g. police/EMS radio, aircraft transponders etc).
For testing, a short wire antenna shouldn't radiate much further than a few meters past the room you're in, so in this case you should be fine without a filter. But if you ever connect up to an outdoor antenna or amplify the signal then you absolutely must use adequate filtering, or you could find yourself in huge trouble with the law. Currently there are no commercially made 433 MHz filters for RPiTX available that we know of, so you would need to make your own. Also remember that you are still only allowed to transmit in bands that you are licensed to which for most people will be the ISM bands.
In the past we've seen RPiTX used for things like controlling an RC car, building a home made FM repeater, creating a ham transceiver and transmitting WSPR (via a well made filter). We've also seen people perform replay attacks using the cleaner but harder way by reverse engineering a 433 MHz signal, and then generating the RPiTX OOK modulation manually.
Tutorial
In this tutorial we will show how to perform replay attacks on simple OOK modulated 433 MHz ISM band devices using an RTL-SDR dongle and RPiTX. The RTL-SDR will be used to record an AM audio file of the signal, and then RPiTX will do it's magic to transform that recording into a file that can be transmitted back on the same frequency via one of the Raspberry Pi's GPIO pins.
Install RPiTX
Installation instructions are available on the RPiTX GitHub page at https://github.com/F5OEO/rpitx. It's very simple to install as all you need to do is clone the repo, and then run an automated install script.
Install the latest Keenerd version of RTL-SDR
We need the Keenerd version of RTL-SDR as his version provides an option which allows us to output rtl_fm data with a WAV header, allowing us to record directly to a wav file using sox.
git clone https://github.com/keenerd/rtl-sdr
cd rtl-sdr/
mkdir build
cd build
cmake ../ -DINSTALL_UDEV_RULES=ON
make
sudo make install
sudo ldconfig
Install Sox
sudo apt-get install sox
Recording the Data
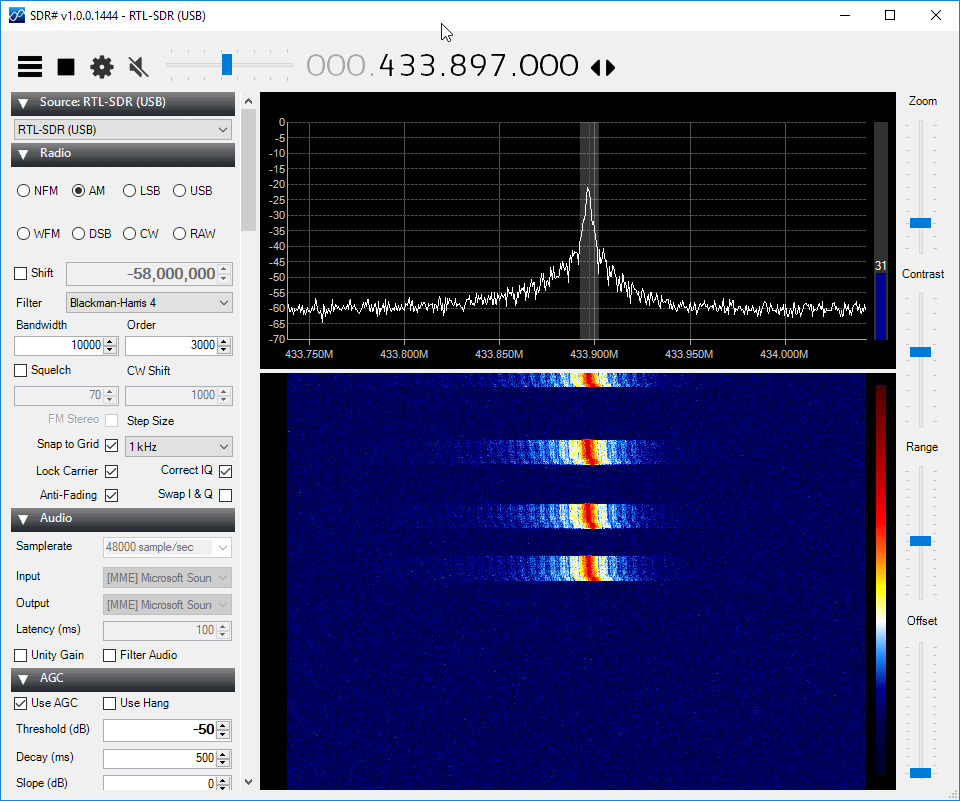
Using receiver software with a visual spectrum analyzer and/or waterfall like SDR#, GQRX, HDSDR or SDR-Console determine the exact frequency and bandwidth of the digital signal that you want to copy. For example in the image below the center frequency of the signal is 433.897 MHz, and the bandwidth is about 10000 Hz (10 kHz). Also you may want to determine the optimum RF gain settings.
Be aware that many cheap remotes are not particularly frequency accurate and the frequency can change slightly just by the position of your hand on the remote. So be consistent with the way that you handle the remote to ensure that you're always on frequency.
When ready, run the following command on your Pi, press the button on your remote, and then press CTRL+C on the keyboard to stop the recording. Make sure to change the frequency (-f), bandwidth (-s) and gain (-g) to what you determined earlier. This command will record an AM 48 kHz wav file of your keyfob signal. 48 kHz is what RPiTX expects.
rtl_fm -M am -f 433.897M -s 10k -g 20 -E wav -F 9 - | sox -t wav - myrec.wav rate 48k
Normalize the Audio
Normalizing the audio brings the volume up to the loudest it can be without distorting the waveform. This must be done otherwise the RPiTX output will be weak. Use the following sox command to create the myrec_n.wav normalized wav file.
sox --norm=-3 myrec.wav myrec_n.wav
If you have speakers plugged into your Pi or the HDMI monitor attached to your Pi, you can optionally use the following command to test the recorded audio. You should be able to hear the signal audio playback.
play myrec_n.wav
Create an RFA File
This step converts the wav file into an RFA file, which is a file format used by RPiTX when transmitting. The RFA file format seems to work much better than the IQ options for AM OOK signals.
piam myrec_n.wav myrec.rfa
Transmit with RPiTX
Use the following command to transmit with RPiTX, ensuring that you set the frequency to the correct value for your wireless device.
sudo rpitx -m RFA -i myrec.rfa -f 434004
Troubleshooting
If it doesn't work first time try these steps:
- Make another longer recording with the button pressed down for longer.
- Play with the normalization, e.g. try --norm=0 vs --norm=-3.
- Ensure that you have a wire attached to the correct pin.
- Try the alternative RPiTX pin with the '-c 1' flag.


hi robin,
i ended up buying a “hackrf” instead, and this works 🙂
Dear søren,
Thank you for reply.
Was it difficult to unlock your car?
I’m not able to install piam module can you please guide any alternative? or how should i do it
“July 20, 2017”. rpitx was v1.
To use the old v1 and have piam working:
goto rpitx folder
git checkout v1
add #include <sys/sysmacros.h> to head of src/mailbox.c
./install.sh
piam command also not found for me. rpitx seems to be able to transmit a WAV file anyway, but it doesnt appear to unlock my car. I know it could be because of rolling codes, but it is a very old car so i doubt it
Dear Soren, i have the same issue.
My car is very old but it wont unlock with above commands.
Did you find a solution?
Installed software per the instructions, can record wav file. But cannot convert it, ‘piam’ command not found.
why gqrx fails to start when I try to run with keenerd’s libraries? it works fine with osmocom rtl-sdr libraries. the error is:
gqrx: symbol lookup error: /usr/lib/x86_64-linux-gnu/libgnuradio-osmosdr.so.0.1.5git: undefined symbol: rtlsdr_set_bias_tee
when i use rpitx with my rtl-sdr it bugs :s i have to reboot my Rpi 3 b+ 🙁
Can it be used with devices with ask modulation?
Also, I set a frequency of 433.86M and it shows it’s tunned at 434.23M…why is that?
Do you mean when you transmit it’s off frequency? The Raspberry Pi doesn’t have an accurate clock, so it could be off by a bit.
yes, that’s what I meant…so it could be that
I tried your example, but I think the sampling rates aren’t correct for me. When I do it with HDSDR, the input sample rate is 2MHz, which is not an allowed sampling rate here. Any solution or procedure to try?
2 MHz is the SDR sampling rate, not the audio sample rate. I guess in HDSDR you could record the sound file, then sample it to 48 kHz in Audacity maybe.
Can you capture and transmit at 303.875 frequency as well?
Yes most likely. 303.875 is in the RTL-SDR and RPiTX’s range.
hello, sorry but what is the gpio antenna wire pin?
13
no its actually GPIO_18 which is pin 12.
Thanks for this guide, I really had to try this!
It works semi-successfully. For some reason I can only switch the 433 mHz remote socket on. When I try to replay the off-signal, nothing happens. I have tried several times with different recordings. What could be the reason for that?
A couple of specific questions:
1) When you replay the command, you use 434.004 mHz while you record at 433.897 mHz. Is this just a typo, or is there a reason for it?
2) How do you determine the bandwidth to be 10 kHz?
One of your signals is within the receiver’s tolerance, the other is not. Rpitx is crap. You record a frequency, it transmits another. Totally unstable. Even the best solutions to modify the CPU governor or use more stable C libraries are below the lowest level of any practical use.
Is this also possible on the BeagleBone Black? The RPi is a nonfree broadcom device i dont want to support by buying it.
Would be great if it would also work with the BeagleBone Black (BBB).
Thanks
What is your point out the Pi? All CPUs are private technology, as are the mainboards for all microcontrollers, they are all patented. So I am not sure I understand your point about RPI is a nonfree device… all variants Pis, Beagles, etc.are nonfree based devices. You have to use private (owned) technology in all of them.
BBB is openhardware. 2017 there was no RISC-V. The BBB was the best and most free device you could get with such functionality.
Its still one of the most free ones. Now there is even Coreboot support for it(if you dont want to use u-boot).
It would be interesting to see a comparable RF waterfall capture of the RPiTX output.
See video at 2:51 https://youtu.be/ewY-woG1dNw?t=171
Can you tell as what is max tx output power that you can get….
sox FAIL formats: can’t open input `-‘: WAVE: RIFF header not found
i get this error while trying to record how could i fix it
Are you using the Keenered version of RTL-SDR? https://github.com/keenerd/rtl-sdr.
Only this one has wave header output as far as I know.
Try reinstalling RPiTX with the -DDETACH_KERNEL_DRIVER=ON
You readers might also find this interesting http://www.securipi.co.uk/remote-433-receivers.pdf – it uses inexpensive 433MHz or 315MHz receiver and transmitter boards connected to a Raspberry Pi and doesn’t require the filtering you talk about in the article, and allows capture & replay of standard AM OOK signals.
Could you use a 433MAze SAW filter