A Review of the KiwiSDR: 10 kHz – 30 MHz Wideband Network SDR
The KiwiSDR is a 14-bit wideband RX only HF software defined radio created by John Seamons (ZL/KF6VO) which has up to 32 MHz of bandwidth, so it can receive the entire 10 kHz – 30 MHz VLF/LF/MW/HF spectrum all at once. However, it is not a typical SDR as you do not connect the KiwiSDR directly to your PC. Instead the KiwiSDR is a cape (add on board) for the Beaglebone single board computing platform. If you’re unfamiliar with the Beaglebone, it is a small computing board that is similar to a Raspberry Pi. The KiwiSDR is designed to be a low cost standalone unit that runs 24/7, connects to your HF antenna and internet network, and shares your 10 kHz – 30 MHz reception over the internet with up to 4 simultaneous users.
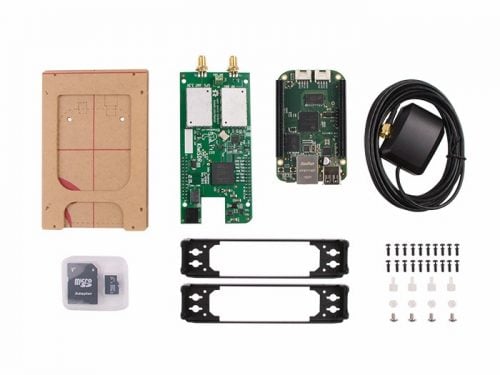
The KiwiSDR kit retails for $299 USD (Amazon) (Direct from Seeed Studio), and with that price you get the KiwiSDR cape, a Beaglebone Green board, an enclosure, microSD card and a GPS antenna. If you already have a Beaglebone lying around, then you can purchase the KiwiSDR board only for $199 USD.
Because the KiwiSDR is a network SDR, instead of connecting it to your PC it connects to your home internet network, allowing you to access it from any computing device via a web browser. Direct access to the SDR is not possible (actually it seems that it is, but it’s not easy to do), and all the computing is performed on the KiwiSDR’s on board FPGA and Beaglebone’s CPU before being sent to the network. Thus raw ADC or IQ data is never touched by your PC, your PC only sees the compressed audio and waterfall stream. So a powerful computer is not required to run the SDR. In fact, a mobile phone or tablet will do just fine.
In comparison, a $299 USD wideband non-networked SDR such as the LimeSDR uses a 12-bit ADC and can do up to 80 MHz of bandwidth over USB 3.0. But even on our relatively powerful PC (i7-6700 CPU, Geforce GTX 970 and 32 GB RAM) the LimeSDR can only get up to about 65 MHz on SDR-Console V3 before performance becomes too choppy.
But the real reason to purchase a KiwiSDR is that it is designed to be shared and accessed over the internet from anywhere in the world. You can connect to over 137 shared KiwiSDRs right now over at sdr.hu which is a site that indexes public KiwiSDRs. To achieve internet sharing, the KiwiSDR runs a modified version of András Retzler’s OpenWebRX software. OpenWebRX is similar to WebSDR, but is open source and freely available to download online. The standard OpenWebRX is also designed to support the RTL-SDR. Of course if you don’t want to share your receiver over the internet you don’t have to, and you could use it on your own local network only.
Some applications of the KiwiSDR might include things like: setting up a remote receiver in a good noise free location, helping hams give themselves propagation reports by accessing a remote KiwiSDR while they are TXing, listening to shortwave stations, monitoring WSPR or WEFAX channels, education, crowd sourced science experiments and more.
Hardware
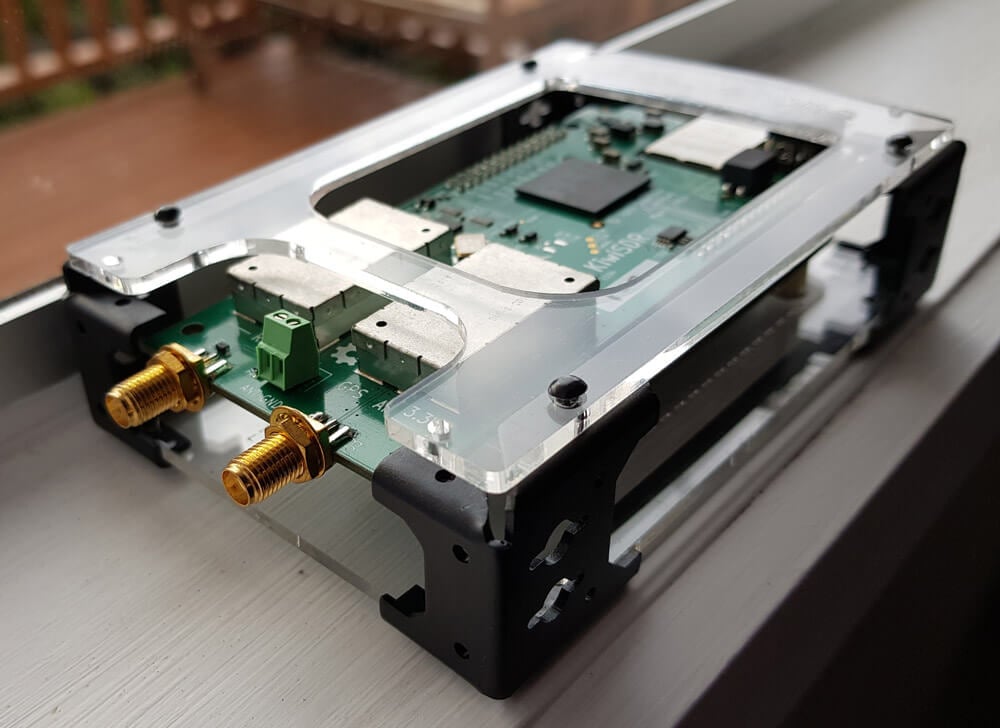
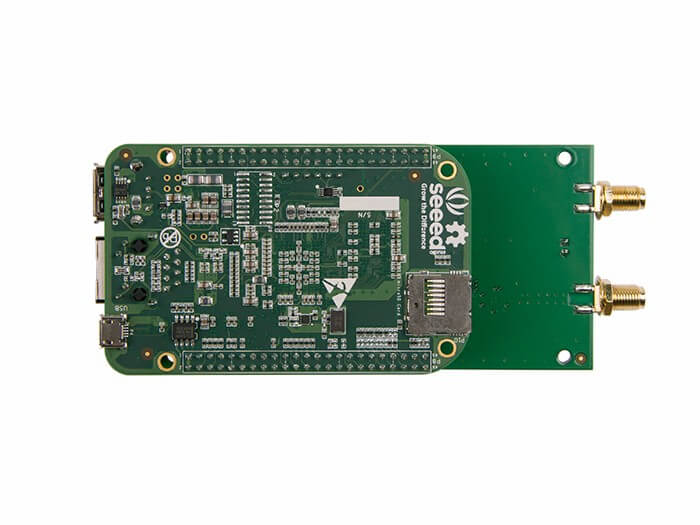
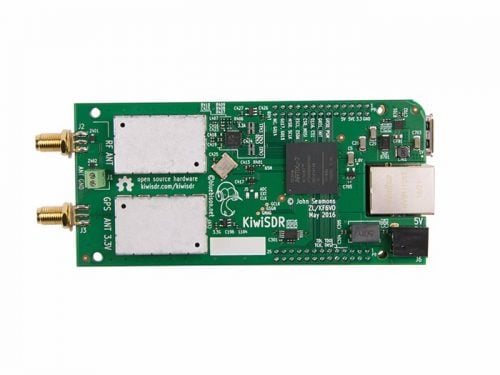
The KiwiSDR PCB plugs directly into the expansion ports of the BeagleBone PCB. On the KiwiSDR PCB is the FPGA which handles most of the DSP processing, two shielding cans which contain the HF and GPS RF front-ends, two SMA ports (one for a wideband HF antenna, and one for a GPS antenna), an Ethernet port, and a 2.1mm DC 5V power jack. There is also a terminal block connector for directly connecting a long wire antenna and ground to the unit.
There is no WiFi on the KiwiSDR so it must be connected to an Ethernet cable, although it is possible to use a cheap wireless Ethernet to WiFi adapter or router like a TP-Link N300 to connect it to WiFi. The KiwiSDR doesn’t require much network bandwidth, so WiFi connection speeds are more than adequate.


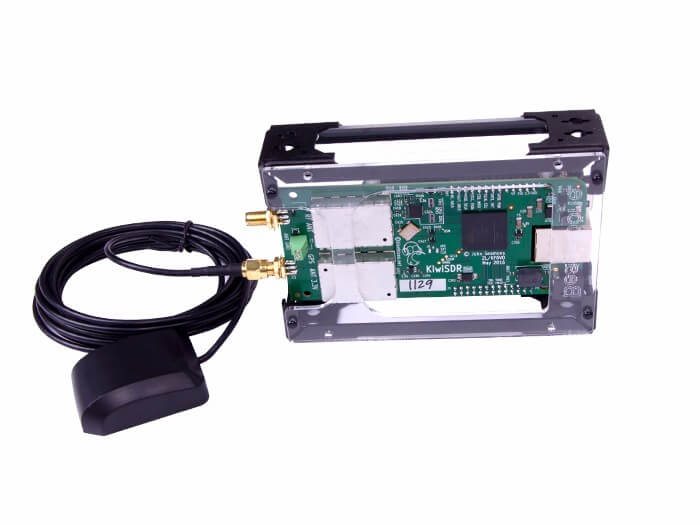
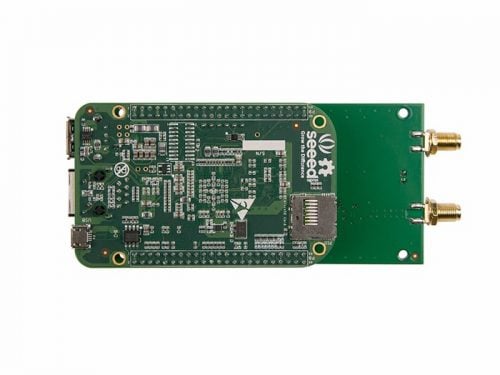

The GPS antenna is used together with the KiwiSDR’s onboard software GPS receiver which is used to enhance the frequency stability of the KiwiSDR.
The enclosure that comes with the kit is made of acrylic glass and metal side plates. It’s unfortunately quite a badly designed enclosure, and it’s difficult to get the final piece of acrylic in (some minor bending is required) but it at least protects the electronics. John does write that a proper aluminum enclosure is in the works.
The ADC is a LTC2248 14-bit 65 MHZ chip, and it uses a standard non-TCXO oscillator as the clock. However, remeber that drift is not a problem as long as you have the GPS antenna connected which will compensate. The FPGA is a Xilinx Artix-7 A35 FPGA.
Heat generated does not seem like it will be an issue for most with the open enclosure. However, there have been reports of the Beaglebone going into thermal shutdown on users using the open enclosure in ambient temperatures in excess of 40C/104F. John writes that the upcoming official enclosure will come with a fan and vent holes for cooling.
KiwiSDR Setup
The KiwiSDR is fairly easy to setup for personal use, but you will need some basic networking knowledge to get it to work over the internet.
When you receive the kit, the Beaglebone’s onboard memory should be already preloaded with the KiwiSDR firmware. The kit comes with an SDcard, but this card is only in case you accidentally mess something up and need to revert to the original software. To get going on your local network all you need to do is connect the KiwiSDR to an HF antenna, an Ethernet cable which is on your network and a 5V power supply. (John does recommend that the network have an active internet connection so that the KiwiSDR can automatically update to the latest firmware which will occur on the first boot.) Then run the KiwiSDR scanner at kiwisdr.com/scan to auto-detect the device, and connect to it!
You can then later connect to YOURKIWISDRIP:8073/admin to access the admin page so that you can control things like passwords, KiwiSDR owner info, what’s displayed on your KiwiSDR interface, your location, and set whether or not you want to share your KiwiSDR publicly, or password protect the unit so only certain people can use it.
5V Power Supply
One minor issue is that the KiwiSDR takes 5V DC via a 2.1mm barrel connector which is on the KiwiSDR PCB. The DC power adapter also must be able to supply at least 1.5A. There is a standard microUSB connector on the BeagleBone PCB, but it not capable of powering the unit with enough current, so the 5V barrel connector is the only way to apply power. The KiwiSDR does not come with a DC power adapter so you will need to purchase your own 5V DC supply.
KiwiSDR recommend that a 5V linear power supply be used to avoid the noise caused by switch mode power supplies. Most power supplies that we’re used to (e.g. phone chargers) are switch mode supplies. Linear supplies are generally used by Audiophiles who like to power their audio equipment with them to avoid audio noise. They can be found quite easily on Aliexpress or eBay (an example supply – note that you need to specify to the seller what output DC voltage and what input AC voltage you require). They start at about $50 USD including shipping, so this is a potential additional expense. In our testing we did see a noticeable reduction in noise at around 1 – 5 MHz once we changed from switch mode to linear mode power supplies for both our active loop antenna and the KiwiSDR. The image below shows the difference during a daytime test.


If using a switch mode power supply, adding lots of clip on ferrites to the cables can help.
Internet Setup
In order to access your KiwiSDR over the internet you’ll need a broadband internet connection with at least 40kB/s upload speeds. Most modern broadband connections can handle this with ease. You’ll also need a decent data plan, as if your KiwiSDR is popular and used often in theory you could reach up to 105 GB of usage a month. People using 4G mobile connections should ensure they are able to pay for that much data. However, in practice most KiwiSDRs sit idle for most of the day as there are not many web users at the moment so data usage should be significantly less than 105 GB (although this could change in the future if sdr.hu becomes more popular).
To setup internet connectivity you’ll need to perform extra setup steps and access your network router’s configuration page. If you’re router doesn’t support UPnP, then you’ll first need to connect to your routers configuration page and forward the 8073 port on your router to your KiwiSDR. This will allow internet traffic for that port to be routed to your KiwiSDR. In the future John writes that the KiwiSDR may support “TCP hole punching” which will bypass the need to do any router configuration.
Then ideally, you’ll need to get a fixed static IP address from your ISP so that guests can always enter the same IP address to connect to your KiwiSDR. An IP address is a unique number that uniquely identifies your internet connection in the world. Unfortunately most ISPs give customers dynamic IP addresses which change every time you reconnect.
If a static IP address is not possible from your ISP (or costs extra), then you can sign up to the free noip.com hostname service. This service works by giving you a public web address that always resolves to your dynamic public IP address. Software running on the KiwiSDR ensures that the noip.com service always knows your public IP even when it changes. The software for this service is already baked into the KiwiSDR firmware so all you need to do is enter your noip.com account credentials into the KiwiSDR admin page. Finally if using the noip.com service you’ll need to also ensure that your router always gives the KiwiSDR the same internal IP address on the local network and that will need to be setup from within your routers admin page.
The noip.com service is free, but on a free account you’ll need to reconfirm your account every 30 days. This simply entails clicking a link in an email that comes every 30 days. If that’s too much of an annoyance then you can sign up to their paid service.
Now to get your KiwiSDR to show up on sdr.hu, you’ll need to register for an account at sdr.hu/register, obtain your sdr.hu API key, and enter this into the appropriate KiwiSDR admin page.
The full setup instructions for the KiwiSDR are in its documentation and quickstart guide, and this is just an overview to give you an idea of what you’ll need to do. The whole process is relatively simple for someone familiar with basic networking, but for someone with no network knowledge, or no knowledge of how to access their routers settings page, it could be daunting. Some routers may also be easier to configure than others, and it’s also possible that some might be so locked down that configuration like this is made impossible. It’s also possible that some ISPs may ban the running of servers, making using the KiwiSDR online impossible.
Antenna Setup
With such a wideband SDR like the KiwiSDR, a good wideband HF antenna is pretty much a requirement. It’s no use to use a tuned narrowband loop antenna, or preselector with the KiwiSDR as then you’d simply be wasting its wideband design.
A simple random/long wire antenna used with a 9:1 unun is already quite wideband, although it will certainly be more resonant at some particular frequencies depending on the length. Electric field mini-whip antennas can usually cover the entire HF band, but they are usually too noisy in today’s urban environments as they very easily pick up noise generated by modern electronics. On sdr.hu you’ll see that most setups using miniwhip antennas seem to have poor reception. In our opinion, the best choice is a wideband magnetic loop antenna like a Wellbrook Loop as these don’t pick up local electrical noise that easily, and can be easily rotated to null out noise sources. However these antennas can be very costly. An alternative is to build one yourself. If you have a large backyard, you might consider a delta loop, large dipole or TC2M antenna.
Finally, of course don’t forget the GPS antenna. The provided GPS antenna comes with a nice long run of coax cable, so it should be easy to get this into a position where it has a good view of the sky.
KiwiSDR Testing
We connected our KiwiSDR to a Wellbrook Loop (with 12V linear power supply), 5V linear power supply and Ethernet cable. After performing the setup the KiwiSDR was running smoothly over the internet without any problems, and indexed on sdr.hu.
Sensitivity seems to be good, and if you’re interested in further sensitivity measurements Bjarne Mjelde’s review of the KiwiSDR gives it at around -97 dBm. In terms of dynamic range, we didn’t experience any overloading with broadcast AM, or any other strong signals. According to the KiwiSDR website however, some European customers do experience overloading on broadcast AM thanks to incredibly powerful broadcasters, and these customers do require that a broadcast AM filter or attenuator be added to make the KiwiSDR usable.
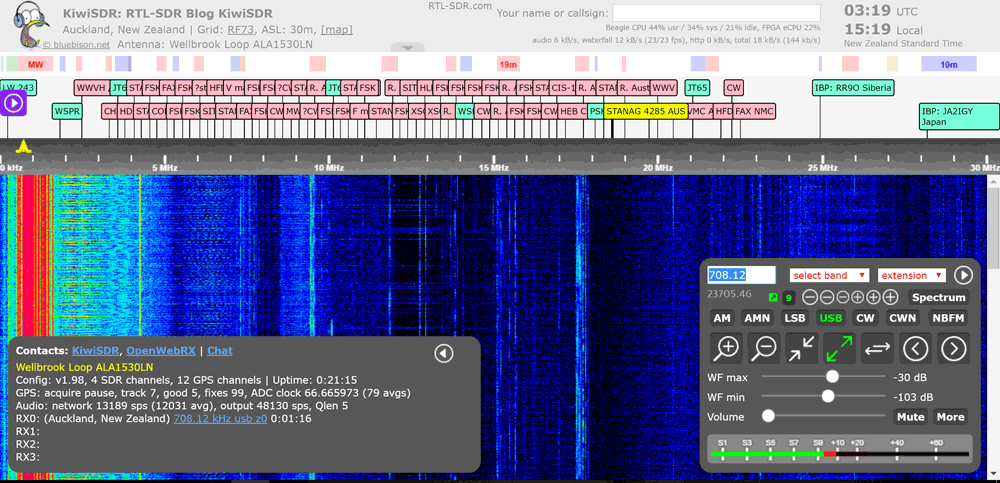
Next we connected to its OpenWebRX web interface from a remote location over the internet using the Chrome web browser. Note that we also tested Firefox and Microsoft Edge (the new IE – older IE does NOT work) and both worked just fine. Chrome on Android also worked flawlessly.
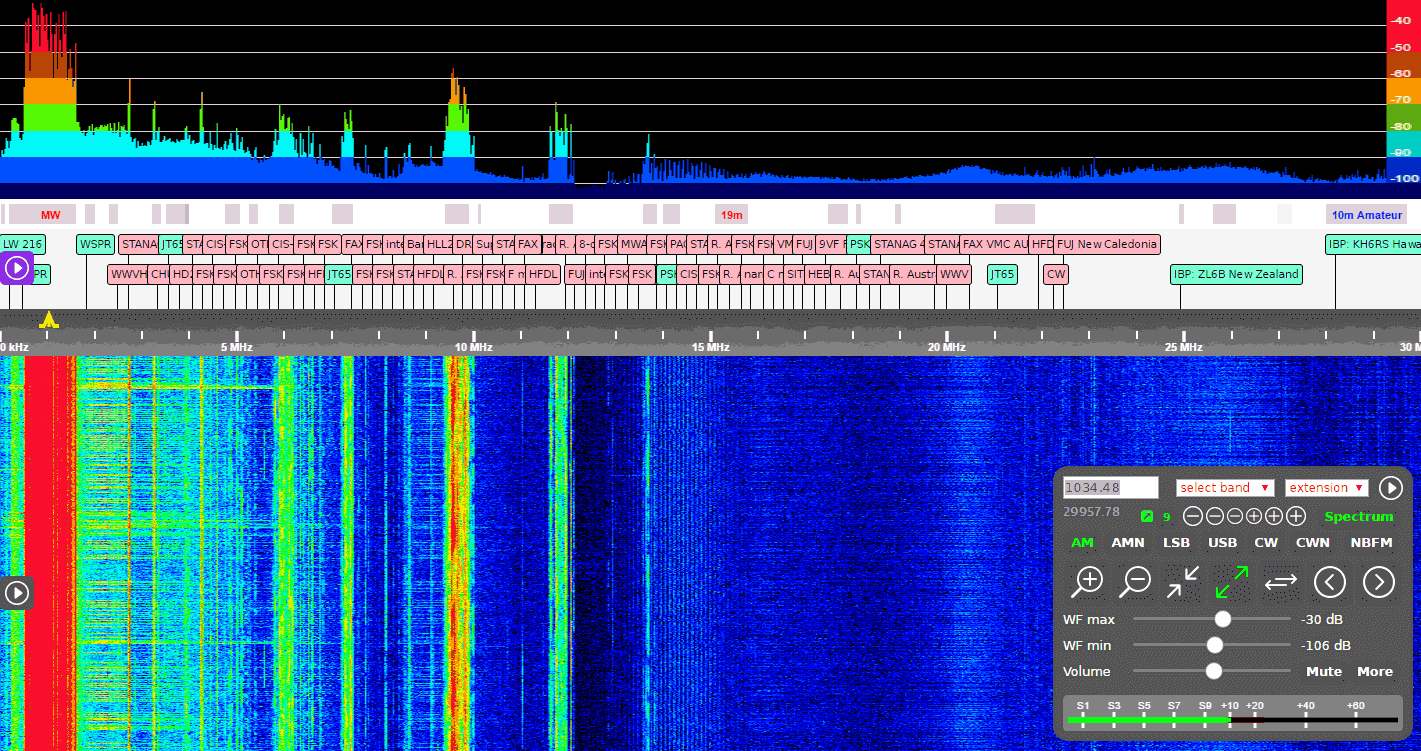
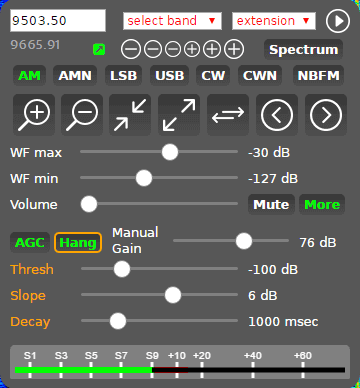
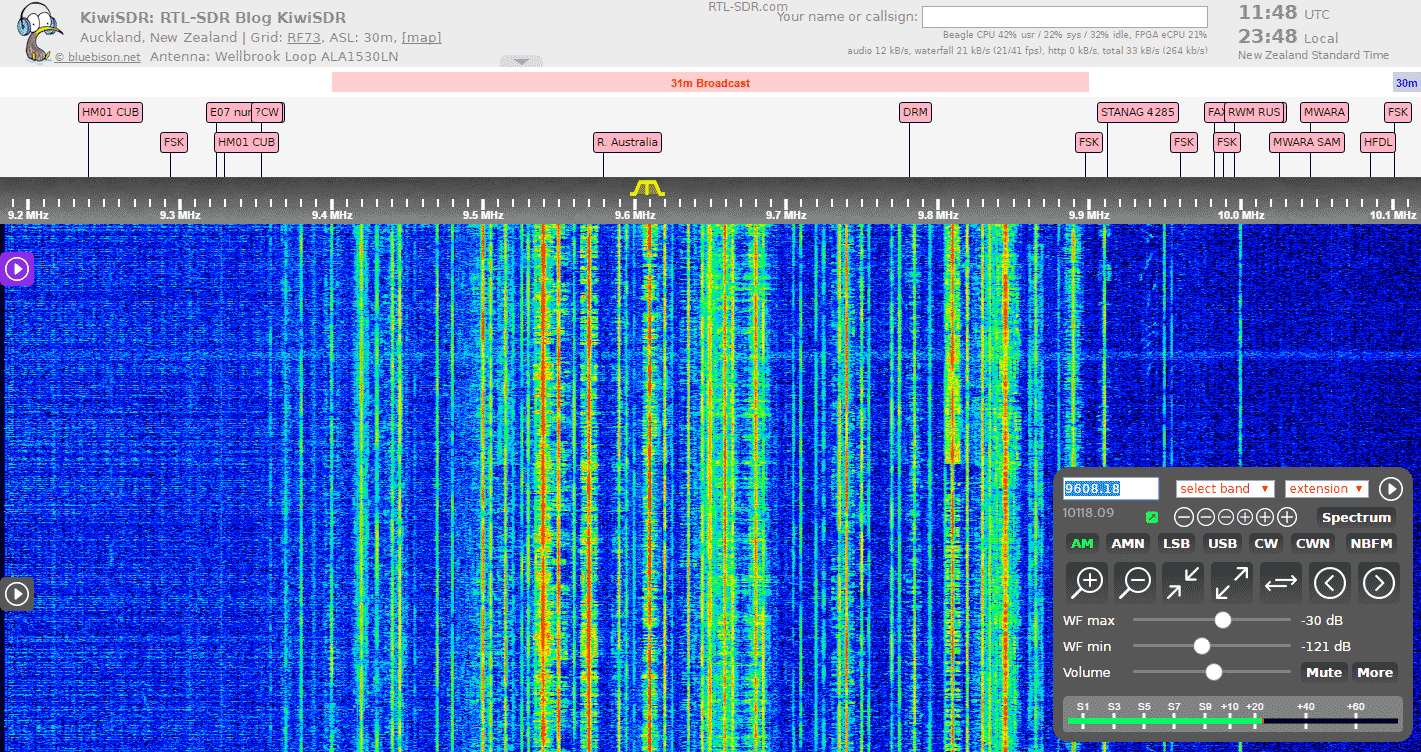
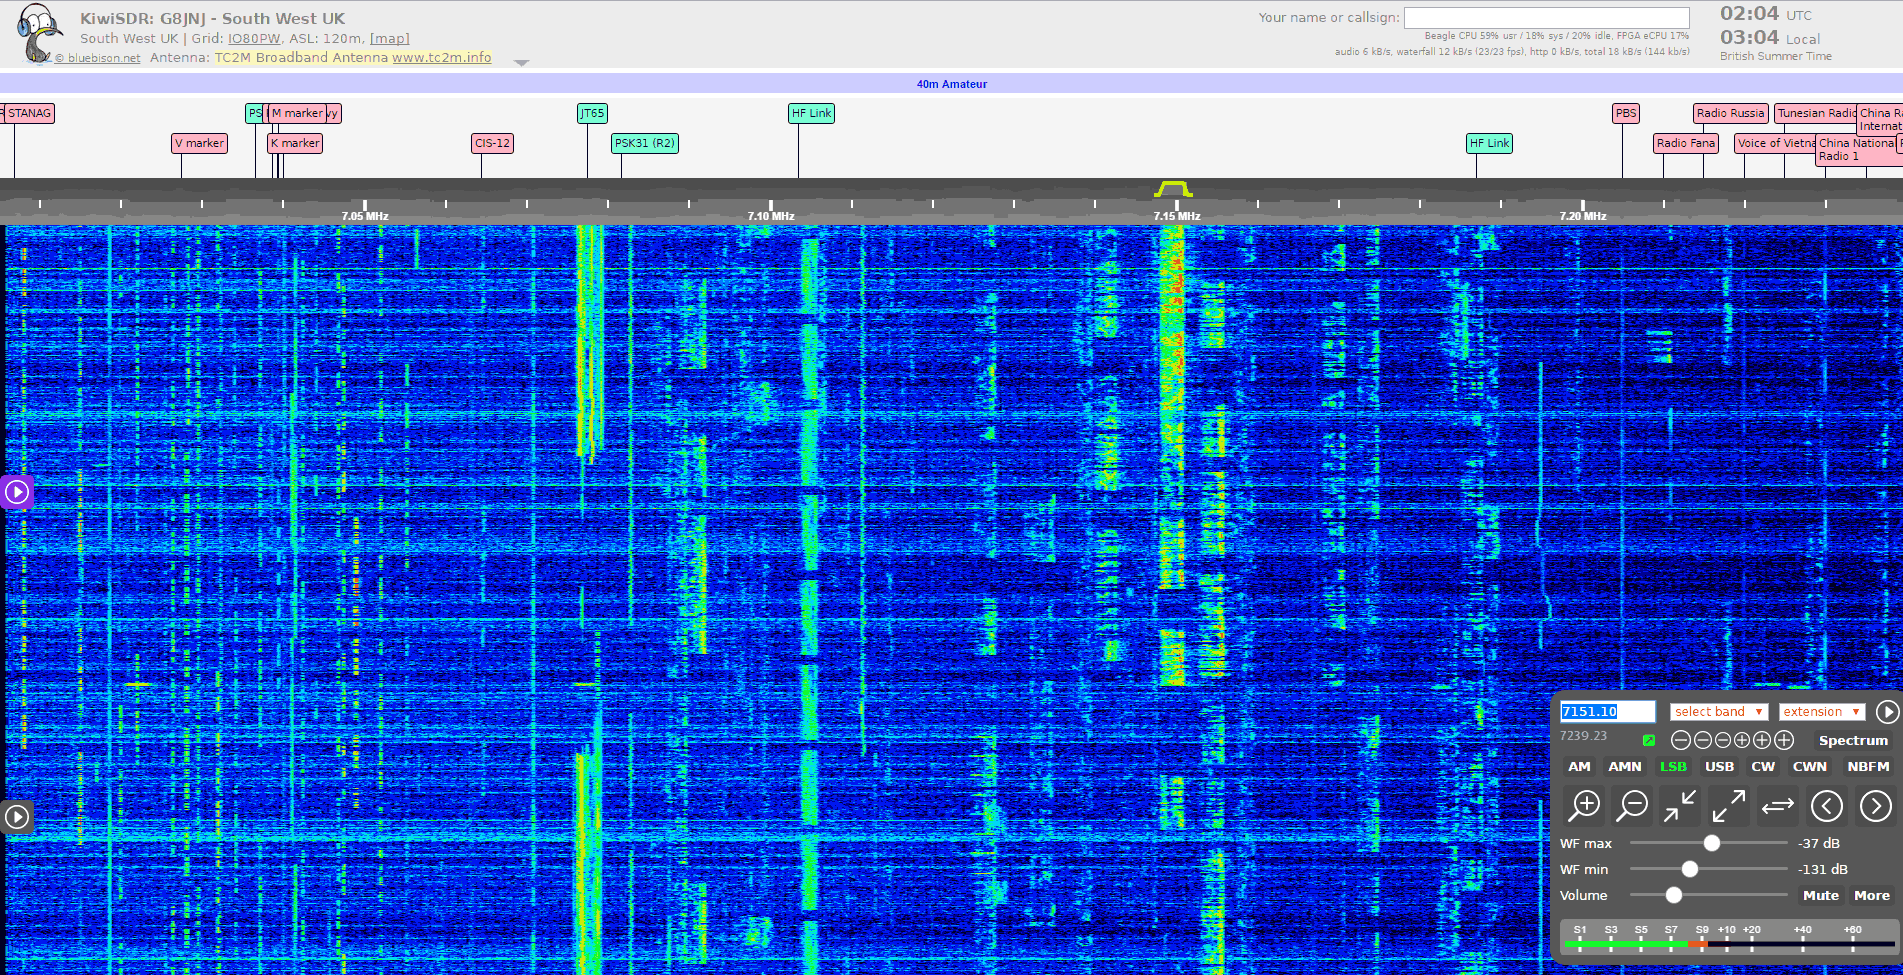
Moving around the OpenWebRX interface is very simple, and the interface acts very similarly to general purpose SDR software like SDR#, HSDR, SDR-Console etc. You can use the mouse wheel to zoom in and out, click to tune, and use the control box in the lower right to select between AM/AMN/LSB/USB/CW/CWN and NBFM. The control box also provides quick controls to quickly zoom right into the currently selected signal, or zoom into its band. There are also waterfall controls, and the ability to enable a spectrum analyzer display. Clicking on ‘more’ enables the audio AGC settings. There is no RF gain control, as the KiwiSDR appears to automatically determine the optimal gain. At the moment there is no audio noise reduction or other DSP capabilities available.
Just above the waterfall are frequency labels. Owners of a KiwiSDR can set these so that guest users can easily identify signals that they are not familiar with. Shift clicking in the frequency label area allows you to add or edit a label.
Because it’s an internet/network based SDR there is a noticeable 1-2 second lag between clicking and hearing audio, even when used on your local network. Also when zooming in and out and moving the spectrum there is a short 1-2 second lag before the screen updates with high resolution waterfall.
Frequency Stability
Thanks to the GPS disciplined oscillator, frequency stability is excellent. Everything is exactly on frequency and there is zero drift as the unit warms up, or the ambient temperature changes.
Extensions
There are several interesting extensions being built into the KiwiSDR OpenWebRX interface, and new ones continue to slowly trickle out of the development pipeline. The current extensions include an S-Meter, WEFAX decoder, signal waterfall integrate display, an IQ display, a Loran-C decoder, and finally a WSPR decoder. Probably the most interesting are the WSPR and WEFAX decoders which we tested below.
WSPR
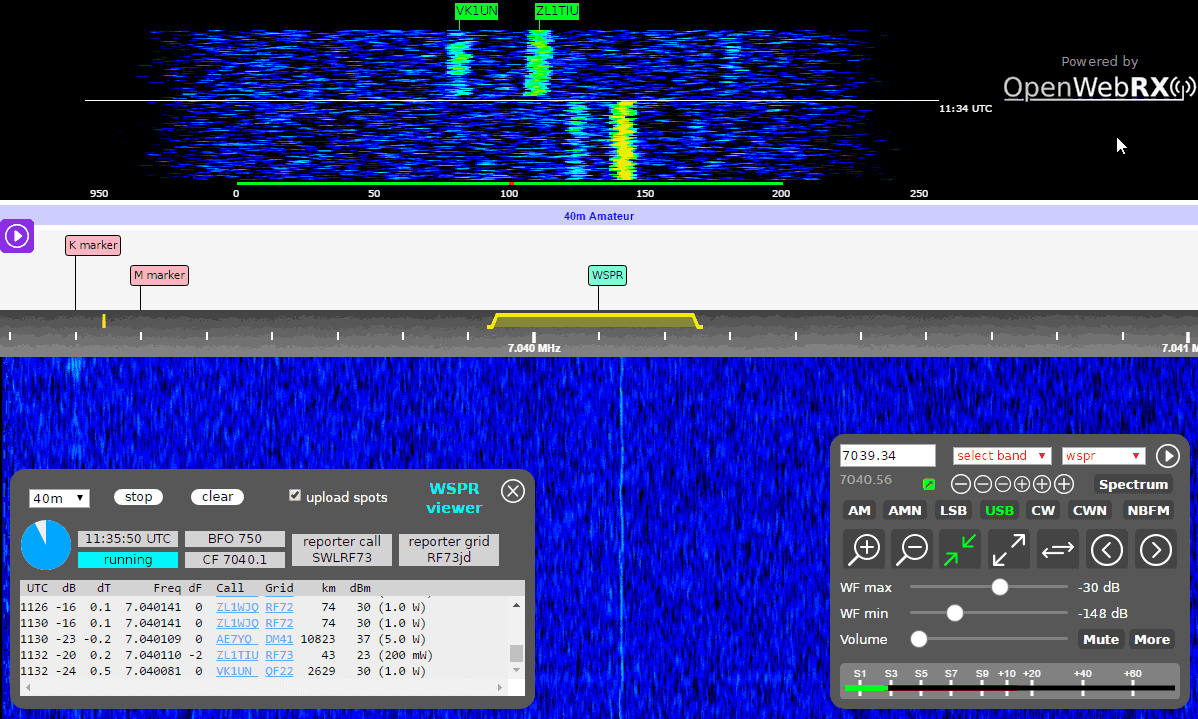
The WSPR decoder can be easily accessed by selecting ‘wspr’ from the extensions drop down menu in OpenWebRX. This will open up the WSPR decoding box in the lower left of the screen. Here you can choose the band that you wish to monitor using the drop down box. OpenWebRX will automatically tune to the band and begin decoding.
Any connected user can start up a WSPR receiver on your KiwiSDR, and if you’ve entered your callsign details in the KiwiSDR setup pages then the decodes will be automatically submitted to WSPRnet.org. If you’re not a ham and don’t have a callsign but still want to contribute to WSPRnet, then KiwiSDR recommend using the ‘SWL’ prefix together with your grid location. WSPRnet appears to accept these non-ham callsigns.
One disappointment (and this is a hotly requested feature on the KiwiSDR buglist), is that WSPR decoding cannot be run in the background. There must always be a user connected to a OpenWebRX browser session running the WSPR decoder. This takes up 1 of the four connections slots available and requires you to have a PC or mobile device constantly connected. The good news is that the developer says that background decoding is a feature that will appear in the future, although it seems that it will still take up one user slot.
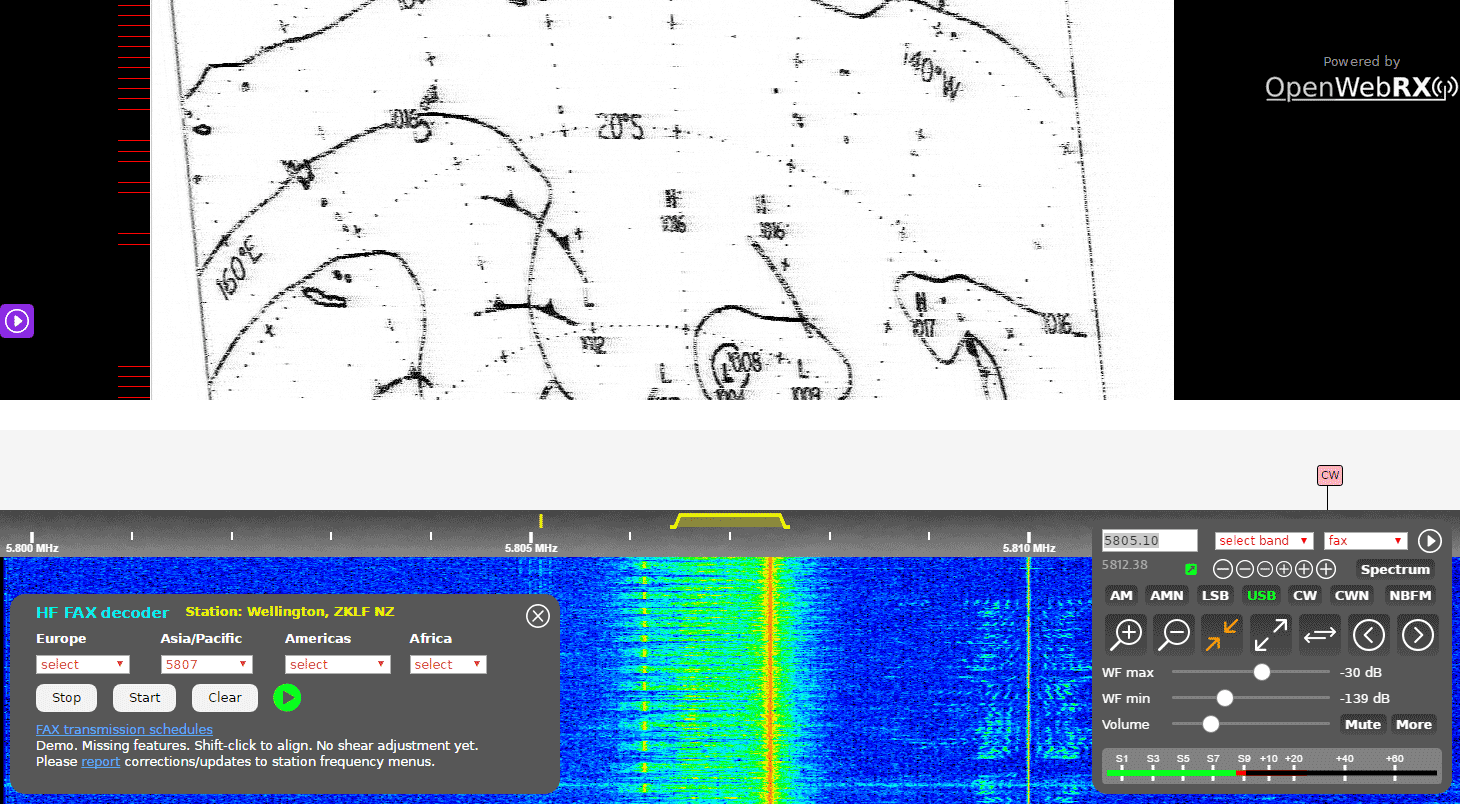
WEFAX
This is a fairly new extension that was just released not to long ago. Again like with the WSPR decoder, all you need to do is select the ‘fax’ entry from the drop box box under extensions. The fax decoder box has a bunch of built in frequency choices that you can select. If there is an active HF FAX transmission, it will be decoded automatically. Saving the image can be done by right clicking it and clicking ‘Save Image As’.
At the moment this is still a new extension, and so there is no way to adjust for slant or alignment. Sometimes if the KiwiSDR drops a sample and the image will be out of alignment.
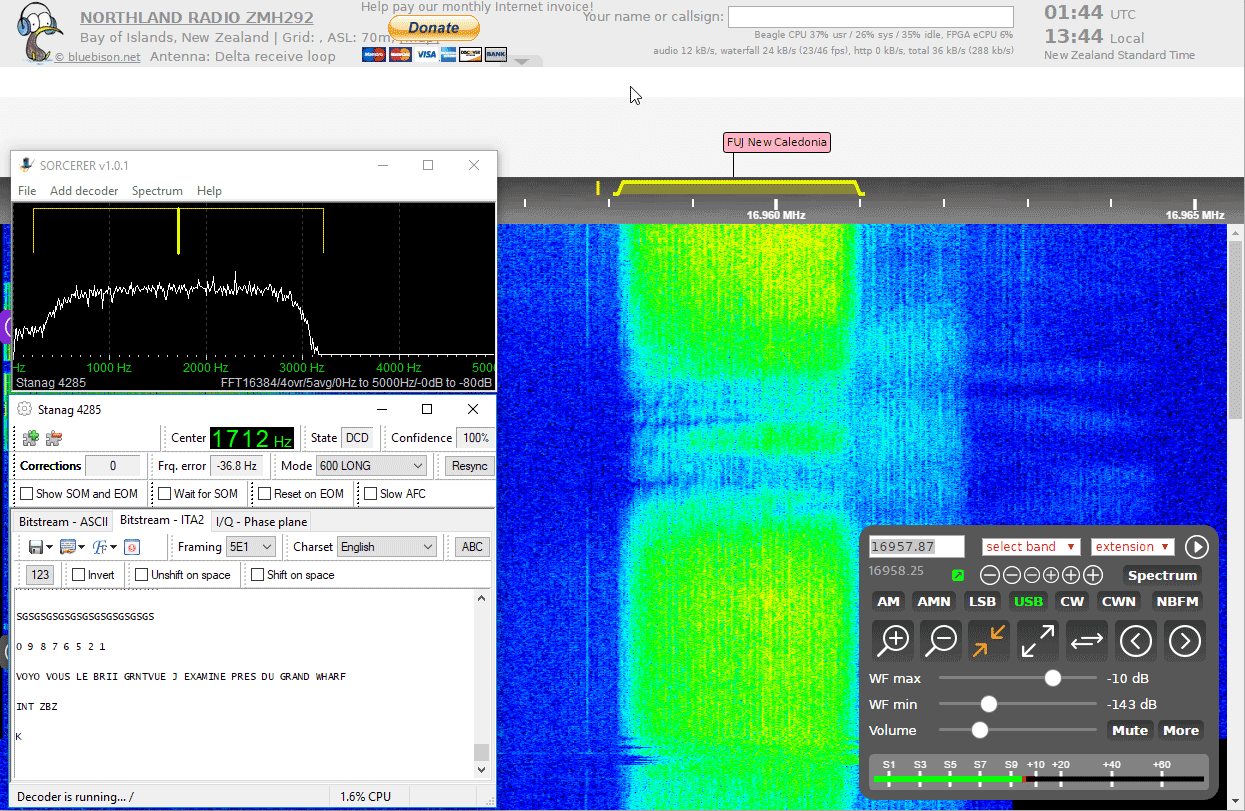
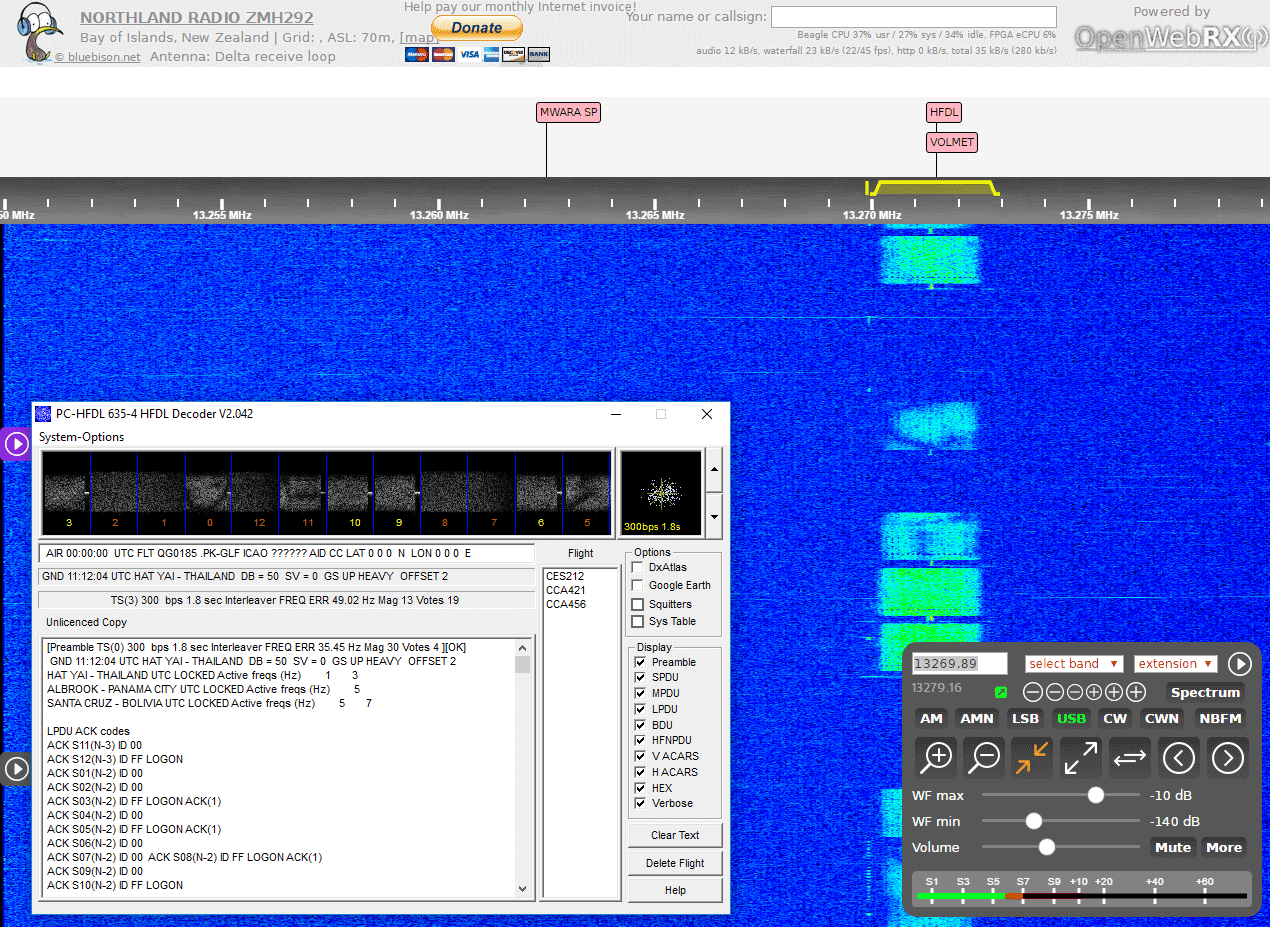
Other Signal Decoding
Of course if a decoder that you want isn’t built into the KiwiSDR interface yet, then you can always use an external decoding program, just like you would with any PC based SDR. The audio compression doesn’t seem to affect digital signals on HF too much. We tested STANAG 4285 decoding with Sorcerer and HFDL decoding with PC-HFDL and both worked fine.
The good thing about the KiwiSDR is that you don’t even need to use your own unit to do the decoding. You can of course connect to someone else’s unit over the internet and decode from their signal. Although if you are planning on doing long periods of decoding it might be considered rude to hog one of the four connection slots for long periods of time. However, at the moment on sdr.hu even the best receivers are terribly underutilized, with there being zero users most of the time so hogging is unlikely to be an issue.
Audio Quality and Compression Degradation
One potential deal breaker for many people with audiophile tendencies is that with the KiwiSDR there seems to be noticeable audio degradation due to the ADPCM audio compression that is used to achieve low bandwidth internet transfer. ADPCM is a compression codec that is an excellent choice for the KiwiSDR because it is CPU efficient, handles background radio noise gracefully and compresses audio down to 4-bits per sample making it very efficient for internet streaming. However, there is still degradation in audio quality which can make it hard to listen to the muffled sounding KiwiSDR audio for long periods of time. In particular ADPCM compression has trouble with accurately reproducing higher pitched frequencies
Below are some examples of the audio degradation. The first audio bar is recorded from a ColibiriNano SDR, and the second from the KiwiSDR. The same antenna was used, and the signal was split through a splitter. You can tell that the higher pitched sounds have been removed or muffled.
Again in this example the ColibiriNano is used first, and then the KiwiSDR.
The following video demonstrates the ADPCM codec that is used in the KiwiSDR very nicely.

We asked John Seamons (creator of the KiwiSDR hardware) if there is to be any future developments that may improve the audio quality and he wrote:
I’m pretty sure my CIC filtering in the FPGA DDC is not quite right. The design document talks about this issue. But there are lots of potential sources: distortion from the compression or the required filtering afterwards. Something I’ve never been happy with is the current algorithm used for the fractional interpolation between the network rate of the audio (12 kHz before compression) and the audio rate required by the browser/computer (typ 44.1 kHz). But the good news is that it’s all software, so changes are relatively easy. Which also means setting up realtime A/B comparisons of different techniques is possible. I did some of this during development.
Interference at 2 meters
The KiwiSDR seems to emit some interference in the 2M VHF band. The cause seems to be something to do with the 48 MHz SPI clock. There is a workaround which involves reducing the SPI clock down to 24 MHz in the KiwiSDR settings page. But this workaround reduces performance, and can cause some waterfall lag when two or more users connect. Possibly a metal enclosure may remedy this.
What we’d like to see in the future
There is a lot of potential in wideband 24/7 HF receivers like the KiwiSDR. Right now the software is quite basic, but hopefully in the future we’ll see some interesting developments. Linked here is the official KiwiSDR bug/feature request list, and below are our biggest wishes.
Additional Decoders and Background Decoding
On the wish list are decoders for typical ham modes like PSK31, CW skimmers and JT65. Hopefully these can be implemented as background decoders as well, so a browser session is not required to run a decoder.
Automated Recording/Decoding
We’d like to see the KiwiSDR have the ability to be able to automatically record shortwave broadcasts for later listening. Also automatically decode WEFAX and other broadcasts.
Distributed Citizen Science Experiments
One of the promises of crowd sourced, networked radios like the KiwiSDR is that they could one day be used for some interesting citizen science experiments. The KiwiSDR hardware is ready for these experiments, as thanks to the GPS clock data can be easily synchronized among multiple networked receivers.
In the past with WebSDR we’ve seen two year timelapse videos of HF conditions be created. It should be possible to do something similar with KiwiSDR too if data were to be collected. Other experiments could include ionospheric and propagation research, solar eclipse research, direction finding experiments and much more.
No experiments are currently ready or near to implementation yet, but it might be something to look forward to in the future.
Conclusion
The KiwiSDR is an excellent SDR that gives you access to the entire 0 – 30 MHz HF spectrum all at once. It is an absolute joy to be able to quickly zoom in and out of bands, finding interesting stations. When your own reception is insufficient you can then head over to sdr.hu and listen to someone else’s KiwiSDR. The price is a bargain at $299 USD, and sometimes if you follow massdrop or seeed sales it can be purchased for even less.
However, potential buyers need to note that the KiwiSDR is not a standard SDR that runs on your PC. Instead it is a network SDR that is designed to be shared with others over the internet. As such due to the compression algorithms used to make internet streaming efficient the audio quality will never be as crisp as it could be with a regular radio or SDR. But as a network shared SDR it is truly excellent value for the price.
Below are some pros and cons of the KiwiSDR:
| Pros | Cons |
|
|
We recommend the KiwiSDR for people who are able to set up a good wideband antenna in an area with good reception and low RF noise, have a sufficient internet data plan, and want to share their excellent reception over the internet. But if you are only interested in DXing, or SWLing for long periods of time, then you might want to consider a regular HF capable SDR or radio as the sound quality will be a lot better. Of course the KiwiSDR can always be used as a supplementary radio, to help you listen while away from your main radios such as when at work.
The best way to decide if a KiwiSDR is for you is to head on over to sdr.hu and try out a few KiwiSDR receivers over the internet. Note that many of the KiwiSDRs that are shared are quite subpar in terms of their reception. This is not indicative of the KiwiSDR, but rather of the subpar antenna systems used. Also of course, most receivers will really only come alive at night local time, so check the time zones and locations first. The sdr.hu rating system also does not accurately reflect the best receivers. After searching for a while you should be able to find some with good reception.
Some recommended KiwiSDR receivers to try:
- G8JNJ – South West UK – Using TC2M Antenna
- Fenu-Radio | Kefikon Switzerland
- OL72an, Shenzhen, China
- Northland Radio ZMH292 | private maritime coast station | Bay of Islands, New Zealand
There is also a very active KiwiSDR forum at http://valentfx.com/forums/#/categories/kiwisdr-discussion
Review Disclaimer: John sent us a KiwiSDR for free in exchange for an honest review. All other items including the antenna and linear power supplies were purchased by ourselves.


2023 now- article dated 2017- any sig changes since 2017?
It’s all on the KiwiSDR forum: forum.kiwisdr.com
Hello We are from Brazil and in our country there are only two Kiwi SDR receivers.
This receiver helps many radio amateurs and radio eavesfares to have free access to radio signals from the country where it is installed. Just for that to have a mobile phone or computer if you have a full receiver and free access from anywhere in the world. In Brazil a tropical country needs to have one more receptor even more in a major state of the country. Sao Paulo. someone could help install an SDR in Brazil. I don’t have equipment
What are the running costs/fees etc after the initial SDR purchase
Interesting question. Internet costs will almost certainly dominate. A lot of us take low cost, flat rate, unlimited cap Internet service for granted. But a lot of public Kiwis are out in the “middle of nowhere” on an expensive 4G (cellular) connection and request donations to cover the costs. But they usually have great reception located away from all the noise.
Power consumption with losses is maybe worst case 10W (5V @ 2A). So at $0.30 US / kWh (a very high rate) that’s roughly $30 US / year.
Our proxy service, used to overcome ISP/4G limitations on incoming connections, is currently no charge.
I must highly recommend use static IP address. KIWI has a significantly higher sensitivity on higher bands (14MHz and above) in comparison with Perseus.
After a couple days I figured out how to move the red line below the waterfall signal.
It would be nice if there was a way to tune in both signals in a cw qso, without riding the mouse.
Firstly, I’m wondering if the Kiwi board would also connect to the ‘black’ beaglebone board.
Secondly, is the Kiwi more sensitive than the SDRplay SDR’s??
I have an SDRPlay RSP1A, and when I compare it’s signal sensitivity to ‘online’ Kiwisdr website reception, it seems like the online Kiwi receivers pick up signals that my sdrplay can’t hear.
Oh, I should mention that I have two good antennas I can use with my SDRPlay sdr. One is an active mini-whip that covers 10KHz ~ 30 MHz. The other Antenna is a long-wire (65ft) that receives from 2.5 MHz up to 30 MHz. So, by all accounts, I should get pretty good reception (I’m in a somewhat rural location). But nevertheless, the online kiwis seem to pick up signals my SDR can’t ‘hear’.
Hi Tory. Yes, if you buy the Kiwi board alone it will work with the BeagleBone Black (the higher-priced KiwiSDR “kit” version comes with a bundled BeagleBone Green). Other Beagles will not work due to hardware or software limitations. We are currently testing the Kiwi with the new BeagleBone AI.
Sensitivity of all these SDRs is about the same. What matters more is the quality of your antenna installation and luck with local noise sources. There is a wealth of information about these issues on kiwisdr.com and the Kiwi forum (http://valentfx.com/vanilla/discussions)
Nice Information
I realize that compared to a rtl2832 the kiwisdr is a lot louder
I recently purchased a W6LVP Magnetic Loop antenna which I believe will revive the Ham and SWL listening community fighting the horrific electrical noise environment we face not counting the magnetic versus electric reception extensive reduction in static etc. I am extremely satisfied with my purchase!!
The article mentions that the presence of strong AM broadcast stations can render the KiwiSdr unusable on some frequencies. This was certainly the case in my Edmonton, AB location. Using a Wellbrook Loop, I had very strong overload conditions. I inserted an Industrial Communications Engineering, model 402 High-pass filter to block frequencies below 1.8 MHz. That did the trick. Unfortunately, this means that the receiver is unuseable for NDB and AM broadcast listening (other than the stations in Edmonton which are still present, albeit attenuated).
You have other options besides an HPF. An LC trap (band stop) for a single frequency can be built using a coil having decent Q. Or construct a BPF. There are several relevant threads on the Kiwi forum:
http://valentfx.com/forums/#/discussion/593/am-overload-solved
http://valentfx.com/forums/#/discussion/554/strong-local-signal-overloading-any-suggestion
Just like any other SDR the Kiwi has a finite dynamic range. If you’re in an urban environment you have to work at matching the Kiwi to the environment. Same for the interference situation.
This is a very impressive receiver for the price. Support from KiwiSDR is excellent.
The new metal case is a highly recommended addition to the KiwiSDR receiver. We are getting ready to deploy ten receivers around the Caribbean and South and Central America.The one on Bonaire is already operational. The front end naturally overloaded as I am 1.6km from a 100kW MW transmitter but a 5-pole Chebyshev band reject filter does a great job knocking the strong signal down.The antenna here is a W6LVP loop.
Computer optimized G5RV long wire/asymmetrical dipole is still a useful compromise wire antenna optimized for ham band usage, and easy to cook up for yourself without spending money on kits. There was an article in NZART mag about 15-20 years ago, or Google can help you out 🙂
@VA3ROM said, “Second, the idea of using an SDR to listen to voice broadcasts is an oxymoron. Analog receivers have far superior audio…”
Nonsense, a properly designed SDR operating in linear mode should at-worst sound indistinguishable from a good analog radio, and at-best sound significantly better. The basis of that claim is firmly rooted in Coding and Information Theory.
Overall, a good review, albeit some major points weren’t covered. I’ll only mention one big thing. The KiwiSDR doesn’t require a LAN or Internet connection. You can plug it into your PC’s Ethernet port and control/run it stand-alone if you prefer and don’t want to share it with anyone http://kiwisdr.com/quickstart/index.html#id-net-p2p.
Second, the idea of using an SDR to listen to voice broadcasts is an oxymoron. Analog receivers have far superior audio, IMHO. SDR’s forte is in the data modes world and the KiwiSDR with built-in decoders and more to come make it extremely easier for non-Linux and non-computer savvy users (and many Hams, I’ve found) to get into the digital world. No virtual audio cables (VB-Cable, et al ), no virtual serial (VSP et al), and so on.
The KiwiSDR system is a total paradigm shift in the SDR world and especially for those of us who get migraines from trying to setup and use Linux based systems for the vast majority of home PC users who basically are plug ‘n play type. The Kiwi system is as close to plug ‘n play as it gets and insulates you from knowing anything about Linux (or any operating system) except for using a web browser.
Regards and 73,
Robert, VA3ROM
“4 users” is not a Pro, pro a Cons…..the board made by websdr author has about the same bandwidth and allow a way more users at same time. I know that’s a different project (and a great one!). The only thing that I disagree is “4 users” limitation in a Pro list.
Except that the Twente WebSDR has a monster PC with a US$1000 GPU card behind that ADC/FPGA board with the same 30 MHz bandwidth. That’s how they get 400+ simultaneous users. So it’s all I trade off. The Kiwi just picked a different point on the price / performance / functionality graph. Also, it’s all software and FPGA firmware. It’s possible someone smarter than us will figure out how to get more than 4 channels (it’s 8 really since the waterfalls can tune independently of the audio — there are 8 DDCs in the FPGA).
What length of wire do you recommend to be as ‘wideband’ as possible?
“A simple random/long wire antenna used with a 9:1 unun is already quite wideband”
It’s wideband in comparison to a tuned loop, or other tuned antenna, but different lengths will be better on some bands than others. Generally the longer the wire is, the better it is for the lower bands. There are also some non-optimal lengths that have poor impedance on most amateur bands of interest see: http://udel.edu/~mm/ham/randomWire/, http://www.hamuniverse.com/randomwireantennalengths.html