RTL-SDR.COM GOES 16/17 and GK-2A Weather Satellite Reception Comprehensive Tutorial
GOES 16/17 and GK-2A are geosynchronous weather satellites that transmit high resolution weather images and data. In particular they are far enough away from the earth to be able to take beautiful 'full disk' images which show the entirety of one side of the Earth. As these satellites are in a geosynchronous orbit, they can be counted on to be in the same position in the sky at all times, so no tracking hardware is required and images can be pulled down constantly throughout the day without having to wait for a polar orbiting satellite to pass over like you would with the NOAA APT or Russian Meteor satellites.
With a low cost WiFi grid dish antenna, LNA and RTL-SDR dongle, any home user within the footprint of one of these weather satellites can receive and decode live images directly from the sky. Setting up a station is overall not too difficult, but it can be a bit fiddly with a number of steps to complete. Below is our comprehensive guide. We'll show how to set up a self contained Raspberry Pi based system with goestools (free), as well as a guide for the Windows PC software XRIT decoder (US$125).
We've attempted to make the tutorial as newbie friendly as possible, but we do need to assume basic RF knowledge (know what antennas, SDRs, coaxial, adapters etc are), basic Linux competency for the goestools tutorial (using the terminal, using nano text editor), and basic Windows competency for the XRIT decoder tutorial (unzipping, editing text files, running programs).

There are two fourth generation NOAA GOES satellites that are currently active, GOES-16 and GOES-17. These transmit HRIT signals, and also transmit shared data from the older third generation GOES 15, and Japanese Himiwari8 satellites. At the moment GOES-16 and GOES-17 are producing full disk images every 30 minutes, and close up "mesoscale" shots of the USA every ~15 minutes. GOES-16 (aka GOES-R) and GOES-17 (aka GOES-S) are also known as GOES-EAST and GOES-WEST respectively. At least one of these satellites can be received from North/South America, Canada, Alaska/Hawaii, New Zealand, Eastern Australia and some pacific islands.
There is also the older generation GOES-15 and GOES-14 which have been placed in standby orbits. These transmit LRIT signals which provide images at a slower rate.

There is also the Korean GK-2A (GEO-KOMPSAT-2A) satellite which is very similar to the GOES satellites. GK-2A covers countries like India, Asia, Australia, New Zealand and parts of Russia. Note that you may have previously heard of the COMS-1 satellite which used to cover this area. Since July 2019 COMS-1 was replaced by GK-2A. Unlike GOES, GK-2A images are encrypted. However it has been found that "sample" encryption keys found online in demo code work just fine.
GK-2A contains both LRIT and HRIT channels, but at the moment only the LRIT channel can be decoded with the currently available software. The LRIT channel sends full disk IR images every 10 minutes in 2200 x 2200 resolution. Compared to the 5424 x 5424 resolution GOES full disk images, this is smaller, but still large enough to be interesting.
Note that even if HRIT decoding is added by the current software, you would require an Airspy or other wideband SDR as the GK-2A HRIT signal bandwidth is 5 MHz. Also since the HRIT bandwidth is so wide, the signal strength is reduced, meaning that you'll need a larger dish. People who have received the HRIT signal note that a 3M+ sized dish seems to be required.

You might ask why bother receiving these satellite images directly, when you can get the exact same images from NOAA at https://www.star.nesdis.noaa.gov/GOES/index.php. Well, you might want to set up your own station to be independent from the internet, or you live in a remote location without internet, or maybe just for the fun and learning of it.
To set up a receiver for GOES 16/17 HRIT or GK-2A LRIT you'll need to purchase a dish antenna such as a cheap 2.4 GHz WiFi antenna, an RTL-SDR, GOES LNA, and a Raspberry Pi if using goestools, otherwise a Windows PC can be used. The total cost could be anywhere from $150 - $200 depending on what pieces you already have available.
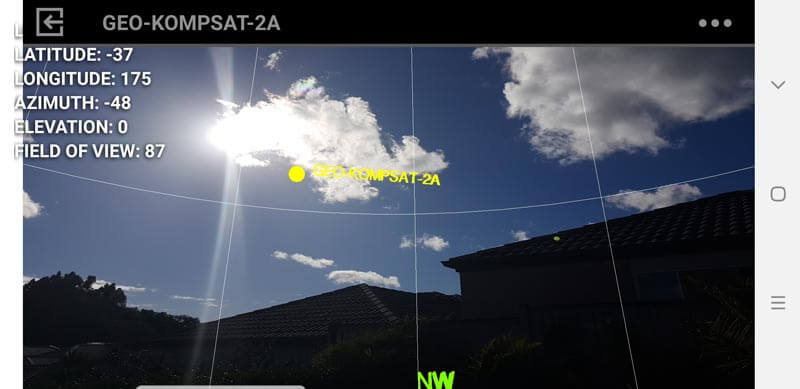
Before we start the tutorial, you might want to use an augmented reality Android app like "Satellite-AR" to get a rough idea of where either GOES 16/17 or GK-2A (GEO-KOMPSAT-2A) is in your sky, and if receiving them is even feasible for your location. You'll need to find an area on your land where you can mount a small satellite dish with an unobstructed line of sight view to the satellite (no trees or buildings can be blocking the signal path). If the satellite is low on the horizon (below 25 deg elevation), then things get a little more difficult as you have more obstructions and a weaker signal. But it can still be done, and we're able to routinely get good results at 24.5 deg elevation.
Note that for Europe and Africa, unfortunately there are no satellites that can be received easily with an SDR and LNA. But you might instead be interested in the EUMETCAST service, which can be received from EUTELSAT 10A (Ku band), Eutelsat 5 WEST A (C Band) and SES-6 (C Band) . To receive this service you'll need a DVB-S2 receiver and a satellite dish with appropriate band LNB. You also need a license keys and software which all together cost €100. EUMETCAST reception is not covered in this tutorial, instead see this video.
Hardware Required
We note that there is now a bundle available from NooElec that includes most of the required components.
- An RTL-SDR Blog V3 dongle. (US$21.95)
- Some other RTL-SDRs will work too, but confirm that the dongle you purchase has a bias tee built in. (All RTL-SDR Blog V3 dongles have a bias tee). Alternatively, you can purchase an external bias tee.
- Note that most of the cheapest generic RTL-SDRs do not work properly at 1.7 GHz due to overheating issues that we discovered can cause problems with reception above roughly 1.5 GHz. Only RTL-SDR Blog V3, E4000 and other dongles with cooling fixes will work.
- An Airspy One can also be used with goestools on Linux and XRIT Decoder on Windows. An SDRplay unit can be used with XRIT Decoder on Windows only.
- Some other RTL-SDRs will work too, but confirm that the dongle you purchase has a bias tee built in. (All RTL-SDR Blog V3 dongles have a bias tee). Alternatively, you can purchase an external bias tee.
- A low noise amplifier (LNA), preferably with filtering. (US$34.95) An LNA is absolutely required to receive the GOES signal. The LNA should ideally have a noise figure (NF) below 1 dB.
- We recommend purchasing the NooElec SAWbird+ Filtered GOES LNA.
- Optionally, adding a second LNA after the SAWbird can help improve reception too, but then you'll need to power the SAWbird directly. If powering directly be very careful and be aware that SAWBird products have a minor design flaw where if you use external power it will output power to the dongle side as well. This could destroy your RTL-SDR's ESD diode and other components if you do not use a DC blocking cap.
- We recommend purchasing the NooElec SAWbird+ Filtered GOES LNA.
- A 2.4 GHz WiFi parabolic grid dish antenna. (US$50 - US$100) 2.4 GHz is above our intended RX frequency of 1.7 GHz, but these antennas are confirmed to still work well. Note that for reception of satellites that are low on your horizon (below 25 deg), we recommend looking for a 1.9 GHz antenna instead as these work a bit better. However we have been able to confirm that with minor modifications we can still receive the signal decently at 24.5 deg elevation with a 2.4 GHz WiFi antenna.
- A 2.4 GHz WiFi parabolic grid antenna - make sure you get the kind with the largest reflector (the grid dish part) possible. The right size is around 100cm x 60cm (39 x 24 in) or larger. Also ensure that it has a metal secondary reflector. Examples Products [1] [2] [3]
- Alternatively, if you can find a similarly sized or larger 1.9 GHz antenna, then this will work even better. But these are typically much more expensive when compared to WiFi grid antennas and sometimes difficult to find.
- Other circular satellite dishes can work too, but those typically don't come with their own feed as they're designed for LNBs. If using a circular dish you'd have to design and make your own feed. If this interests you, see Lucas' cantenna feed example as a reference.
- If needed, you can improve reception by extending the parabolic grid dish reflector size with metal chicken mesh.
- We note that if you only want to receive GK-2A, then you can easily get away with a much smaller 40 x 60 cm dish size.
- A 2.4 GHz WiFi parabolic grid antenna - make sure you get the kind with the largest reflector (the grid dish part) possible. The right size is around 100cm x 60cm (39 x 24 in) or larger. Also ensure that it has a metal secondary reflector. Examples Products [1] [2] [3]
- A mount for the parabolic dish. (US$39.99) This could be a portable antenna tripod, or a more permanent mast. Example product [1].
- Coax adapter for the parabolic grid. (US$5.99) The grid antenna will typically come with an N-female connector. So look for an N-Male to SMA Male adapter, to be able to fit the RTL-SDRs SMA female input. Example product [1].
- Low loss RG6 coax cable, or an active USB extension cable.
- Either use low loss coax cable or a USB extension cable to get the LNA and/or RTL-SDR out to the antenna. An active USB cable will be required for longer USB runs. You may have to build a waterproof enclosure if mounting permanently outside.
- To ensure good signal strength, the LNA must be connected right at the antenna - there should be as little coax as possible between the LNA and antenna.
- We strongly recommend using as little coax as possible after the LNA too. The SAWbird LNA doesn't have enough gain to push the signal through long runs of coax. If you're forced to use long runs of coax, use a secondary LNA. Preferably use a USB extension cable to reduce coax runs.
- Either use low loss coax cable or a USB extension cable to get the LNA and/or RTL-SDR out to the antenna. An active USB cable will be required for longer USB runs. You may have to build a waterproof enclosure if mounting permanently outside.
- A Raspberry Pi 3/4 + 8GB or larger SD card. (US$40 - US$100) Setting up the software on a Raspberry Pi 3/4 is the easiest way to create a permanent monitoring solution. Example product [1].
- (Optional) You may want to have an external hard drive connected to the Pi for image storage as you'll be getting 1-2 GB of images a day.
- (Optional) You may want to have an external hard drive connected to the Pi for image storage as you'll be getting 1-2 GB of images a day.
- (Optional) Weather proofing boxes.
- If you're planning on running the system permanently, you'll want a water proof box to house your LNA and/or RTL-SDR.
- If you're planning on running the system permanently, you'll want a water proof box to house your LNA and/or RTL-SDR.
- (Optional) Additional Cooling
- Avoid running the RTL-SDR or Raspberry Pi in direct sunlight, or in very hot areas. The RTL-SDR V3 has passive cooling, but if the RTL-SDR overheats from direct sunlight or a lack of surrounding airflow you will probably begin to see the viterbi error rates rising, and eventually failed reception. If you experience heat related issues, shield the SDR from direct heat, and/or use some sort of cooling system with a heatsink and fan. Even a small amount of airflow can help significantly.
Setting Up the Hardware and Modifying the Antenna
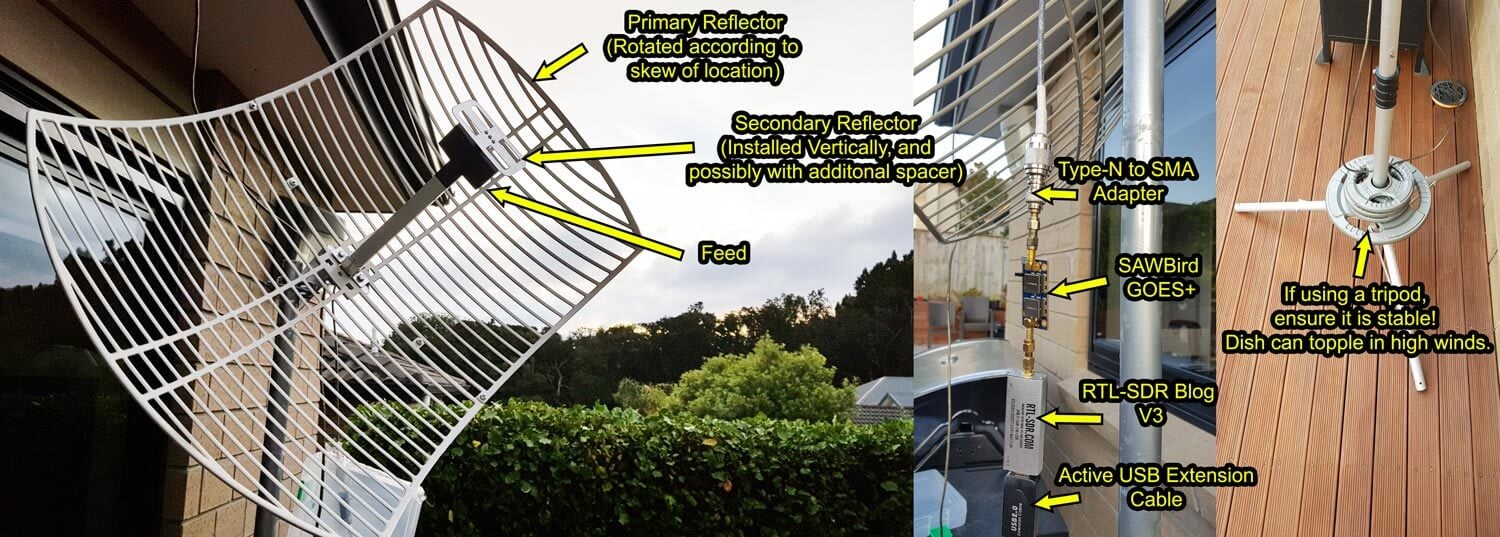
Connect the SAWBird to the antenna, and then the RTL-SDR. Double check that you have the SAWBird the correct way around, with the "OUT" side connected to the RTL-SDR, and the "IN" side connected to the antenna. Keep the SAWBird as close to the antenna as possible. You can use a short run of coax between the SAWBird and RTL-SDR, but keep this to a minimum too. Instead of coax, use long active USB cables, or keep your Raspberry Pi close by.
GOES satellite signals are vertically polarized, so the secondary reflector and feed should be installed vertically, not horizontally.
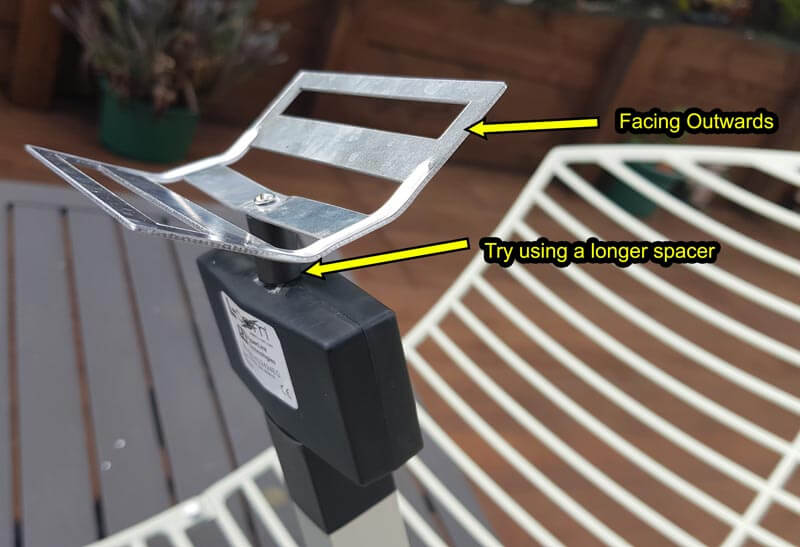
For 2.4 GHz WiFi antennas, the secondary reflector might be curved. To optimize the reception for 1.7 GHz mount the secondary reflector concave side facing outwards.
You can improve the antennas performance at 1.7 GHz by adding a spacer to the secondary reflector so that it sits about 2.5 to 3.5 cm away from the end of the feed. Here is a video that demonstrates this idea. To mount the spacer you'll need to find a longer screw of the same size.
.
Pointing the Antenna
The antenna must be positioned outside. The signal is very weak so it will be very difficult to receive through a window.
Elevation: Angle up/down
Azimuth: Angle left/right
Polarization/LNB Skew: Rotation angle of the dish
Setting the Elevation and Azimuth
You'll need to point the grid antenna fairly accurately at the GOES satellite. If you are out by even 1-2 degrees, the signal will not be seen, or be weak. Use the website dishpointer.com to determine the Elevation and Azimuth that is required to point your dish, or simply take note of the line pointing towards the satellite and align the dish with features from your house. Note that on dishpointer GOES-17 is listed as 137.2W GOES-S (may change to GOES-17 in the future), and GOES-16 is listed as 75.2W GOES 16.
For now you can just point it roughly as we'll fine tune alignment later.
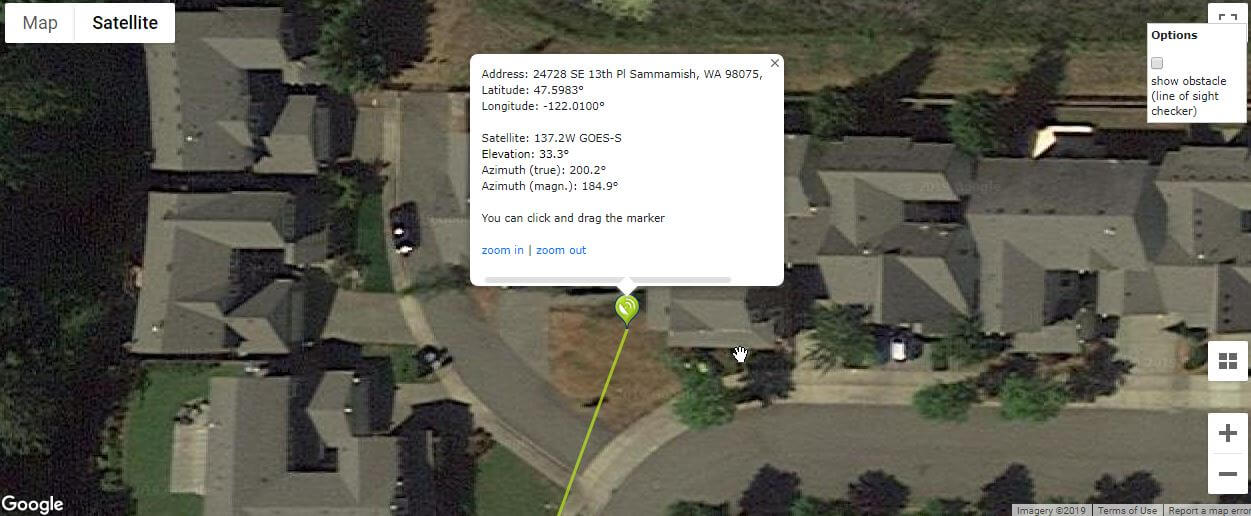
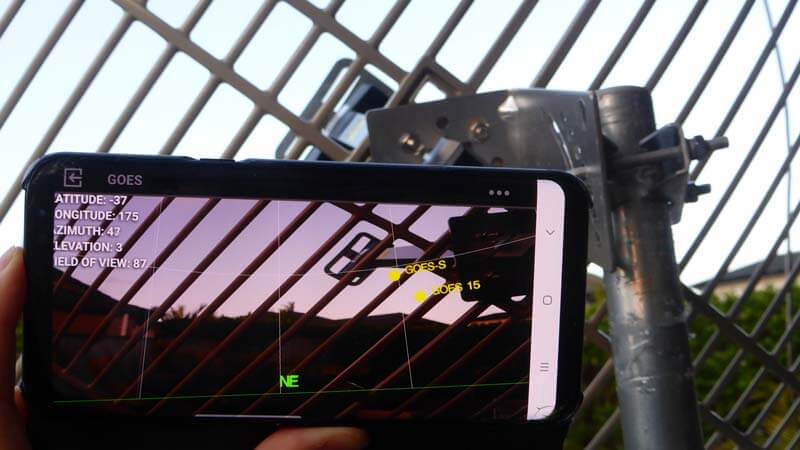
You can also use an augmented reality Android app like "Satellite-AR" to get a rough direction of the satellite. But this cannot be trusted for accuracy as the compasses on smartphones are often not very accurate. We recommend using a standard magnetic compass to help point by using the Azimuth (magn.) information from dishpointer.
To determine the elevation you can use a bubble leveling tool, or an Android app like "Bubble Level".

Setting the Polarization
NOTE: We may be slightly wrong on this polarization info as the polarization might also be dependent on the satellites's antenna orientation. This info seems to hold true for GOES satellites, but not GK-2A. If any one can confirm, please let us know.
Once you have the Elevation and Azimuth of the dish approximately correct, you'll need to adjust the rotation (aka skew) of the dish in order to match the polarization of the satellite at your location. Dishpointer will tell you exactly what rotation angle to use, and in which direction, under the "LNB Skew" information.
If you are on the same longitude as the satellite your skew will be zero, and no rotation will be required. However, those further away on the longitude plane will require their dishes to be rotated. Most WiFi and 1.9 GHz grid dish antennas only allow you to rotate in 45 deg angle increments, so just choose the closest increment to what is given in dish finder.
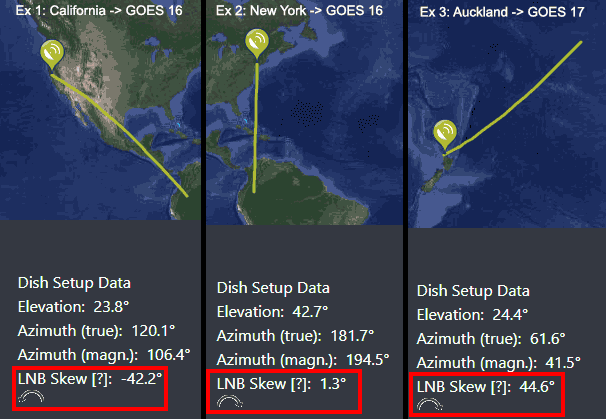
In the image below Example 1 shows a user in California, pointing at GOES 16. Dishpointer shows that the required rotation is 42.2° CCW. So standing behind the antenna you would rotate the dish by 45° so that the left side is closer to the ground. Example 2 shows a user in New York pointing to GOES 16. Here the required rotation is almost zero, so no rotation is required. Keep the dish horizontal. In Example 3 the user in is Auckland, New Zealand pointing at GOES 17. Here the rotation is 44.6° CW, so the user would rotate the dish with the right side being lower.
Note that for GK-2A we found that the LNB skew given by dishpointer appears to be reversed in terms of the required rotation direction. We're not sure why, but may have something to do with the way the antenna is oriented on GK-2A.
Signal Fine Tuning
GOES 16/17 HRIT Frequency: 1.6941 GHz
GK-2A LRIT Frequency: 1.69214 GHz
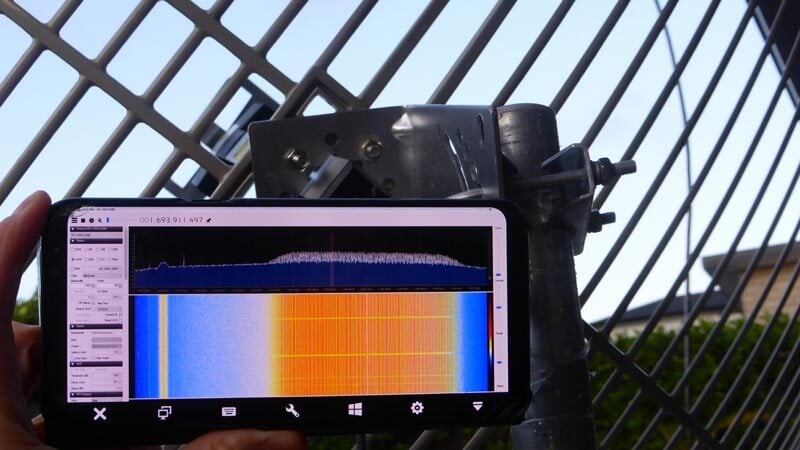
Now that you have your dish pointed in the correct direction we'll need to fine tune the positioning to detect and maximize signal strength. When fine tuning the alignment of the dish you'll need to run a program like SDR#, and keep an eye on the spectrum and waterfall while making fine adjustments to your dish. If you can't see your PC screen while positioning the antenna, it will be very difficult to confirm and tune reception.
To make it easier if you don't have a laptop, install the Teamviewer application (or any alternative like VNC) on your desktop PC, and run SDR# with the dongle and LNA connected to the antenna. Then view the PC's screen on your mobile device using the Teamviewer App, and slowly move the dish around until you see the HRIT/LRIT signal. If using the RTL-SDR V3 make sure that you activate the bias tee first using the bias tee software (see Feature 2 on the V3 guide).
Try to get the signal as strong as you can, but do not worry too much about ultra fine tuning. Later when running the software we will optimize the reception even further using the viterbi error correction rate produced by the decoder software.
The image below shows what reception of a GOES 16/17 HRIT signal looks like. The large bump on the right is the HRIT signal which contains all the weather image data. The narrowband signal on the left is EMWIN, which contains simple text data and simple weather fax type images.
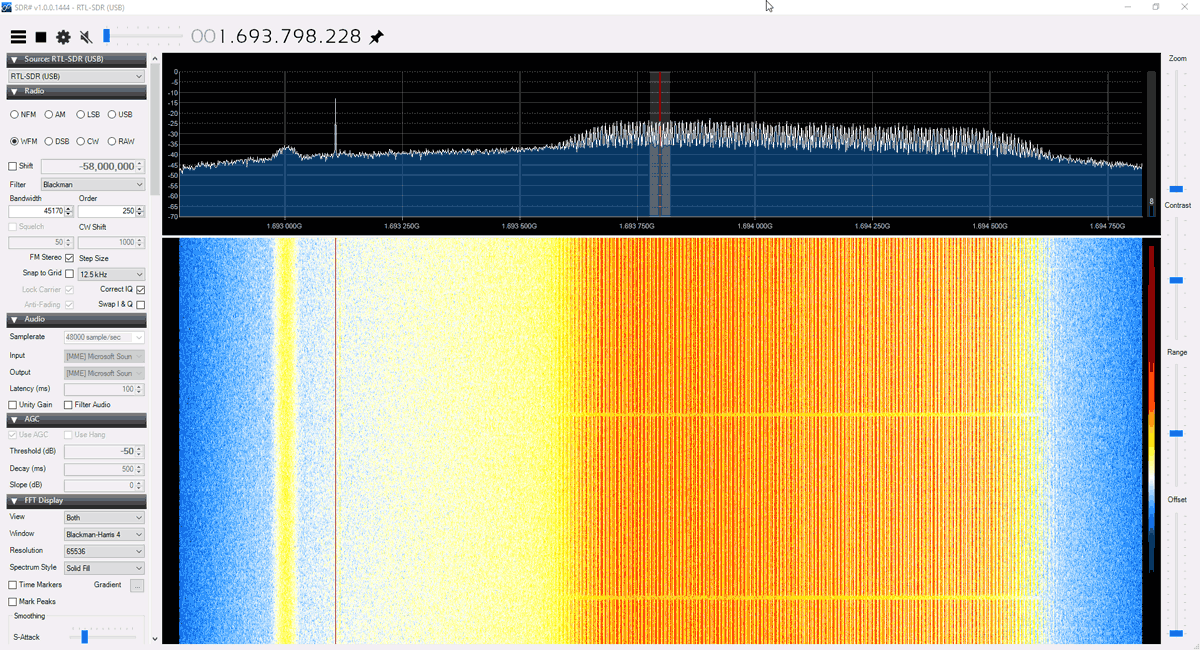
Note that there are sometimes brief periods of a few minutes where the GOES signal is idle. During this time the HRIT signal level will be a bit lower.
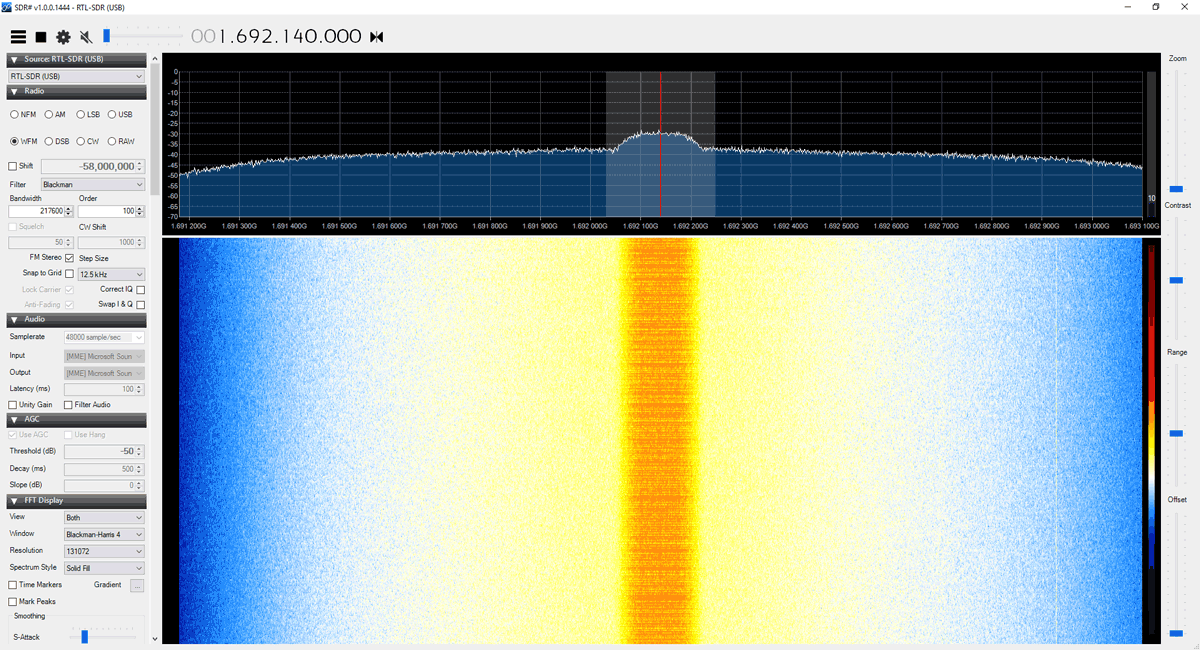
The image below shows that the GK-2A LRIT signal looks like.
Sun Interference Note: During the day time while the sun is up reception signal strength can be reduced, sometimes even resulting in no reception at all. If you cannot find the signal during the day, try again later at night after sundown. Interference appears to be the worst when the sun is behind the satellite.
Raspberry Pi goestools Linux Software Install and Setup
For the Raspberry Pi we will use the goestools software suite which decodes and generates images for us. Goestools is made for Linux, but it might be possible to compile and run on Windows/MacOS too, although we're unaware of any successful attempts. The easiest way to set it up is to install it on a cheap Raspberry Pi 3/4.
- Download Raspbian Lite from the Raspberry Pi site and burn the image to an SDCard using Etcher or Win32Diskimager. Insert the card into the Pi.
- Boot the Pi, and set up an internet connection either with WiFi (method A or B), or by using an Ethernet cable in method C.
- Configure wpa_supplicant.conf on your SDCard or,
- Connect the Pi to a monitor, log in with username: pi and password: raspberry, then run "sudo raspi-config" and set up your WiFi connection.
- If using an Ethernet cable you do not need to set up WiFi.
- Configure wpa_supplicant.conf on your SDCard or,
- Find the IP Address of the Pi either via Method A or B
- Using a monitor, open a terminal on the Pi and find it's IP address by using the command "ip addr" without quotes. Or,
- Open your network routers' configuration page on any PC, and search the settings for a list of connected devices. You should be able to see the Raspberry Pi listed there, with it's IP address.
- Using a monitor, open a terminal on the Pi and find it's IP address by using the command "ip addr" without quotes. Or,
- Now you should connect to your Pi from a PC on the same network using any SSH software such as PuTTy.
- At this point we recommend following the excellent goesrecv software installation guidelines written by Aleksey Smolenchuk (lxe). Go through steps 1 - 6. It is a simple matter of copy and pasting the commands into the SSH terminal.
However, on step 6 of Aleksey's guide, we recommend changing the sample_rate to 2000000. We've found that higher sample rates often cause goesrecv to require multiple restarts in order to get a lock on the frequency. Also if you're using an RTL-SDR V3 enable the bias tee and increase the gain to 30:
sample_rate = 2000000
gain = 30
bias_tee = true
Running the Software and Fine Tuning the Antenna
Later we will create a script that automatically runs the software on boot. However, for now let's first test it.
To run the software open two separate SSH terminals on your main PC using PuTTy or a similar SSH terminal program. Connect to the Raspberry Pi's IP address, port: 2222 with SSH. Log into the Pi with the default username/password: pi/raspberry. In the first terminal run the command:
goesrecv -v -i 1 -c ~/goesrecv.conf
At this point you'll see a bunch of data begin to scroll by. The important thing to look at is the "vit(avg) and "drops" data. You should be seeing zero drops, and a vit(avg) of below 500, and ideally below 400. If you are seeing higher vit(avg) values and drops, you must realign and improve your dish antenna's reception. If you're getting a vit(avg) of around 400 - 600 you may be able to proceed, but some images may be lost or incomplete if you are seeing frequent drops. Anything above 600 and you probably won't be able to get any images.
Signal Optimization TIP: To further optimize the signal, install an SSH terminal like "JuiceSSH" on your mobile device. Run the above goesrecv command on your mobile, and adjust the antenna until the vit(avg) reading is as low as possible. You may need to restart goesrecv after a large adjustment for it to get a better lock on the frequency.

Alternatively, sam210723 also has a Windows compatible GUI monitor for goesrecv available where you can see the Viterbi error rate. If you have a laptop you could run this. Binary releases are available here.
Finally, if you have vit(avg) below 500 and are seeing zero drops, run the following command in the second PuTTy window.
goesproc -c /usr/share/goestools/goesproc-goesr.conf -m packet --subscribe tcp://127.0.0.1:5004 --out /home/pi/goes
At this point images will begin to download. Check back in 15 minutes and see what you've received. All images are written to the folder specified by the --out flag, in this case /home/pi/goes.
During testing you can easily transfer files out of the Pi to a Windows machine on the same network using a program called WinSCP. When starting WinSCP, simply select "New Site", choose the SCP file protocol and enter the Pi's IP address. You can then browse the Pi's directories, and download the image files from the folders generated in the home directory. But this is slow and time consuming, so we recommend using a more automated solution explained further below.
Also, if you wanted to, you could run goesproc on another Linux PC on your network and have the images generated on that machine. To do that, run goesproc with the Raspberry Pi's IP address in the --subscribe flag on the networked machine.
Browsing Images in a Web Browser
Note that we've had issues with Mediaweb crashing and being very slow when generating thumbnails, so we generally recommend that you use syncthing (shown below) instead.
An easier way to view the downloaded images is to install a simple folder web server like "Mediaweb" which will allow you to browse your received images on a web browser over a network connection.
Install the software using the instructions on the mediaweb Git. When installing be sure to choose /home/pi/goes as the default directory. Once installed Mediaweb will run in the background continually even after rebooting. So you can always browse your images.
Once mediaweb is installed and running, you can then browse to PI_IP_ADDR:9834 on any device connected to the same network as the Pi, and you'll be able to see the currently created folders and images (where PI_IP_ADDR is the IP Address of your Raspberry Pi).
Note that you might want to enable the thumbnail cache in /etc/mediaweb.conf, too. Remember to restart mediaweb after by using "sudo systemctl restart mediaweb".
Automatically Transferring Images to your Windows/Other Main PC
Syncthing is a program that you can use to automatically copy and sync your goes image folder with your main Windows/Mac/etc PC on the same network.
- Install syncthing on your Raspberry Pi via the instructions at https://apt.syncthing.net
- Syncthing is configured via a web interface, with default IP address of 127.0.0.1 (localhost). As we're running Raspbian Lite, we don't have a GUI and therefore can't run a web browser on the Pi. So we'll need to open the browser based configuration GUI on a networked PC. To do this we need to set the IP address of the GUI to the Pi's local network address. Edit the syncthing config, and under the <gui> entry, change the <address> value to 0.0.0.0 which will allow you to connect to the Pi's IP Address.
sudo nano /home/pi/.config/syncthing/config.xml

Syncthing config, set IP to 0.0.0.0 - Save and exit with CTRL+X, Y.
- Next, run "syncthing" on the command line.
- Now on your main PC, open a web browser and browse to PI_IP_ADDR:8384 to open the syncthing GUI for the Raspberry Pi.
- On your main PC, download, install and run the Windows version of syncthing. This will automatically open up a browser with the GUI for the Windows syncthing instance. Click on "Add Remote Device". It should be able to find the Raspberry Pi automatically, and you can double check the device ID by going to Actions->Show ID in the Raspberry Pi GUI. In the Windows GUI, simply click on the device ID, and click on Save.
- Within a few seconds/minutes, the Raspberry Pi GUI should pop up with a "New Device" alert. Click on Add Device -> Save.
- Still within the Raspberry PI GUI click on Add Folder. Set the folder path to /home/pi/goes, and set the label to "GOES Images". Leave the Folder ID default. Go into the "Sharing" tab, and enable sharing for your Windows machine. Click on Save.
- After a few seconds/minute or two, the Windows GUI web interface should pop up with a "New Folder" alert. Click on "Add", then under "Folder Path" set where you want the image files to be copied to. Then click on save.
- Wait a couple of minutes, and then it should begin syncing.
Run goesrecv, goesproc and syncthing Automatically on Boot
At the moment goesrec, goesproc and syncthing all need to be started manually whenever the Pi is rebooted. It would be better to create a system that automatically runs goesrecv, goesproc and syncthing when the Pi is booted. Then there is no need to keep an SSH terminal open and manually start the receiver and decoder whenever the Pi is rebooted.
First create two startup scripts called startgoesrecv.sh and startgoesproc.sh in your home directory.
sudo nano ~/startgoesrecv.sh

#!/bin/bash
/usr/bin/goesrecv -v -i 1 -c /home/pi/goesrecv.conf

sudo nano ~/startgoesproc.sh

#!/bin/bash
/usr/bin/goesproc -c /usr/share/goestools/goesproc-goesr.conf -m packet --subscribe tcp://127.0.0.1:5004 --out /home/pi/goes
Then make the script files executable
sudo chmod +x startgoesrecv.sh
sudo chmod +x startgoesproc.sh
Next create a system service that will load the script on boot, after the network service has already been loaded. We are creating two services instead of one, because we need goesrecv to start as root in order to be able to open the RTL-SDRs, and goesproc to start as user pi to make accessing the files easier later on. Also Syncthing cannot be run as root.
# Create the service to start goesrecv

sudo nano /etc/systemd/system/startgoesrecv.service

# Copy and paste the following

[Unit]
Description=Start GOES receiver after network is loaded
After=network.target
[Service]
User=root
Group=root
Type=oneshot
ExecStart=/home/pi/startgoesrecv.sh
[Install]
WantedBy=multi-user.target

# Create the service to start goesproc

sudo nano /etc/systemd/system/startgoesproc.service

# Copy and paste the following
[Unit] Description=Start GOES processor after network is loaded as user pi
After=network.target
[Service]
User=pi
Group=pi
Type=oneshot
ExecStart=/home/pi/startgoesproc.sh
[Install] WantedBy=multi-user.target

# Create the service to start synthing
sudo nano /etc/systemd/system/startsyncthing.service

# Copy and paste the following
[Unit] Description=Start syncthing after network is loaded as user pi
After=network.target
[Service]
User=pi
Group=pi
Type=oneshot
ExecStart=/usr/bin/syncthing
[Install]
WantedBy=multi-user.target
Enable the services:
sudo systemctl daemon-reload
sudo systemctl enable startgoesrecv
sudo systemctl enable startgoesproc
sudo systemctl enable startsyncthing
Note that if you plan on making this a permanent station, it would be wise to connect a large external hard drive to your Pi, and save images to there. In that case you'd change the --out flag in the startgoesproc.sh to the path of the harddrive.
(Untested Idea) Even with a hard drive, you might also want to remove files and folders older than ~30 days or so to avoid running out of space. GOES16/17 transmit about 2GB of data a day so storage can run out fast. (Adjust +30 in the script below to how many number of days of images you want to keep)
nano ~/removeoldfiles.sh

#!/bin/bash
find /home/pi/goes/* -type d -mtime +30 -exec rm -rf {} \;

sudo chmod +x removeoldfiles.sh
Then create a crontab entry to run this script daily.
crontab -e

# Add the following to the end of the crontab file
@daily sh /home/pi/removeoldfiles.sh
Automatically Transferring Images to Dropbox
This is an untested idea, but may be worth looking into if you run Dropbox.
https://github.com/andreafabrizi/Dropbox-Uploader
Create GIF Videos from Images
The easiest way that we found was to use an online service like https://gifmaker.me. Pieterns goestools guide shows an offline Linux method involving Imagemagick, but we found it too slow to run on a Pi 3.
Below is a video of half a day of GOES 17 false color full disk images that come in every 30 minutes.
Below is a short video from GK-2A with 10 minute interval images.
Raspberry Pi GK-2A goestools Tutorial
Please note that GK-2A decoding is still in it's infancy, and the decoder is still being worked on by @sam210723. He is frequently updating his modified version of goestools and his xrit-rx software for GK-2A decoding.
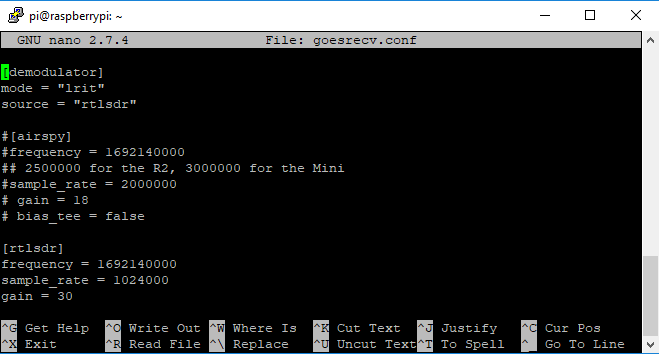
First install the modified goestools for GK-2A version at https://github.com/sam210723/goestools. Compilation instructions are on the page but note that running sudo make install will overwrite the original GOES goestools version. If you prefer you can just run the GK-2A goesrecv program from the build/src/goesrecv folder and not run sudo make install.
Next edit the goesrecv.conf file that you copied over with "nano goesrecv.conf". If you're using an Airspy, the conf file should already be ready, but you may want to edit it to activate the bias tee. If using an RTL-SDR, change the "source" to "rtlsdr", comment out the [airspy] settings by putting a "#" in front of them, and remove the "#" from the [rtlsdr] lines. Set the gain to 30, and bias_tee to true. CTRL+X, Y to save and exit.
Install xrit-rx
XRIT-RX takes the place of goesproc. Sam, creator of the software recommends using the latest zipped release version from https://github.com/sam210723/xrit-rx/releases/latest as the latest code in the Main Git branch may be unstable. Check the release site for the latest version, and update the command below with the newest asset file name. Unzip that into a folder
# Install dependencies
sudo apt-get install python3-pip

# Download xrit-rx
mkdir xrit-rx
cd xrit-rx
wget https://github.com/sam210723/xrit-rx/releases/latest/download/xrit-rx.zip
unzip xrit-rx.zip
cd xrit-rx
pip3 install -r requirements.txt
Next we need to download the encryption key.
# Download the encryption key
cd ~
mkdir COMS
cd COMS
wget http://nmsc.kma.go.kr/resources/enhome/resources/satellites/coms/COMS_Decryption_Sample_Cpp.zip
unzip COMS_Decryption_Sample_Cpp.zip
mv EncryptionKeyMessage_001F2904C905.bin ~/xrit-rx/

# Decrypt the key
cd ~/xrit-rx
python3 tools/keymsg-decrypt.py EncryptionKeyMessage_001F2904C905.bin 001F2904C905
You'll now have a file EncryptionKeyMessage.bin stored inside the xrit-rx folder.
Finally, open two terminal windows in PuTTy. In terminal one run the following, and confirm that you get a low vit(avg) rate, and no drops. Use the tips mentioned in the GOES guide above for fine tuning if necessary.
goesrecv -i 1 -c goesrecv.conf
In the second terminal window run the following and it will automatically begin creating LRIT files.
sh xrit-rx.sh
Image files will be generated automatically as the decoder software runs.
Like with the standard goestools setup, you could now make these programs run on boot with systemd, and set up syncthing.
Windows XRIT Decoder Tutorial
If you instead prefer to use Windows software, USA-Satcom (Joe) has a decoder called "XRIT Decoder". Due to certain libraries used, it is not free and is available for a price of USD $125. The price includes free future updates and access to a private groups.io forum for support and downloads.
An additional US$25 gets you an option piece of software called "XView" which is a viewer that allows you to view and filter images as they arrive. This is useful if you're creating some sort of live display. XView also has an animation feature that allows you to easily create weather movies.
XRIT-Decoder can decode GOES LRIT and HRIT data. It also appears to be somewhat compatible with GK-2A LRIT at the moment, and this is set to be improved in the future. It is compatible with the RTL-SDR, Airspy and SDRplay software defined radios.
In order to purchase XRIT-Decider you must contact him directly by email. You can also request a 30-day demo. After purchasing or requesting a demo USA-Satcom will send you activation and usage instructions.
XRIT Decoder SpyServer Setup
Note that if you are using an SDRplay SDR, you can skip this step.
For RTL-SDR and Airspy SDRs, XRIT Decoder relies on SpyServer from SDR# to provide data. SpyServer is a remote server application that supports the RTL-SDR and Airspy products. It's a part of the SDR# software package and can be downloaded from www.airspy.com.
SpyServer runs on Linux, Windows and ARM single board PCs like the Raspberry Pi. So if you wanted to you could set up a remote SpyServer on a Raspberry Pi connected directly to the antenna, and decode the data remotely on your Windows PC with XRIT Decoder.
- Turn on the bias tee.
- If using an RTL-SDR V3, run the V3 bias tee software and turn ON the bias tee.
- If using an Airspy, edit spyserver.config with a text editor and uncomment (remove the preceeding #) the "enable_bias_tee" option in spyserver.config, and set it to '1'.
- If using an RTL-SDR V3, run the V3 bias tee software and turn ON the bias tee.
- Start the SpyServer by double clicking on spyserver.exe, or running it from the command line in Linux. The default config is fine for RTL-SDRs - just remember to activate the bias tee first in step 1.
Starting and Running XRIT Decoder
After purchasing XRIT Decoder, USA-Satcom will send you usage instructions that we won't repeat here. The basic steps are to run xrit_decoder.exe, select the SDR, sample rate and mode (LRIT/HRIT), then click on Start Demod. (For GK-2A select COMS-1 LRIT). You can then adjust the gain, and check the Viterbi rate. Like with the initial antenna setup, you can then use Teamviewer and the "Dish Align" feature in XRIT Decoder to fine tune your dish for the lowest Viterbi error rate. USA-Satcom recommends a viterbi rate of below 100, but we've found that under 400 still gives decent results.
Once your viterbi is optimized, go to the GOES XRIT Ingestor screen and click Start. Now you can open xrit_file_manager.exe, and click Start Processing in that window. Over time images will be stored in the "images" folder within the XRIT Decoder folder.
Finally, if you purchased XView, open xview.exe, and set the image path if necessary. Over time the last downloaded image will be displayed.

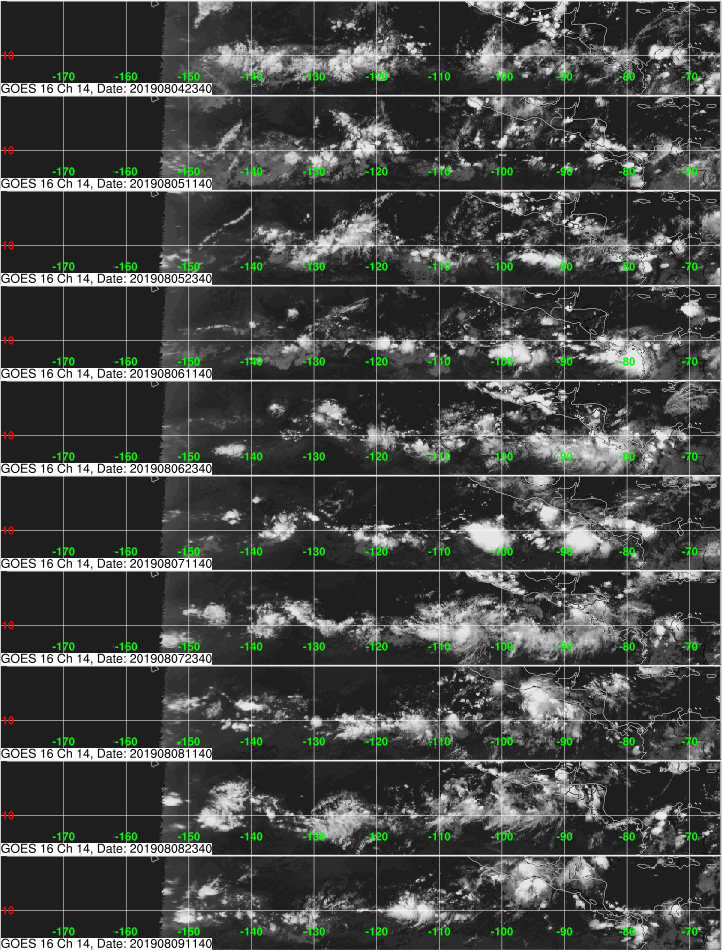
Example Images that You'll Receive from GOES 16/17 and GK-2A


This is an absolutely wonderful article and I am deeply grateful for the author for putting it together. I couldn’t have put together my GOES ground station without it. Just one thing to note – if anyone is going crazy trying to figure out why you cannot get goesproc to run automatically on boot, it is because there is a typo and the startgoesproc.service code has ExecStart=/home/pi/startgoesrecv.sh instead of ExecStart=/home/pi/startgoesproc.sh . Easy fix and I am embarrassed it took me so long to catch it. Just wanted to pass it along.
Can anyone share their goesproc-goesr.conf file? I have let goesproc run for hours and it does not write any files. I have no idea what is wrong with this program. I downloaded goestools for windows and ran goesproc on windows and it receives packets from my rpi and I get tons of text files and images, but none when I run goesproc on the rpi. It was working for a bit when I first ran it but after trying to update the file to include GOES 18 images it doesn’t write anything.
I figured it out. I created a new conf file for goesproc but failed to point the .sh script to the new location of that conf file. If anyone has a conf file to share it may help others. Had a hard time finding any online.
So I decided to take the plunge and get a dish and dongle to receive sat images of the earth. The dish arrived yesterday and I printed out a plot where the dish should point to if I wanted to get Goes 16. Ran into my first problem, the dish should be rotated -38 degrees but the mount only had positions for 90 and 45 degrees. So got the drill press and added some more holes. They should sell a mount that has adjustments on both sides.
I used a compass and my cell phone to point the dish in the correct direction and connected the dongle to my computer and ran SDR++ to see what kind of signal that I had. Not much was showing, no more than 5 db above the noise floor. Ok, so I moved the dish around but the signal did not improve much at all. The NESDR SmarTee dongle is connected directly to the SawBird. The Bias T LED is on. I am using Dragon Linux to receive the signal with SDR++ and SatDump.
So I followed some of the guides that are posted online, flipping the reflector, adding a spacer to the reflector but the signal never improved. In fact it got worse. I worked on getting a signal for over 6 hours yesterday and still got nothing. In SatDump, the Viterbi section would show SYNCED but the Deframer would never sync. I was temped to cut up the dish with a hack saw and call it done. At 10pm I decided to disconnect the dongle from the preamp and connect the dongle directly to my computer, connected back to the preamp with the long cable that was supplied with the dish. I then got a signal that was almost 15db above the noise floor. Yeah. I was even getting syncs for both sections, but one would flicker every once in a while.
At 11pm I had to go to bed, work in the morning. There were folders created with a lot of text files in them and but no photos of the earth, I have reconnected the dongle to the preamp and have my laptop running Windows with SatDump at the dish antenna to try to fine tune the dish pointing but could not get an improved signal. Today after running for the past 3 hours I have not received any photos of the earth. Strange since everyone else who has this setup talk about all of the photos they have received.
What are the files in the DCS folder? They have a .lrit file type. I can’t find any info about them and if I am to do anything with them.
If this is all that I can get with this setup I will warm up my hack saw..
Dwight
Have you ever used Linux (Windows is weird; I switched 3 years ago and never switched back)?
I was having issues with SATDump as well. I spent the last 3 weeks playing with settings and hardware configurations. I used SDR# to make sure I was able to see a signal and I could. WXtoimg could not decode anything. SATDump never even saw a signal, it was like nothing was even connected. I finally downloaded goestools as a last resort. The moment I initiated the scripts, I was getting images and weather text within 2 to 3 minutes. I had not even moved the dish at all. My suspicion the whole time was that maybe something was up with SATDump and it turns out that was indeed the case for me. I’m using Windows 11, I would recommend you give goestools a try. Also, be aware Norton Antivirus does not like goestools, I had to fight with it to stop it from deleting pieces of the unzipped folder. Good luck if you are still trying!
Glad to see you had success, the tutorial here is a bit dated and there is an updated version at https://usradioguy.com/goes-satellite-imagery-reception/ which is current with new operating systems and latest goestools build. LIGADOS, and LTE can and has messed with many a system, and there are some articles on the usradguy.com site about those as well. Also, check your packet loss at the times when the satellite is between your dish and the sun, that can cause issues as well.
This was an excellent how-to. Followed the steps precisely and ended up with a ton of amazing images. Thank you for putting this together! Ended up setting this up using the mentioned Amazon bundle w/ Raspberry Pi 3B+ in a big city on a 3rd floor balcony. Apparently it’s suspicious looking as I’ve had people stop and point at me while I was trying to locate GOES-16. Enough so that my landlord came by. I guess that makes sense when it’s 30F outside and there’s a lunatic fidgeting with a dish outside connected to a cobweb of cables and extension cords.
A few gotchas I ran into along the way:
1) The Amazon bundle’s mount bends under the load. So, that took care of the skew I needed without needing to drill extra holes. Expect a 5-to-10-ish degree bend.
2) I ran into an issue with installing the dependencies using the github tutorial while installing goestools. It was unable to find libusb-1.0. Simply ran an extra “sudo apt install libusb-1.0” and it worked.
3) I spent something like 6 hours frustrated that I couldn’t get a vit(avg) below 2000. Turns out that a wifi-connected PC I had on the other side of the wall was causing interference. I happened to shut it down and noticed my vit(avg) dropped to 400. Repeatedly powered it on and off to verify it was the cause. Ultimately left it off during this whole process. I Put a metal porch table between the dish and my laptop which brought vit(avg) down to 300 with 20-30 dropped packets. I guess it’s common sense, but avoid any nearby signal interference if you can. I ended up using a 50ft ethernet cable while checking my laptop for vit(avg) but ultimately let the raspberry continue communicating to the network via WIFI after everything was set up and working.
4) Neighborhood signal interference in a city is no joke. I taped a piece of folded aluminum foil to the outside of the secondary reflector (oriented inward with wings facing into the dish) and it brought my vit(avg) down by 150 and my packet loss from 20-30 to 0-1. Power cables? Airplanes? Cell signal? Neighborhood Wifi cobweb? No idea which — but it helped immensely.
Still not perfect since I get packet loss between 1 and 2 every 25 iterations or so. Wind up here will wiggle the whole setup enough to bump a stable vit(avg) of 150 up to ~600 for a few seconds. Still, I got about 1GB of data in the first day. Remember to keep the electronics out of the sun. Trial and error is the key!
Glad to see you had success, the tutorial here is a bit dated and there is an updated version at https://usradioguy.com/goes-satellite-imagery-reception/ which is current with new operating systems and latest goestools build. LIGADOS, and LTE can and has messed with many a system, and there are some articles on the usradguy.com site about those as well. Also, check your packet loss at the times when the satellite is between your dish and the sun, that can cause issues as well.
I have a complaint with the Amazon bundle too. The grid in the bundle is very brittle and it arrived with the thinner top and bottom tabs broken so it was very flimsy when constructed. I ended up buying a cheaper wifi grid which is a lot thicker. At first it was working very poorly, but I discovered that the bundle uses a different curve and hence different focal distance to normal 2.4G wifi grids, so I can’t use the bundles improved feed with the standard wifi grid. Changed to the standard 2.4G feed and grid works just fine anyway with the SAWBIRD LNA. My advice, buy a regular wifi grid and the LNA separately – James
Do you need the bias tee
Hello All. I’m going through the data packets saved from the other day. I’m encountering an error I can’t seem to get past. I converted the raw files into lrit files first. I am trying to process the lrit files I saved but get this error…
pi@GOES16:~ $ goesproc -c fd-fc.conf -m lrit lrit/*.lrit –out output
-bash: /usr/bin/goesproc: Argument list too long
pi@GOES16:~ $ cat fd*
[[handler]]
type = “image”
product = “goes15”
region = “fd”
channels = [ “VS” ]
crop = [ -2373, 2371, -1357, 1347 ]
filename = “GOES15_%r_%c_%t”
pi@GOES16:~ $ goesproc -c fd-fc.conf -m packet lrit/*.lrit –out output
-bash: /usr/bin/goesproc: Argument list too long
pi@GOES16:~ $ goesproc -c fd-fc.conf -m lrit lrit/*.lrit –out output
-bash: /usr/bin/goesproc: Argument list too long
pi@GOES16:~ $ /usr/bin/goesproc -c fd-fc.conf -m lrit lrit/*.lrit –out output
-bash: /usr/bin/goesproc: Argument list too long
pi@GOES16:~ $
I’m stumped. Do you see anything I’m doing wrong?
In advance, thank you for your input.
Alan
I resigned to the thought that it wasn’t going to work on a pi3+. Tonight, I ordered a pi4 4Gb ram & parts & pieces. I guess Go Big or Go Home. Should arrive this Saturday.
I have copied and pasted all commands but I receive this:
pi@raspberrypi:~ $ goesrecv -v -i 1 -c ~/goesrecv.conf
Illegal instruction
—–
[demodulator]
mode = “hrit”
source = “rtlsdr”
[rtlsdr]
frequency = 1694100000
sample_rate = 2400000
gain = 5
bias_tee = false
[costas]
max_deviation = 200e3
[decoder.packet_publisher]
bind = “tcp://0.0.0.0:5004”
send_buffer = 1048576
[monitor]
statsd_address = “udp4://localhost:8125”
Any ideas? This is on a pi3.
7th install, 4th computer. None of the current goestools installation tutorials are good for raspberry pi, ubuntu or debian at this time. All versions error out.
— Performing Test NN_HAVE_GCC_ATOMIC_BUILTINS – Success
— Found PkgConfig: /usr/bin/pkg-config (found version “0.29.1”)
— Checking for module ‘libairspy’
— No package ‘libairspy’ found
CMake Warning at src/goesrecv/CMakeLists.txt:14 (message):
Unable to find libairspy
— Checking for module ‘librtlsdr’
— Found librtlsdr, version 0.6.0-27-ged03
— Checking for module ‘opencv’
— No package ‘opencv’ found
CMake Error at /usr/share/cmake-3.16/Modules/FindPkgConfig.cmake:463 (message):
A required package was not found
Call Stack (most recent call first):
/usr/share/cmake-3.16/Modules/FindPkgConfig.cmake:643 (_pkg_check_modules_internal)
src/goesproc/CMakeLists.txt:23 (pkg_check_modules)
— Configuring incomplete, errors occurred!
See also “/home/alan/librtlsdr/build/goestools/build/goestools/build/goestools/build/goestools/build/goestools/build/CMakeFiles/CMakeOutput.log”.
See also “/home/alan/librtlsdr/build/goestools/build/goestools/build/goestools/build/goestools/build/goestools/build/CMakeFiles/CMakeError.log”.
alan@El:~/librtlsdr/build/goestools/build/goestools/build/goestools/build/goestools/build/goestools/build$ make
make: *** No targets specified and no makefile found. Stop.
alan@El:~/librtlsdr/build/goestools/build/goestools/build/goestools/build/goestools/build/goestools/build$ sudo make install
make: *** No rule to make target ‘install’. Stop.
————–
This is just the last try installing. Nothing seems to work for these OS’s.
I was really looking forward to decoding these images. I guess I’m stuck with internet websites only. SUCKS!!!
Are you installing on a headless pi via SSH?
Yes, at the moment, I’m trying again to get it working on something with more power. on ubuntu with goestools.
tried a new install of ubuntu. found this after yet another copy/paste session that also errored out…
— Detecting C compiler ABI info – done
— Detecting C compile features
— Detecting C compile features – done
CMake Warning at CMakeLists.txt:36 (find_package):
By not providing “FindSanitizers.cmake” in CMAKE_MODULE_PATH this project
has asked CMake to find a package configuration file provided by
“Sanitizers”, but CMake did not find one.
Could not find a package configuration file provided by “Sanitizers” with
any of the following names:
SanitizersConfig.cmake
sanitizers-config.cmake
Add the installation prefix of “Sanitizers” to CMAKE_PREFIX_PATH or set
“Sanitizers_DIR” to a directory containing one of the above files. If
“Sanitizers” provides a separate development package or SDK, be sure it has
been installed.
— Defaulting build type to ‘RelWithDebInfo’
CMake Error at CMakeLists.txt:59 (add_subdirectory):
The source directory
/home/alan/librtlsdr/build/goestools/build/goestools/build/goestools/build/librtlsdr/build/goestools/build/librtlsdr/build/goestools/build/goestools/build/goestools/build/goestools/vendor/libcorrect
does not contain a CMakeLists.txt file.
CMake Error at CMakeLists.txt:60 (add_subdirectory):
The source directory
/home/alan/librtlsdr/build/goestools/build/goestools/build/goestools/build/librtlsdr/build/goestools/build/librtlsdr/build/goestools/build/goestools/build/goestools/build/goestools/vendor/libaec
does not contain a CMakeLists.txt file.
CMake Error at CMakeLists.txt:68 (add_subdirectory):
The source directory
/home/alan/librtlsdr/build/goestools/build/goestools/build/goestools/build/librtlsdr/build/goestools/build/librtlsdr/build/goestools/build/goestools/build/goestools/build/goestools/vendor/nanomsg
does not contain a CMakeLists.txt file.
CMake Error at src/lrit/CMakeLists.txt:5 (add_sanitizers):
Unknown CMake command “add_sanitizers”.
— Configuring incomplete, errors occurred!
See also “/home/alan/librtlsdr/build/goestools/build/goestools/build/goestools/build/librtlsdr/build/goestools/build/librtlsdr/build/goestools/build/goestools/build/goestools/build/goestools/build/CMakeFiles/CMakeOutput.log”.
alan@El:~/librtlsdr/build/goestools/build/goestools/build/goestools/build/librtlsdr/build/goestools/build/librtlsdr/build/goestools/build/goestools/build/goestools/build/goestools/build$ ls ./src/goesdec ./src/goesproc
ls: cannot access ‘./src/goesdec’: No such file or directory
alan@El:~/librtlsdr/build/goestools/build/goestools/build/goestools/build/librtlsdr/build/goestools/build/lialan@El:~/librtlsdr/build/goestools/build/goestools/build/goestools/build/librtlsdr/build/goestools/build/librtlsdr/build/goestools/build/goestools/build/goestools/build/goestools/build$ goeslrit –images
goeslrit: command not found
alan@El:~/librtlsdr/build/goestools/build/goestools/build/goestools/build/librtlsdr/build/goestools/build/librtlsdr/build/goestools/build/goestools/build/goestools/build/goestools/build$ /usr/bin/sudo -u pi /usr/bin/screen -dmS goesrecv /usr/local/bin/goesrecv -v -i 1 -c /home/pi/goesrecv.conf
sudo: unknown user: pi
sudo: unable to initialize policy plugin
———————————-
Even though I have good signal in sdr#, this will not install on any system/OS I try.
Then you will have to make changes, as Goestools was designed for minimal headless operation. And the latest version of Ubuntu comes with Proj 5.20 which is apparently not compatible. However, there appears to be a workaround posted here: https://github.com/pietern/goestools/issues/39 and here is a post with similar problem https://www.reddit.com/r/RTLSDR/comments/9xwerx/goestools_build/
as a side note, I took a new sd card, set for a headless PI (4 in my case) and went through the steps on my installation guide one by one via SSH, and it installed correctly. Good Luck!
By the way, I located a script that someone wrote for this task. I copied to my flash card. It should come in handy.
Thank you for the input. I hope to be making pictures this saturday. There’s light at the end of the tunnel.
I may put to paper on MY journey setting up a camera in space.
can you share the script for others?
Sorry for the delay. My computer decided to die on me while I was attempting to get goestools running.
I mentioned a script that I use to automate most of the installation of goestools. I hope that it may help someone so they won’t burn days setting this up as I have. It can be found here:
https://gist.github.com/hdoverobinson/a539d4e0a3afea480c425e37904365b9
KE6KSJ
Been trying to get goestools to work for a couple weeks now with no luck at all. First I tried a rpi3+ but it didn’t have enough power to run goestools. I ordered a rpi4/4Gb with a starter kit of cables & such. I loaded up raspian, goestools and associated config files.
Now, when I run goesrecv I see this:
goesrecv -v -i 1 -c ~/goesrecv.conf
2020-11-30T17:10:19Z [monitor] gain: 0.00, freq: 0.0, omega: 0.000, vit(avg): 0, rs(sum): 0, packets: 0, drops: 0
2020-11-30T17:10:20Z [monitor] gain: 0.00, freq: 0.0, omega: 0.000, vit(avg): 0, rs(sum): 0, packets: 0, drops: 0
2020-11-30T17:10:21Z [monitor] gain: 0.00, freq: 0.0, omega: 0.000, vit(avg): 0, rs(sum): 0, packets: 0, drops: 0
2020-11-30T17:10:22Z [monitor] gain: 0.00, freq: 0.0, omega: 0.000, vit(avg): 0, rs(sum): 0, packets: 0, drops: 0
2020-11-30T17:10:23Z [monitor] gain: 0.00, freq: 0.0, omega: 0.000, vit(avg): 0, rs(sum): 0, packets: 0, drops: 0
2020-11-30T17:10:24Z [monitor] gain: 0.00, freq: 0.0, omega: 0.000, vit(avg): 0, rs(sum): 0, packets: 0, drops: 0
2020-11-30T17:10:25Z [monitor] gain: 0.00, freq: 0.0, omega: 0.000, vit(avg): 0, rs(sum): 0, packets: 0, drops: 0
This is my goesrecv.conf:[demodulator]
mode = “hrit”
source = “rtlsdr”
[rtlsdr]
frequency = 1694100000
sample_rate = 2200000
gain = 30
bias_tee = false
[costas]
max_deviation = 200e3
[decoder.packet_publisher]
bind = “tcp://0.0.0.0:5004”
send_buffer = 1048576
[monitor]
statsd_address = “udp4://localhost:8125”
[clock_recovery.sample_publisher]
bind = “tcp://0.0.0.0:5002”
send_buffer = 2097152
[demodulator.stats_publisher]
bind = “tcp://0.0.0.0:6001”
[decoder.stats_publisher]
bind = “tcp://0.0.0.0:6002”
Does anyone have any pointers?
All I did was copy & paste.
user@El:~/librtlsdr/build/goestools/build$ cmake -DCMAKE_INSTALL_PREFIX:PATH=/usr ..
— Inline keyword found – inline
— Restrict keyword found – restrict
— Detected nanomsg ABI v5.1.0
— OS System is Linux
— OS Version is 5.4.0-54-lowlatency
— Checking for module ‘libairspy’
— No package ‘libairspy’ found
CMake Warning at src/goesrecv/CMakeLists.txt:14 (message):
Unable to find libairspy
— Checking for module ‘opencv’
— No package ‘opencv’ found
CMake Error at /usr/share/cmake-3.16/Modules/FindPkgConfig.cmake:463 (message):
A required package was not found
Call Stack (most recent call first):
/usr/share/cmake-3.16/Modules/FindPkgConfig.cmake:643 (_pkg_check_modules_internal)
src/goesproc/CMakeLists.txt:23 (pkg_check_modules)
— Configuring incomplete, errors occurred!
See also “/home/user/librtlsdr/build/goestools/build/CMakeFiles/CMakeOutput.log”.
See also “/home/user/librtlsdr/build/goestools/build/CMakeFiles/CMakeError.log”.
user@El:~/librtlsdr/build/goestools/build$ sudo make install
make: *** No rule to make target ‘install’. Stop.
For ref and internet archiving, my friend FireTime showed me how to do this via PowerShell
((((Invoke-WebRequest -Uri ‘https://www.star.nesdis.noaa.gov/GOES/fulldisk.php?sat=G16’).Links | Where-Object {$_.href -like “https://cdn.star.nesdis.noaa.gov/GOES16/ABI/FD/GEOCOLOR/*_GOES16-ABI-FD-GEOCOLOR-1808×1808.jpg”}).href)[0])
Save that in a .ps file and make a scheduled task to run:
powershell -File Script.ps1 -WindowStyle Hidden
to get it to update silently
This assumes interned connectivity…
this is a nice project to be on social distancing. it is like the software programmer from usa satcom distance him/herself from everyone eh! is the website taken or the owner expired!
It’s up and running at https://usa-satcom.com/
i can gather and put all the hardware together, but the software is not easily available nor the email is not being answered.
you can build the machine, but it will work without software!
Use the free software “goesrecv” and “goesproc” on Github. One receives, and the other processes the data to foldered images. Both can run on a rpi, or goesrecv on a rpi and goesproc on another Linux machine. Very easy to setup and full instructions are included.
Is there any way of decoding GOES 16 images on Windows10, without having to pay $125.oo+ ?
Hi, and what’s about the sun photos that goes 16 takes? Is it possible to receive?
That’s from GOES 16 SUVI instrument, Not the ABI that produces the HRIT and EMWIN data and Imagery. To get data from all of the instruments on GOES-R series you will need a different dish to receive GRB data and a whole different kind of decoding system.
Is there a command or way to have syncthing move the files over to my main computer, rather than keeping them both on the PI and on my Computer? So in other words, move the file to my main computer, then delete that file off the PI.
Great article! I understand getting the images, but what needs to be done to get the EMWIN text products?
They will come in without any changes needed. They will become their own folder.
Rich you need to enable EMWIN in the goesproc-goesr.conf file or a seperate goesproc.conf file by adding this
Note, You will get A LOT of txt files!
# The HRIT stream on the GOES-R series includes EMWIN data.
# This handler writes EMWIN files and decompresses them if applicable
# (a subset of EMWIN files is compressed as ZIP file).
[[handler]]
type = “emwin”
directory = “./emwin/{time:%Y-%m-%d}”
Hi,
I am having an hard time getting startgoesproc.service to run on boot. I know that startgoesproc.sh works when i test it manually. Do you think that this could be because of the oneshot command? Thank you.
THANK YOU. I WAS PART OF THE 80-90S GOES/ POLAR SAT. MOVEMENT VIA NOAA. FOR AWHILE I RAN JAESUG. THANKS AGAIN FOR ALL YOUR EFFORTS WITH THIS TUTORIAL.
is there any sat’s for africa
Same for Europe, take a look at EUMETCAST. It’s a different set up though, you need DVB-S2 receiver, satellite dish with LNB, and you need to purchase a hardware licence dongle and licensed software. Seems that liecencing costs 100 euros. http://y2u.be/UvA-iRr2wOo
Awesome guide with extreme attention to detail. I gave this project a shot a week ago and even though my vit(avg) was ~ 600, I still managed to snag all the full disk images before the sun came up!
What about Europe? Is there any geosynchronous satellite one could currently receive and decode?
As far as i’ve seen, all the geosynchronous sats available to Europe are encrypted, so only available to organizations who pay.
But take a look at EUMETCAST on the Ku band. That needs a DVB-S2 receiver and a satellite dish with LNB. Plus licensed keys and software that seems to cost 100 euros together.
Nice HowTo !
Mucky that now there are some opensource software to decode Xrit.
USA-Satcom (Joe) No comment LoL … if they sell software like they reply to people … better to win lottery.
Joe’s Twitter is full of favorites of right wing conspiracy theories and Q BS. So if you follow USA SatCom expect to be getting a bunch of that in your timeline.
Making software do not give you the right to be rude & thoug.
He can be a fan of Maga Trump or any Alien conspiracy … i do not care , it is just showing the kind of guy …. that think USA is center of universe….
You say not to be rude then go on to throw general insults yourself. Wow some troll detector. The bias is so overwhelming in the microcosm bubble you guys live in those that think you are objective are still extremely slanted. It’s sad that you all can not allow your views of social political to stain everything else. Seriously we are talking social science and you have to pollute it with thenviews that have nothing to do with it. Interesting that all the Euro sats are pay only decode yet you pointbto USA the face of censorship capitalism. As far as USA as center of the universe be etreme much? Now if you want to talk about economic, military, new tech invention etc it’s sort of hard to argue with facts. But the world over history waxes and wanes. Rome was for centuries but it too eventually fell. But to deny facts is obtuse and ignorant. So how about we all including myself pull our collective head out of our backside and get back on point and focus on the topic and our hobby.