Outernet Dreamcatcher Setup with ADS-B dump1090 and PiAware Tutorial
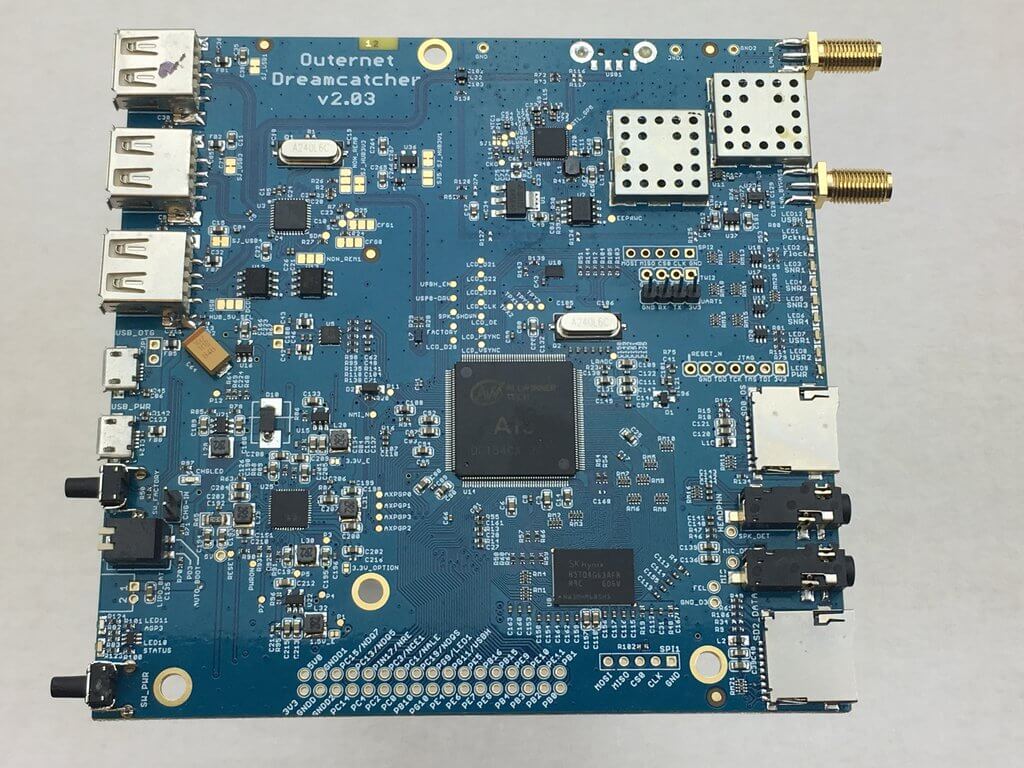
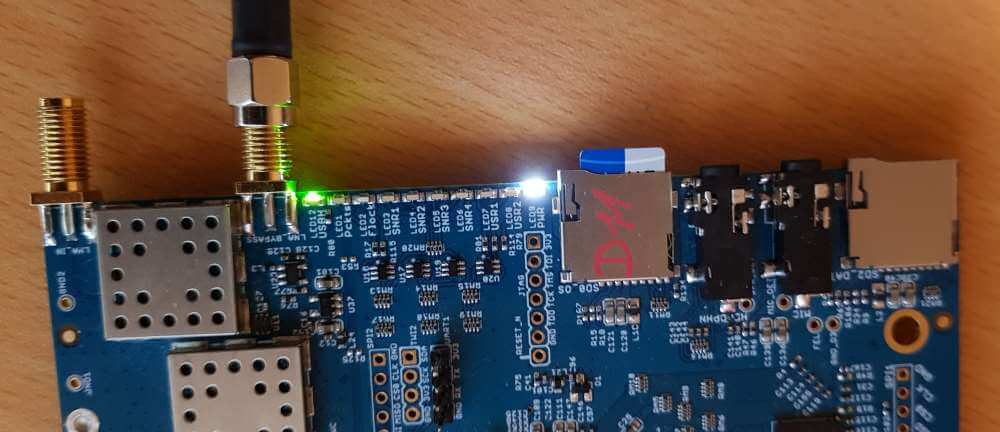
The Outernet Dreamcatcher is a single board PC with a built in RTL-SDR. It has a TCXO and two SMA ports, one being amplified and filtered for L-band applications and the other being a regular port for all other applications.
With built in computing hardware the Dreamcatcher can be used as a standalone unit for various applications. As the Dreamcatcher is now on sale we've decided to create a brief tutorial that shows how to set one up as a cheap ADS-B aircraft radar receiver, and also how to set it up as a PiAware feeder. PiAware is software that allows you to feed FlightAware.com which is an ADS-B aggregatpr.
Any simple SMA antenna can be used, like our Dipole kit, an old RTL-SDR whip antenna, or even a short piece of wire.
We also have a previous review of the Dreamcatcher available here. In the past the main problem with the $59 USD Dreamcatcher was that you could get a more powerful Raspberry Pi 3 and RTL-SDR dongle for a similar price. But now at the sale price of $39 USD the Dreamcatcher is definitely a great deal.
Note that we'd recommend NOT purchasing the Dreamcatcher specifically for the Outernet data signal as we're unsure exactly how long that signal will continue to be broadcasting for.
What follows below is a tutorial that shows how to set up a Dreamcatcher. The tutorial installs dump1090 at the same time, but afterwards could be used for a number of other applications.
Dreamcatcher Setup (via Windows) with dump1090
Setting up the Dreamcatcher requires working with the terminal, but this is fairly simple. You'll need an 8GB or larger micro SD card.
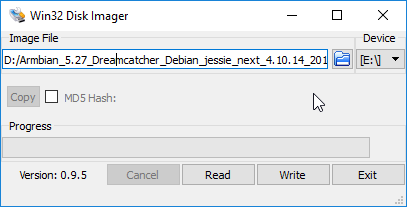
- First download the latest Dreamcatcher Armbian Image. The image comes as a .gz file, so you'll need to use an extraction program like 7zip to extract the .img file if you are on Windows.
- Plug the SD card into your PC. If on Windows, using Win32 Disk Imager burn the .img file to the SD card. Make sure to select the drive that your SD card is assigned to (in this case E:\). Press 'Write' to write the image to the SD card.
- Insert the SD Card into the middle SD card slot on the Dreamcatcher (labelled SD0)
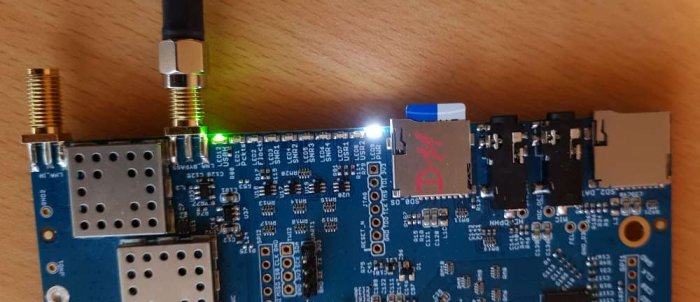
- Using a microUSB cable, connect the Dreamcatcher to your PC using the USB_OTG port. (It's the center microUSB port on the Dreamcatcher). This will power the dreamcatcher and provide a way to communicate to it. A few second after plugging it in you should hear the Windows USB connection sound.
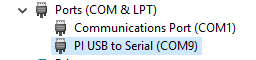
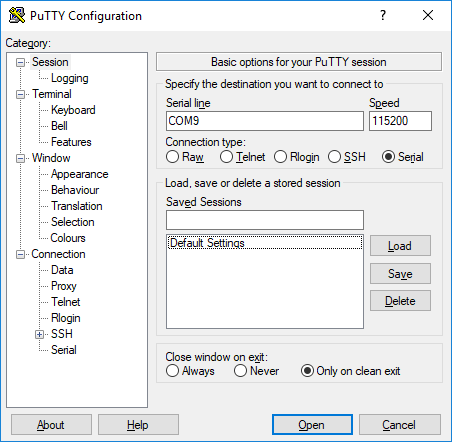
- Open up Device Manager (hit the start menu and type Device Manager). Under 'Serial' check what port number your Dreamcatcher is using. It will be under the name 'PI USB to Serial'. For example in the image below the COM port is COM9.
- Open PuTTY and select Serial. Edit the COM port to the COM port number shown in device manager and set the baud rate to 115200. Press Open. For example in the image below we had COM9.
- Once you connect you'll be asked to login in the terminal window. The default username/password is 'root/1234'. After entering the login you'll be asked to reenter the original password and then update the password and create a new user account. Simply follow the prompts here.

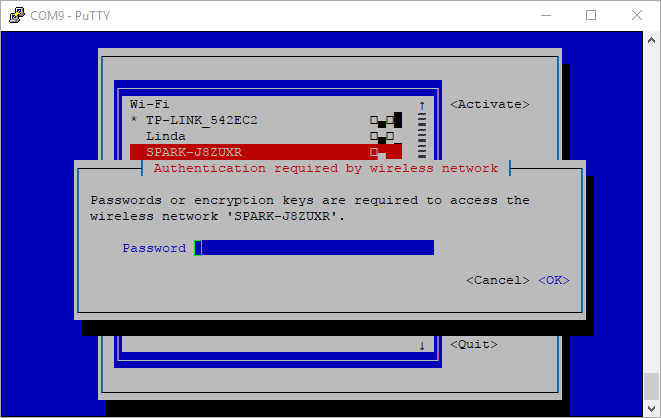
- First make sure that the included EDUP WiFi dongle is plugged into the Dreamcatcher. You can now connect to your WiFi by entering 'nmtui' into the terminal. This will bring up a text GUI. Using the keyboard select 'Activate a connection'. Then find your WiFi access point name, navigate to us, press enter and then enter the password. After connecting go across to Quit.
- Install the RTL-SDR drivers and dump1090 by using the following commands.
sudo apt update
sudo apt install rtl-sdr librtlsdr-dev pkg-config build-essential

mkdir adsb
cd adsb
git clone https://github.com/MalcolmRobb/dump1090
cd dump1090
make
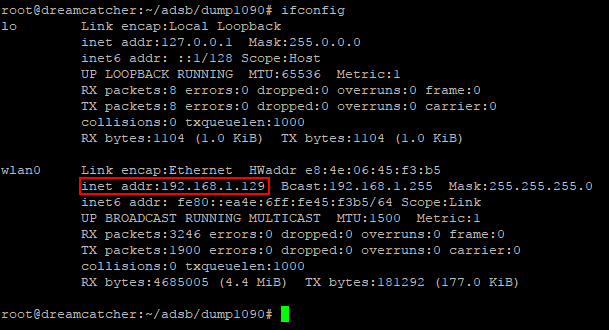
- In the terminal run 'ifconfig' and look for the wlan0 IP address. Write this IP address down.
- Now still in the adsb/dump1090 directory you can start dump1090 with the following commands.
./dump1090 --interactive --net - On another PC on your network you can use a web browser to connect to http://IP_ADDR:8080, where IP_ADDR should be replaced with your wlan0 IP address. This will show the dump1090 GUI and map.
- Connect an antenna to the LNA_BYPASS SMA port, which is the SMA port closest to the SD card. This port is enabled by default.
If you are interested in further documentation, then radionerds.com have created a very good Wiki that documents all the Dreamcatcher features and commands. Outernet also have official text tutorials available at docs.outernet.is.
PiAware
FlightAware.com is a company that aggregates ADS-B data from various sources. A good majority of data comes from volunteers who run RTL-SDR + Raspberry Pi based feeding systems. If you regularly contribute data to FlightAware you gain access to a free Enteprise account which normally costs $89.95. With an Enterprise account you can get various upgrades to the site such as access to historical data of up to 8 months, more flights per page, fleet tracking, no ads and more.
FlightAwares Raspberry Pi software is called PiAware. We tested PiAware on the Dreamcatcher and found that it runs well. The install procedure is exactly the same as what is written on their website for the Raspberry Pi. Simply follow their steps and you should have a PiAware system running in no time.
Be aware that once installed PiAware will start automatically whenever the Dreamcatcher boots, so the Dreamcatcher will become a dedicated PiAware feeder.
ADS-B Performance
Compared to a V3 the Dreamcatcher's performance/sensitivity at 1090 MHz is identical if not slightly better. The Dreamcatcher has an RF front end optimized for L-band frequencies so this makes sense. Below is a screenshot of 10 minute ADS-B test counting the number of messages received between the two dongles connected to the same antenna via a splitter.


Anybody knows if there is a better software solution to repurpose a Dreamcatcher v2.03 as a ADSB receiver ? Dump 1090 and/or Piaware seems not to work anymore following directions in this article. Any help will be appreciated !
im just running it with an old version of dump1090, works fine.. also DO NOT attempt to upgrade the os or kernel on this thing, they misrepresented its upline support and you’ll have to reimage the OS SD card
“Note that we’d recommend NOT purchasing the Dreamcatcher specifically for the Outernet data signal as we’re unsure exactly how long that signal will continue to be broadcasting for.”
Why? Link(s) and/or explanation please?
Check out their forums and the warnings on the product page. Also from the forums they said that the asia-pacific beam is currently offline and not due to be renewed for now. Though he did say that it may be resurrected in about 3 months.
If I am you, I wont not buy. Not worth it and various options and price range for SDR now days. Just save little more and buy good one
I run a fleet of Pi ADSB receivers over Southern California, any comment on how this thing actually performs?
Its price point is attractive since you don’t have to buy the USB dongle, but if it is rather deaf, then its a bad buy.
Will put up a quick test screenshot soon. Performance/sensitivity is nearly identical if not slightly better compared to a V3. That makes sense as it has an L-band optimized RF input. So it should be good at 1090 MHz at least. Still won’t be as good as a FlightAware dongle by itself for ADS-B, but since it has a bias tee you can add an external LNA to make it even better than the FA dongle.