Back in the middle of last year we posted about Othernet's Dreamcatcher hardware and the LoRa chat application. The Dreamcatcher is Othernet's receiver and computing platform that is designed for receiving their satellite data broadcast. It is currently available for US$79.
Although the Othernet datacast is one way receive only, the Dreamcatcher board uses a LoRa radio chipset that has TX capabilities that can be leveraged for experimental purposes. One experimental piece of software that they developed is a chat application that works with two Dreamcatcher boards. It allows you to initiate a text based chat between two boards using the on board LoRa radio chips.
The TechMinds YouTube channel has recently released a video demonstrating the chat application in action, and the video shows how to set up, install and use it too. We note that since our post last year, the Dreamcatcher board has gone through a revision and no longer includes an LCD screen. The company name has also changed from "Outernet" to "Othernet".
What can you do with two Othernet Dreamcatcher Boards?
The Dreamcatcher v3.0 is Outernet's latest revision of their satellite receiver hardware. The freely available Outernet ku-band satellite service aims to keep us up to date with the latest news, provide books, videos, a daily selection of Wikipedia articles and satellite radio. Compared to the internet, Outernet is download only, and is received via their Dreamcatcher 3 hardware with an an antenna pointed to a satellite. At the moment their Ku-band service is in beta testing and so is only available in the continental United States, but they hope to eventually expand to cover more areas of the world.
Starting from today Outernet are holding a 33% off sale. This means that their Dreamcatcher 3 is only US$99 each. To get the discount use the coupon "33%OFFJULY4SALE" on their store. The sale lasts until Midnight Central Time on Wednesday 4 July. The code is valid site wide, so applies to the moRFeus product as well.
Previous Dreamcatcher implementations utilized an RTL-SDR to receive their L-Band network, however that network has now been discontinued. Dreamcatcher 3 utilizes a hardware based LoRa radio to receive their new ku-band satellite LoRa data stream. However, Dreamcatcher 3 has alternative applications, and doesn't need to be used only for the Outernet data service. Dreamcatcher 3.0 is a full LoRa radio that can transmit and receive, and in this post we'll focus on testing that out.
LoRa is a popular wireless protocol that has been designed for Internet of Things (IoT) devices. It is robust against interference and can be used in low power devices.
Dreamcatcher 3 LoRa Chat
Outernet have provided a LoRa two way open source text chat application that runs on the Dreamcatcher 3. To use it you'll need two Dreamcatcher 3 boards. With the application you'll be able to chat with short text messages in real time between the boards. Amateur radio enthusiasts may be interested in the boards as an easy way to set up LoRa experiments.
We note that Outernet are not advertising the transmit features specifically as the board is not FCC approved as an intentional radiator, so it cannot legally be used as an ISM band LoRa device for transmitting and listening to LoRa IoT sensors. But as a ham you are able to transmit with it if you can ensure that the output is clean and legal and on the ham bands.
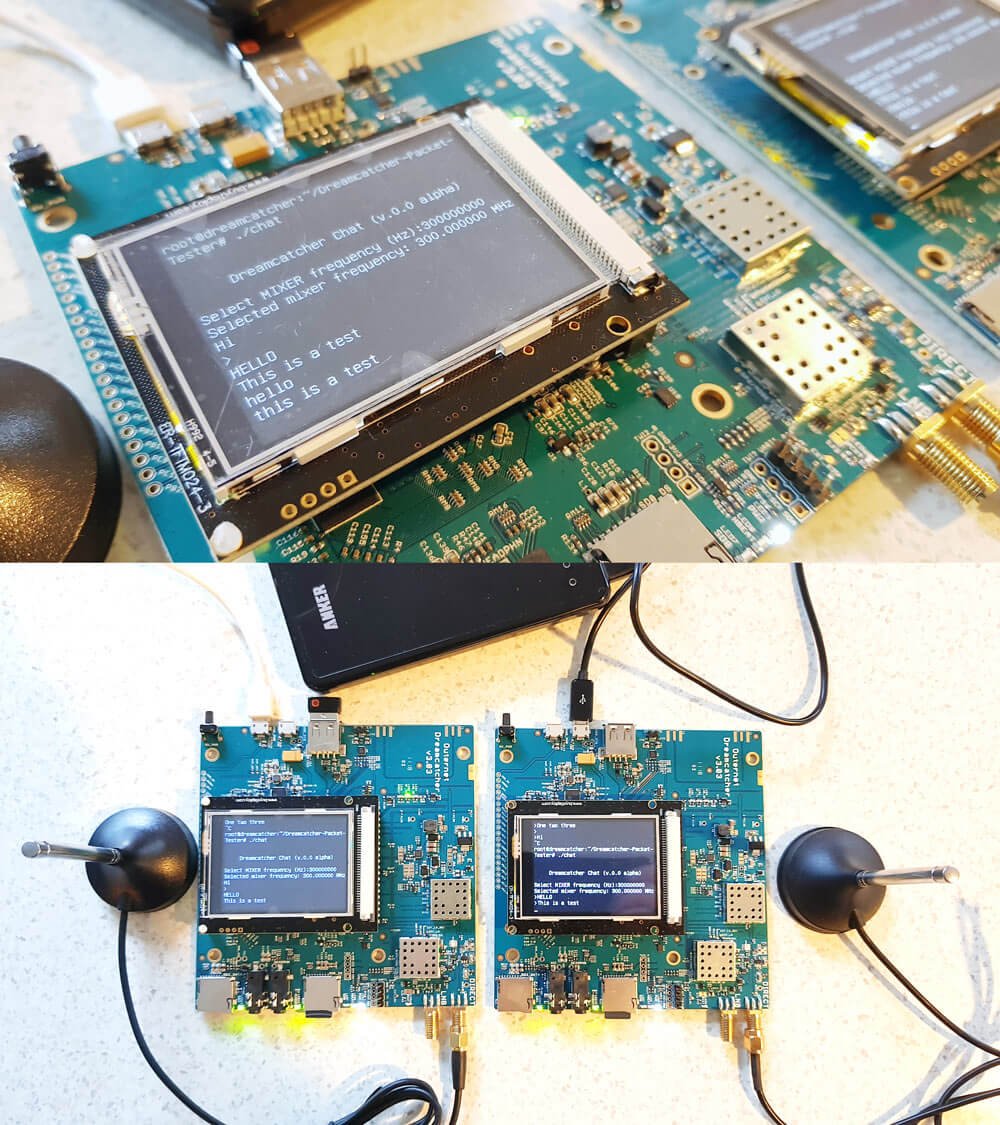
Dreamcatcher 3.0 Running the LoRa Chat App
A brief demo of the chat running below is shown. In the video we're using the default 'spreading factor' setting which results in robust communications, but results in a latency of about 2 seconds. Later we'll show how to change the spreading factor to reduce latency.
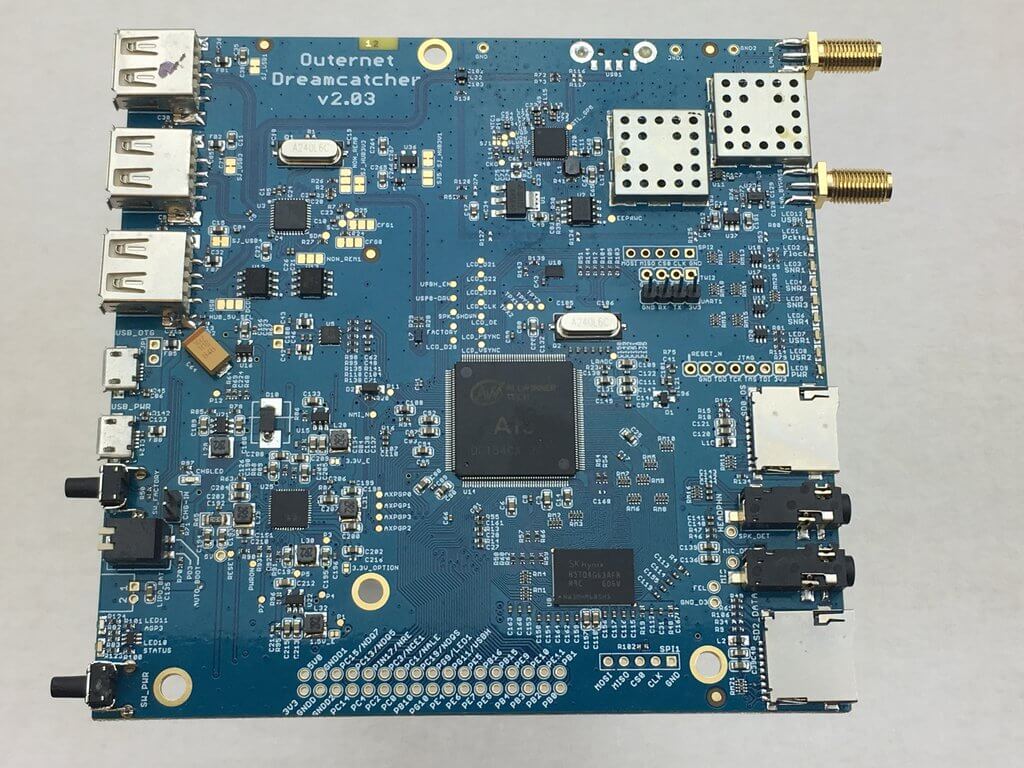
The Dreamcatcher v3.0
Outernet kindly provided us with two Dreamcatcher 3 boards to test the chat application with.
Like the previous versions, the Dreamcatcher is a full computing board with radio built into it. Except this time instead of an RTL-SDR, the radio is a hardware LoRa module. Another difference is that now there is a built in LCD screen.
On the board there are two SMA ports, one labelled "Direct" and the other labelled "LNB". The direct port is what we'll need to use for the chat application as this is the port that can transmit. There are also two SD Card slots, one for the OS and one for storage, a microphone and headphone jack, a USB-A slot with a supplied WiFi adapter, and two USB micro slots, one for USB OTG and one for power.
The package also comes with an LNB that is designed to be used with the Outernet satellite service. The LNB is receive only, so cannot be used with the chat application, so you'll need to use your own antenna if experimenting with the LoRa transmitter.
Chat Setup and Usage
First we burnt the latest version of Dreamcatcher Armbian OS to two SD cards and inserted one into each board. Since Dreamcatcher 3 has a built in LCD screen, you can login and access the terminal through the screen. But as there is only one USB port available, you'll need a USB hub to be able to plug in a mouse and keyboard, and the included USB WiFi adapter. Alternatively, if you connect the USB OTG port to a PC, you can connect to it via a USB serial connection. Instructions for connecting via serial, and for setting up a WiFi connection are the same as in our previous Dreamcatcher 2.0 tutorial.
Upon running the program you'll be asked to enter a MIXER frequency. This frequency doesn't really seem to matter and we're not sure why we're asked for it. But you can enter any frequency such as 300000000 Hz (300 MHz).
Once you've opened the chat program on both Dreamcatchers you should be able to type in text on the console, and have it show up on the other Dreamcatcher after pressing enter. Remember to plug an antenna in to the DIRECT port of both Dreamcatchers, or run of attenuated coax between them. The provided LNB cannot be used for the chat application.
Playing with LoRa Settings
The actual RF output frequency is by default hard coded in at 2.4 GHz. If you want to change it you can edit the main.cpp file with a terminal based text editor like nano, and look for the #define RF_FREQUENCY entry. Then you will need to recompile by running 'make' again. However note that at the time of this post, according to Outernet the software only works properly at around 2.4 GHz. Apparently this is simply a software limitation and once this is fixed you should be able to transmit at any frequency between 85 MHz to 5400 MHz.
Also by default, the LoRa 'Spreading Factor' is set to the maximum of 12. This means that there is roughly a latency of about 1 second between sending a message, and receiving it on the other unit.
The spreading factor can also be adjusted in the code by editing the "modulationParams.Params.LoRa.SpreadingFactor" variable. This determines how spread out in time the packet it. Larger spreading factors result in more robust error free communications, whereas smaller factors result in lower latency. Below are some valid spreading factor entries for the code.
Note that if you reduce the spreading factor you'll also want to reduce the RX_TIMEOUT_VALUE and TX_TIMEOUT_VALUE #defines (you'll need to search for these lines in the code. Hint: In Nano CTRL+W is search.). For a spreading factor of 7 a timeout of 100 ms works well.
It is also possible to adjust the bandwidth from 200 kHz up to 1600 kHz using the following code on the "modulationParams.Params.LoRa.Bandwidth" variable.
You can also adjust the TX output power by adjusting the value specified by #define TX_OUTPUT_POWER. By default it is set to the maximum output power of 13 dBm. The lowest value available is -18 dBm.
Remember that after making a change in the main.cpp file, you'll have to recompile the chat program by running 'make'.
Below we visualized the different LoRa spreading factors with a HackRF. It's interesting to see how the spreading factor changes the packet transmit time.
Comparing LoRa Spreading Factors
Conclusion
Overall the Dreamcatcher 3 LoRa chat software works, but is still very much in early development. Regardless it is an interesting tool for experimenting with LoRa. The hardware is ready, and software now just needs to be developed to make use of the LoRa protocol. We also note that the Dreamcatcher is not a plug and play device, and that it's mostly suited to people who enjoy tinkering with new beta products.
We'd also just like to remind that in order to legally transmit you'll need a ham licence. The board is not FCC approved for regular ISM band LoRa use. While the output power of the Dreamcatcher isn't too strong at a maximum of 13 dBm, we still recommend that you make sure to reduce the output TX power, or run a direct attenuated coax connection when testing. There are also weak signal images present at some harmonics, so any ham using this with an amplifier would be of course expected to provide sufficient filtering.
The Outernet Dreamcatcher is a single board PC with a built in RTL-SDR. It has a TCXO and two SMA ports, one being amplified and filtered for L-band applications and the other being a regular port for all other applications.
With built in computing hardware the Dreamcatcher can be used as a standalone unit for various applications. As the Dreamcatcher is now on sale we've decided to create a brief tutorial that shows how to set one up as a cheap ADS-B aircraft radar receiver, and also how to set it up as a PiAware feeder. PiAware is software that allows you to feed FlightAware.com which is an ADS-B aggregatpr.
Any simple SMA antenna can be used, like our Dipole kit, an old RTL-SDR whip antenna, or even a short piece of wire.
We also have a previous review of the Dreamcatcher available here. In the past the main problem with the $59 USD Dreamcatcher was that you could get a more powerful Raspberry Pi 3 and RTL-SDR dongle for a similar price. But now at the sale price of $39 USD the Dreamcatcher is definitely a great deal.
Note that we'd recommend NOT purchasing the Dreamcatcher specifically for the Outernet data signal as we're unsure exactly how long that signal will continue to be broadcasting for.
The Outernet Dreamcatcher
What follows below is a tutorial that shows how to set up a Dreamcatcher. The tutorial installs dump1090 at the same time, but afterwards could be used for a number of other applications.
The Outernet Dreamcatcher has recently gone on sale and is now only $39 USD. Previously it was priced at $79 and $59 USD. The Dreamcatcher is an RTL-SDR and computing board all built onto the same PCB. It has two SMA inputs - one is an L-band filtered and amplified input and the other is a standard wideband port good for all frequencies covered by a standard R820T2 RTL-SDR. For $39 it appears that you get the board itself, and a WiFi dongle, but no antennas, cables or SD cards are supplied with the unit.
In you are interested in the Dreamcatcher then back in June we posted a comprehensive review of it as well as their ceramic L-band patch antenna. Since then we've found that the Dreamcatcher has become much more stable and is very useful for applications like setting up a dedicated ADS-B receiver/feeder. At this price the Dreamcatcher is even better value than using a Raspberry Pi 3 plus external RTL-SDR dongle which can end up costing over $60 USD.
According to Outernet stocks appear to be fairly limited so this price probably won't last for too long.
Note: We'd advise not purchasing this for use with the Outernet data signal as we're unsure if that signal is going to last for much longer. Purchase it as a general purpose radio/computer instead.
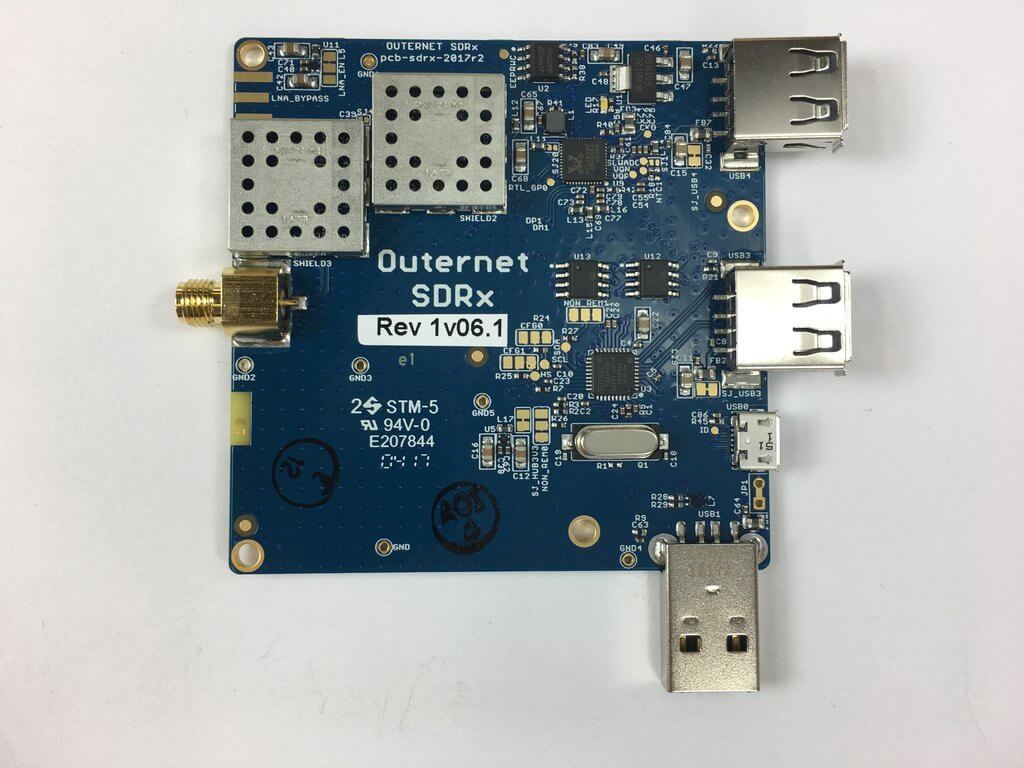
Recently the Outernet project transitioned from using RTL-SDR dongles and C.H.I.P single board computers to using their Dreamcatcher board, which is an RTL-SDR and computing board all in one. In between the transition they also produced a number of ‘SDRx’ dongles. These were custom RTL-SDR dongles with a built in L-band LNA and filter. As they no longer need the SDRx they have them on clearance at their store.
The clearance price is $15 USD which is an excellent deal. Remember though, that the SDRx is limited in frequency range – it is designed for receiving L-band satellites between 1525 – 1559 MHz and the filter will cut off all other frequencies.
The Outernet SDRx on Clearance
Just add a simple L-band tuned antenna to the port and you should be able to receive Inmarsat and a signal like STD-C, AERO or the Outernet signal. A suitable antenna might be a homebrew patch, helix, cooking pot antenna or even a small tuned V-dipole antenna can work for the stronger AERO signals.
We also see that the price of their L-band Outernet active ceramic patch antenna has been dropped down slightly to $25 USD. This antenna is bias tee powered and can be used with a V3 dongle or their Dreamcatcher hardware. The Dreamcatcher itself is also now reduced in price to $59 USD.
We have a review of the Dreamcatcher and active ceramic patch antenna available here.
Outernet Dreamcatcher and L-Band Active Ceramic Patch
We also now list Outernet products in our store. These are commission sales so we receive a little bit per purchase which supports the blog, and the items are shipped by Outernet within the USA.
If you were unaware, Outernet is a free L-band based satellite service that provides content such as news, weather data, APRS repeats and more. Currently you can get about 20MB of data a day. Outernet receivers are also all based around the RTL-SDR, allowing for very cheap receivers to be built
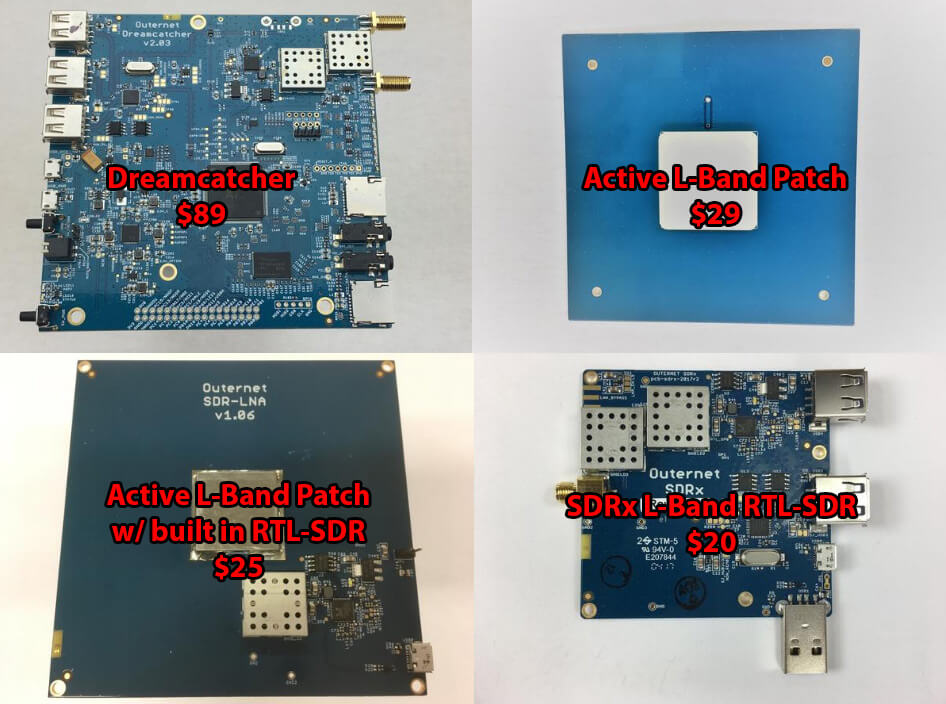
Back in June we tested Outernet’s new Dreamcatcher which is an ARM based computing board with RTL-SDR and L-band LNA built in. The $99 USD kit also included an external active L-band patch antenna. The Dreamcatcher full kit has now been reduced to $89 USD, and the active L-band patch antenna can also now be purchased by itself for $29 USD. The active patch antenna is also compatible with the bias tee on our V3 dongles and is a good low cost option for exploring most L-band satellite signals like Outernet, Inmarsat STD-C and AERO around 1542 MHz. The filter does unfortunately cut off the higher Iridium frequencies though.
They are also selling off their older L-band SDRx RTL-SDR boards at a reduced price of $20 USD. The SDRx is a RTL-SDR PCB with a built in L-band LNA and filter, but unlike the Dreamcatcher does not have built in computing hardware. They also have a limited $25 USD edition version of their active patch antenna which includes a built in RTL-SDR. This version is a bit more noisy compared to the standard active patch, but may be an interesting experimental antenna for some.