RTL-SDR Tutorial: Setting up and using the SpyServer Remote Streaming Server with an RTL-SDR
A number of people have asked how to use SDR#'s SpyServer with an RTL-SDR. In this tutorial we will show how to set up SpyServer on both Windows and Linux systems. We try to assume as little knowledge as possible, but we do assume that you have decent experience with computers. Also for the Linux/Raspberry Pi setup we need to assume that you have some basic experience with Linux and setting up Raspberry Pi's.
What is SpyServer?
SpyServer is a free RTL-SDR compatible SDR server that is designed to work with the popular SDR# software. It is actually designed for the Airspy range of products, but the author has also made it compatible with RTL-SDR dongles. Running a SpyServer allows you to connect to and use a remotely positioned RTL-SDR over a network connection (such as a local LAN/WiFi or the Internet). Once connected, using the dongle is the same as if the dongle was directly connected to the users PC.

Remote servers are useful as you may want to set up an antenna in a remote location (such as up on your roof or shack), and don't want to run a long lossy coax cable down to the PC. Instead you could run Ethernet cable, or avoid cables by using WiFi. All you'd need is power for a remote computing device like a Raspberry Pi 3. Perhaps you also have a great antenna location at a friends house, or other property and want to access that antenna remotely. Or maybe you want to use your radio while travelling.
SpyServer is similar to another tool that you may already be familiar with called rtl_tcp. However, SpyServer is regarded as superior because it is signficantly more efficient at network usage. Instead of sending the entire raw data like rtl_tcp does, SpyServer only sends the IQ data of the currently tuned in signal. Waterfall data is processed on the server and sent in compressed form. There is one disadvantage to SpyServer in that it requires slightly more powerful computing hardware like a Pi 2 or Pi 3, whereas rtl_tcp can run on the lowest end hardware.
Network usage when streaming with SpyServer will be about 120 KB/s when listening to WFM and about 38 KB/s when listening to narrow band modes for one client being connected. Multiple clients can connect to the SpyServer and share the same currently tuned bandwidth.
Server: Setting up SpyServer on Windows
Setting up a SpyServer server on Windows is extremely simple.
- Log on to the Windows PC that you want to be the remote server.
- Go to www.airspy.com/download and download the latest version zip file of SDR#. Extract all the files onto a folder on your PC.
- Run the install-rtlsdr.bat file to download the RTL-SDR drivers.
- In the SDR# folder find the file spyserver.config. Right click it and select 'Open With -> Notepad'.
- Edit the 'device_type' line to show 'device_type = RTL-SDR'.
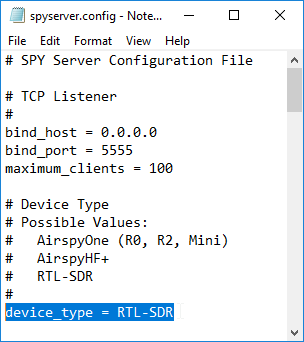
- Save and close the spyserver.config text file.
- Double click on spyserver.exe to start the server.
- Open the start menu and type in 'cmd' and then press enter to open a command prompt.
- In the new command prompt type in 'ipconfig'. This will display a list of network adapters on your PC, with their current IP addresses. Find the one actively being used (likely Ethernet or Wireless) and note down the IPv4 Address. This is your server PCs IP address.
Server: Setting up SpyServer on Linux
- Log into the Linux device that you are using for the server, and open a terminal window if needed.
- First install prerequisites such as the RTL-SDR drivers and librtlsdr.
sudo apt install rtl-sdr librtlsdr-dev
- Create a new folder for the spyserver and navigate into it.
mkdir spyserver
cd spyserver
- Download the latest SpyServer and extract it using the commands below. NOTE: That you will need to download the correct version for the platform that you are using (e.g. 32 or 64-bit, ARM or x86). Go to airspy.com/download, and find the links for the SpyServer download that matches your platform. Replace the link below with it. The link used in this example is for the 32-bit ARM version which is what Raspberry Pi's and most other single board PCsww like Odroids and Orange Pi's use.
wget -O spyserver.tgz http://airspy.com/?ddownload=4247
tar xvzf spyserver.tgz
- Use a text editor like nano to edit the spyserver.config file. Change the "device_type" to "device_type = RTL-SDR" (without quotes).
If you are unfamiliar with Nano, then note that you cannot use the mouse. You will need to use the arrow keys to move the cursor. Editing is done with the bakspace/del keys and keyboard keys as usual. To save and exit, Press "Ctrl + X", and then the "y" key.nano spyserver.config
- Find your device's IP address using the "ifconfig" command. Note NOT "ipconfig" from windows, notice the "f". Write this IP address down as it is the address you'll use to connect to the SpyServer.
- Now you can run SpyServer
./spyserver
Note that if you get the error './spyserver: /usr/lib/arm-linux-gnueabihf/libstdc++.so.6: version `GLIBCXX_3.4.21' not found (required by ./spyserver)', then you'll need to install the newer GCC-5 or GCC-6.
To do this use the following steps:
- Type 'sudo nano /etc/apt/sources.list' and change the word 'jessie' to 'stretch'. Save and close the file (Ctrl+X, Y)
- Type 'sudo apt-get update'
- Type 'sudo apt-get install gcc-5' or if that is not found 'sudo apt-get install gcc-6'
If you get error 'W: There is no public key available for the following key IDs:
EF0F382A1A7B6500' after running 'sudo apt-get update', then first install the following with 'sudo apt-get install debian-keyring debian-archive-keyring'
You'll be asked a few questions during the install and all the defaults are fine. Installation will take about 20 minutes. Once upgraded you should be able to run ./spyserver.
Tip: Setting up a headless Raspberry Pi
If you're setting up a Raspberry Pi as a server then you're probably not going to be connecting it to a monitor. This is called a headless setup. You'll also probably be using WiFi. This tip shows you how to enable SSH and enter the WiFi credentials on a Raspberry Pi without any monitor, keyboard or mouse. If you want you still can of course initially connect a monitor keyboard and mouse and set it up via the Raspbian GUI, or connect a network cable.
After writing the Raspbian image to the SD card, put it into a PC and open the boot drive partition in file explorer.
To enable SSH simply create an empty text file with the name 'SSH' in the root of the partition.
To allow a WiFi connection create a text file called 'wpa_supplicant.conf' in the root of the partition and fill it with the following text. NOTE: Make sure that it is not wpa_supplicant.conf.txt. You must set Windows to display the full file extension so you can change it to just wpa_supplicant.conf. This will set up a WiFi connection on boot and automatically connect it. (Only good for WPA2 secured systems)
network={
       ssid="YOUR SSID"
       psk="YOUR PASSWORD"
       key_mgmt=WPA-PSK
    }
Finally you'll need to look in your routers status page to find the IP address of the Raspberry Pi. Usually the routers access page can be accessed at http://192.168.1.1 or 192.168.1.254, but this address is entirely dependent on your router set up. Consult your router manual or ISP for these details if you do not know them.
Client PC: Connecting to the SpyServer
Once you've set up the server you can now connect to it from a client PC.
- Log on to the Windows PC that you want to browse the radio spectrum with (client PC). This PC should be on the same network as your server PC (or see below about port forwarding to use remotely over the internet).
- Download and extract the latest SDR# version on the client PC.
- Open SDR#.
- Under Source select 'Spy Server'.
- Enter the IP address of the server in the following format: 'sdr://IP_ADDR:5555' (without quotes).
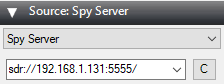
- Press the play button.
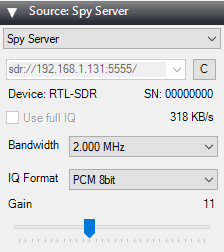
You should now be connected to the remote SpyServer and the spectrum should be active.
There are some additional options that you'll see in the Source box. Apart from the standard gain and bandwidth settings there is an IQ format drop down box and a 'use full IQ' checkbox.
Use Full IQ - This essentially reverts SpyServer back into rtl_tcp, sending the entire IQ data over the network. Note that you'll need to press the stop button first or this option will be greyed out.
IQ Format - This enables/disables IQ compression. With an RTL-SDR in most cases you should use PCM 8bit to keep the network data as low as possible. If you experience problems you can try other options.
The limitation with 8-bit mode is that you might loose dynamic range, but for most signals (and the RTL-SDR which is 8-bits anyway) it will be fine. Higher end SDRs like the HF+ may benefit from PCB 16-bit or higher modes in some cases.
Tweaking SpyServer
If you're having performance issues on slower hardware or networks like choppy audio then you might want to reduce the frame rate. You can do this in the spyserver.config text file by editing the 'fft_fps' variable. By default it is 15, try lower values to improve performance. Lower the frame rate results in a more pixelated waterfall in SDR#.
You may also want to play with increasing the 'buffer_size_ms' and 'buffer_count' variables if you experience choppiness especially over the internet.
After editing the file restart the server.
Using SpyServer with an Upconverter
This is simple, but you need to know your upconverters offset. For example the ham-it-up upconverter has an offset of 125 MHz (-125,000,000 Hz) and the SpyVerter upconverter has an offset of 120 MHz (-120,000,000 Hz). If you have another upconverter and are unsure of the offset then consult the manufacturer or it's documentation.
To set the offset in SpyServer edit the spyserver.config file with a text editor. Uncomment the 'converter_offset' variable by removing the '#' next to it (do not delete the '#' on the two lines above). You can then set the offset used by your upconverter after the equals sign.

Running SpyServer Automatically on Boot (Raspberry Pi)
You may wish to set up your server so that it automatically starts on boot. Doing so is simple with crontab.
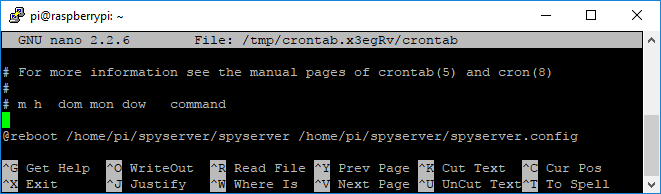
- Open crontab with nano
crontab -e
- Add the following line at the bottom.
@reboot /home/pi/spyserver/spyserver /home/pi/spyserver/spyserver.config
- Press Ctrl + X and then 'y' to save and quit.
Port Forwarding
If you want to connect to your SpyServer over the internet then you may need to activate port forwarding on your router. You need to tell your router what IP address or MAC address to forward data coming in from port 5555 which is the default SpyServer port. The data should be forwarded to the IP address or MAC address of the device running the SpyServer. You'll probably also want to ensure that the device running the SpyServer is set to a static IP from within your router.
Port forwarding is slightly out of the scope of this tutorial as the procedure is different for each network router. There are guides for most routers in the world at portforward.com.
You can find your public IP by browsing to whatismyip.com on a PC on your network, or by running 'curl ifconfig.me' at a Linux terminal.
Public SpyServer Servers
If you want to try out some publicly available remote SpyServers over the internet then please check out airspy.com/spy-servers. We've found that streaming over the internet even across the world is fairly smooth and problem free.


