Demonstrating Two Channel Coherent Spatial Filtering In a GNU Radio Simulation

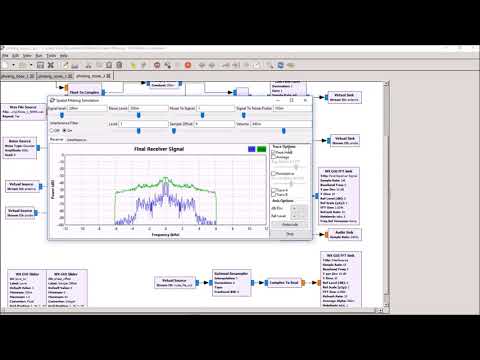
Over on YouTube VE6EY has uploaded a video that demonstrates spatial filtering (aka beamforming) working in a GNU Radio simulation. This is a technique that can be used with a 2-channel coherent SDR with to nullify local interference. One SDR is connected to an antenna for receiving the distant signal, and the second is connected to a noise probe that is designed to receive only the local noise source.

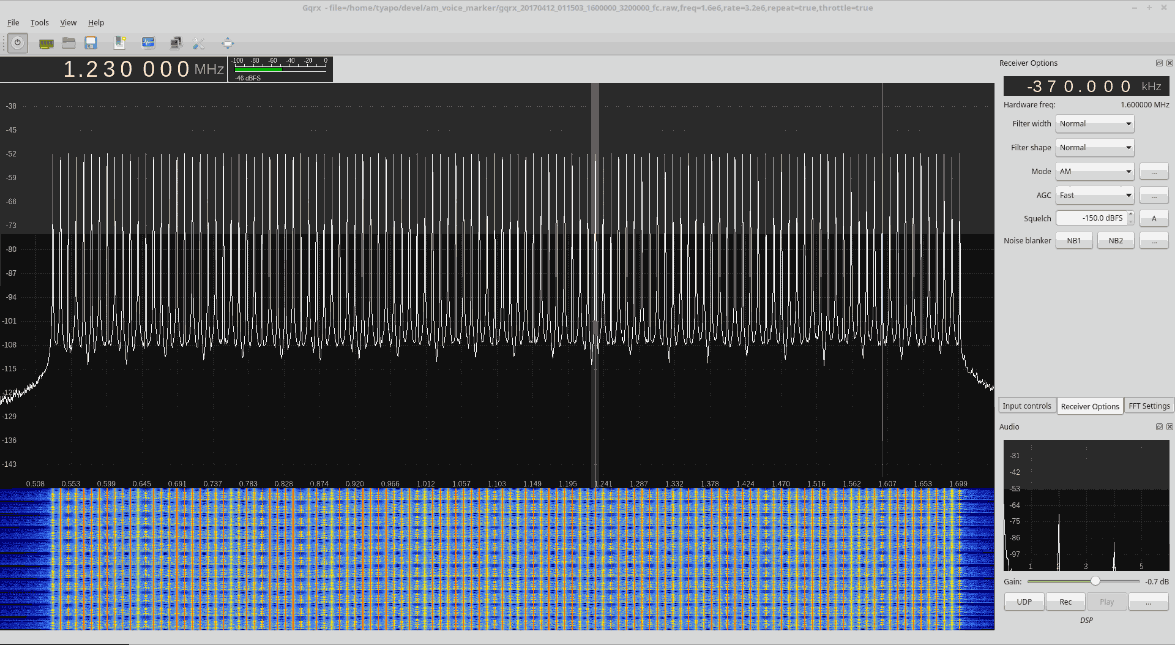
The demonstration is not performed with real SDRs, but with prerecorded signals, although it still shows the effectiveness of the technique. In the video VE6EY shows switch mode and powerline noise being nulled out from some AM music, and explains through a demo why phase coherence is required.

V36EY gives further information and a link to download the demo over on his blog post.

SDR Spatial Filtering Demo

A Review of the miniVNA Pro Vector Network Analyzer

Over on YouTube Kevin Loughin has reviewed the miniVNA Pro Vector Network Analyzer (VNA). A VNA is a tool that can be used to measure antenna or coax parameters such as SWR, impedance, loss as well as characterize filters. It is a very useful tool to have if you are building antennas, filters or RF circuits. The RTL-SDR with a noise source can somewhat be used as a network analyzer, but a fully functional VNA will be a lot more accurate and easier to use. The miniVNA costs US$490 and is significantly cheaper compared to desktop based VNAs.

In the video Kevin explains what a VNA is and that the miniVNA Pro is, shows how to calibrate the unit, shows some measurements on his roof mounted dipole, measures a home made filter, and then demonstrates portable operation of the device on an Android phone. The miniVNA Pro has a built in battery so it can be used portably in the field together with an Android phone and bluetooth.

We ourselves have the miniVNA tiny which operates in frequency from 1 MHz all the way up to 3 GHz, whereas the miniVNA Pro operates from 0.1 MHz to 200 MHz. However the tiny does not have portable operation. The miniVNA tiny is excellent for building things like ADS-B and Inmarsat antennas.

The miniVNA Pro and Tiny can both be found for sale on Ham Radio Outlet.

Ham Radio - A look at the miniVNA PRO Vector Network Analyzer

New SDR# Plugin Manager and Colorizer Available

SDR# plugin developer Eddie Mac has again released a new plugin for SDR# called "SDR# Plugin Manager". This plugin is designed to make it easy to install, remove and re-order other SDR# plugins. Also included is a repository browser. This is a repository of many known SDR# plugin links which can be used to download and install a plugin with a simple click of a button.

Eddie has also recently released another plugin called "Spectrum Colorizer". This simply changes the background color of the spectrum analyzer window.

SDRSharp Plugin Manager
SDR# Plugin Repository

If you are interested in programming your own plugins, Eddie also offers the following advice which he posted in our forum:

A good place to get started programming plugins is to download the express version of .NET (free for personal use) and install at least the C# pack. Then go to the Airspy website and download Youssef's zipped examples on coding plugins. 
While they are not documented you can use them as an example of the steps involved.

If you know a bit of c++ that is great it should be a good spring board to learn C#. In fact, you can even program simple plugins (like my tuner knob) in Visual Basic. Both C# and VB.NET compile to Common Language Run time anyway so to SDR# it's not much difference. The only caveat is that if you want to create any plugins to do processing on signals of any sort you MUST use C# as it supports the data types SDR# uses and VB does not. As well, VB does not allow unsafe code which C# can be instructed to allow. 

Another great resource for learning to program plugins for SDR# is GitHUb and another great place is Andrej Mohar's website where he actually has a tutorial and an good explanation of the plugin coding process. You can find it here http://www.andrej-mohar.com/plugin-basics-for-sdr 

If you would like an example of a "stencil" as you call it - a template, I would be happy to share a template in both VB and C# for you to use to start to learn. However, I would suggest begginning with C# from the start.

The basics of it is that the "plugin" is actually in interface that is called while SDR# loads. The "Plugins.xml" file tells SDR# what your dll is called and what the name of the plugin is. Once it has initialized your plugin, SDR# sharp asks the plugin for a "panel" control which contains the controls for your plugin. In also returns to you a "control" object interface that allows you to receive notifications of program value changes or to set program values. There are more complex things you can do but the basics are simple.

SDRSharp Users Guide

This is an excerpt from our book on RTL-SDR which we've decided to post given that many new users struggle to understand all the settings in SDR#.

SDR# is currently the most popular SDR program used with the RTL-SDR. It's easy to set up and use. To install SDR#, go through our Quickstart Guide. Below we explain some of the settings and displays in SDR#.

Upon opening SDR# you'll be greeted with the screen shown below. Here we have highlighted the main parts of SDR#

After opening SDR# for the first time, we suggest that you immediately remember to perform the following steps (if you don’t know what some of these steps are, continue reading further below for more information):

  1. Increase the RF gain from zero to a higher value in the configure menu.
  2. Reduce the range slider on the right of the SDR# window to about -70 (for RTL-SDR dongles).
  3. Enable the “Correct IQ” setting to remove the center spike if using an R820T/R820T2, or enable “Offset Tuning” in the configure menu if using an E4000/FC0012/13.
  4. Turn off the “Snap to grid” setting, or adjust the PPM offset accordingly.
  5. Set the 'Mode' to the correct setting for the signal that you are listing to.

Continue reading

Reading Household Wireless Utility Meters with an RTL-SDR and Plotting the Data in Home Automation Software

Over on YouTube Debashish Sahu has uploaded a video showing how he uses an RTL-SDR to capture and decode consumption data from his home electric/gas/water utility meters. He uses the rtl_amr software which already supports a wide range of meters such as Debashish's gas meter. Later in the video he shows a Python script that he's written which continuously grabs the data from rtl_amr, and passes it into the Home Assistant software using JSON. Then in Home Assistant the data is graphed, and he is able to determine points of interest, such as when appliances turned on or off.

Using RTL-SDR to read values from wireless electric/gas/water meters

Fixing Factory Defective FL2K Dongles

If you've recently purchased an FL2K-SDR to use as a cheap osmo-fl2k transmitter and found that it only works on USB 2.0 ports, or at very slow sample rates, then you may have received a defective unit. Over on his blog Yohanes Nugroho discovered that his FL2K-SDR was experiencing these issues. Upon opening it up he discovered that the wiring inside looked different when compared to the sample image found on the Osmo-FL2K website.

Looking further into it he found that the USB wiring was soldered on incorrectly. After resoldering the wiring Yohanes was able to get the FL2K-SDR working properly at high sample rates on USB 3.0 ports.

FL2K-SDR Rewired
FL2K-SDR Rewired

An Enhanced Version of Freqshow for Raspberry Pi’s with Touch Screens

The Freqshow software is an RTL-SDR compatible tool for Raspberry Pi devices that can render live spectrum and waterfall displays. It is designed to run on portable touchscreens that plug into the Raspberry Pi. We've posted about freqshow a few times in the past.

Recently Dan Stixrud has created an enhanced version of Freqshow. Over on the his post on the Adafruit forums, Dan explains the improvements as follows:

The additional features are many. Additional features include: Full resolution zooming, I and Q Swap, 9 different pre FFT windowing functions to choose from. Center frequency offset or shift. PPM correction for the RTL2832. FFT averaging or FFT peaking. Easy frequency up and down from main screen. Easy Scale adjustment from main screen.

On YouTube he's also posted a video that demonstrates the software in action when running on an Adafruit 2.8" and Pi Foundation 7" TFT capacitive touch screen. Dan uses the software as a panadapter for his ham radio.

An Osmo-FL2K Broadcast AM Band Frequency Marker Generator

Over on Hackaday.io Ted Yapo has written about his frequency marker generator which uses Osmo-FL2K. Osmo-FL2K is a recently released hack that allows cheap $5 - $15 USB 3.0 to VGA adapters to be used as an SDR transmitter. We have several posts on it available here. The FL2K-SDR frequency marker generator tool simply generates an AM voice that reads out the current frequency on all of the 118 US AM channels. He writes:

A frequency marker generator is a very useful tool for calibrating antique or experimental (even crystal!) medium wave (aka AM broadcast band) radios. While an RF marker can be as simple as a fixed frequency oscillator, that's not the most convenient way to calibrate multiple frequencies. This project provides a software-defined-radio solution for a deluxe marker generator using a cheap USB-to-VGA dongle. The output signal consists of 118 individual AM "stations" in the MW band - one for each assigned channel in the US - each announcing their own frequency in a synthesized voice.

In the future Ted hopes to be able to generate a full band of old radio shows that could be sent to an antique radio, which is sure to help in improving that authentic antique feeling.

If you're interested in Osmo-FL2K his hackaday.io page also has information on throughputs that he got from different USB interfaces on his PC, as well as a PCB breakout board to convert the FL2K-SDR VGA port into SMA outputs.

Osmo-FL2K Generating AM Band Frequency Markers
osmo-fl2k AM Voice Marker