Over on YouTube user Tysonpower has uploaded a video showing how he was (almost) able to receive the HRPT signal from NOAA18 with an ADALM-PLUTO, LNA4ALL and a WiFi grid antenna.
Most readers will be familiar with the low resolution 137 MHz APT weather satellite images transmitted by the NOAA weather satellites. But NOAA 15, 18, 19 and well as Metop-A and Feng Yun satellites also transmit an HRPT (High Resolution Picture Transmission) signal up in the 1.7 GHz region. These HRPT images are much nicer to look at with a high 1.1 km resolution. If you follow @usa_satcom on Twitter you can see some HRPT images that he uploads every now and then.
However HRPT is quite difficult to receive and decode because the bandwidth is about 3 MHz so something with more bandwidth than an RTL-SDR is required. The signal also needs a ~1 meter or larger dish antenna as it is very weak, and you also need a motorized pointing system to track the satellite with the dish as it passes over.
Despite the difficulty in his video Tysonpower showed that he was able to at least receive a weak signal using a non-optimal 2.4 GHz WiFi grid dish antenna, LNA4ALL and his ADALM-PLUTO. The signal is far too weak to actually decode, but it’s still pretty surprising to receive it at all. In the future Tysonpower hopes to be able to improve his system and actually get some image decodes going. Note that the video is in German, but there are English subtitles available.
[EN subs] Empfang von HRPT mit dem ADALM-PLUTO SDR - NOAA18
At the North-West University in South Africa Masters student SW Krüger submitted his dissertation titled “An inexpensive hyperbolic positioning system for tracking wildlife using off-the-shelf hardware” back in May of this year. Recently it was found online and can be viewed here (large pdf warning).
In his thesis Krüger explains his experiments with using RTL-SDR dongles to set up a very low cost wildlife monitoring system using TDOA (Time Difference of Arrival) techniques, and very low power beacons on the animal tags. TDOA is a difrection finding technique which involves using multiple receivers spread out over a region and calculating the difference in time from when the signal arrives at each receiver. With this information the position of the transmitter can be determined. Typically to do this the system clock in the computing hardware and OS needs to be synchronized as perfectly as possible between receivers, otherwise timing difference will cause huge errors in the position. Krüger uses synchronization bursts from a beacon, but notes that a real-time clock or GPS module could also be used for accurate time keeping.
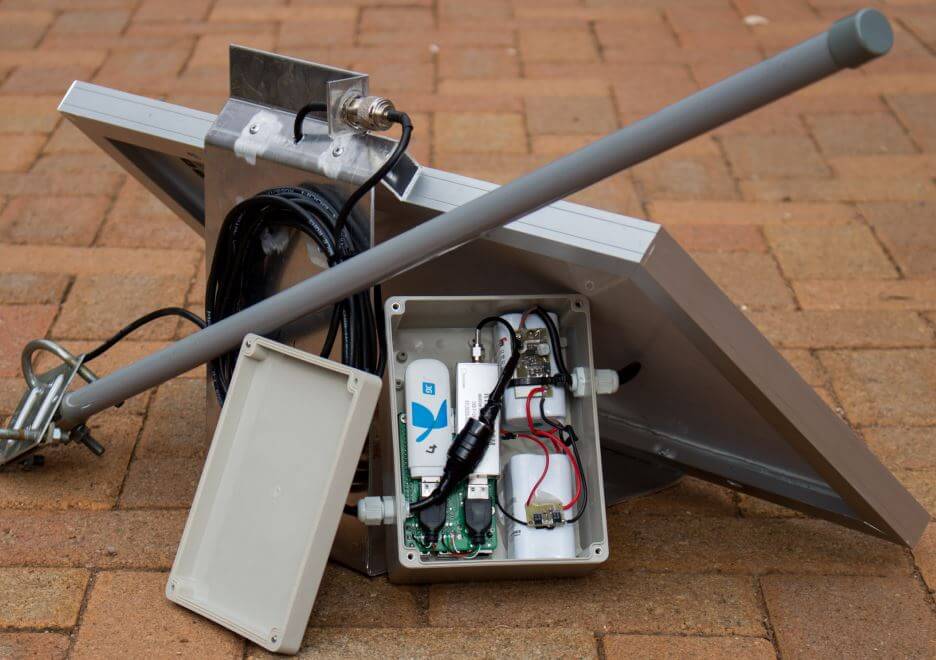
In his experiment he set up two RTL-SDR receivers spaced 9 km apart and was able to obtain an accuracy of about 3.5m, which he writes is similar to other wildlife positioning systems that use tags with much higher power consumption. The computing hardware used at the RX station is a Raspberry Pi 3 powered by a 20W solar panel and batteries. There is also a wireless 3G modem for communications. The DSP software produced for the project is all open source and available on GitHub.
The RX System with RTL-SDR, Raspberry Pi, Mobile Broadband Modem, Power Supply and Solar Panel.
Thanks to Dave for submitting news of his recent release of his Python script called dopplerscript. This is a tool that can help people automate the reception and decoding of the Meteor M2 weather satellite in Linux with GNU Radio by providing a tool for automatic Doppler correction. He writes:
gr-gpredict-doppler is an out-of-tree gnuradio block for getting doppler updates from gpredict into a flowgraph. I’ve written a small python script (based on pyephem) that replaces gpredict for generating the doppler updates. This script allows one to automate scripting the reception of Meteor M2 satellite transmissions while compensating for the doppler shift.
dopplerscript is a command-line tool to input satellite doppler shifts into a gnuradio flowgraph. The doppler.py script replaces gpredict as the source for doppler frequency updates in gr-gpredict-doppler, making it easy to script satellite reception.
As low earth orbit satellites fly very quickly overhead, the signal will be affected by the doppler effect, thus shifting the frequency as it moves towards and away from you. Tools like this can be used to predict and compensate for this effect and thus providing better signal processing. Meteor M2 is a Russian weather satellite in low earth orbit which transmits digital LRPT weather satellite images that can be received with an RTL-SDR or other SDR.
An Example LRPT Image Received with an RTL-SDR from Meteor M2.
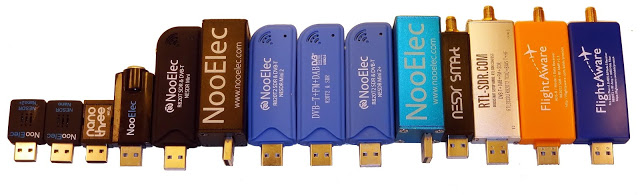
For his tests he used a Raspberry Pi 3 and compares two dongles at a time. The results are about as would be predicted. The tiny Nano dongles are usually the worst performers due to their trade off in size vs heat dissipation and internally generated noise. The standard sized dongles all perform about the same, but the dongles with heatsinking perform the best. Of course the FlightAware dongles still get the best ADS-B reception due to their significantly lower noise figure thanks to the built in ADS-B LNA.
One interesting finding is that Akos shows that heat does play a noticeable role in performance of these dongles at 1090 MHz. Akos noticed that the better heatsinking on the RTL-SDR Blog V3 or cooler days improved reception.
Over on YouTube channel Bootstrap Workbench has been running a series on using an RTL-SDR and noise source to create a poor man’s spectrum analyzer. So far he has three videos available. The first shows how to install and setup Spektrum, his preferred Windows based wideband scanner for the RTL-SDR.
The second video shows how the RTL-SDR, noise source and Spektrum can be used to tune a cavity duplexer. A cavity duplexer is an adjustable set of filters that allows you to use a single antenna for TX and RX at different frequencies. It can be tuned by adjusting screws on the unit body.
In the third video he shows how to examine the response of a dual ferrite isolator/circulator which is a device that can be used to ensure RF only travels in one direction. This could be use for example to prevent damage to a TX power amplifier from reflected signals due to high VSWR or other nearby powerful signals.
Poor Man's Spectrum Analyzer - Installing Spektrum and Testing an RTL-SDR com 88-108 Bandstop Filter
Salamandra is a tool to detect and locate spy microphones in closed environments. It find microphones based on the strength of the signal sent by the microphone and the amount of noise and overlapped frequencies. Based on the generated noise it can estimate how close or far away you are from the mic.
Salamandra can either be used in live mode, or can use data recorded from rtl_power. It seems that the software simply attempts to detect peaks in the spectrum that look like analog audio, and print out their frequencies.
We’ve also seen this somewhat related piece of software called rtlsdr-wwb-scanner which can be used with an RTL-SDR to scan for microphones as well. However, this software is mostly intended to be used with the Shure Wireless Workbench which is a professional program for managing multiple microphones used in conferences, theatre performance, concerts etc.
Apologies for the long out of stock period, we sold out of our remaining Amazon US stock almost immediately a few weeks ago due to a large Reddit thread which popularized the Reddit /r/rtlsdr forums (a big welcome to any new RTL-SDR users!). Amazon is currently processing the new stock and it should be ready to ship out in a few days.
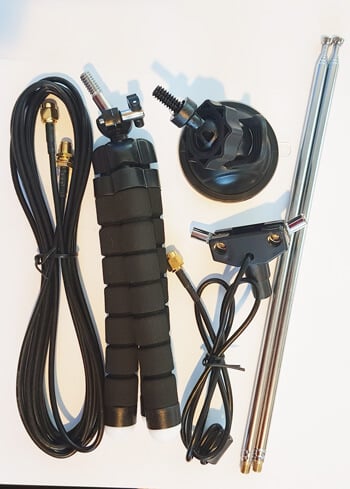
We also have a new antenna set in the works which should be ready for purchase in a few weeks. This antenna set is essentially a custom modified TV dipole with mounting kit. The kit will contain:
1x Telescopic Dipole Antenna base with 20cm RG174 cable
2x removable 22cm to 1M telescopic antennas
2x removable 5cm to 13cm telescopic antennas
1x 3M SMA RG174 extension cable
1x suction cup window mount
1x bendy tripod mount
Antenna Base
The telescopic antennas mount onto the antenna base via a screw, so they can easily be removed and interchanged between the large and small ones, or packed away for storage.
The dipole antenna base attaches to the suction cup or bendy tripod mounts using a 1/4″ camera screw. So any cheap camera mounting accessories like clamps, tripods etc can be used to mount the dipole as well.
The coax cable on the base also has a ferrite core choke on it to help decouple the feedline from the antenna, and there is a 100kOhm bleed resistor added to reduce static discharge.
Mounts
The included suction cup mount allows you to mount the dipole on a window (ideally outside) and orient it into a vertical, horizontal or V-Dipole position. The bendy tripod allows you to use the antenna on your desk, folded over a door, on a tree branch, pole, or anywhere that the tripod legs can be wrapped around.
Usage
The biggest problem that new RTL-SDR users face is the antenna. Most are starting off with a mag mount whip, and have no way to mount them outside where they should be for better reception. Keeping them inside can cause poor reception and increased pickup of local interference from electronics. Our dipole with the mounts aims to solve this problem.
Using a dipole generally results in better reception than with a mag mount whip, and also allows for easier outdoor mounting. The 3M coax extension cable allows you to get the antenna at least to a window in your room.
Note that although we recommend using the antenna outside, please remember to take the antenna back inside when not in use to avoid lightning/ESD/weathering problems. It is not designed for permanent outdoor mounting and please remember that any permanently mounted outdoor antenna should have good grounding to protect your radio against ESD and lightning.
For general use we recommend using the dipole in the vertical orientation as most signals are vertically polarized. The dipole can also be used in a V-Dipole configuration for excellent VHF satellite reception, such as for NOAA/Meteor weather satellites. Just extend the telescopic dipoles to be as close as possible to resonant at the frequency of interest using this calculator. Getting the length perfect is not critical, and actually using any length will still receive something.
Apart from NOAA we’ve also tested the dipole with L-band satellites. Together with an LNA and the smaller telescopic antennas it’s possible to receive Iridium and Inmarsat signals. Reception is not as good as a patch antenna, but you can still get the stronger AERO and Iridium signals quite easily. If you add a reflector made out of a small cookie tin the signals can be boosted further, and this is enough to receive the weaker STD-C and Outernet signals.
Eventually this dipole set will replace the mag mount antenna bundled with the dongles currently. Target price is between $9.95 – $14.95 for the antenna set by itself, and $25.95 for the dongle + antenna set. We expect the antenna set to be ready for shipping in 2-3 weeks, and about 3-4 weeks for the dongle + antenna set. More details and usage examples will be shown nearer to the release.
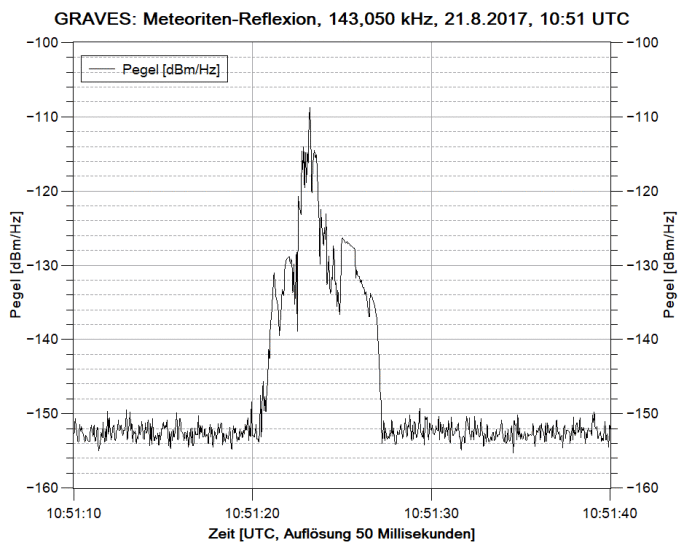
If you are in Europe you can also make use of the Graves radar simply by tuning to its frequency of 143.050 MHz and listening for reflections of its signal bouncing off things like meteors, planes and spacecraft. Since Graves points its signal upwards, it’s unlikely that you’ll directly receive the signal straight from the antenna, instead you’ll only see the reflections from objects.
DK8OK also explains in his post how you can use SDR-Console V3 to create a level diagram which shows power vs time, allowing you to count reflections and visualize the response of the reflection.
Any SDR that can tune to VHF frequencies such an an RTL-SDR can be used for monitoring reflections like this. If you aren’t in Europe you might consider looking for distant strong transmitters such as for TV/FM which you could also monitor for reflections.
Graves reflection of a meteor trail visualized in SDR-Console V3.
![[EN subs] Empfang von HRPT mit dem ADALM-PLUTO SDR - NOAA18](https://www.rtl-sdr.com/wp-content/plugins/wp-youtube-lyte/lyteCache.php?origThumbUrl=https%3A%2F%2Fi.ytimg.com%2Fvi%2FrMhMhz0pwD8%2F0.jpg)