Testing the Outernet-In-A-Box Virtual Machine Decoder for Windows & Linux

Back in September we posted a tutorial that showed how to set up an Outernet receiver with a Raspberry Pi running their rxOS software and an RTL-SDR, LNA and patch antenna. Recently, Outernet have released a new decoder for Windows and Linux which is very easy to install and run. Outernet is an L-band satellite data service which can be received almost anywhere in the world with an RTL-SDR. They aim to be a “library in the sky”, constantly broadcasting public data like news, books, images/videos and other data files.

The new decoder is a Linux machine that runs in a self contained multiplatform Virtual Box virtual machine. This means that it is a standalone package, and it comes included with the OS, decoder, and all the files needed to make it run. Using a virtual machine eliminates any installation issues due to missing dependencies or libraries. Running the VM in Windows is as easy as double clicking on a .exe file to open it up. Note that you’ll need a relatively modern machine that supports hardware virtualization support (VT-x) (Core 2 or newer). The virtual machine itself is lightweight, and uses less than 50MB of RAM, and has very low CPU usage.

At the moment, the decoder writes files downloaded from the Outernet service to a directory stored in C:\Outernet\downloads. Unlike the Raspberry Pi decoder, there is no web interface for accessing the content, though this will probably be added in future builds. The files can be directly accessed in the Windows/Linux file managers.

To set up the VM on a Windows machine:

  1. Download the Windows .exe archive and open it. When prompted, extract the files to a convenient folder on your PC.
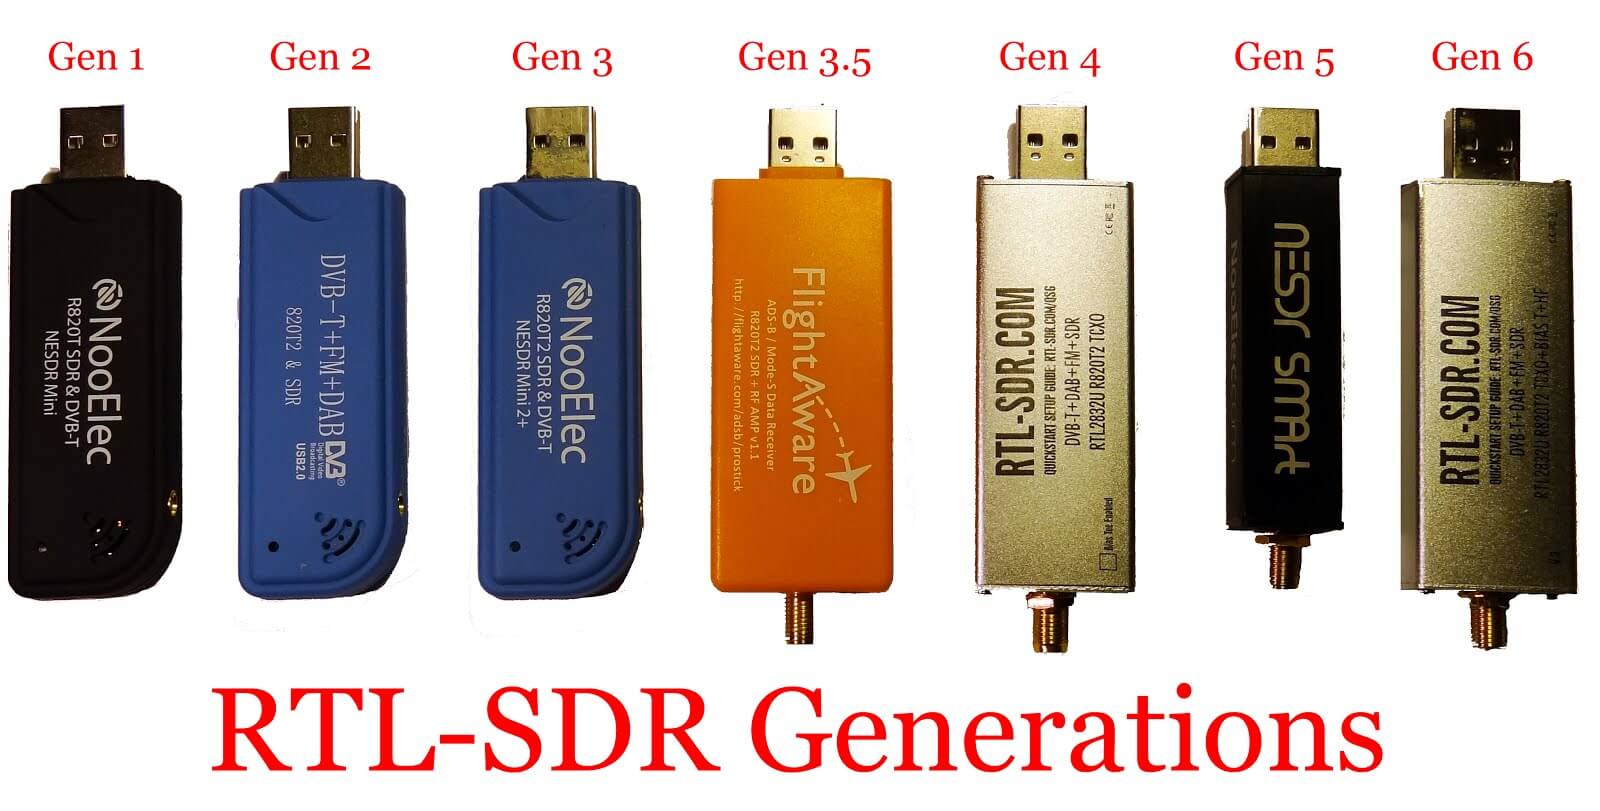
  2. Plug in your RTL-SDR and LNA, and set up your L-band antenna.
  3. In the extracted folder run the outernet.exe file once. This will open the decoder and the first time it is run it will automatically create a folder in C:\Outernet.
  4. If you are in the Europe/Africa and use the Alphasat satellite then you can ignore this step. If you are in another region, close the opened VM, then go to C:\Outernet\Satellites.Available, and then copy the file corresponding to the satellite used in your part of the world over to C:\Outernet\Satellites.Selected. Now reopen the outernet.exe VM.
  5. The decoder should now be showing a good SNR value >2 in the top right information, and the State: should show FRAME LK. The bottom right window should also scroll “Packed written to socket.”
  6. After a few minutes check the C:\Outernet\cache folder for pieces of files. Later check the C:\Outernet\downloads folder for completed files.

Further instructions can be found on their Windows Readme file. Note that as there is no web browser for the files, some will be downloaded as GZipped files, and will need to be unzipped to be viewed. For more information on the Outernet service as well as the hardware requirements see our previous tutorial.

We tested out the VM on a Windows laptop for a few hours and was able to receive several GZipped Wikipedia webpages as well as a photo, as shown in the screenshot below.

Files downloaded from Outernet (left). Outernet decoder running in VM (right).

Comparing the RTL-SDR, FunCube PRO Plus and SDRplay on Moon Bounce/EME Reception

Moon Bounce or “Earth Moon Earth” (EME) is an amateur radio activity where people attempt to transmit a signal towards to the moon, and listen to the reflected signal. In some cases a separate transmitter is not needed, as an already powerful constant transmitter like the GRAVES radar in France can be used.

Over on his YouTube channel user cqpy2rn has uploaded a video showing his moon bounce reception of the GRAVES radar using an eleven element yagi antenna. He compares the reception with an RTL-SDR, FunCube PRO Plus and SDRplay. He writes:

+++ Nooelec model NESDR Smart (RTL-SDR) +++
GOODs: Price $20, frequency stability 0.5ppm tcxo, aluminum case, firm sma antenna connector, better dynamic range than regular-cheaper RTL dongles. Easy gain adjustment.
BADs: No pass filters, freq coverage from 24MHz to 1.7GHz, poor dynamic range (moderate de-sense with near strong signals)

+++ FunCube PRO PLUS – FCDPP +++
GOODs: freq coverage from 150KHz to 2GHz, pass saw filters, frequency stable 0.5ppm tcxo, easy gain adjustment, acceptable dynamic range.
BADs: Plastic case, fragile sma connector, just 192KHz wide spectrum view, price $160.

+++ SDRPlay +++
GOODs: Frequecy coverage from 10KHz to 2GHz, firm SMA connector, pass saw filters, up to 8MHz wide spectrum view, acceptable dynamic range.
BADs: Plastic case, legacy printer USB connector, frequency drift during warm up, difficult gain adjustment

CONCLUSION: In essence all these have the same “DNA”, they were made from digital TV tuner chips, comparisons produce very similar RX practical results, the RTL suffers due the lack of internal filtering which can be a little remediated adjusting the gain carefully through your SDR software or adding external filters. FCDPP and SDRPlay are vey similar, although the freq drift for SDRPlay is a bit annoying to me.

Nooelec RTL vs. FunCube PRO Plus vs. SDRPlay (VHF 143MHz graves via EME test)

RTLSDR4Everyone: SDRUno 1.04 Guide Updated, and Overview of RTL-SDR Generations

Akos from the RTLSDR4Everyone blog has recently released two new posts. The first post is a tutorial on the set up and use of SDRUno. SDRUno is the official software of the SDRplay, but supports the RTL-SDR too, albeit with an artificial 0.96MSPS (1 MHz) sampling rate/bandwidth limit. The guide starts from the download of SDRUno, shows how to select the 0.96 MSPS sampling rate and goes over the interface and some of the features of the software.

In his second post Akos discusses the topic of what he feels is the different generations of RTL-SDR dongles that we’ve seen come out over the years. He also speculates at what new features we might see coming in the future.

rtl-sdr dongle generations

Using the RTL-SDR as a Panadapter for the IC-751A

A panadapter is a device that connects to a standard hardware radio and allows you to visually see the RF signals on a waterfall. Since SDR’s run on the PC, they naturally have the ability to display a panadapter screen, and most software like SDR#, HDSDR and SDR-Console already provide this. The RTL-SDR can also be used to add panadapter capabilities to a regular hardware radio. 

Gary Rondeau has been using the RTL-SDR as a panadapter for his IC-751A, which is a high quality ham radio transceiver. In his first post, Gary shows how he connected the RTL-SDR in a block diagram, and then shows how he interfaces the RTL-SDR and IC-751A together using HDSDR and the Omnirig software.

Block diagram showing the RTL-SDR as a Panadapter with the IC-751A and HDSDR.

In his second post he shows a comparison between decoding JT65 and JT9 signals directly from the IC-751A audio output, vs via the RTL-SDR & HDSDR panadapter connection. His results show that as long as there is sufficient signal level, the RTL-SDR as a panadapter can match the performance of the raw IC-751A audio output, even producing less signal splatter on strong signals due to the pure numerical vs analogue mixing strategies of SDRs vs analogue radios.

RTL-SDR (top) vs raw audio from IC-751A below. RTL-SDR has a wider bandwidth, and less splatter at 2200 kHz when the strong signal came in.

Finally, in his third post he shows some more benefits of using the RTL-SDR as a panadapter, including rapid SSB tuning, RFI identification and signatures, helping work a pile up, monitor SSB net while working PSK on the parent radio, monitor the JT65 & JT9 band while working PSK – or vise versa and finally leave the radios on and monitor PSK, RTTY, JT65 & JT9 traffic for PSK Reporter.

Reverse Engineering Digital RF Signals the Easy Way with DSpectrum

Recently nullwolf (T.J. Acton) wrote in to let us know about a very useful wrapper for Inspectrum that he has created, called DSpectrum. Inspectrum is a Linux/Mac based tool that makes it very easy to extract a binary string from a digital transmission which can be recorded with any SDR like an RTL-SDR. DSpectrum builds on Inspectrum and further automates the reverse engineering process. He writes:

The wrapper [DSpectrum] assesses the amplitude measurements, or frequency shifts, that are reported by Inspectrum. The wrapper uses the average of the provided values as a threshold. When a cell’s value falls below the threshold, the wrapper determines that the value is a binary ‘0’, and when it is above the threshold, it records the value as a ‘1’. It then returns this raw binary data as output, in addition to the binary’s hex and ascii translations.

Another two features were included: the semi-automatic comparison of two portions of a transmission in the same file, and the semi-automatic comparison of two signals in separate files.

Nullwolf notes that with DSpectrum the time taken for him to reverse engineer signals has dropped from 1 hour down to 5 minutes in some cases.

A comparison of two binary signals in DSpectrum

Airspy vs SDRPlay: Two New Comparison Videos

Over on YouTube two new videos comparing the reception on the SDRplay and Airspy have been uploaded. The first is by Mile Kokotov and he compares the reception on a very weak broadcast FM station, with several strong signals surrounding it. He writes:

In this video I am presenting Airspy+SDR# vs SDRplay+SDRuno in the real world, receiving very weak FM broadcast station in the terrible conditions, with very strong signals around.
The Weak signal was in the lower edge of the FM broadcast spectrum, with very strong local signals close to the weak one, in the upper frequencies of the FM broadcast spectrum.
The antenna for the both SDR receivers was the same – Vertical Dipole for FM BC band.

Both SDR receivers were tuned to maximum possible signal to noise ratio (SNR) of the weak FM broadcast signal.

In SDRuno RSP control panel (for SDRplay receiver) ZERO IF and 0.3/0.6 bandwidth were chosen, and the weak signal of interest was placed on the right edge of IF filter, so that the strong signals from other FM broadcast radio stations were placed right from the weak one in order to minimized the negative influence to the our weak signal.
LNA was switched off. When the LNA was on, there where high distortion level because LNA was overloaded from the strong signals, and SNR was deteriorated regardless of gain reduction.
The best results were achieved with gain reduction set to “0”, without LNA.

In SDR# software (for Airspy SDR receiver) 10 MSPS and Decimation was used.
From the version 1480, in SDR#, when decimation is choosed, there is tracking filter which allow better selectivity, so you can use more gain, increasing the SNR to maximum possible level depending of concrete situation.

The overall receiving conditions was extremely bad. The signals from local FM radio stations were too strong so the weak signal from this video can not be received at all, with many expensive FM tuners which I tried: Pioneer VSX 527, Denon AVR-1802, Marantz SR6300. I was tried RTL-SDR just for fun, but it can not receive weak signal too :-), not because SDR-RTL is not sensitive enough, but because its dynamic range is not so high and it is overloaded by too strong local signals.

The very sensitive receiver is not problem to design and produce. Much more difficult is to design a high dynamic range receiver. which will be able to receive very weak and very strong signals at the same time without overloading.

Overloaded receiver front end means that it is not linear any more, and produces many signals by itself, increasing its noise level.
Very strong signals at the receiver front end makes Desensitization of the receiver, so it could not receive weak signals any more.
We should not forget that the receiver front end “looks” all signals from the wide frequency range even if we want to receive only one signal at the time. The more wideband the receiver is, the higher dynamic range it has to be, for not been overloaded…

SDRplay and Airspy receiving Very WEAK FM broadcast signal

In the second video Leif sm5bsz compares the Airspy+SpyVerter with the SDRplay RSP on HF reception. He concludes that the difference between the two radios on HF is small. However, Youssef from Airspy has contested the result, noticing that Leif ran the Airspy at 2.5 MSPS, resulting is significantly less decimation being used. In response Leif updated his video adding an A/B comparison on HF with the Airspy correctly running at 10 MSPS in the last 8 minutes of the video. The results seem to show that the SDRPlay and Airspy+Spyverter have similar HF performance, but when comparing maximum decimation on the Airspy and the smallest bandwidth the SDRplay to obtain similar bandwidth’s, the results seem to show that the Airspy+SpyVerter is about 5 dB more sensitive at receiving weak signals.

SDRUno Updated to Version 1.03

SDRUno, the official software for the SDRplay has recently been updated to version 1.03. SDRUno is the free SDRplay specific version of Studio1, and also supports other SDR’s like the RTL-SDR, with an artificial 1MHz bandwidth limit. The change log is shown below:

Bug Fixes

  • High DPI resolution issue.
  • Various minor bug fixes and typos

Updates

  • Reworked filter cutoffs
  • Separate out EXTIO functionality
  • RSP Ready indicator in Main Window/SETT/Input
  • Rename FM Stereo Noise Reduction button and slider to FMS-NR to avoid confusion with SNR (Signal Noise Ratio)
  • Improvements to tuner AGC scheme
  • Improvements to DC offset scheme
  • Removed unused buttons in SP1/SP2 windows
  • LO display in RSP advanced window and the SP1 window
  • Change defaults (LNA OFF / AGC ON)
  • Added RDS PTY support

sdruno_announcement

New Posts From RTLSDR4Everyone: Avoiding RTL-SDR Ripoffs, ADS-B Antenna Reviews, Travel Kits and Direct Sampling vs Upconverter vs SDRPlay

Akos from the rtlsdr4everyone blog has been busy uploading new posts over the past few days. His first post is part three in a series that discusses how to avoid ripoffs when buying RTL-SDR dongles. The RTL-SDR market has recently become quite saturated, and it is now easy to purchase something that most experienced users would consider a ripoff. His post shows some examples of what he considers to be poor value choices available on eBay.

An example of a ripoff price.

His second post discusses his methodology for testing dongles on their ADS-B performance. The second post then leads into the third post in which he compares four antennas on ADS-B reception. He compares two telescopic whip antennas, one set to 1/2 wave length, and the other set to 1/4 wave, a NooElec 5dBi whip antenna, and the FlightAware ADS-B antenna. His results show that the FlightAware antenna was the best performer, followed by the 1/2 wave telescopic whip, then the NooElec 5dBi whip and finally the 1/4 wave telescopic whip. The fourth post continues the ADS-B topic, and he reviews the NooElec 5dBi ADS-B antenna. Although the performance is not as good as the FlightAware antenna he mentions that it is much smaller and great for portable use. If  you are interested, we have also a review of the FlightAware antenna, and we also found its performance to be excellent.

The four ADS-B antennas tested in Akos' review.
The four ADS-B antennas tested in Akos’ review.

In his fifth post Akos shows what his RTL-SDR travel kit consists of. In this post he recommends both our RTL-SDR V3 dongle as well as the NooElec SMArt. For a portable computer, he takes along a Raspberry Pi 3 and a 20,000 mAh battery bank with solar charger. (Though we’d be interested to hear from Akos how long it takes for that small solar panel to charge the battery bank, probably takes days to charge?) For antennas he prefers to take along our large 1.5m telescopic antenna, the NooElec 5dBi ADS-B antenna, a medium telescopic antenna and a Nagoya knock-off telescopic antenna.

Akos' Mobile ADS-B Station.
Akos’ Mobile ADS-B Station.

Finally in the sixth post he shows a video that compares the differences between a generic dongle modded with direct sampling (without any impedance matching circuitry), an RTL-SDR dongle with ham-it-up upconverter and an SDRplay. Unsurprisingly the upconverter and SDRplay performs best.

Direct sampling vs upconverter vs SDRPlay on shortwave broadcast stations - 16 mins

As a bonus, Akos also has done an interesting stress test on the metal case of our RTL-SDR dongles, where he runs it over with a bus to see if it will survive. The case is mangled afterwards, but the dongle and functionality survives!

Dotcom dongle meets a bus