SDR#'s SpyServer streaming server now supports the direct sampling mode on RTL-SDR dongles and it's probably the cheapest way to set up a HF streaming server. SpyServer is a streaming server for SDR# and Airspy products. Although it's designed for Airspy products it also works well with RTL-SDR dongles.
On RTL-SDR dongles the direct sampling mode allows you to receive HF frequencies by bypassing the tuner. The dynamic range is not quite as good as using an upconverter and there are Nyquist images from sampling at 28.8 MHz centered around 14.4 MHz, but in most cases it is good enough to give people decent HF results especially if filtering is used. Normally a hardware hack is required to enable direct sampling, but our RTL-SDR Blog V3 units have direct sampling built in and ready to go just by connecting an HF antenna to the SMA port, and enabling the Q-branch direct sampling mode.
There is a sample server set up at sdr://151.20.181.90:5555.
SpyServer Direct Sampling Mode
Direct Sampling for #RTLSDR was added to Spy Server. This must be the most affordable networked HF radio ever.
The servers that are currently online include some streaming from Airspy HF+ devices, which is the hotly anticipated but as of yet unreleased HF receiver from Airspy. Over the last few months and weeks a number of prototype devices went out to testers and programmers and some have now put them online with a SpyServer. There are also some Airspy One/Mini and RTL-SDR devices available for streaming too.
To connect to one of the servers simply download the latest version of SDR# from airspy.com, and then in SDR# select SpyServer from the Source menu. Enter the URL from the list into the box and press the play button up the top. Note that you must ensure that there are no spaces after entering the URL in SDR#.
Most servers are locked to a particular frequency band, but some allow for free tuning. But if more than one person is connected to the server free tuning will be locked until there is only one person connected again. Currently streaming from most servers seems smooth, but it's possible that some may struggle if many users are connected at once.
A number of people have asked how to use SDR#'s SpyServer with an RTL-SDR. In this tutorial we will show how to set up SpyServer on both Windows and Linux systems. We try to assume as little knowledge as possible, but we do assume that you have decent experience with computers. Also for the Linux/Raspberry Pi setup we need to assume that you have some basic experience with Linux and setting up Raspberry Pi's.
What is SpyServer?
SpyServer is a free RTL-SDR compatible SDR server that is designed to work with the popular SDR# software. It is actually designed for the Airspy range of products, but the author has also made it compatible with RTL-SDR dongles. Running a SpyServer allows you to connect to and use a remotely positioned RTL-SDR over a network connection (such as a local LAN/WiFi or the Internet). Once connected, using the dongle is the same as if the dongle was directly connected to the users PC.
An example SpyServer Overview (Can use an RTL-SDR instead of the Airspy HF+)
Remote servers are useful as you may want to set up an antenna in a remote location (such as up on your roof or shack), and don't want to run a long lossy coax cable down to the PC. Instead you could run Ethernet cable, or avoid cables by using WiFi. All you'd need is power for a remote computing device like a Raspberry Pi 3. Perhaps you also have a great antenna location at a friends house, or other property and want to access that antenna remotely. Or maybe you want to use your radio while travelling.
SpyServer is similar to another tool that you may already be familiar with called rtl_tcp. However, SpyServer is regarded as superior because it is signficantly more efficient at network usage. Instead of sending the entire raw data like rtl_tcp does, SpyServer only sends the IQ data of the currently tuned in signal. Waterfall data is processed on the server and sent in compressed form. There is one disadvantage to SpyServer in that it requires slightly more powerful computing hardware like a Pi 2 or Pi 3, whereas rtl_tcp can run on the lowest end hardware.
Network usage when streaming with SpyServer will be about 120 KB/s when listening to WFM and about 38 KB/s when listening to narrow band modes for one client being connected. Multiple clients can connect to the SpyServer and share the same currently tuned bandwidth.
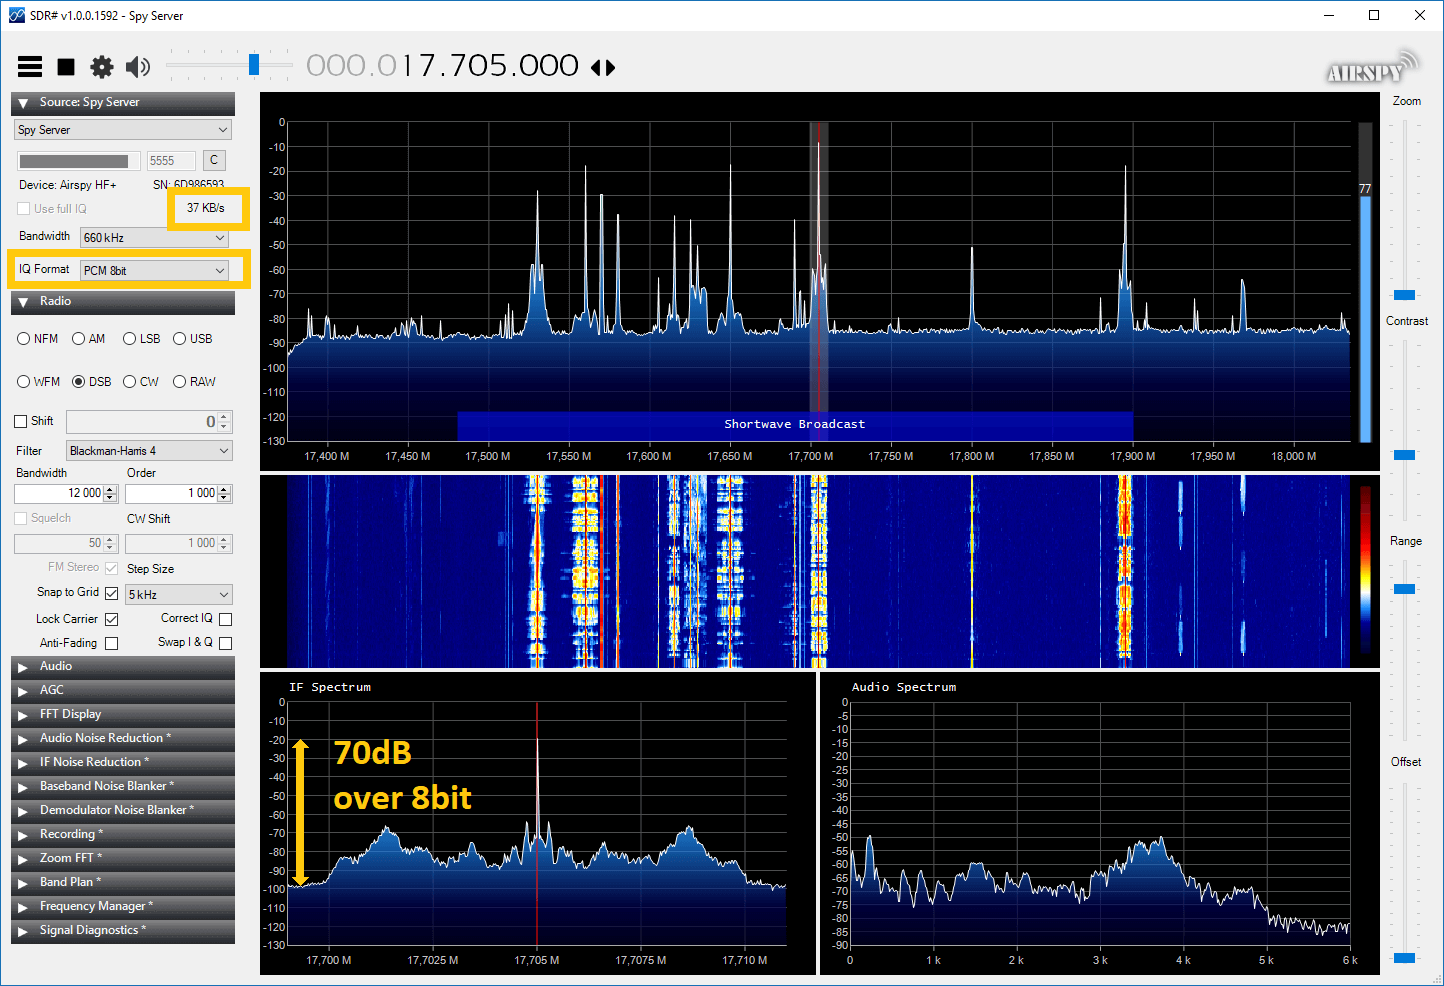
Over the last month SDRSharp's SpyServer has been updated several times. SpyServer is a streaming server for SDR# which allows you to use Airspy and RTL-SDR radios remotely over a network connection.
The updates brought improvements such as IQ PCM compression at various bit depths including an efficient 8-bit mode, removing the DC spike residual in the 8-bit streaming mode, and recently improving the 8-bit mode to work like lossy compression for strong signals.
We tested the new 8-bit PCM streaming mode and found it to be extremely efficient with network usage. When streaming at 2 MHz with an RTL-SDR a WFM signal on the older SpyServer versions used to use about 1.2 MB/s without any compression modes, and now with 8-bit compression active it only uses 322 KB/s. A NFM signal used to require 120 KB/s, now only requiring about 38 KB/s. No DC spike is present and no degradation in reception quality is noticeable unless the signal requires over 70 dB of dynamic range, which is unlikely for most signals.
If you've had trouble with SpyServer or rtl_tcp not working well on your slow network connection, then the new updated SpyServer may be the solution for you.
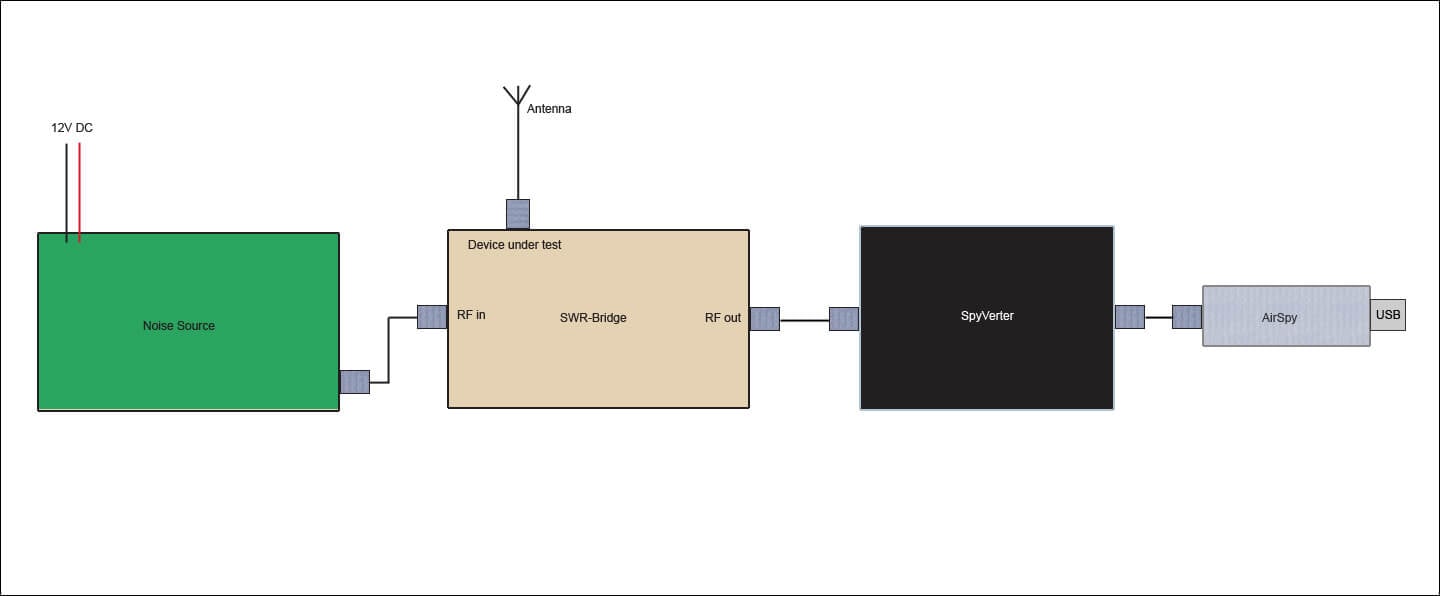
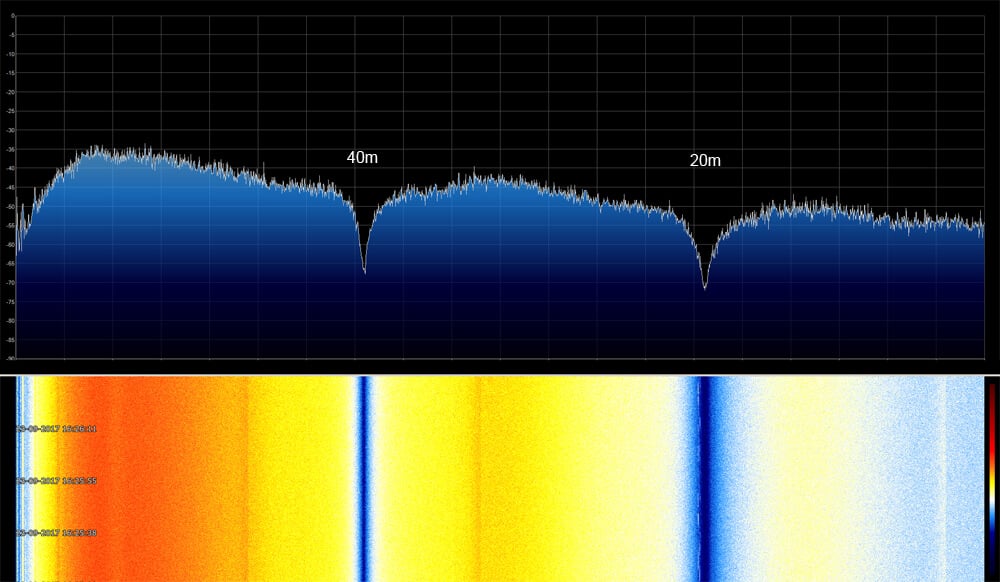
By connecting the output of the noise source to the SWR-bridge input, and the antenna to the DUT port the return loss or SWR of the antenna can be measured with the Airspy. To get a wider than 10 MHz view of the spectrum Anders uses the SpectrumSpy software for the Airspy which is a spectrum analyzer application that allows you to view any bandwidth that you like. With the Airspy, noise source and antenna all connected correct to the SWR-Bridge significantly notches in the spectrum show up in SpectrumSpy. These notches are the resonant points of the antenna. Visually seeing these notches allows you to fine tune the length of the antenna elements for best SWR.
How to connect it all upSpectrumSpy showing the resonant notches at 40m and 20m.
Over on Twitter @lambdaprog and @mm6dos, developers of SDR# and Airspy SDR products have tweeted videos showing off an Android watch being used as an SDR interface. They use a prototype of their upcoming Airspy HF+ SDR, their SpyServer streaming software and an Android watch. The Android watch receives the streaming FFT and audio data from a server running the SpyServer and Airspy HF+.
They write that this new SpyServer client is mainly for phones and tablets and is efficient enough to run on a watch. It appears that this lightweight version of the SpyServer sends compressed FFT and audio instead of a slice of the IQ data like the current SpyServer, making it very light on the client side CPU and network usage.
If you’re interested in the Airspy HF+ we have an initial review available here.
Over the last few months we've been posting and getting excited about the Airspy HF+, an upcoming high dynamic range HF/VHF receiver designed for DXing. The Airspy team were kind enough to supply us with an early pre-production unit for review.
Long story short, the Airspy HF+ is probably one of the best low cost SDRs we've seen for DXing or weak signal reception out there. So far few details on the availability of the HF+ have been released, but we're aware that preorders are due to start soon, and the target price is expected to be $149 USD from iTead Studio in China.
What follows is the full review and comparisons against other similarly priced SDRs. The Airspy team want us and readers to understand that our review unit is a pre-production model, and apparently already the matching and thus SNR has already been improved by about 2-4 dBs, so the sound samples we provide in the review below should sound even better with the newer revision.
Disclaimer: We received the HF+ for free in exchange for an honest review, but are not affiliated with Airspy. We've been in contact with the Airspy team who have helped clarify some points about the architecture and technology used in the design.
Introduction
The Airspy HF+ is designed to be a HF/VHF specialist receiver with a frequency range of DC to 31 MHz, and then 60 to 260 MHz. It has a maximum bandwidth of 768 kHz. So the question is then, why would you consider buying this over something like the regular Airspy R2/Mini or an SDRplay RSP2 which both have larger frequency ranges and bandwidths? You would buy the Airspy HF+ because has been designed with DXing and weak signal reception in mind. Basically the main idea behind the HF+ is to design it so that it will never overload when in the presence of really strong signals. Combined with it's high sensitivity, weak or DX signals should come in much clearer than on the other radios especially if you have strong blocking signals like broadcast AM/FM around.
Aside: What is overloading, intermodulation and dynamic range?
Basically strong signals can cause weak signals to be drowned out, making them not receivable, even though they're there at your antenna. This is called overloading or saturation. Intermodulation occurs when the SDR overloads and results in images of unwanted signals showing up all over the spectrum.
A simple analogy is to think about what happens when you are trying to drive, but there is sunstrike. The road is very hard to see because the sun is so bright and right in your eyes. The human eye does not have enough "dynamic range" to handle the situation of sunstrike. Dynamic range is a measure of how well a radio (eye) can handle strong (bright) and weak (dark) signals at the same time. The same analogy applies to radios which can struggle to 'see' weak signals if there is a very strong signal nearby on the frequency spectrum. There are a few ways to solve this:
Filtering: Block the strong signals that you don't want using LC filters.
Eye analogy: using your sun visor to block the sun.
Attenuation: Reduce the strength of all signals.
Eye analogy: using sunglasses or squint.
Increase dynamic range: Get a better SDR with better design/technology and more bits in the ADC.
Eye analogy: upgrade your eyes.
Technology and Architecture
The HF+ uses a typical Filter->Tuner ->ADC architecture. So it is not a direct sampling receiver like most of the more expensive SDRs. Direct sampling receivers directly sample the analogue spectrum, without the need for a tuner so they avoid losses and the intermodulation problems that usually come from the mixing stages. But there are some major cutting edge technology differences in the HF+ architecture that should make its performance even better than direct sampling receivers.
Tuner: The tuner on the HF+ is one of the first to use a "Polyphase Harmonic Rejection" architecture. Essentially this means that harmonics produced in the mixing stages are naturally rejected, making the front end filtering requirements much more relaxed. So unlike the tuners used in other SDRs, this one is extremely unlikely overload in the mixing stage.
An additional benefit to this architecture is that the mixer is very low loss, so the LNA in the tuner only needs to use low gain, giving it a very high IIP3 value. So the first LNA which is typically another point of saturation and imermodulation, is very unlikely to saturate in the HF+ design. Most of the amplification only occurs after the mixing stage with the filtered narrowband output of the tuner.
Analogue to Digital Converter (ADC): The ADC is 16-bits and uses a "Sigma Delta" (ΣΔ) design. Basically a Sigma Delta ADC has a natural filtering ability due to its narrowband nature. Instead of seeing say a 30 MHz signal, it only sees 1 - 2 MHz, thus increasing dynamic range and reducing the likelihood of out of band overload.
Digital Down-Converter (DDC): Then after the ADC is a DDC which decimates the output from the ADC, increasing the effective number of bits. The more bits the larger the resolution of the digitized RF signal, so weak signals are less likely to be lost when converted from analogue to digital.
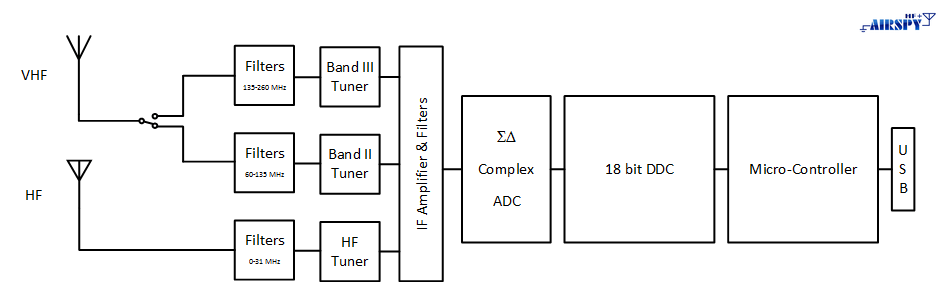
The HF+ Block Diagram
So the block diagram flow goes like this:
A weakly filtered signal enters the tuner, is weakly amplified by the tuner LNA, mixed down to baseband and filtered to 1-2 MHz. It is then amplified and sampled with the sigma delta ADC into 16-bits. The DDC decimates the output into 18-bits which is then sent to the microcontroller and PC via USB.
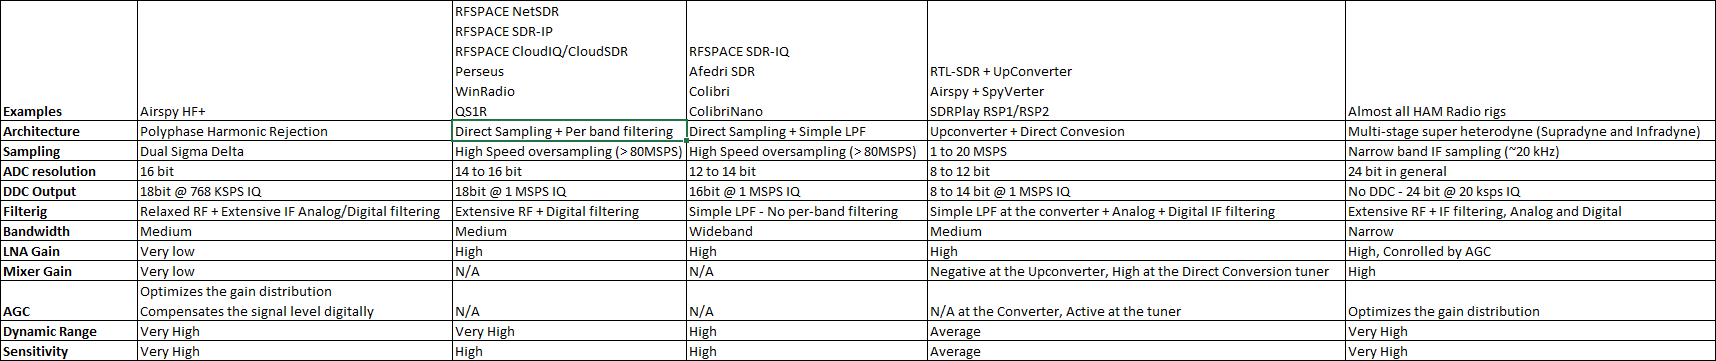
The Airspy team also compiled this comparison chart for us to understand the differences in architecture between the current SDRs on the market (click to enlarge). This shows that the HF+ is a different type of design compared to other SDRs. Generally the best SDRs out the market right now are direct sampling receivers with many filter banks. The HF+ approaches the problem in a different way, and according to the specs seems to match or better the performance of heavily filtered direct sampling receivers.
Performance from the Airspy HF+ product page is stated as:
-141.0 dBm (0.02 µV / 50 ohms) MDS Typ. at 500Hz bandwidth in HF
-141.5 dBm MDS Typ. at 500Hz bandwidth in FM Broadcast Band (60 – 108 MHz)
-139.5 dBm MDS Typ. at 500Hz bandwidth in VHF Aviation Band (118 – 136 MHz)
-139 dBm MDS Typ. at 500Hz bandwidth in VHF Commercial Band (136 – 174 MHz)
-138 dBm MDS Typ. at 500Hz bandwidth in the upper VHF Band (> 174 MHz)
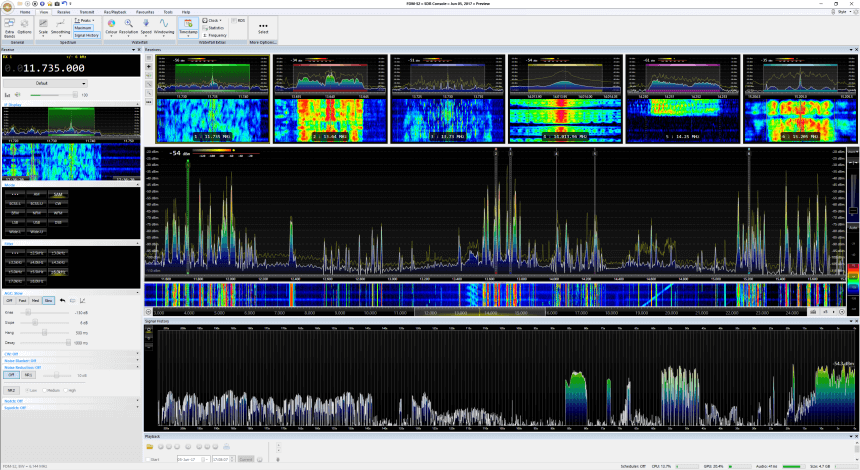
SDR-Console is a popular RTL-SDR compatible multi purpose SDR software package which is similar to programs like SDR#, HDSDR and SDRuno. Currently SDR-Console V2 is the stable version and SDR-Console V3 is in a beta state. A few days ago SDR-Console V3 Preview 6 was released. It comes with some very interesting new features including a built in Airspy server, a recording scheduler, a new feature called signal history and a new receivers pane.
“Signal History” takes the signal strength of the given bandwidth each 50 milliseconds, which can be saved in a CSV file. It is also shown in three different speeds on a display.
“Receivers’ Pane” shows up to six combos of spectrum/spectrogram of the complete up to 24 parallel demodulators (they additionally can be shown in the Matrix, as in former versions).
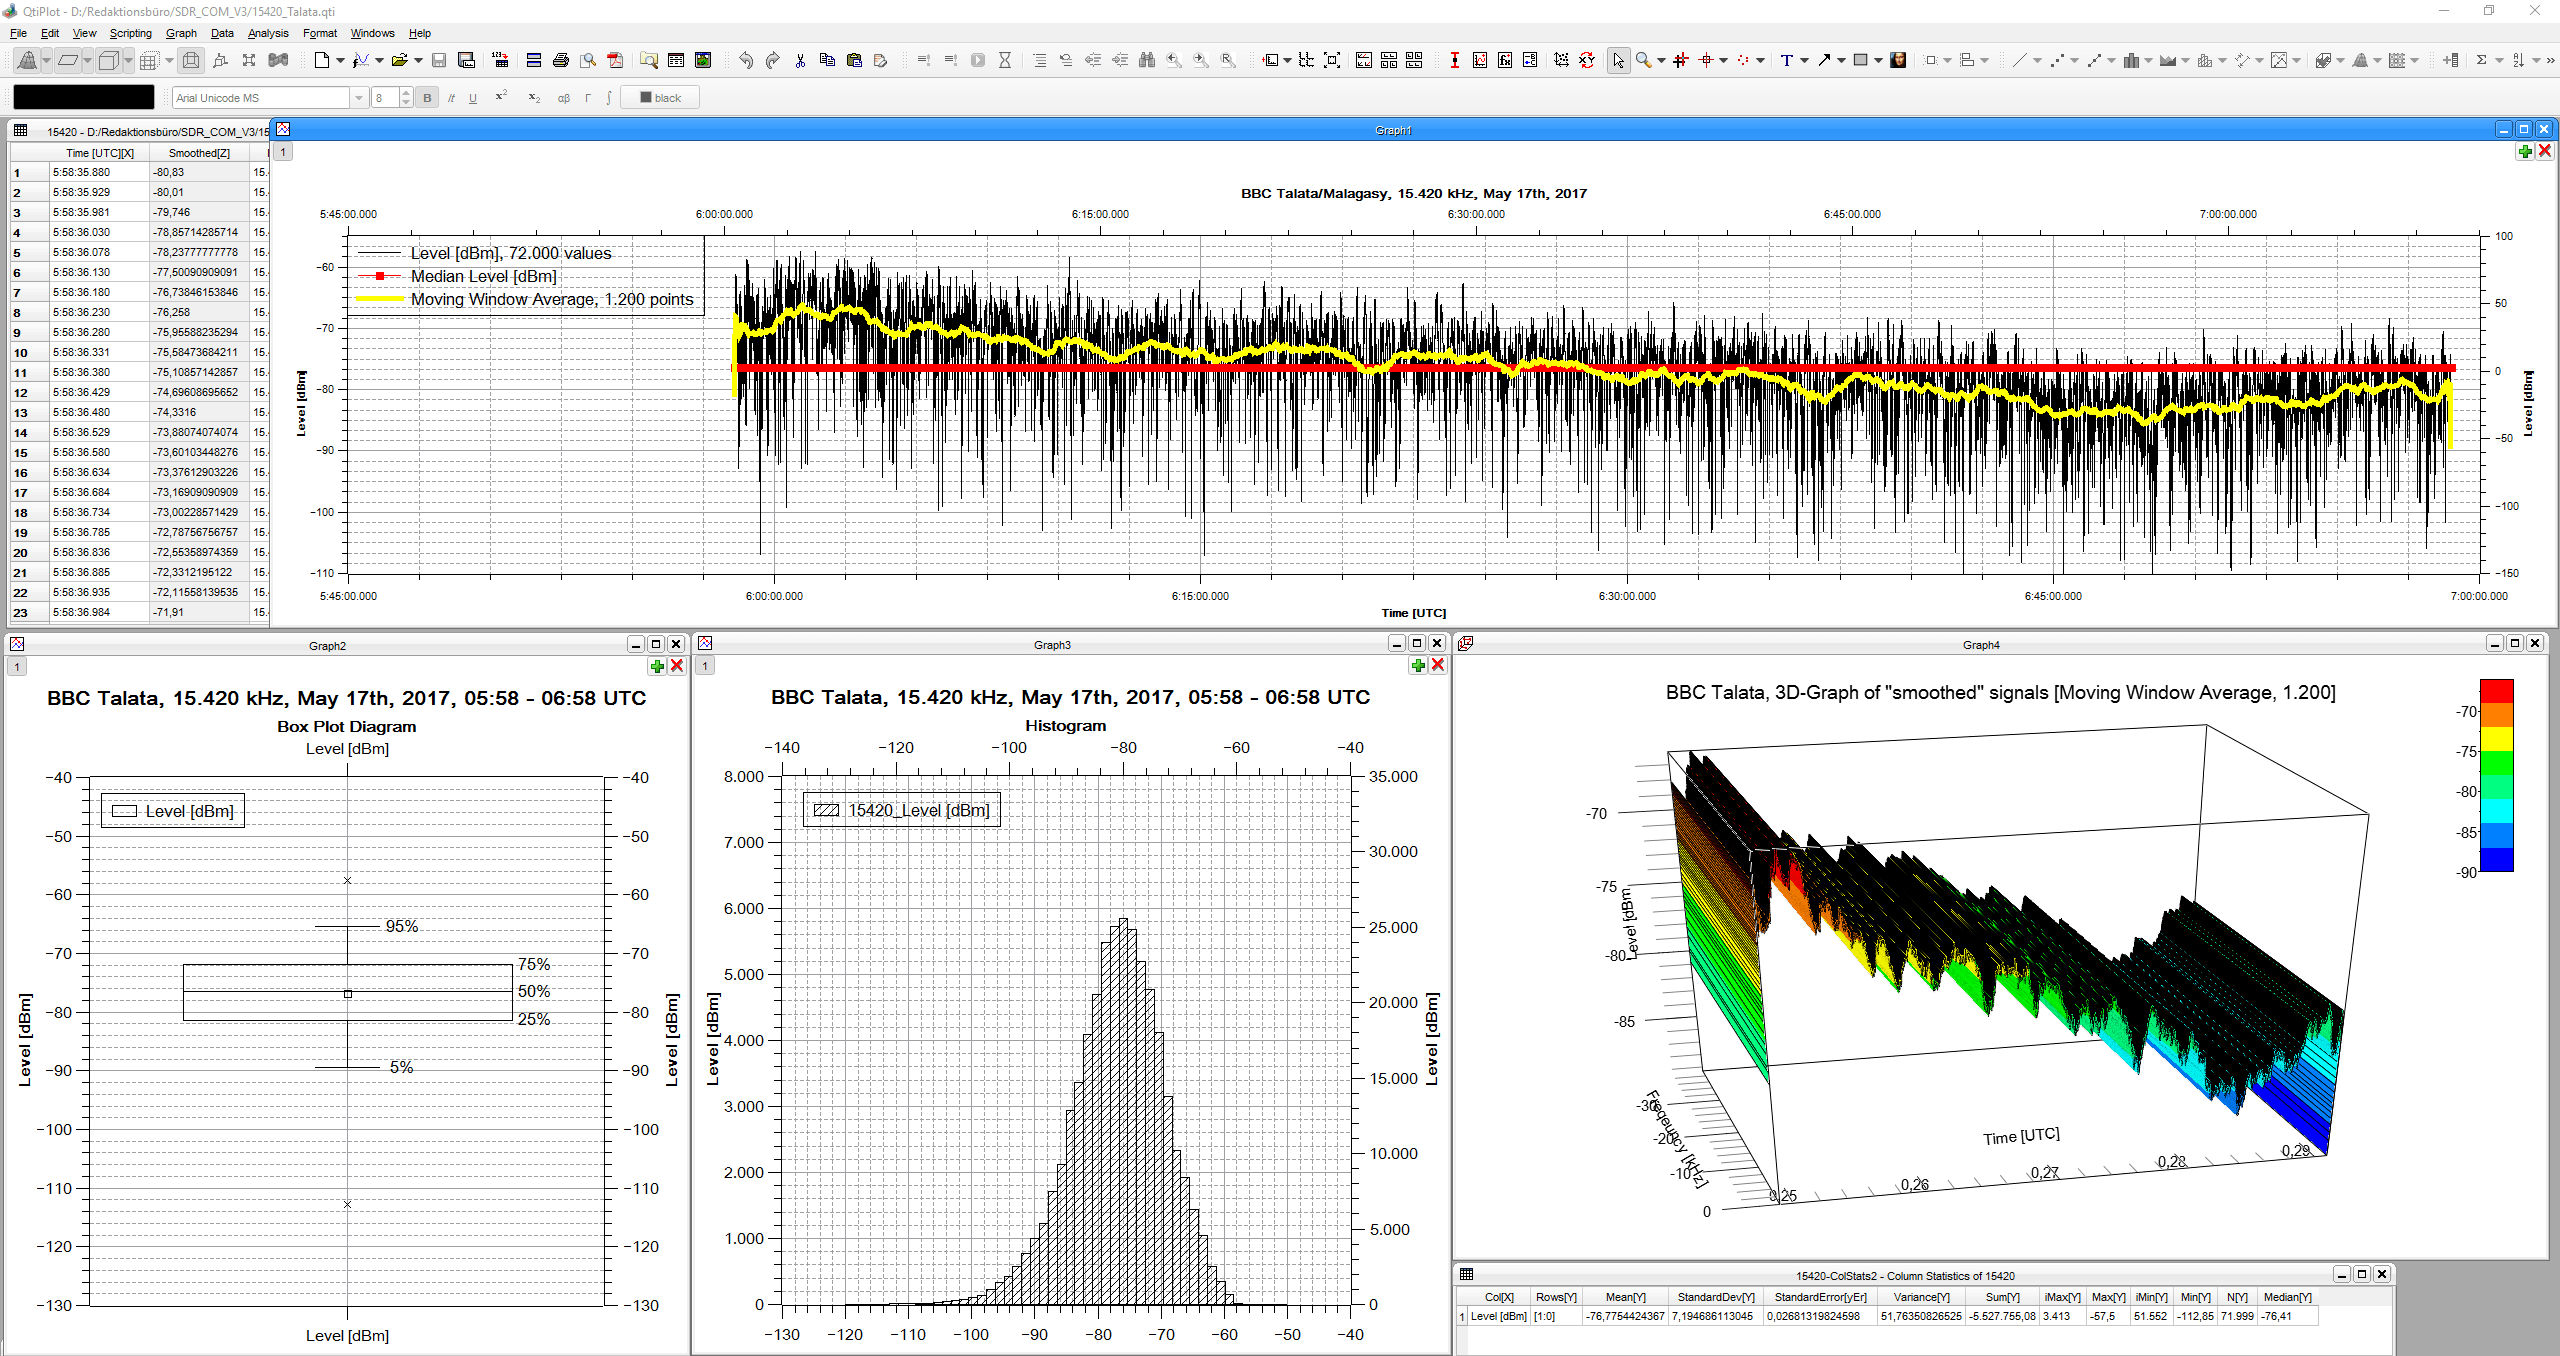
“Signal History” offers many applications, to name just three:
analyze fading and its structure with an unsurpassed time resolution of 50 ms
document fade-in and fade out
measure signal-to-noise ratio of signals
In addition Nils has also uploaded a very useful 19 page PDF where he writes step by step instructions and shows numerous examples of the new signal history tool.
DK8OK’s SDR-Console V3 P6 Screenshot. Showing multiple receiver panes and the new signal history feature.DK8OK’s screenshot of the signal history toolbox.