Over on YouTube the web show Hacker Warehouse have created a video explaining wireless pagers and how RTL-SDRs can be used to sniff them. In the video host Troy Brown starts by explaining what pagers are and how they work, and then he shows how to decode them with SDR# and PDW. We have a tutorial on this project available here too.
Later in the video he shows some examples of pager messages that he's received. He shows censored messages such as hospital patient data being transmitted in plain text, sports scores, a memo from a .gov address claiming allegations of abuse from a client, office gossip about a hookup, a message about a drunk man with a knife, a message from a Windows server with IP address and URL, a message from a computer database, and messages from banks.
In the past we've also seen an art installation in New York which used SDR to highlight the blatant breach of privacy that these pager messages can contain.
Over on Twitter and his github.io page, Pieter Noordhuis (@pnoordhuis) has shared details about his low cost RTL-SDR based GOES satellite receiving setup. GOES 15/16/17 are geosynchronous weather satellites that beam back high resolution weather images and data. In particular they send beautiful high resolution 'full disk' images which show one side of the entire earth. As the satellites are in geosynchronous orbit, they are quite a bit further away from the earth. So compared to the more easily receivable low earth orbit satellites such as the NOAA APT and Meteor M2 LRPT satellites, a dish antenna, good LNA and possibly a filter is required to receive them. However fortunately, as they are in a geosynchronous orbit, the satellite is in the same position in the sky all the time, so no tracking hardware is required.
In the past we've seen people receive these images with higher end SDRs like the Airspy and SDRplay. However, Pieter has shown that it is possible to receive these images on a budget. He uses an RTL-SDR, a 1.9 GHz grid dish antenna from L-Com, a Raspberry Pi 2, the NooElec 'SAWBird' LNA, and an additional SPF5189Z based LNA. The SAWBird is a yet to be released product from NooElec. It is similar to their 1.5 GHz Inmarsat LNA, but with a different SAW filter designed for 1.7 GHz GOES satellites. The total cost of all required parts should be less than US $200 (excluding any shipping costs).
Pieter also notes that he uses the stock 1.9 GHz feed on the L-com antenna, and that it appears to work fine for the 1.7 GHz GOES satellite frequency. With this dish he is able to receive all three GOES satellites at his location with the lowest being at 25 degrees elevation. If the elevation is lower at your location he mentions that a larger dish may be required. It may be possible to extend the 1.9 GHz L-Band dish for better reception with panels from a second cheaper 2.4 GHz grid dish, and this is what @scott23192 did in his setup.
For software Pieter uses the open source goestools software that Pieter himself developed. The software is capable of running on the Raspberry Pi 2 and demodulating and decoding the signal, and then fully assembling the decoded signal into files and images.
SDR# plugin developer Eddie Mac has again released a new plugin for SDR# called "SDR# Plugin Manager". This plugin is designed to make it easy to install, remove and re-order other SDR# plugins. Also included is a repository browser. This is a repository of many known SDR# plugin links which can be used to download and install a plugin with a simple click of a button.
If you are interested in programming your own plugins, Eddie also offers the following advice which he posted in our forum:
A good place to get started programming plugins is to download the express version of .NET (free for personal use) and install at least the C# pack. Then go to the Airspy website and download Youssef's zipped examples on coding plugins. While they are not documented you can use them as an example of the steps involved.
If you know a bit of c++ that is great it should be a good spring board to learn C#. In fact, you can even program simple plugins (like my tuner knob) in Visual Basic. Both C# and VB.NET compile to Common Language Run time anyway so to SDR# it's not much difference. The only caveat is that if you want to create any plugins to do processing on signals of any sort you MUST use C# as it supports the data types SDR# uses and VB does not. As well, VB does not allow unsafe code which C# can be instructed to allow.
Another great resource for learning to program plugins for SDR# is GitHUb and another great place is Andrej Mohar's website where he actually has a tutorial and an good explanation of the plugin coding process. You can find it here http://www.andrej-mohar.com/plugin-basics-for-sdr
If you would like an example of a "stencil" as you call it - a template, I would be happy to share a template in both VB and C# for you to use to start to learn. However, I would suggest begginning with C# from the start.
The basics of it is that the "plugin" is actually in interface that is called while SDR# loads. The "Plugins.xml" file tells SDR# what your dll is called and what the name of the plugin is. Once it has initialized your plugin, SDR# sharp asks the plugin for a "panel" control which contains the controls for your plugin. In also returns to you a "control" object interface that allows you to receive notifications of program value changes or to set program values. There are more complex things you can do but the basics are simple.
This is an excerpt from our book on RTL-SDR which we've decided to post given that many new users struggle to understand all the settings in SDR#.
SDR# is currently the most popular SDR program used with the RTL-SDR. It's easy to set up and use. To install SDR#, go through our Quickstart Guide. Below we explain some of the settings and displays in SDR#.
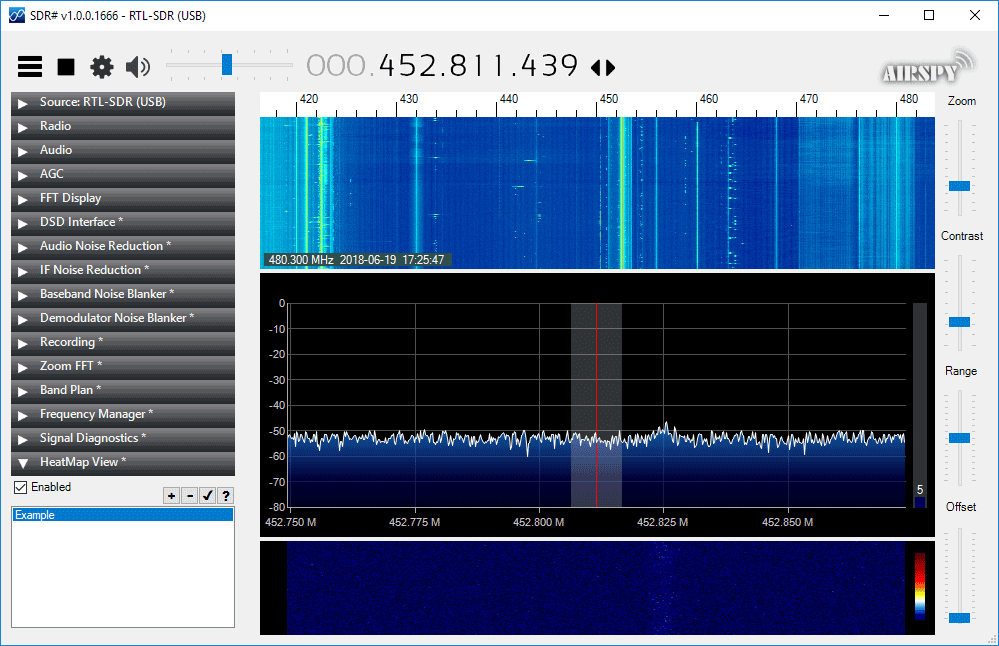
Upon opening SDR# you'll be greeted with the screen shown below. Here we have highlighted the main parts of SDR#
After opening SDR# for the first time, we suggest that you immediately remember to perform the following steps (if you don’t know what some of these steps are, continue reading further below for more information):
Increase the RF gain from zero to a higher value in the configure menu.
Reduce the range slider on the right of the SDR# window to about -70 (for RTL-SDR dongles).
Enable the “Correct IQ” setting to remove the center spike if using an R820T/R820T2, or enable “Offset Tuning” in the configure menu if using an E4000/FC0012/13.
Turn off the “Snap to grid” setting, or adjust the PPM offset accordingly.
Set the 'Mode' to the correct setting for the signal that you are listing to.
Over on YouTube Debashish Sahu has uploaded a video showing how he uses an RTL-SDR to capture and decode consumption data from his home electric/gas/water utility meters. He uses the rtl_amr software which already supports a wide range of meters such as Debashish's gas meter. Later in the video he shows a Python script that he's written which continuously grabs the data from rtl_amr, and passes it into the Home Assistant software using JSON. Then in Home Assistant the data is graphed, and he is able to determine points of interest, such as when appliances turned on or off.
Using RTL-SDR to read values from wireless electric/gas/water meters
The Freqshow software is an RTL-SDR compatible tool for Raspberry Pi devices that can render live spectrum and waterfall displays. It is designed to run on portable touchscreens that plug into the Raspberry Pi. We've posted about freqshow a few times in the past.
The additional features are many. Additional features include: Full resolution zooming, I and Q Swap, 9 different pre FFT windowing functions to choose from. Center frequency offset or shift. PPM correction for the RTL2832. FFT averaging or FFT peaking. Easy frequency up and down from main screen. Easy Scale adjustment from main screen.
On YouTube he's also posted a video that demonstrates the software in action when running on an Adafruit 2.8" and Pi Foundation 7" TFT capacitive touch screen. Dan uses the software as a panadapter for his ham radio.
"RTL_TCP SDR" is a little different to "SDR Receiver" because it contains a full spectrum analyzer and waterfall display, whereas "SDR Receiver" only allows you to listen via presets or manual tuning. Both apps can not access the RTL-SDR directly on the iOS device due to Apple limitations. An external server on a Raspberry Pi or PC running rtl_tcp is required. Programmer HotPaw writes about his App:
An RTL-SDR Software Defined Radio receiver for iOS devices (requires an external rtl_tcp server). Listen to VHF AM and FM radio signals. View a waterfall of the RF spectrum. Connect, via the rtl_tcp network protocol, to a networked RTL-SDR USB peripheral.
iOS devices do not currently support the direct connection of USB devices such as an RTL-SDR. Thus, the use of this app requires network access to a server, such as a Raspberry Pi (or Mac), with an RTL-SDR unit plugged into its USB port, and running the rtl_tcp protocol at an TCP/IP network address accessible from your iOS device. The Raspberry Pi acts, essentially, as a USB port adapter for your iOS device.
No support is provided for installing any of the software needed to use this app with a Raspberry Pi. Please do not download this app unless you are already familiar with Software Defined Radio, have an RTL-SDR USB device, and have already installed and tested rtl_tcp on your Raspberry Pi, Mac, or other server.
Since Apple's iOS doesn't allow an RTL-SDR to be plugged directly into a Lightning port (even with a USB adapter), an rtl_tcp adapter, such as a Raspberry Pi (or Pi Zero) server is required.
This app is an experiment in real-time DSP and SDR coding using Apple's Swift and Metal GPU-shader programming languages. It includes a spectrum waterfall, and supports demodulating FM, AM, and SSB. Also, includes beta test support for the AirSpy HF+.
Programmer P. Lutus has recently released a new Python based software defined radio application that he calls "PLSDR". PLSDR is a full receiver, with spectrum and waterfall displays, a frequency manager, and support for multiple modes such as AM/FM/SSB/CW. Being Python based PLSDR supports both Linux and Windows. Compatible hardware includes the RTL-SDR, HackRF and SDRplay, however Lutus notes that he could only get the SDRplay working on Linux.
The PLSDR download page also contains various bits of information about the DSP math behind designing the SSB demodulator. Essentially he found that no online examples of GNU Radio based SSB demodulators were correctly implemented, so he decided to research and implement his own design. He also notes that PLSDR was designed by initially prototyping each function in GNU Radio first, before moving it over to Python. This approach allowed him to easily check his fundamental design before optimizing it for Python. If you are interested Lutus also has a very useful page dedicated to explaining the DSP basics behind SDRs.
PLSDR is fully open sourced and available on GitHub. Exploring the code may be a good way to learn about SDR concepts.