Category: RTL-SDR

New RTL-SDR Drivers and SDR-Console ExtIO Available: Bias Tee Support, Direct Sampling, Tunable IF Filters and Improved Gain Profiles

Recently two branches of RTL-SDR drivers were updated. Over on GitHub racerxdl’s librtlsdr branch adds bias tee support for our V3 RTL-SDR.com dongles to rtl_adsb, rtl_fm, rtl_power and rtl_tcp.

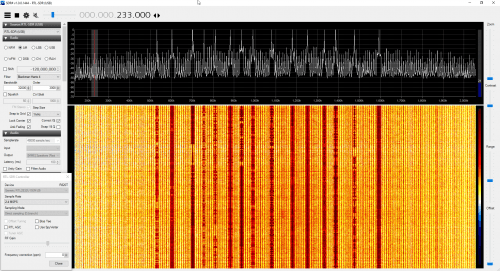
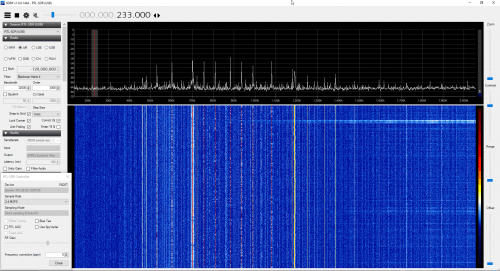
For SDR-Console users jdow’s ExtIO and driver now has an option to enable the direct sampling mode, which is allows the HF mode on our V3 dongles to be activated. The ExtIO module can be downloaded from her Google drive.

To use Joannes drivers download the SDRconsole folder by right clicking it, and selecting download. Then copy files from the x86 (32-bit) or x64 (64 bit) folders into the SDRConsole folder, replacing any files that already exist. Run the RtlSdr Catalog.exe file, then open SDR-Console and from the definitions choose RTL-SDR(Full). Then in the Radio Configuration settings you can choose to use the Q-branch, which will automatically enable the direct sampling mode when tuned below 24 MHz.

SDRConsole with a V3 dongle and HF Direct Sampling.

We’ve also discovered that Joanne has been working on RTLSDR++, which is a driver upgrade that includes some pretty interesting enhancements. When running Joanne’s drivers in SDR-Console we also see options to change the IF filter bandwidths of the R820T2 tuner. This is very useful as this allows you to control the preselector on board the R820T2. You can use this to attenuate strong out of band signals. Her driver also has improved gain profiles. One gain profile is optimized to reduce IMD distortion (prevent overload and images), and the other is designed to optimize sensitivity.

RTLSDR++ Driver: New IF bandwidth settings for preselection.
RTLSDR++ Drivers: New Gain Options

In addition Joanne has also created RtlTool.exe which is a GUI replacement for rtl_test.exe and rtl_eeprom.exe. It can be used to test for lost samples on your RTL-SDR and to flash the EEPROM memory. Most RTL-SDR dongles on most PCs are stable up till 2.56 MSPS, but this tool can be used to check. It can also be used to set the dongle serial number, vendor ID and name by flashing the EEPROM which most RTL-SDRs contain.

There’s also the RtlSdr Catalog tool which also helps manage multiple dongles being connected to the PC at once. See the readme file for more information on using this tool.

All these programs can also be downloaded from Google drive. Her RTL++ driver is also open sourced and available on GitHub.

RTLTOOL
RTLTOOL

Reverse Engineering and Reading Data from a Wireless Temperature Meter: Tutorial + Code

On GitHub user spenmcgee has uploaded a write up and Python software that decodes data from a Lacross TX29 wireless temperature meter. Spenmcgee’s write up goes into excellent detail about how he actually wrote the program and reversed engineered the transmitter.

First he explains how he used Python to extract the data from the RTL-SDR I/Q samples. From those samples he calculates the amplitude data, and plots it on a graph which shows the digital signal. He then decimates the signal to reduce the number of samples and figures out how to detect the preamble, data bits and packet repetitions. Then to decode the signal he explains how he does clock recovery, convolution and thresholding, and also the importance and meaning of those steps.

If you’re new to reverse engineering signals and don’t have a DSP background, then spenmcgee’s write up is an excellent starting point. It’s written in a way that even a layman should be able to understand with a little effort. If you have a Lacross TX29 wireless temperature meter that you just want to decode, then his code will also be of use.

Bits detected from the RTL-SDR data.

ThumbNet N3 Unboxing and Nongles.com: SDR Lego

NOTE: Please do not go to the Nongles.com site linked in this post as it has been taken over by explicit content. This post is from 2016 and is outdated as ThumbNet have moved away from dongle hardware. This post is now only kept up for archival purposes.

A few days ago we received a production sample of the new ThumbNet N3 receiver. Our sample came with the works, which includes the green aluminum enclosure and shielding can soldered on over the PCB. This full set costs $33.50 USD + $4.50 USD international shipping, but there are cheaper options if you do not want the aluminum case or the RFI shield.

We've only had a brief time to play around with it so far, but it's performance seems very similar to the prototype unit that they sent us earlier. We intend to give the N3 a longer review next week but our first impressions are favorable. In this post we'll simply unbox the unit, show some photos and give it a quick turn on test.

The N3 comes in a protective cardboard box with the N3 and Thumbnet/Nongles logo on it. Inside sits the ThumbNet N3 unit itself, and there is a power plug terminal block adapter located on the bottom of the box. Excluding the F-type connector, the ThumbNet unit has dimensions of 6.2 cm x 4 cm x 2.1 cm, and weighs 58g. The green enclosure is strong and rugged.

Unlike the prototype they sent, this unit can run direct from USB power alone. We saw that it draws about 400 mA of power, and we had no trouble running it from our 1A capable USB ports. Of course one of the main advantages to the N3 is the ability to power it with a low noise external power supply, and we will be testing that in the next review.

The ThumbNet N3 shipping box

Nongles SDR Lego

ThumbNet have also announced their new sister site, Nongles.com. On this site they intend to soon begin selling something called "Nongles" which is a mashup of "NOt a dONGLE". Nongles are an idea that can be best described as a type of "SDR Lego", and we think will be very interesting to people interested in experimenting with different SDR set ups and for use in education. Nongles will be based on the RTL-SDR design, but they are going to be split the RTL-SDR up into several discrete PCB modules/blocks such as:

  • R820T2 Module
  • RTL2832U Module
  • Experimenter Module
  • External Clock Module
  • LNA
  • Bias Tee
  • Signal Amplifier
  • 50 - 75 Ohm Transformer
  • Filter blocks such as SAW/FM Bandstop/High Pass/Low Pass and other DIY kits

Obviously you'll at least need the R820T2 and RTL2832U blocks to have a working system. Then the other blocks can then be added in as needed. The Nongles are not ready for sale yet so keep an eye on their website for news of their release.

New RTL-SDR Drivers and SDR-Console ExtIO Available: Bias Tee Support, Direct Sampling, Tunable IF Filters and Improved Gain Profiles

Recently two branches of RTL-SDR drivers were updated. Over on GitHub racerxdl’s librtlsdr branch adds bias tee support for our V3 RTL-SDR.com dongles to rtl_adsb, rtl_fm, rtl_power and rtl_tcp.

For SDR-Console users jdow’s ExtIO and driver now has an option to enable the direct sampling mode, which is allows the HF mode on our V3 dongles to be activated. The ExtIO module can be downloaded from her Google drive.

To use Joannes drivers download the SDRconsole folder by right clicking it, and selecting download. Then copy files from the x86 (32-bit) or x64 (64 bit) folders into the SDRConsole folder, replacing any files that already exist. Run the RtlSdr Catalog.exe file, then open SDR-Console and from the definitions choose RTL-SDR(Full). Then in the Radio Configuration settings you can choose to use the Q-branch, which will automatically enable the direct sampling mode when tuned below 24 MHz.

SDRConsole with a V3 dongle and HF Direct Sampling.

We’ve also discovered that Joanne has been working on RTLSDR++, which is a driver upgrade that includes some pretty interesting enhancements. When running Joanne’s drivers in SDR-Console we also see options to change the IF filter bandwidths of the R820T2 tuner. This is very useful as this allows you to control the preselector on board the R820T2. You can use this to attenuate strong out of band signals. Her driver also has improved gain profiles. One gain profile is optimized to reduce IMD distortion (prevent overload and images), and the other is designed to optimize sensitivity.

RTLSDR++ Driver: New IF bandwidth settings for preselection.
RTLSDR++ Drivers: New Gain Options

In addition Joanne has also created RtlTool.exe which is a GUI replacement for rtl_test.exe and rtl_eeprom.exe. It can be used to test for lost samples on your RTL-SDR and to flash the EEPROM memory. Most RTL-SDR dongles on most PCs are stable up till 2.56 MSPS, but this tool can be used to check. It can also be used to set the dongle serial number, vendor ID and name by flashing the EEPROM which most RTL-SDRs contain.

There’s also the RtlSdr Catalog tool which also helps manage multiple dongles being connected to the PC at once. See the readme file for more information on using this tool.

All these programs can also be downloaded from Google drive. Her RTL++ driver is also open sourced and available on GitHub.

RTLTOOL
RTLTOOL

Reverse Engineering and Reading Data from a Wireless Temperature Meter: Tutorial + Code

On GitHub user spenmcgee has uploaded a write up and Python software that decodes data from a Lacross TX29 wireless temperature meter. Spenmcgee’s write up goes into excellent detail about how he actually wrote the program and reversed engineered the transmitter.

First he explains how he used Python to extract the data from the RTL-SDR I/Q samples. From those samples he calculates the amplitude data, and plots it on a graph which shows the digital signal. He then decimates the signal to reduce the number of samples and figures out how to detect the preamble, data bits and packet repetitions. Then to decode the signal he explains how he does clock recovery, convolution and thresholding, and also the importance and meaning of those steps.

If you’re new to reverse engineering signals and don’t have a DSP background, then spenmcgee’s write up is an excellent starting point. It’s written in a way that even a layman should be able to understand with a little effort. If you have a Lacross TX29 wireless temperature meter that you just want to decode, then his code will also be of use.

Bits detected from the RTL-SDR data.

ThumbNet N3 Unboxing and Nongles.com: SDR Lego

NOTE: Please do not go to the Nongles.com site linked in this post as it has been taken over by explicit content. This post is from 2016 and is outdated as ThumbNet have moved away from dongle hardware. This post is now only kept up for archival purposes.

A few days ago we received a production sample of the new ThumbNet N3 receiver. Our sample came with the works, which includes the green aluminum enclosure and shielding can soldered on over the PCB. This full set costs $33.50 USD + $4.50 USD international shipping, but there are cheaper options if you do not want the aluminum case or the RFI shield.

We've only had a brief time to play around with it so far, but it's performance seems very similar to the prototype unit that they sent us earlier. We intend to give the N3 a longer review next week but our first impressions are favorable. In this post we'll simply unbox the unit, show some photos and give it a quick turn on test.

The N3 comes in a protective cardboard box with the N3 and Thumbnet/Nongles logo on it. Inside sits the ThumbNet N3 unit itself, and there is a power plug terminal block adapter located on the bottom of the box. Excluding the F-type connector, the ThumbNet unit has dimensions of 6.2 cm x 4 cm x 2.1 cm, and weighs 58g. The green enclosure is strong and rugged.

Unlike the prototype they sent, this unit can run direct from USB power alone. We saw that it draws about 400 mA of power, and we had no trouble running it from our 1A capable USB ports. Of course one of the main advantages to the N3 is the ability to power it with a low noise external power supply, and we will be testing that in the next review.

The ThumbNet N3 shipping box

Nongles SDR Lego

ThumbNet have also announced their new sister site, Nongles.com. On this site they intend to soon begin selling something called "Nongles" which is a mashup of "NOt a dONGLE". Nongles are an idea that can be best described as a type of "SDR Lego", and we think will be very interesting to people interested in experimenting with different SDR set ups and for use in education. Nongles will be based on the RTL-SDR design, but they are going to be split the RTL-SDR up into several discrete PCB modules/blocks such as:

  • R820T2 Module
  • RTL2832U Module
  • Experimenter Module
  • External Clock Module
  • LNA
  • Bias Tee
  • Signal Amplifier
  • 50 - 75 Ohm Transformer
  • Filter blocks such as SAW/FM Bandstop/High Pass/Low Pass and other DIY kits

Obviously you'll at least need the R820T2 and RTL2832U blocks to have a working system. Then the other blocks can then be added in as needed. The Nongles are not ready for sale yet so keep an eye on their website for news of their release.

Radio For Everyone: An Easy Homemade Outernet Antenna, More FlightAware Pro Stick Plus Results

Akos from the radio for everyone blog (formerly known as the rtlsdr4everyone blog) has uploaded two new posts. On the first post he shows some further tests on the new FlightAware Prostick plus. The Prostick is an RTL-SDR that contains a built in LNA and the Prostick plus adds an additional SAW filter on the stick. For him the Prostick Plus works significantly better than the regular Protstick + external FA cavity filter and also gets about twice the ADS-B reception reports as our V3 which does not use an additional internal LNA. Next week we hope to release our own review of the Prostick Plus, and we’ll hopefully be able to show and explain why some people see better performance with the plus and why some instead see degraded performance.

In his second post Akos shows a tutorial on building an easy helical antenna for Outernet reception. The antenna is constructed from readily available household materials such as a soda bottle, coax cable, electrical tape and a cookie tin. With the cookie tin used he was able to get a SNR reading between 7 – 9 dB, which is pretty good considering that only 3 dB is required for Outernet decoding to work.

Outernet hardware plus the homemade helical antenna made by Akos.

The 2016 /r/rtlsdr Reddit Giveaway

The mods of the /r/RTL-SDR community on the Reddit discussion platform are currently hosting an RTL-SDR themed giveaway. The prizes up for grabs include units which have been donated from ThumbNet (Nongles.com) and us at RTL-SDR.com. The prizes also include several donated home brew projects including filters and downconverters. See the table at the end of this post for the full prize list.

To enter all you need to do is write a comment on the competition thread at reddit.com/r/rtlsdr and mention what you like about SDR and what you hope to do with a prize if you win. While you’re at it we strongly suggest subscribing to /r/rtlsdr if you haven’t already as that is one of the the largest and most active communities of rtlsdr users on the web.

The competition closes on December 3rd and only one entry per household is allowed.

Place Prizes Description
1st-2nd 2 ThumbNet – Nongles.com N3 SDR RECEIVER
3rd-5th 3 RTL-SDR Blog V3 Dongle + Antenna Kit
6th-7th 2 $25 ThumbNet – Nongles.com Gift Certificate
8th-11th 4 RTL-SDR.com Blog V3 Dongle Only
12th 1 PA0RDT Mini-Whip Antenna
13th-14th 2 RTL-SDR.com Blog Broadcast FM Filter
15th-16th 2 Up to ~4.5GHz Microwave Downconverter
17th 1 70cm HamSat / 433 Combline BPF
18th-20th 3 Choice of Custom Made 5 Pole HF BPF/LPF/HPF

Two Videos That Show How To Set Up An Outernet Receiver

Outernet is a relatively new satellite based file delivery service which can be received with an RTL-SDR dongle. They continuously send out useful data like weather reports, news, APRS data as well as files like Wikipeda pages, images, videos and books. Previously we posted a tutorial that shows how to set up an Outernet receiver here.

If you instead prefer video tutorials, then two YouTube channels have uploaded Outernet set up tutorials. The first tutorial is by MKme Lab. In this video they set up Outernet using a Raspberry Pi and a Lipo battery for portable operation. Once setup he shows the Outernet browser and weather app in action.

DIY Raspberry Pi Outernet Satellite Receiver Assembly & Testing | #EduCase Project Build

The second video is by John’s DIY Playground and is similar, but goes a bit deeper into setting up the software on the Raspberry Pi and shows how to point the patch antenna towards the satellite.

Outernet satellite receiver using Raspberry Pi

An RTL-SDR Receiver App Written in Swift for MacOS

Over on YouTube user GetOffMyHack has uploaded a video that shows his development of a Mac based general purpose tuning app for the RTL-SDR, which was written in the Swift programming language. Swift is a programming language which is designed for creating apps for a wide range of smart Apple devices.

GetOffMyHack’s program currently has a spectrum and waterfall view, can tune to any frequency, demodulate NFM and AM, and it also has a built in CTCSS decoder. At the moment the software and code is unreleased, but he writes that in the future the code will be released and made open source once he reaches the next version in the development cycle. Keep an eye on his YouTube channel for any updates.

MacOS Desktop RTLSDR Application written in Swift

A Portable RTL-SDR Project

Frequent RTL-SDR.com reader Rodolfo recently wrote in to us wanting to share a portable RTL-SDR set up that he has produced. From the supplied photo the portable unit looks very robust and really well built. We hope that it will give inspiration to others wanting to make portable units as well. Rodolfo wrote:

Last year, a friend of mine in the telecommunication services industry, was talking to me regarding some kind of sporadic interferences he was getting in their devices, and asked if I can do something about it. I spend some days trying to figure a way to help him, as it was (and is) a good friend of mine. I seat in my library at home, and start to scratch some designs, based in rtl-sdr.com article published in 6 October 2014: “RASPBERRY PI RTL-SDR SPECTRUM ANALYSER SCANNER”. Some weeks later, I get the designs and get a good cup of coffee with him. After the second cup,  and I get a “go” sign, and so it born a portable spectrum capture that I called “sapinho”, as my youngest son nickname. Just “for the record”, “sapinho” in Portuguese means a little frog – you can jump from place to place to scan the RF band.

So, the device is very simple, the great problem was  finding the most small configuration possible, to meet the portable specifications:

  • Raspberry pi ver. B;
  • NooElec RTL Receiver;
  • “FreqShow” python software.
  • A pair of LM2596 DC-DC;
  • 3.5 ‘’ TFT LCD Touch Screen for Raspberry Pi;
  • 6VDc battery;
  • Cable;
  • Expandable antenna;
  • Enthusiasm.

Trying to get the most of it, I put a wifi dongle, so that he can connect to a nearby hotspot, or get a “had oc” connection for remote control. There is a plug for charging the batteries, and two red leds (one for the charging , and the other for operation status).  All of it was install in a 100 x 300 x 100 (mm) portable aluminum box.

Portable RTL-SDR Unit