SunFounder TS7-Pro Touch Screen Review: Building a Portable RTL-SDR Pi 4 System

The SunFounder TS7-Pro 7-Inch Touch Display is a portable high resolution 1024x600 7-inch touch screen with space on the back for a Raspberry Pi 4 to be mounted. It is also possible to mount an optional 2.5" SSD and 'PiPower' battery mount. The price of the TS7-Pro is currently reduced to $79.99 on Amazon and $89.99 in their direct store.

Last year in October we reviewed the 'RasPad 3.0' another SunFounder product that is a portable tablet enclosure for the Raspberry Pi 4. The RasPad is a more complete setup offering a full enclosure and built in battery. We reviewed the RasPad as we were curious to see how easy it would be to integrate a RTL-SDR on the inside. With some minor modifications we were able to successfully do this and create a portable RTL-SDR station. The RasPad 3.0 is a more costly device at US$259 on Amazon and $219 on their direct store.

This year SunFounder reached out to us again and asked if we wanted to test their TS7-Pro display, and see if it is possible to integrate an RTL-SDR.

Unboxing and General Assembly

SunFound TS7 Pro Boxed

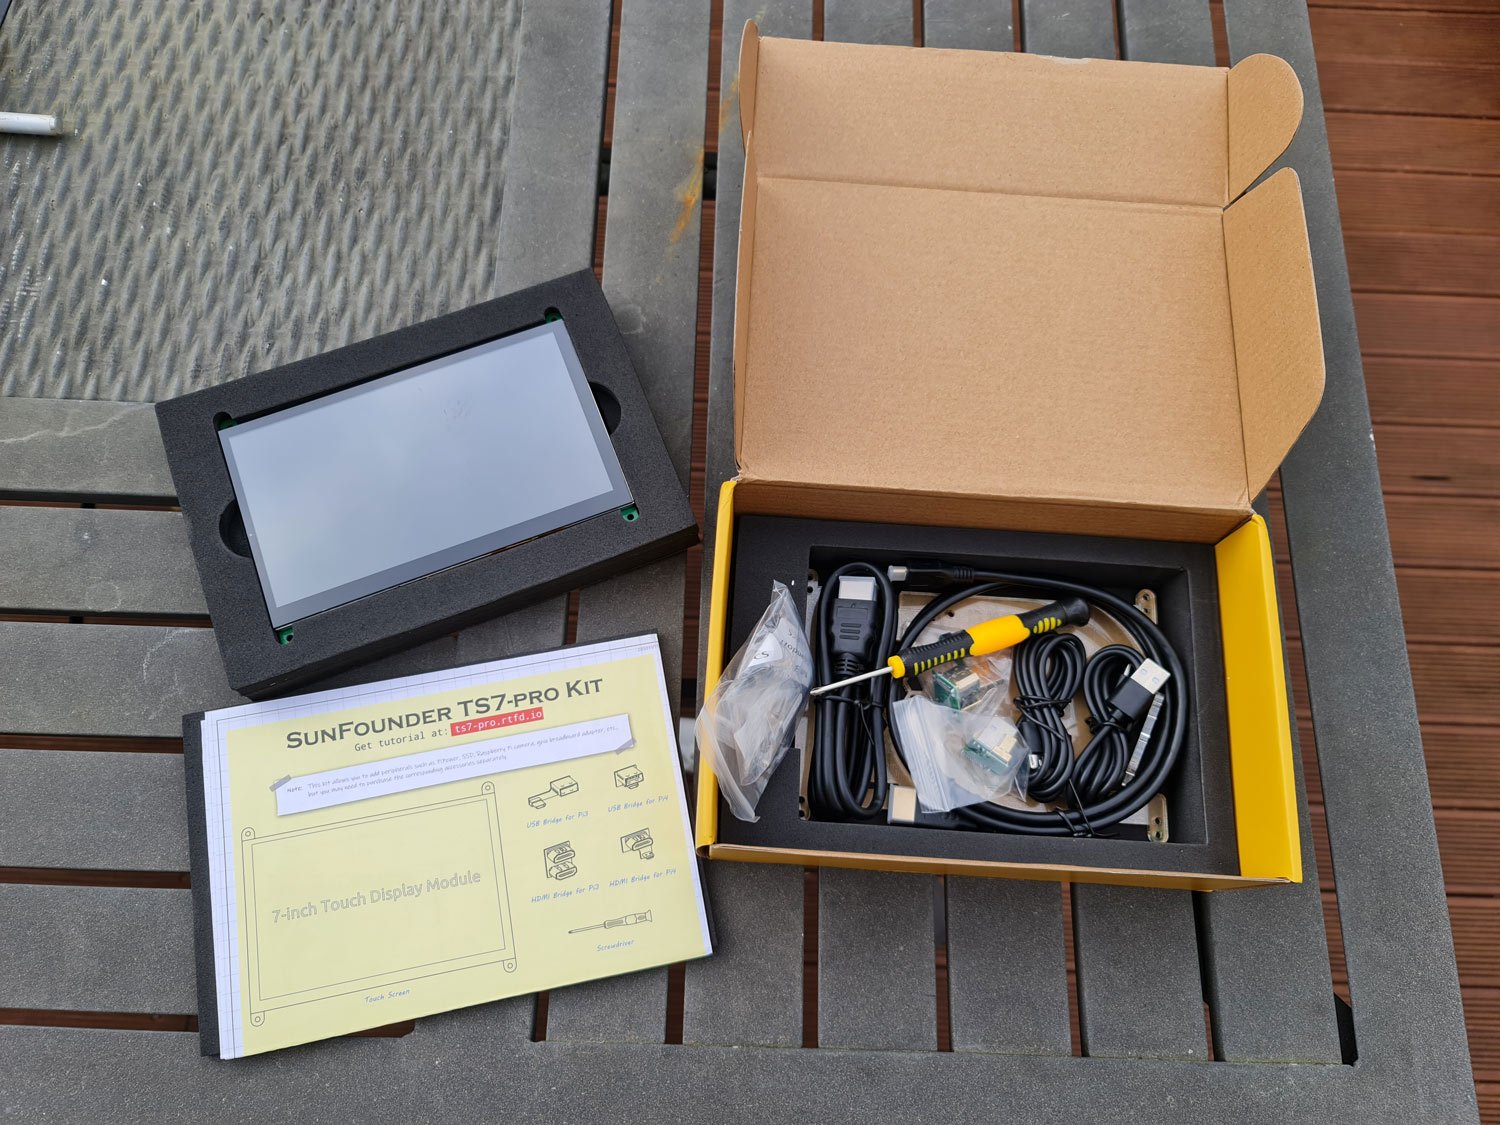
The TS7-Pro comes packed well with foam. Inside is the manual, acrylic cover, 2x HDMI and 2x USB cables, 2x USB-USB bridge adapter (one for the Pi 4 and one for the Pi 3), 2x Micro-HDMI to HDMI bridge (one for the Pi 4 and one for the Pi 3), various M3 screws, a screwdriver and the LCD screen itself. The cables are designed for people who want to use the screen as a suppletory PC screen, so we did not end up using them.

SunFounder TS7 Pro Unboxed

The rear of the LCD screen contains all the LCD driver circuity as well as speaker and mounting points for the Raspberry Pi to connect it's GPIO header. The required HDMI and USB connections between the Raspberry Pi and LCD screen are handled by small bridge connectors.

SunFounder TS7 Pro LCD Rear PCB

The assembly process is very simple. Just mount the Raspberry Pi on the back, connect up the HDMI and USB bridge adapters, and screw on the acrylic backing plate.

There is also a very useful metal kickstand on the back which allows the screen to sit almost upright for easy viewing when placed on a surface.

RTL-SDR Modifications

The acrylic backing plate is designed to be able to mount a 2.5" SSD and/or a 'PiPower' battery module. Instead of using these accessories we decided to see if we could instead fit an RTL-SDR Blog V3 and our own USB battery pack on the back.

The acrylic plate has several screw and venting holes which we made use of to simply zip tie the RTL-SDR onto the back. We then used a short USB extension cable with a right angle connector between the RTL-SDR and Pi 4. There is plenty of space on the inside between the PCB and acrylic plate, so the RTL-SDR can be hidden away with the antenna port still easily accessible.

The USB battery pack is a bit larger, so fits on the outside of the enclosure also via zip ties.

Portable RTL-SDR with SunFounder TS7 Pro
Showing how much space is available between the PCB and acrylic plate.

After tightening down the zip ties, and hiding away the excess cabling, the whole construction is stable and not likely to fall apart easily.

Operating and Testing

Both the LCD screen and Pi 4 need to be powered separately. So you will need a battery pack that can support at least two outputs, and one that can support the required power draw of the Raspberry Pi whilst also powering the LCD screen.

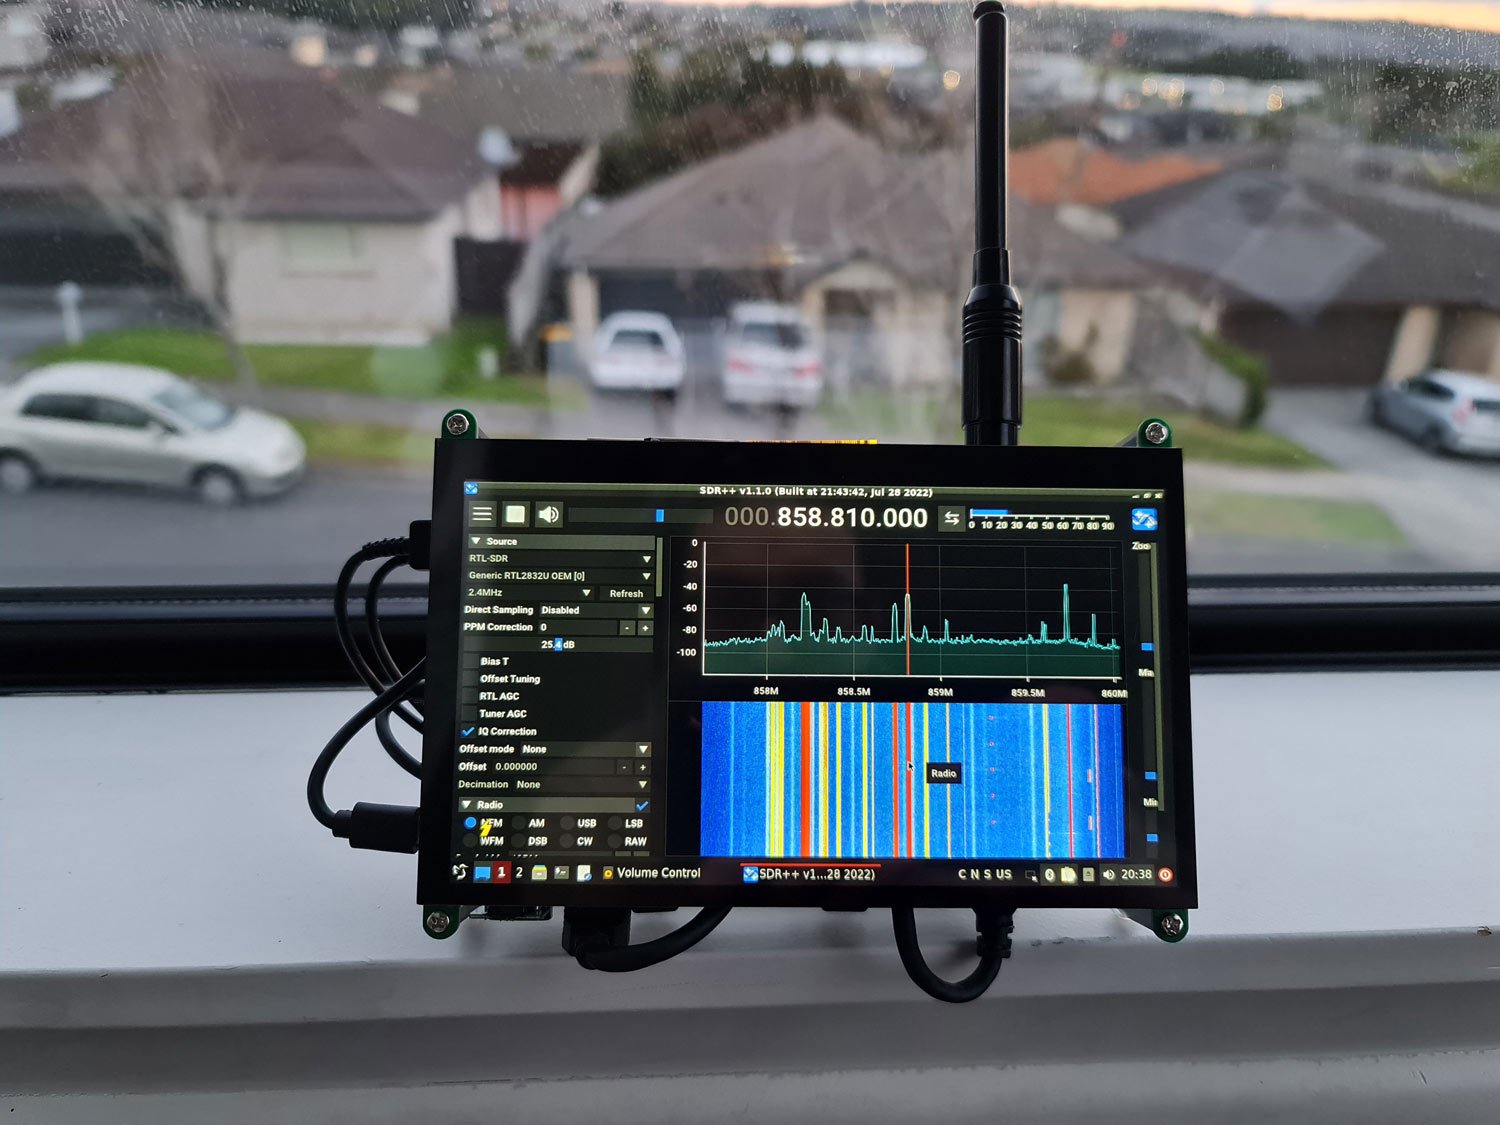
We also initially connected a simple whip antenna to the RTL-SDR, but had to change that later as we will discuss.

RTL-SDR and Battery Pack Zip Tied to the TS7 Pro

For software we installed the Pi64 version of DragonOS, which is a ready to use Pi 4 image that has many RTL-SDR compatible programs built into it. A reminder that any software issues we discuss are unrelated to the SunFounder hardware.

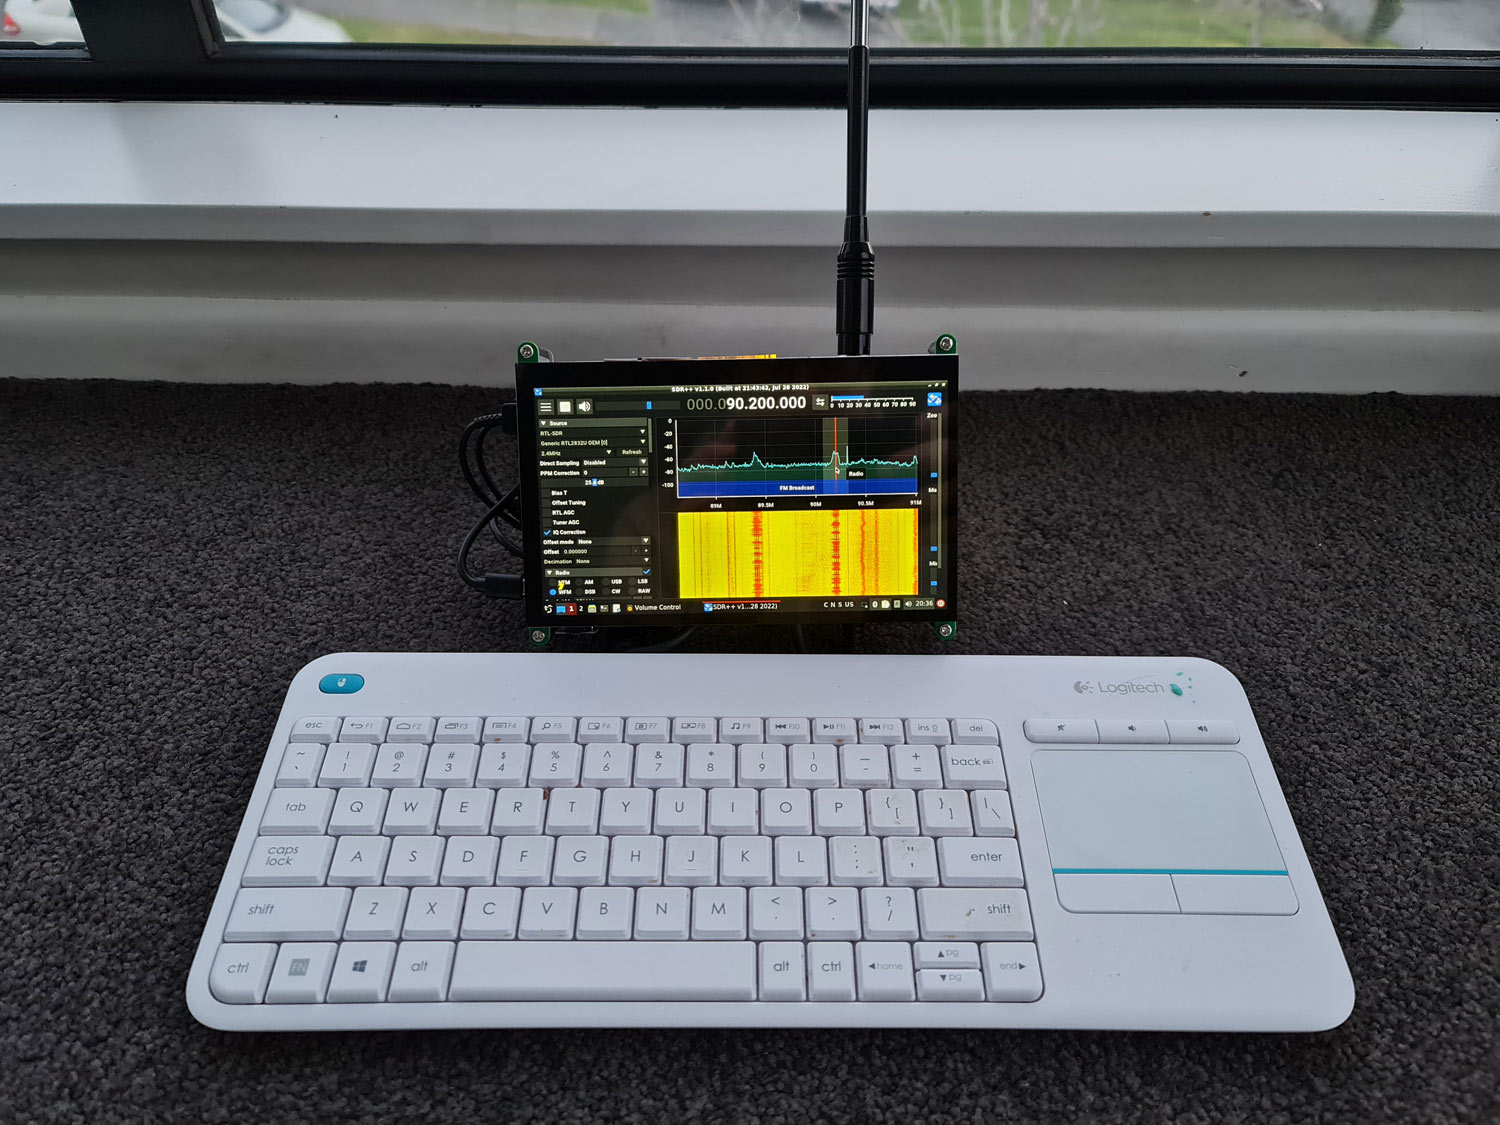
The touchscreen works as expected, however we did notice that there is an initial bug on boot where the onscreen keyboard won't work unless you try to log in once with an empty password first. However, as we discovered in the RasPad review, most SDR programs like SDR++ are not very well suited to touch screens, so in the end we ended up connecting a wireless keyboard for ease of use. 

Using a keyboard ended up also being a requirement in our tests, because the way we mounted the RTL-SDR meant that the screen was upside down. Using the screen in this 'upside down' orientation was preferred as the kickstand makes it sit a bit more upright and keeps the antenna more vertical. To get around the upside down screen we had to flip the screen in Ubuntu settings. Unfortunately flipping the screen does not also flip the touch screen inputs, so our touch inputs became inversed. There seem to be ways to fix this but we did not look further into the issue.

One other minor annoyance is that we found that the LCD screen would not get recognized by the Pi 4 when the keyboard's USB dongle was connected at boot. This may just be a Pi 4 issue, or an issue with our power pack unable to provide enough current at boot, as we have encountered similar issues in the past with Pi 4's used in other projects. Once the first text appears on the screen, connecting the keyboard USB dongle is possible. 

With a keyboard connected, SDR++ opened and ran smoothly, and looks great on the 7 inch screen. We note that we did have to apply a small configuration fix in the Ubuntu sound settings in order to get the built in speakers to work. The fix is the same one used in the RasPad review, so please see that review for more information.

With it's somewhat open back, cooling doesn't seem to be an issue and we never noticed the Pi 4 throttling, or the RTL-SDR overheating.

RTL-SDR TS7-Pro with Wireless Keyboard

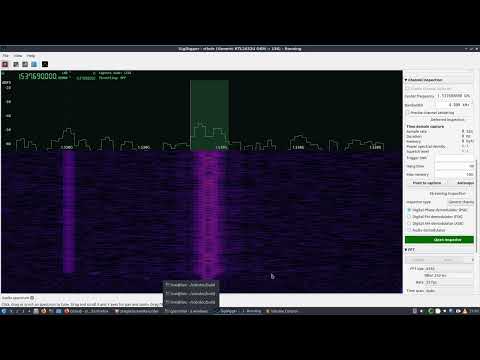
LCD Screen Interference

Again as we noted in the RasPad review, LCD screens are known to be big sources of RF interference and having the dongle and antenna this close to the screen electronics is not ideal. The image below shows what interference from the LCD screen looks like on the spectrum. Interference on the TS7 screen appears to be more pronounced when compared to the RasPad, possibly due to a different driver PCB with more exposed ribbon cables.

RF Interference from the TS-7 Pro LCD Screen

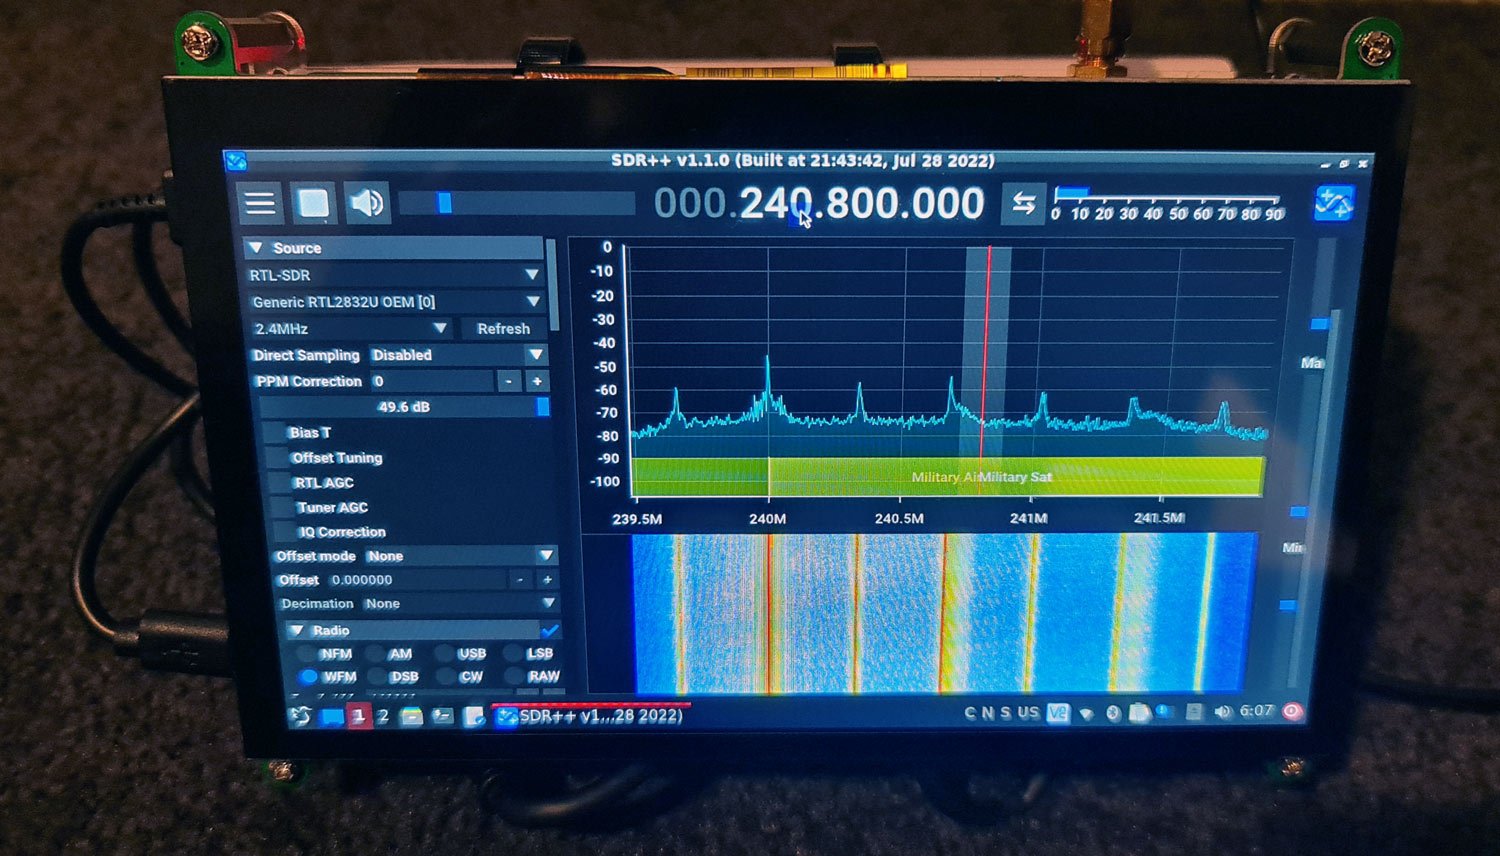
This interference is not present on all bands, and once an external antenna is used with a few meters of coax distance away from the LCD the problem reduces, but it doesn't go away fully. With an antenna disconnected there is almost no interference seen at full gain, so most of the interference appears to come through the coax cable and antenna. So we recommend using high quality shielded coax, as well as getting the antenna away from the LCD screen too.

Using a directly connected whip on a band with no LCD RFI

Conclusion

The SunFounder TS7 Pro is a nice and low cost product that allows you to easily connect a Raspberry Pi 4 to a touchscreen. Unlike the RasPad it does not come with a battery or enclosure, but this allows for a smaller form factor. The LCD screen itself is high quality, bright and  with good viewing angles.

Hacking an RTL-SDR and battery pack onto the back of the SunFounder TS7 LCD display is easily possible and does result in a very nice portable form factor. However, there are still wires hanging out the sides which make it a little less neat to carry around and store away, although all the connections seem secure. Mounting the assembly into a 3D printed enclosure could help neaten things up.

LCD interference remains an issue, but by using an external antenna with a few meters of good quality shielded coax the problem can be managed. 

Overall we think the product is an excellent starting point for any RTL-SDR Pi 4 project that requires a screen.

Disclaimer: We do not receive any compensation for this review apart from a free TS7 Pro.

SDR# Co-Channel Canceller and Micro Tuner Updates

SDRSharp (SDR#) is one of the most popular SDR programs that is used often with Airspy and RTL-SDR devices. Recently Youssef, the developer of Airspy products and the programmer behind SDR# has again been adding new enhancements to the software that allow AM DX listeners to easily receive channels that are even on top of each other in frequency.

The Co-Channel Canceller has been in SDR# since 2020, but recently enhanced for better performance and easier use, and a 'micro-tuner' feature has been added, allowing users to easily select the overlapping channel that needs to be cancelled. 

Earlier in the year the noise canceller was also improved with a 'NINR' (Natural Intelligence Noise Reduction) algorithm that appears to be one of the best noise cancellers available in SDR software today.

Youssef's twitter @lambdaprog contains several videos demonstrating the effectiveness of the updates.

WiFi Grid RTL-SDR Radio Telescopes featured in SARA2022 Conference Talks

Over on YouTube the Society of Amateur Radio Astronomers have recently uploaded talks from their SARA 2022 online conference. Two of the talks we've seen focus on describing results produced by small and cheap WiFi Grid RTL-SDR radio telescopes.

Back in early 2020 we first published an article about how it is possible to use get into amateur radio astronomy cheaply using off the shelf WiFi grid dishes, combined with a 1420 MHz LNA + filter, an RTL-SDR and the SDR# software with IF average plugin to measure the galactic hydrogen line.

In the SARA conference we've seen two talks expanding on the use of WiFi grids for radio astronomy. In the first talk Alex Pettit discusses how he's used a WiFi grid attached to an equatorial telescope mount, and a custom modified feed in his setup. In his talk he explains how to use the IF average plugin, and how he uses a MATLAB script to process and plot the saved data.

Alex Pettit: Galactic Hydrogen 1.42 GHz RF Emission Radio Astronomy for $300

In the second talk Charles Osborne describes his "Scope-In-A-Box" which consists of the WiFi Grid, LNA, Filter and RTL-SDR combination and compare the setup versus the same hardware used on a larger 3.7m dish.

Charles Osborne: Comparing Scope-in-A-Box to a 3.7m Dish

If you were interested in those talks, you might also want to check out the other talks from the conference, many of which also involve the use of software defined radios in the receive chain for various amateur radio astronomy experiments.

SI-SDR-UG Recorded Livestream: Corey Explains DF-Aggregator for KrakenSDR and KerberosSDR

The South Indian SDR User Group (SI-SDR-UG) have recently held their fourth live stream conference. This conference included some interesting talks such as:

  • "Introduction to GNU Radio Series, Part 2" by Neel Pandeya
  • "Silice, a Language for Hardcoding Algorithms into FPGA Hardware" by Dr.Sylvain Lefebvre
  • "RF Geo-Location for Everyone" by Corey Koval
  • "Overview of Wireless Channels, Part 1" by Aditya Arun Kumar

In particular we were interested in Corey's talk which starts at 1:27:40 and talks about DF-Aggregator, an open source mapping program he's written for KerberosSDR, KrakenSDR and any other radio direction finding hardware that can be adapted to the software. In the talk Corey explains what DF-Aggregator is and how the clustering algorithm works.

South Indian SDR User Group (SI-SDR-UG) Live Stream Event-4

A teardown of the early 2000’s Psion Wavefinder DAB SDR Receiver

The Psion Wavefinder was one of the first applications of SDR technology in consumer electronics. It was a Windows PC based USD DAB SDR radio receiver that released in the UK in October of the year 2000, for an initial price of £299. (In comparison RTL-SDR wasn't discovered until 2012).

Digital Audio Broadcast (DAB) is a digital replacement for analog broadcast FM. It provides high quality digital audio at the expense of higher cost receivers, and possibly greater difficulty with reception in weak or challenging RF environments. DAB is mostly only used in Europe and Asia Pacific regions, and is not found in the USA.

Due to the lack of popularity of DAB, combined with show stopping bugs in the official software (as seen in reviews), the Psion Wavefinder flopped as a product, and was promptly reduced to £49.99, and out of production by the year 2002.

Over on his YouTube channel backofficeshow, Andrew claims the Wavefinder as the first SDR Radio device and has filmed a teardown, and demonstration of the device working in a Windows XP virtual machine.

The main chips on the device consist of a CPLD DSP, RISC based USB controller, RAM and a fixed point DSP processor. According to some further information from a compatible third party Linux program called dabtools, the Wavefinder performs the COFDM demodulation in hardware on the DSP chips and then transfers the samples over USB for further SDR processing on the host computer.

Psion Wavefinder - The first SDR Radio Device

Decoding Inmarsat STD-C with Command Line Decoder STDCDEC and SigDigger

Over on his YouTube channel Aaron has uploaded a video showing how to use SigDigger and a C based command line Inmarsat STD-C decoder called 'stdcdec' together on his DragonOS SDR based Linux OS image.

STD-C is a marine satellite service that broadcasts messages that typically contain text information such as search and rescue (SAR) and coast guard messages as well as news, weather and incident reports. With the right software, an RTL-SDR and an appropriate L-Band satellite antenna like our 'Active L-Band 1525 - 1660 Inmarsat to Iridium Patch Antenna Set' these signals can be received and decoded.

The stdcdec software provides a way for command line only systems to receive and view STD-C data. In his video Aaron shows an example setup that uses SigDigger to determine the audio frequency offset, and receive the audio which is then passed to the stdcdec software. We note that SigDigger is a GUI based program but could probably be replaced with another CLI based program, in order to run on a headless system (as long as the tuning and audio center freq is determined before hand). Aaron is hoping to explore solutions for this in the future.

DragonOS Focal Rx and Decode Inmarsat-C Messages w/ SigDigger + STDCDEC (RTLSDR)

APT_COLOR: Add False Color to Black and White NOAA APT Images

Thank you to Sasha for submitting news about the release of their latest application called "apt_color". The most popular application for decoding APT weather satellite images from NOAA polar orbiting satellites is WXtoIMG. However, WXtoIMG is closed source and is abandonware. There are APT decoder alternatives, however unlike WXtoIMG most other open source APT decoders only provide black and white images, and do not have a false color feature.

The apt_color application can be used to turn black and white APT images received from NOAA satellites into false color images. Sasha writes:

I am working on an APT false color application here. The application is still in the very, very, early stages but still seems to produce good results. It does not need to rely on any overlays, it simply works off the data you give it - the original decoded image data. I will attach some results. NOAA-18 seems to be the best suited spacecraft for this program.

apt_color: Turn black and white NOAA images into false color
apt_color: Examples

Rolling-Pwn: Wireless rolling code security completely defeated on all Honda vehicles since 2012

Back in May we posted about CVE-2022-27254 where university student researchers discovered that the wireless locking system on several Honda vehicles was vulnerable to simple RF replay attacks. A replay attack is when a wireless signal such as a door unlock signal is recorded, and then played back at a later time with a device like a HackRF SDR. This vulnerability only affected 2016-2020 Honda Civic vehicles which came without rolling code security.

Recently a new vulnerability discovered by @kevin2600 that affects ALL Honda vehicles currently on the market (2012-2022) has been disclosed. The vulnerability is dubbed 'Rolling-PWN' (CVE-2022-27254) and as the name suggests, details a method for defeating the rolling code security that exists on most Honda vehicles. Rolling code security is designed to prevent simple replay attacks, and is implemented on most modern vehicles with wireless keyfobs. However @kevin2600 notes the following vulnerability that has been discovered:

A rolling code system in keyless entry systems is to prevent replay attack. After each keyfob button pressed the rolling codes synchronizing counter is increased. However, the vehicle receiver will accept a sliding window of codes, to avoid accidental key pressed by design. By sending the commands in a consecutive sequence to the Honda vehicles, it will be resynchronizing the counter. Once counter resynced, commands from the previous cycle of the counter worked again. Therefore, those commands can be used later to unlock the car at will.

The vulnerability has been tested on various Honda vehicles with HackRF SDRs, and this seems to indicate that all Honda vehicles since 2012 are vulnerable.

Although no tools have been released, the vulnerability is simple enough and we've already seen people replicate results.

The story of Rolling-Pwn has already been covered by magazines and news organizations such as TheDrive, Vice, NYPost, and FoxLA.

It should be noted that when the previous replay attack vulnerability was highlighted, Honda released a statement noting that it has no plans to update its older vehicles. It is likely that Honda will not issue updates for this vulnerability either. It is possible that this vulnerability extends beyond just Honda vehicles too.