Thank you to Marco Cardelli (IZ5IOW) who recently wrote in and shared with us his design for mounting a YouLoop antenna indoors, which he uses with his Airspy HF+ Discovery SDR receiver.
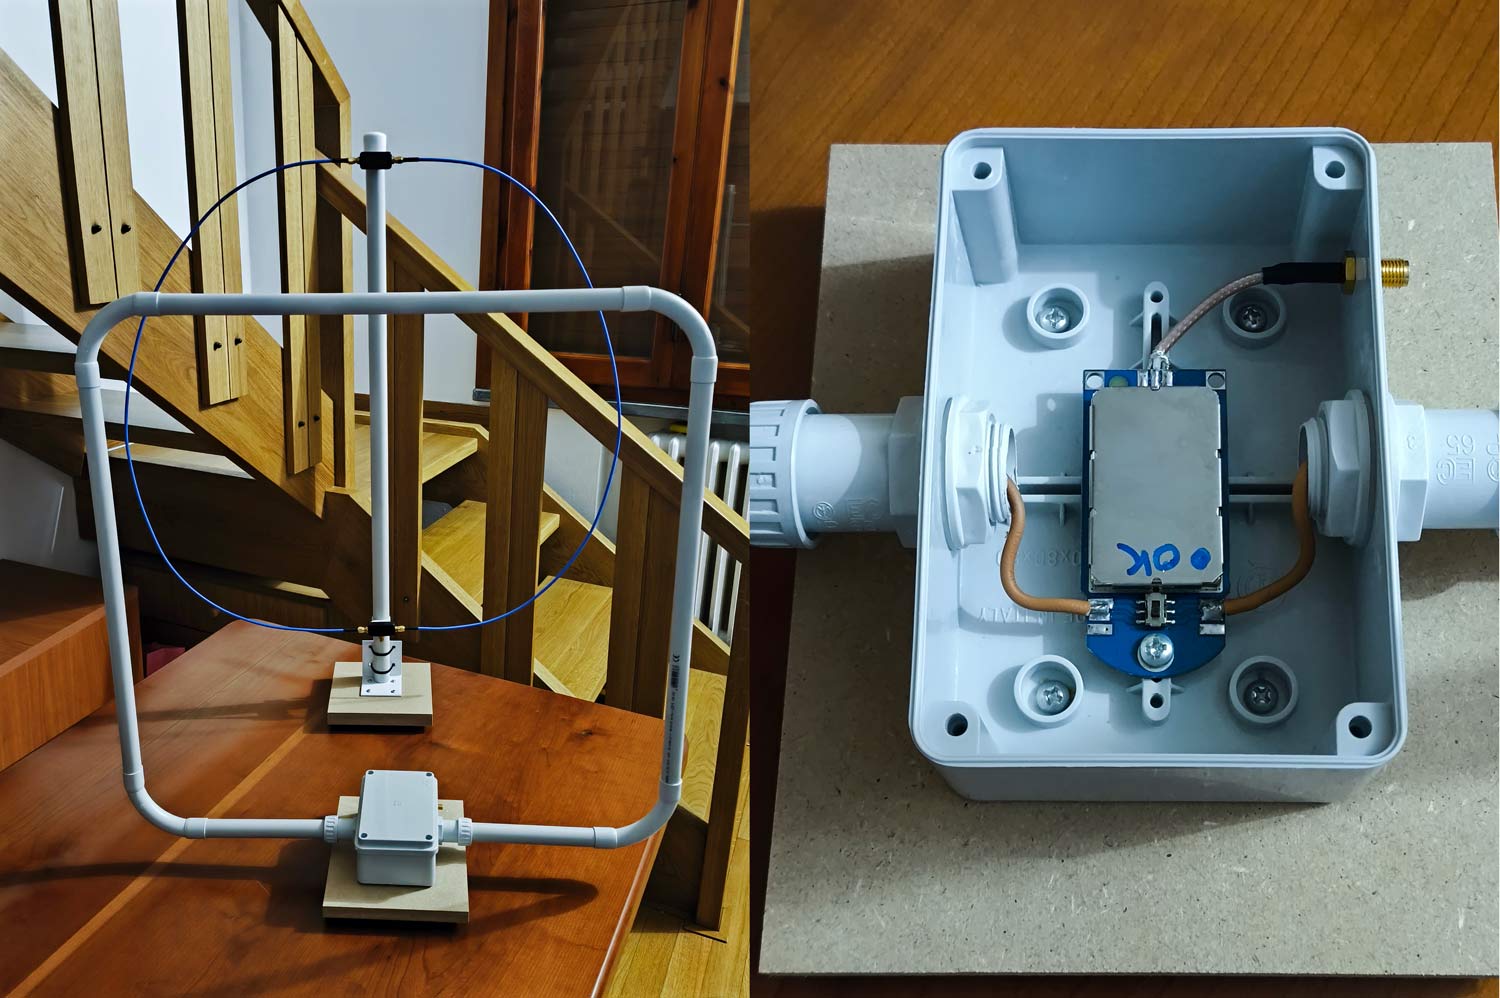
Marco's build involves an MDF wooden base measuring 15cm x 15cm, supporting a vertical mast made from a 70cm long, 25mm diameter PVC pipe. The mast is secured to the wooden base using a repurposed metal bracket and cable ties.
Additionally, Marco constructed square loop enclosure out of 20mm diameter PVC pipe for containing his HFDY active loop, measuring 60cm per side. The HFDY is an active loop variant of the YouLoop, available on sites like Aliexpress.
Marco's YouLoop stand, and the inside of the HFDY active loop.
The Airspy HF+ and HF+ Discovery are popular and affordable software defined radios that have a focus on excellent reception on the HF bands. Recently @lambdaprog, the creator of Airspy products has released updated firmware for the Airspy HF+ series of products. The announcement on X is shown below.
We're excited to bring you a special firmware update for the #Airspy HF+ series. This release delivers several key enhancements:
✅New, more robust USB streaming stack
✅Smoother and faster tuning
✅Enhanced AGC behavior
Thank you to Nobu who has submitted news about the release of his new product, a machined aluminum enclosure for the Airspy HF+ Discovery. The Airspy HF+ Discovery comes by default in a plastic enclosure. Although the HF+ Discovery does not need a metal enclosure to perform well in terms of PCB noise rejection, a metal enclosure gives the product a much more premium feel, and aesthetically looks great. Nobu also mentions that the metal enclosure may help with heat dissipation.
The product is only available on Amazon Japan and may show no stock for international customers. If you are outside of Japan, to be able to purchase you may need to use a Japanese market buying agency, many of which can be found online.
@lambdaprog, creator of Airspy products mentions that this enclosure may help with Airspy HF+ Discovery devices running 24/7.
The RF shielding is already achieved using a small anechoic chamber made from the PCB itself, the metal can, and some EMI absorbing material. So, I won't expect much changes in that aspect. However, this alu case can help with the heat dissipation in systems running 24/7/365.
In this weeks video Rob from his Frugal Radio YouTube channel shows us how he's turned an old piece of scrap electrical extension cord into an effective HF antenna for his Airspy HF+ SDR. The scrap wire is combined with a US$15 NooElec 9:1 balun which helps improve the impedance match of the antenna. He then stretches the dipole out through his backyard and then hooks it up to his Airspy HF+.
The results show good reception across the 20m, 80m, 40m amateur radio bands, as well as on HF ATC aircraft communications, US coast guard weather information broadcasts and the AM broadcast band.
I made an HF Dipole for free! Reception was good on my AirSpy HF+ Discovery SDR!
Over on the SWLing post blog we've seen a post contributed by Mike Ladd who works with SDRplay. Mike has been comparing the new SDRplay RSPdx on medium wave and long wave reception against the Elad FDM-S2, Airspy HF+ Discovery and the Perseus. The RSPdx is SDRplay's latest product which sits at the top of their line as their highest performance single tuner receiver.
Each test consists of a video where he runs a comparison between the RSPdx and another receiver. All SDRs are run in SDRuno, the official application for SDRplay receivers. It is left for the listener to determine which SDR sounds better. From a listeners perspective, it appears that the RSPdx performs at least identically to the other SDRs.
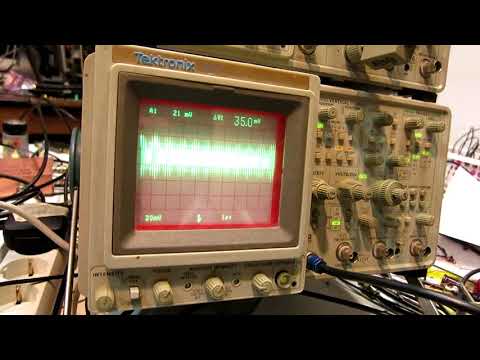
Software defined radios can have many more applications other than just radio. For example, it's possible to connect an ultrasonic sensor which outputs a waveform at some frequency above DC directly to the input of an SDR. We can then simply treat the sensor output as an RF signal, and view it in any SDR compatible software that shows us a spectrum. Normally you'd use a microcontroller with ADC to process the output of these sensors, but using an SDR makes visualizing and experimenting with these sensors much easier.
Over on YouTube W1VLF has uploaded a video showing his experiments with an ultrasonic sensor connected to his Airspy HF+. In his experiment he places the Airspy HF+ with directly connected ultrasonic sensor in one room, and sets up an ultrasonic emitter in another room. He then uses SDR# to view the 24 kHz ultrasonic sensor signal output on the computer. As he moves the sensor around it's possible to clearly see the doppler shift of the ultrasonic sound waves on the waterfall.
In the past we've also posted about Jan de Jong who experimented with using a piezo speaker connected to an SDRplay RSP1A to detect the ultrasonic navigation sounds from bats.
Thank you to Nils Schiffhauer (DK8OK) for submitting an article documenting his tests on the Airspy HF+ Discovery (pdf mirror). Spurred on by discussions on the SDR-Console mailing list, Nils went looking for issues with spurious signals generated by the HF+ itself. In the end he finds some minor spurious signals, but notes that they have absolutely no adverse effects once an antenna is connected.
Youssef Touil (developer of the Airspy HF+ line of products) has also noted that the minimum discernible signal (MDS) of the HF+ is so low that it's become normal for very weak spurs to now be visible without an antenna connected. However, once an antenna is connected the natural atmospheric noise floor which is much higher than the MDS hides these spurs, and so the spurs have no consequence on reception.
In Nils' first test he uses a very high end Winradio W65DDC SDR to detect the spurs coming from an Airspy HF+, Airspy HF+ with preselector retrofit, and the Airspy HF+ Discovery. The results are quoted below:
[With the Airspy HF+] you indeed see a very few spurious signals, all well below -140 dBm/Hz.
With the Airspy HF+ Preselector connected, the number of spurious signal is very much reduced, as is their maximum level.
This picture still further improves with the Airspy HF+ Discovery connected: all visible seven spurious signals are measured to well below -150 dBm/Hz.
The first result is clear:
Airspy has improved also the spurious signals from model to model, landing at a stunning reduction with their matchbox-like Discovery.
The spurious signals were significantly reduced in both numbers and level.
Together with sensitivity and dynamic range, the performance of these SDRs is exceptionally good. If you see their price tag, they are a real bargain.
Overall: they deliver professional performance in every important aspect at an incredible low price.
In the second test Nils tunes to the center of a spur, then tested with a dummy load and then antenna connected. His results showed that all spurs disappeared once an antenna was connected. He summarizes below:
Yes, there are a very few and low-level spurious signals at all Airspy’s receivers – as they are found [much] worse at some competing SDRs.
By development, even this has been significantly improved from model to model with the new Discovery leading the gang.
All spurious signals disappear with an antenna connected.
There has been found no case where, in practice, any spurious signal even remotely touched or even limited reception of the most miniscule signals.To complain about “spurious signals” simply is “Much Ado about Nothing” in an Ivory Tower, far away from any practical application.
Nils also tested 7300 kHz reception and the co-existance of weak amateur radio signals with strong broadcast signals.
The Airspy team have recently been working on a preselector retrofit product for their HF+. The Airspy HF+ already has excellent dynamic range and sensitivity, but by adding a preselector they seek to improve performance enough to claim that the HF+ is as good as or even better than much more pricey SDRs like the Perseus by achieving dynamic range figures of more than 105 dBm.
A preselector is a filter or bank of filters that attenuates out of band signals. This is useful as radios can desensitize if an unwanted signal comes in too strongly. For example, if you are tuned to the 20m band, but there is a very strong MW signal, the SNR of your desired 20m band signal might be reduced. Radios with a natural high dynamic range design like the Airspy HF+ are less affected by this problem, but for the strongest of signals use of a preselector can still help.
The Airspy HF+ preselector needs to be soldered directly onto the HF+'s PCB, and once installed it automatically switches bands using GPIO expansion ports controlled automatically via tuning in SDR#, so no external switching is required.
The expected pricing of the HF+ preselector is US$49, and it will be ready for sale in a few weeks.
Measurements
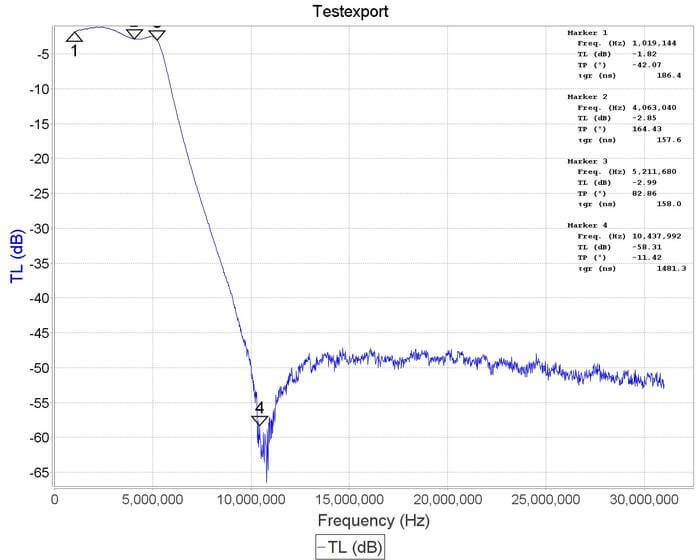
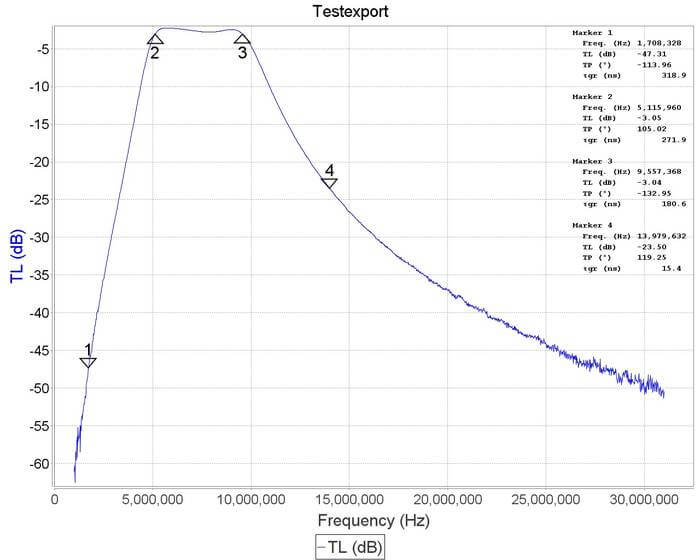
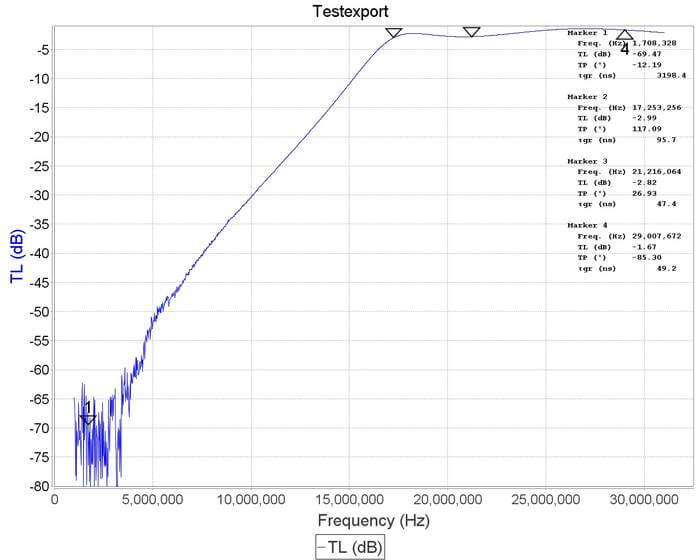
We received a prototype of the filter a few days ago and have been testing it out. From measurements on a VNA, we found that the preselector features four bands of operation:
0 - 5.2 MHz
5.2 - 10 MHz
10 - 17 MHz
17 - 30 MHz
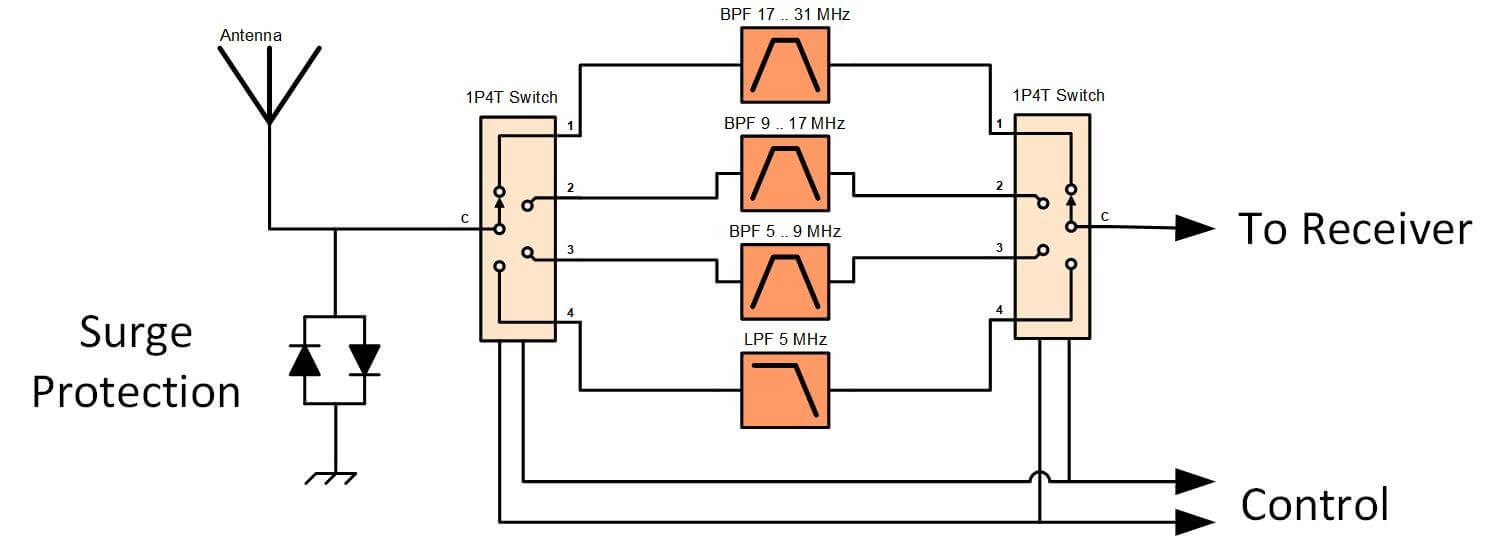
Airspy have also provided us with a block diagram schematic which we show below.
HF+ Preselector Schematic
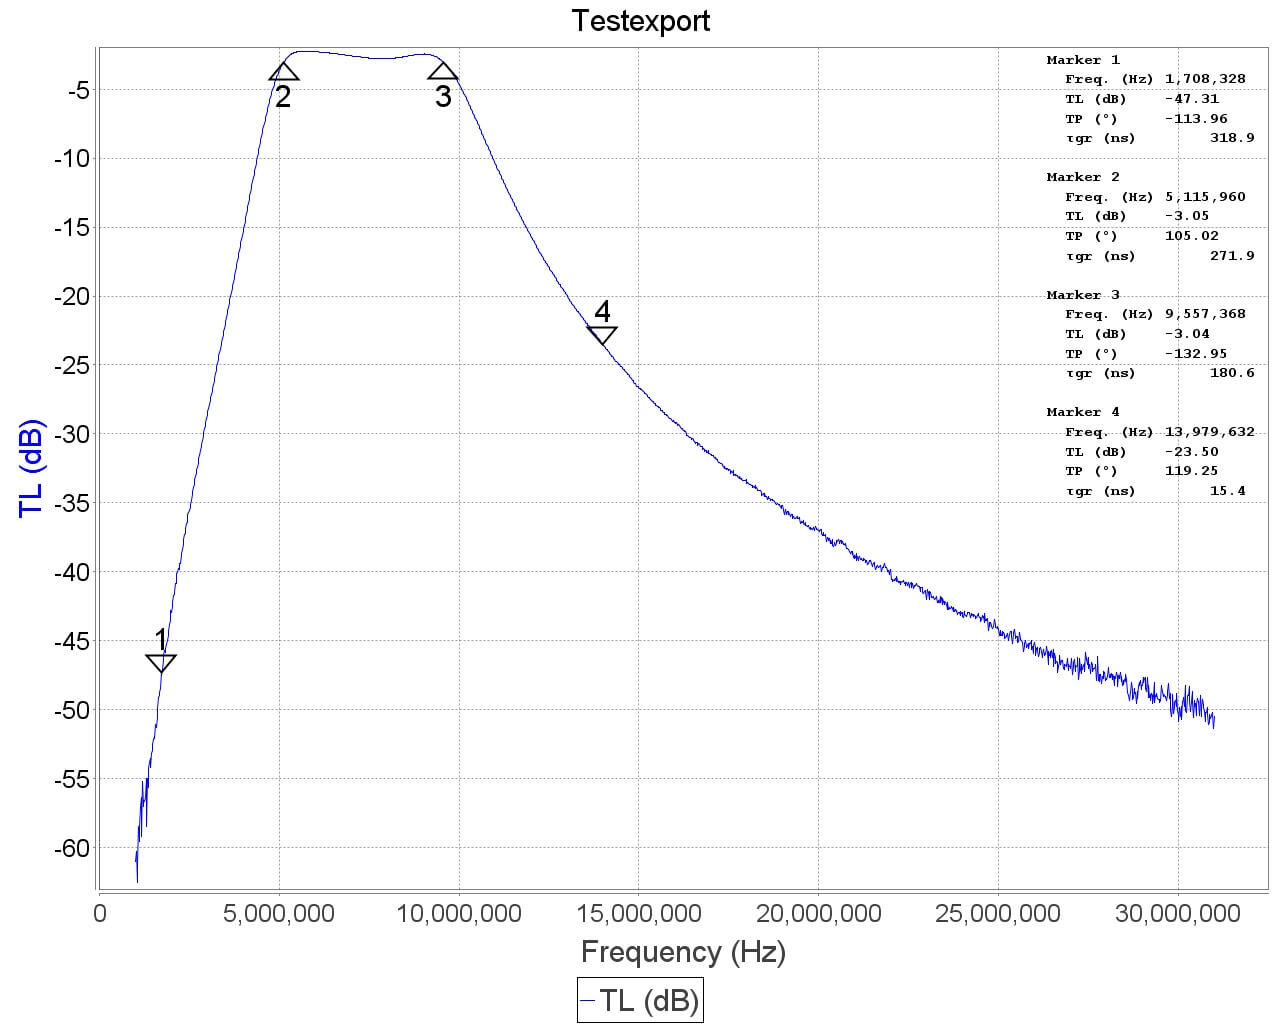
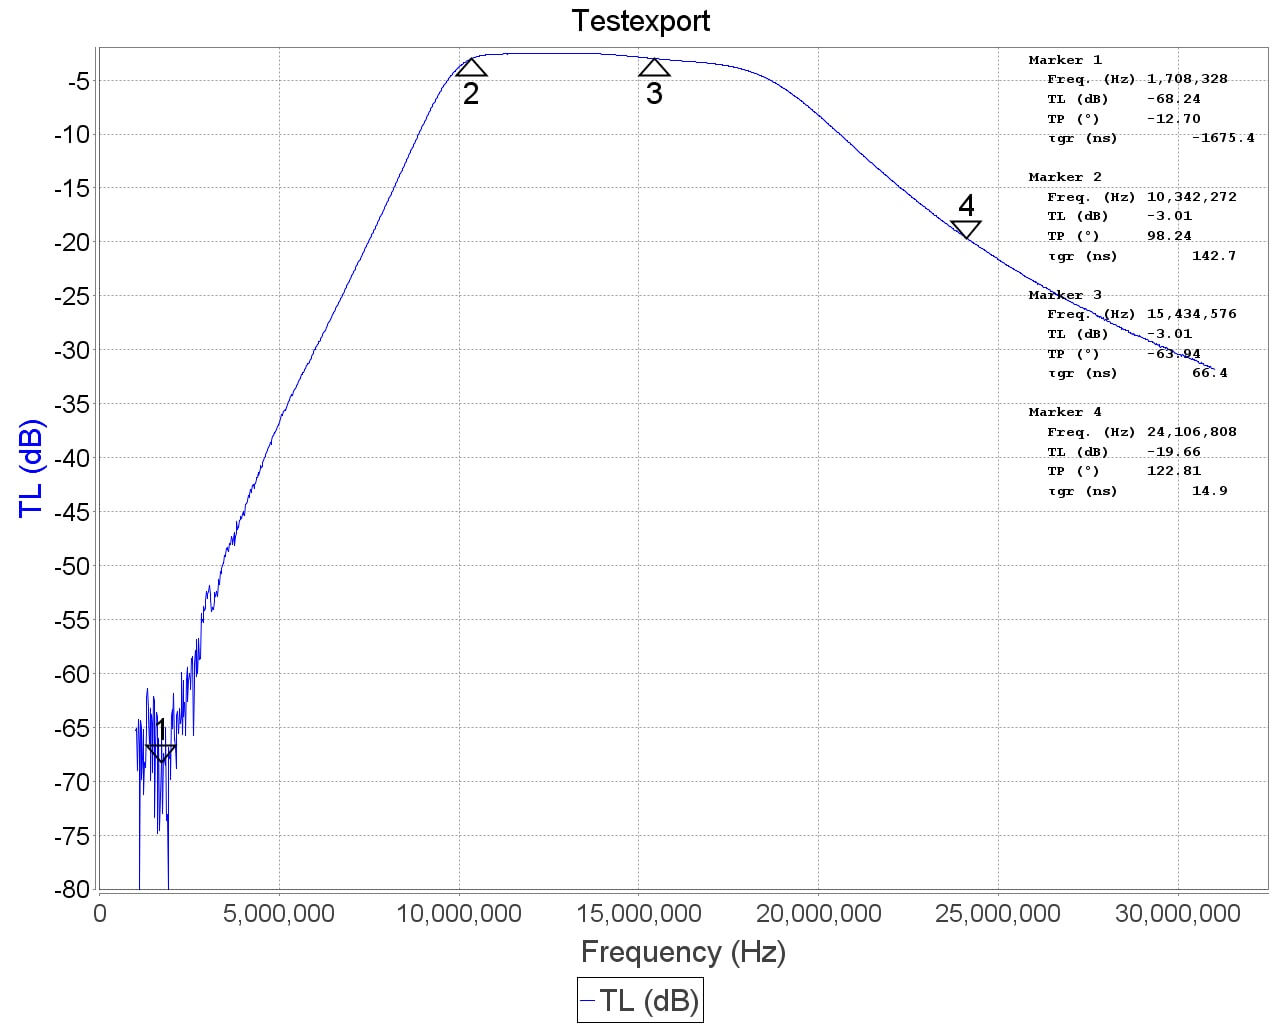
Insertion loss appears to be mostly below 3 dB with fairly steep skirts especially on the lower side. The top three filters do an excellent job at blocking out the broadcast AM band. Below are some VNA plots that show the filter responses.
Installation
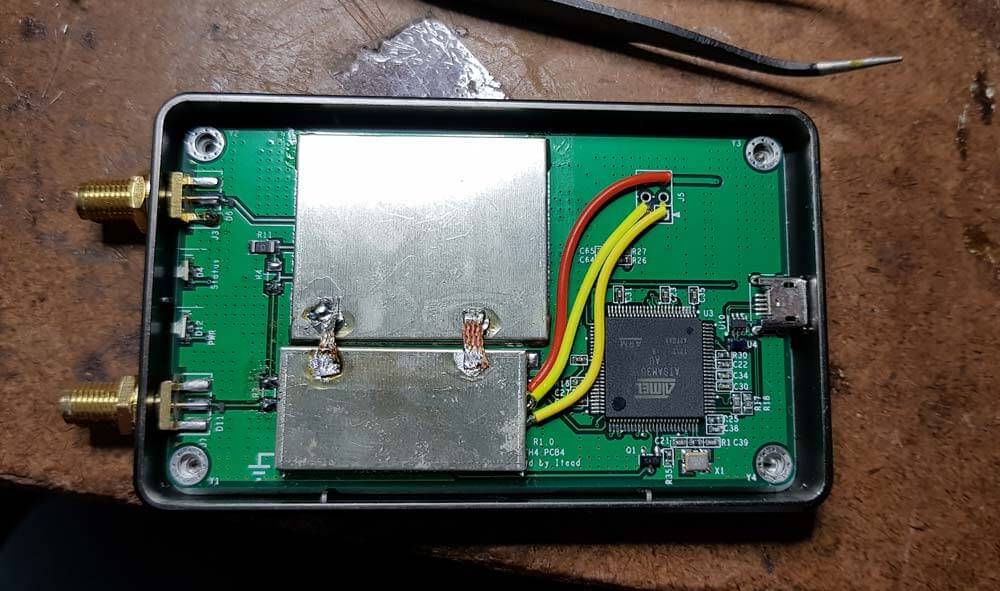
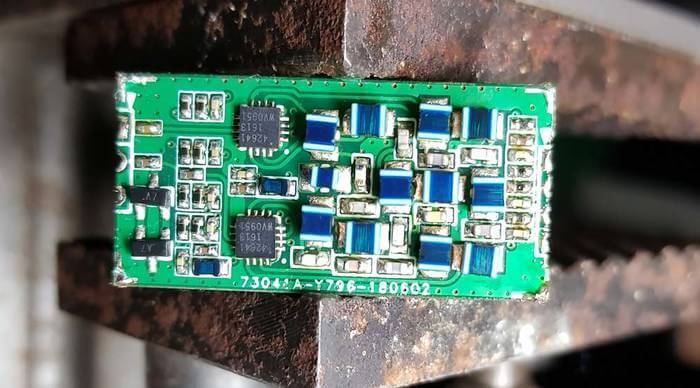
The preselector comes in a small 3.2 x 1.7 cm sized PCB that is fully covered with a metal shielding can. To install it you need to carefully solder it onto the HF+ PCB. This can be a little tricky since the pads are so small, but if you're experienced with soldering it shouldn't be an issue.
First you need to open the HF+ and remove R3 from the HF+ PCB, which is a zero ohm resistor.
The preselector PCB can then be positioned and the two IN and OUT pads soldered in place.
Then you'll also need to connect the power and 2x GPIO lines to the preselector using wires.
Now you need to bridge the two shielding CANs with a thick bit of wire. We simply used two cuts of copper solder braid to do this.
Finally is also recommended to update the HF+ firmware to the latest version and download the latest version of SDR#.
Once soldered in place the preselector is ready to use, and the HF+ cover can be put back on. It is expected that the commercially sold versions of the preselector will come with detailed installation instructions.
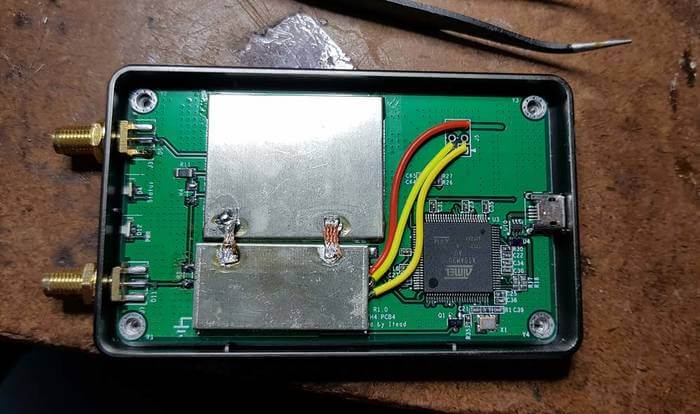
In the first photo below we removed the shield to see what was inside, and the second photo shows it installed on the HF+ PCB.
Using it on a RTL-SDR V3
Whilst the preselector is designed for the Airspy HF+, there's no reason why it couldn't also be retrofitted onto other SDRs, such as our RTL-SDR V3, for use in improving direct sampling mode performance.
The V3 has spare GPIO ports that can be used to control the filter, and 5V for powering the filter could be tapped off the PCB as well. Currently we're considering making a breakout PCB for the filter than might aide with this.
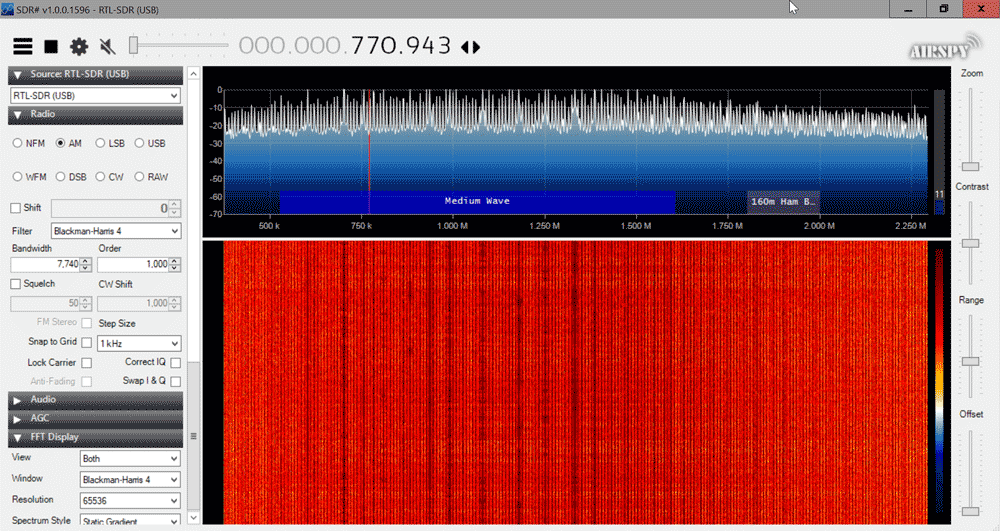
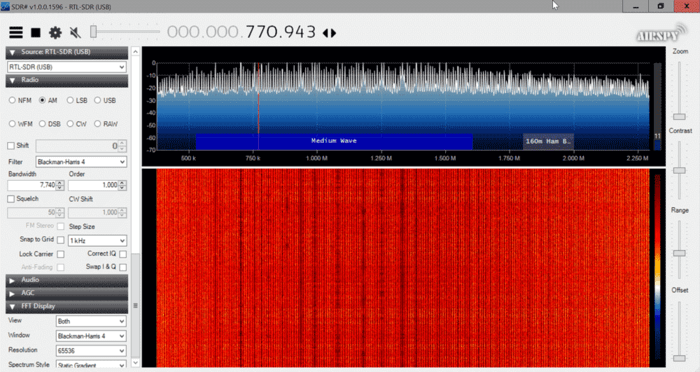
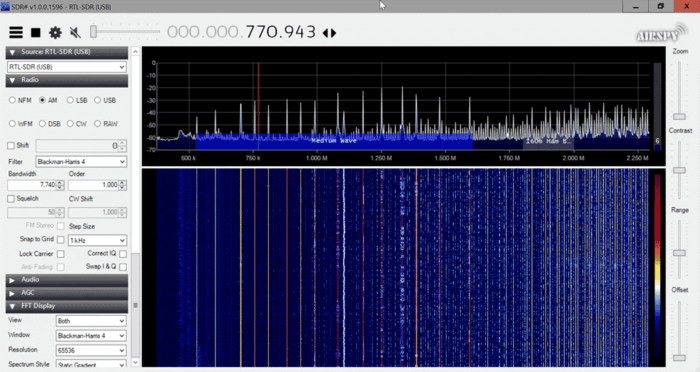
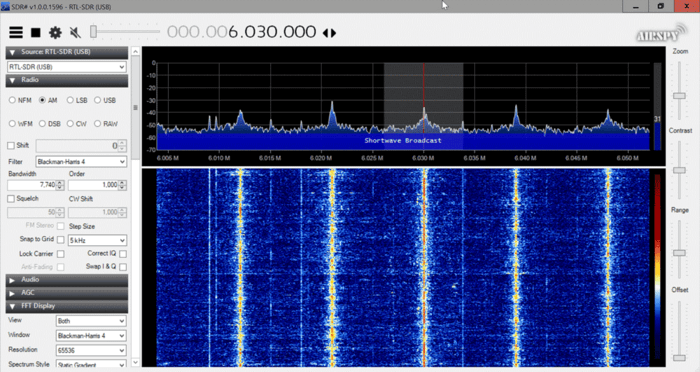
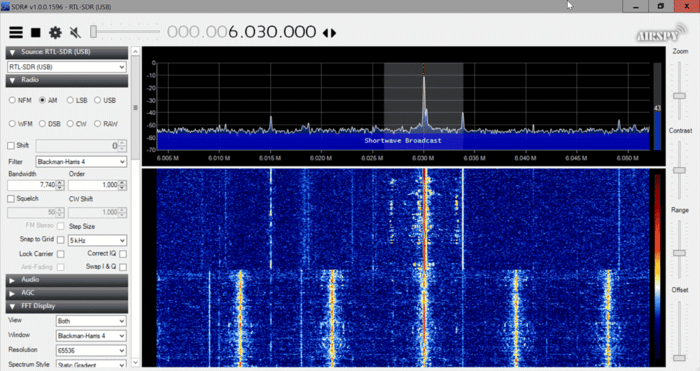
We did a quick test with the preselector connected to the RTL-SDR V3 running in direct sampling mode, and as expected performance is much better, especially above 5 MHz once the second filter kicks in. This is because the second, third and fourth filters all heavily attenuate the MW broadcast AM band, which is the main source of overload issues on HF.
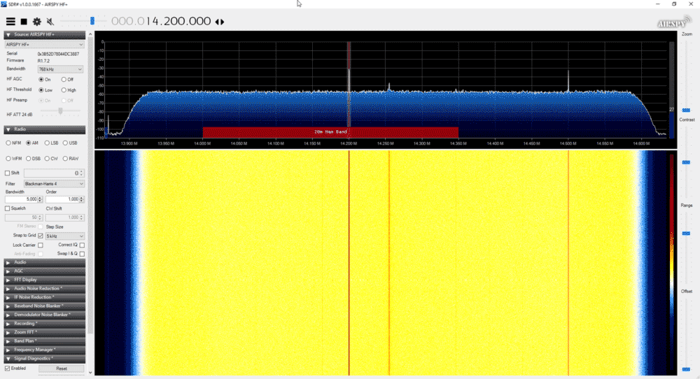
The following screenshots show how much the filter was able to reduce the signal strength of AM broadcast when the second 5.2 - 10 MHz filter was turned on. This reduction was enough to prevent overload on all the higher bands.
HF+ Results
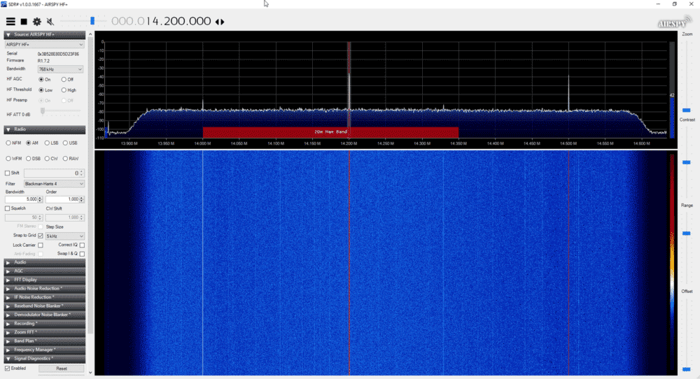
For the HF+ we tested by injecting a strong signal into two HF+ SDRs, one with the filter installed and the other without. The HF+ with the filter was routinely able to withstand much higher signal powers without any signs of overload occurring, and no degradation due to insertion loss was observed.
The screenshots below show an experiment with a weak desired signal injected at 14.2 MHz, and a strong unwanted signal being injected at 1.5 MHz. With the unwanted signal at 5 dBm, the filtered HF+ showed no signs of overload, whilst the unfiltered HF+ had the AGC kick in to increase the front end attenuation, reducing the signal strength by about 20 dB and raising the noise floor.
Other Reviews
Other reviewers have also received the preselector and have been testing it. Fenu radio has uploaded a short review, and plans to write more in the future. He's also made his HF+ with preselector available for public use via SpyServer (details in his post). In the video below Leif SM5BSZ reviews the preselector and runs through several tests while comparing it against the Perseus. His results seem to show that the Persues gets a +25 dBm IP3, whilst the HF+ with the latest firmware and preselector is able to obtain a respectable +10 dBm IP3.
hfpluspresel2
Conclusion
For most people, the dynamic range of the HF+ is probably already more than enough, but if you are receiving very strong signals, the preselector can help get you get more performance out of the HF+. Of course the preselector cannot help if you have strong signals within the filter bands.
If you're looking to get the most out of your HF+ then the filter at only $49 is a pretty good deal. Just take note that you'll need to open the HF+ and be comfortable with soldering onto the PCB.
Thank you to Marco Cardelli (IZ5IOW) who recently wrote in and shared with us his design for mounting a YouLoop antenna indoors, which he uses with his Airspy HF+ Discovery SDR receiver.
Marco's build involves an MDF wooden base measuring 15cm x 15cm, supporting a vertical mast made from a 70cm long, 25mm diameter PVC pipe. The mast is secured to the wooden base using a repurposed metal bracket and cable ties.
Additionally, Marco constructed square loop enclosure out of 20mm diameter PVC pipe for containing his HFDY active loop, measuring 60cm per side. The HFDY is an active loop variant of the YouLoop, available on sites like Aliexpress.
Marco's YouLoop stand, and the inside of the HFDY active loop.
The Airspy HF+ and HF+ Discovery are popular and affordable software defined radios that have a focus on excellent reception on the HF bands. Recently @lambdaprog, the creator of Airspy products has released updated firmware for the Airspy HF+ series of products. The announcement on X is shown below.
We're excited to bring you a special firmware update for the #Airspy HF+ series. This release delivers several key enhancements:
✅New, more robust USB streaming stack
✅Smoother and faster tuning
✅Enhanced AGC behavior
Thank you to Nobu who has submitted news about the release of his new product, a machined aluminum enclosure for the Airspy HF+ Discovery. The Airspy HF+ Discovery comes by default in a plastic enclosure. Although the HF+ Discovery does not need a metal enclosure to perform well in terms of PCB noise rejection, a metal enclosure gives the product a much more premium feel, and aesthetically looks great. Nobu also mentions that the metal enclosure may help with heat dissipation.
The product is only available on Amazon Japan and may show no stock for international customers. If you are outside of Japan, to be able to purchase you may need to use a Japanese market buying agency, many of which can be found online.
@lambdaprog, creator of Airspy products mentions that this enclosure may help with Airspy HF+ Discovery devices running 24/7.
The RF shielding is already achieved using a small anechoic chamber made from the PCB itself, the metal can, and some EMI absorbing material. So, I won't expect much changes in that aspect. However, this alu case can help with the heat dissipation in systems running 24/7/365.
In this weeks video Rob from his Frugal Radio YouTube channel shows us how he's turned an old piece of scrap electrical extension cord into an effective HF antenna for his Airspy HF+ SDR. The scrap wire is combined with a US$15 NooElec 9:1 balun which helps improve the impedance match of the antenna. He then stretches the dipole out through his backyard and then hooks it up to his Airspy HF+.
The results show good reception across the 20m, 80m, 40m amateur radio bands, as well as on HF ATC aircraft communications, US coast guard weather information broadcasts and the AM broadcast band.
I made an HF Dipole for free! Reception was good on my AirSpy HF+ Discovery SDR!
Over on the SWLing post blog we've seen a post contributed by Mike Ladd who works with SDRplay. Mike has been comparing the new SDRplay RSPdx on medium wave and long wave reception against the Elad FDM-S2, Airspy HF+ Discovery and the Perseus. The RSPdx is SDRplay's latest product which sits at the top of their line as their highest performance single tuner receiver.
Each test consists of a video where he runs a comparison between the RSPdx and another receiver. All SDRs are run in SDRuno, the official application for SDRplay receivers. It is left for the listener to determine which SDR sounds better. From a listeners perspective, it appears that the RSPdx performs at least identically to the other SDRs.
Software defined radios can have many more applications other than just radio. For example, it's possible to connect an ultrasonic sensor which outputs a waveform at some frequency above DC directly to the input of an SDR. We can then simply treat the sensor output as an RF signal, and view it in any SDR compatible software that shows us a spectrum. Normally you'd use a microcontroller with ADC to process the output of these sensors, but using an SDR makes visualizing and experimenting with these sensors much easier.
Over on YouTube W1VLF has uploaded a video showing his experiments with an ultrasonic sensor connected to his Airspy HF+. In his experiment he places the Airspy HF+ with directly connected ultrasonic sensor in one room, and sets up an ultrasonic emitter in another room. He then uses SDR# to view the 24 kHz ultrasonic sensor signal output on the computer. As he moves the sensor around it's possible to clearly see the doppler shift of the ultrasonic sound waves on the waterfall.
In the past we've also posted about Jan de Jong who experimented with using a piezo speaker connected to an SDRplay RSP1A to detect the ultrasonic navigation sounds from bats.
Thank you to Nils Schiffhauer (DK8OK) for submitting an article documenting his tests on the Airspy HF+ Discovery (pdf mirror). Spurred on by discussions on the SDR-Console mailing list, Nils went looking for issues with spurious signals generated by the HF+ itself. In the end he finds some minor spurious signals, but notes that they have absolutely no adverse effects once an antenna is connected.
Youssef Touil (developer of the Airspy HF+ line of products) has also noted that the minimum discernible signal (MDS) of the HF+ is so low that it's become normal for very weak spurs to now be visible without an antenna connected. However, once an antenna is connected the natural atmospheric noise floor which is much higher than the MDS hides these spurs, and so the spurs have no consequence on reception.
In Nils' first test he uses a very high end Winradio W65DDC SDR to detect the spurs coming from an Airspy HF+, Airspy HF+ with preselector retrofit, and the Airspy HF+ Discovery. The results are quoted below:
[With the Airspy HF+] you indeed see a very few spurious signals, all well below -140 dBm/Hz.
With the Airspy HF+ Preselector connected, the number of spurious signal is very much reduced, as is their maximum level.
This picture still further improves with the Airspy HF+ Discovery connected: all visible seven spurious signals are measured to well below -150 dBm/Hz.
The first result is clear:
Airspy has improved also the spurious signals from model to model, landing at a stunning reduction with their matchbox-like Discovery.
The spurious signals were significantly reduced in both numbers and level.
Together with sensitivity and dynamic range, the performance of these SDRs is exceptionally good. If you see their price tag, they are a real bargain.
Overall: they deliver professional performance in every important aspect at an incredible low price.
In the second test Nils tunes to the center of a spur, then tested with a dummy load and then antenna connected. His results showed that all spurs disappeared once an antenna was connected. He summarizes below:
Yes, there are a very few and low-level spurious signals at all Airspy’s receivers – as they are found [much] worse at some competing SDRs.
By development, even this has been significantly improved from model to model with the new Discovery leading the gang.
All spurious signals disappear with an antenna connected.
There has been found no case where, in practice, any spurious signal even remotely touched or even limited reception of the most miniscule signals.To complain about “spurious signals” simply is “Much Ado about Nothing” in an Ivory Tower, far away from any practical application.
Nils also tested 7300 kHz reception and the co-existance of weak amateur radio signals with strong broadcast signals.
The Airspy team have recently been working on a preselector retrofit product for their HF+. The Airspy HF+ already has excellent dynamic range and sensitivity, but by adding a preselector they seek to improve performance enough to claim that the HF+ is as good as or even better than much more pricey SDRs like the Perseus by achieving dynamic range figures of more than 105 dBm.
A preselector is a filter or bank of filters that attenuates out of band signals. This is useful as radios can desensitize if an unwanted signal comes in too strongly. For example, if you are tuned to the 20m band, but there is a very strong MW signal, the SNR of your desired 20m band signal might be reduced. Radios with a natural high dynamic range design like the Airspy HF+ are less affected by this problem, but for the strongest of signals use of a preselector can still help.
The Airspy HF+ preselector needs to be soldered directly onto the HF+'s PCB, and once installed it automatically switches bands using GPIO expansion ports controlled automatically via tuning in SDR#, so no external switching is required.
The expected pricing of the HF+ preselector is US$49, and it will be ready for sale in a few weeks.
Measurements
We received a prototype of the filter a few days ago and have been testing it out. From measurements on a VNA, we found that the preselector features four bands of operation:
0 - 5.2 MHz
5.2 - 10 MHz
10 - 17 MHz
17 - 30 MHz
Airspy have also provided us with a block diagram schematic which we show below.
HF+ Preselector Schematic
Insertion loss appears to be mostly below 3 dB with fairly steep skirts especially on the lower side. The top three filters do an excellent job at blocking out the broadcast AM band. Below are some VNA plots that show the filter responses.
Installation
The preselector comes in a small 3.2 x 1.7 cm sized PCB that is fully covered with a metal shielding can. To install it you need to carefully solder it onto the HF+ PCB. This can be a little tricky since the pads are so small, but if you're experienced with soldering it shouldn't be an issue.
First you need to open the HF+ and remove R3 from the HF+ PCB, which is a zero ohm resistor.
The preselector PCB can then be positioned and the two IN and OUT pads soldered in place.
Then you'll also need to connect the power and 2x GPIO lines to the preselector using wires.
Now you need to bridge the two shielding CANs with a thick bit of wire. We simply used two cuts of copper solder braid to do this.
Finally is also recommended to update the HF+ firmware to the latest version and download the latest version of SDR#.
Once soldered in place the preselector is ready to use, and the HF+ cover can be put back on. It is expected that the commercially sold versions of the preselector will come with detailed installation instructions.
In the first photo below we removed the shield to see what was inside, and the second photo shows it installed on the HF+ PCB.
Using it on a RTL-SDR V3
Whilst the preselector is designed for the Airspy HF+, there's no reason why it couldn't also be retrofitted onto other SDRs, such as our RTL-SDR V3, for use in improving direct sampling mode performance.
The V3 has spare GPIO ports that can be used to control the filter, and 5V for powering the filter could be tapped off the PCB as well. Currently we're considering making a breakout PCB for the filter than might aide with this.
We did a quick test with the preselector connected to the RTL-SDR V3 running in direct sampling mode, and as expected performance is much better, especially above 5 MHz once the second filter kicks in. This is because the second, third and fourth filters all heavily attenuate the MW broadcast AM band, which is the main source of overload issues on HF.
The following screenshots show how much the filter was able to reduce the signal strength of AM broadcast when the second 5.2 - 10 MHz filter was turned on. This reduction was enough to prevent overload on all the higher bands.
HF+ Results
For the HF+ we tested by injecting a strong signal into two HF+ SDRs, one with the filter installed and the other without. The HF+ with the filter was routinely able to withstand much higher signal powers without any signs of overload occurring, and no degradation due to insertion loss was observed.
The screenshots below show an experiment with a weak desired signal injected at 14.2 MHz, and a strong unwanted signal being injected at 1.5 MHz. With the unwanted signal at 5 dBm, the filtered HF+ showed no signs of overload, whilst the unfiltered HF+ had the AGC kick in to increase the front end attenuation, reducing the signal strength by about 20 dB and raising the noise floor.
Other Reviews
Other reviewers have also received the preselector and have been testing it. Fenu radio has uploaded a short review, and plans to write more in the future. He's also made his HF+ with preselector available for public use via SpyServer (details in his post). In the video below Leif SM5BSZ reviews the preselector and runs through several tests while comparing it against the Perseus. His results seem to show that the Persues gets a +25 dBm IP3, whilst the HF+ with the latest firmware and preselector is able to obtain a respectable +10 dBm IP3.
hfpluspresel2
Conclusion
For most people, the dynamic range of the HF+ is probably already more than enough, but if you are receiving very strong signals, the preselector can help get you get more performance out of the HF+. Of course the preselector cannot help if you have strong signals within the filter bands.
If you're looking to get the most out of your HF+ then the filter at only $49 is a pretty good deal. Just take note that you'll need to open the HF+ and be comfortable with soldering onto the PCB.