RadarBox.com is an ADS-B aggregator which is very similar to other aggregators like FlightAware.com and FlightRadar24.com. These services use ADS-B data provided from volunteers all around the world to create a live worldwide snapshot of current air traffic. The data is then used by airlines, airports, aerospace companies, as well as enthusiasts and regular people to track aircraft and estimate arrival times.
Typically contributors to these services use an RTL-SDR combined with a Raspberry Pi as the receiver. Some sites also use their own proprietary hardware, but they seem to be slowly falling out of favor as the RTL-SDR solution tends to be cheaper and more effective.
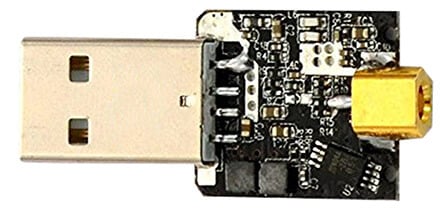
Over on our store we now have a limited amount of “Low Power V2” RTL-SDR dongles available for sale for $16.95 USD incl. free international shipping. These are dongles that were produced for the Stratux project which aims to provide a very low cost ADS-B and UAT receiver for small airplane pilots. These Stratux kits typically consist of a Raspberry Pi, two nano RTL-SDR dongles, a GPS dongle and a Android or iOS tablet. The two RTL-SDR dongles receive both 1090 MHz ADS-B and 978 MHz UAT which are decoded on the Raspberry Pi. The Raspberry Pi then sends the decoded aircraft position and weather data to the tablet via WiFi which is running commercial navigation software.
A full Stratux setup including: Raspberry Pi, two RTL-SDR nano dongles, GPS module, fan, and 1090 + 978 MHz antennas.
One issue that Stratux users continually run into, is that the Raspberry Pi is sometimes unable to power two or more RTL-SDR dongles. When running a Pi with two RTL-SDR dongles, a GPS dongle, and cooling fan the total power draw is above 1A which can cause power supply problems and glitching. By using a low power RTL-SDR these problems can be avoided by keeping the total current draw under 1A.
The Low Power V2 Stratux RTL-SDR’s draw about 160-170 mA, whereas standard dongles draw about 260 mA, so that’s a saving of almost 100 mA. On battery power this current saving can mean a few hours more of operation. The Low Power RTL-SDR dongle achieves its lower current consumption by using a switch mode power supply instead of a linear regulator which is commonly used on most other RTL-SDR dongles. The trade off is that switch mode supplies are inherently RF noisy, so increased noise can be seen on the spectrum. Despite the increased noise, most applications like ADS-B are not significantly degraded. We have seen switch mode supplies used on some other RTL2832U dongles sold in the HDTV market as well. For example all the R828D based DVB-T2 dongles that we have seen use switch mode supplies as well, and also draw about 170 mA.
We think that these low power RTL-SDRs could be useful in other non-stratux related applications too. For example, they could be used on mobile Android devices. One of the key problems with Android usage is that RTL-SDR dongles tend to drain the battery quickly. They could also be used on solar and battery powered installations to help achieve longer run times. Or like with Stratux they could be used on a Raspberry Pi running other applications, to ensure that multiple dongles can be attached.
Currently we are selling these dongles for $16.95 USD with free international shipping included. Note that these dongles do not come with an enclosure (just a bare PCB), and they do not have a TCXO. Below is more information about these dongles.
Back in November 2016 we posted a review on the Low Power V1 dongles. Since then Chris (the man behind producing these dongles) has brought out the Low Power V2 models which improves upon V1 significantly. By switching to a 4-layer PCB the dongle is now much quieter in terms of RF noise produced from the switch mode power supply, and it also now runs significantly cooler. The dongle also now uses even less power and is more sensitive compared with V1.
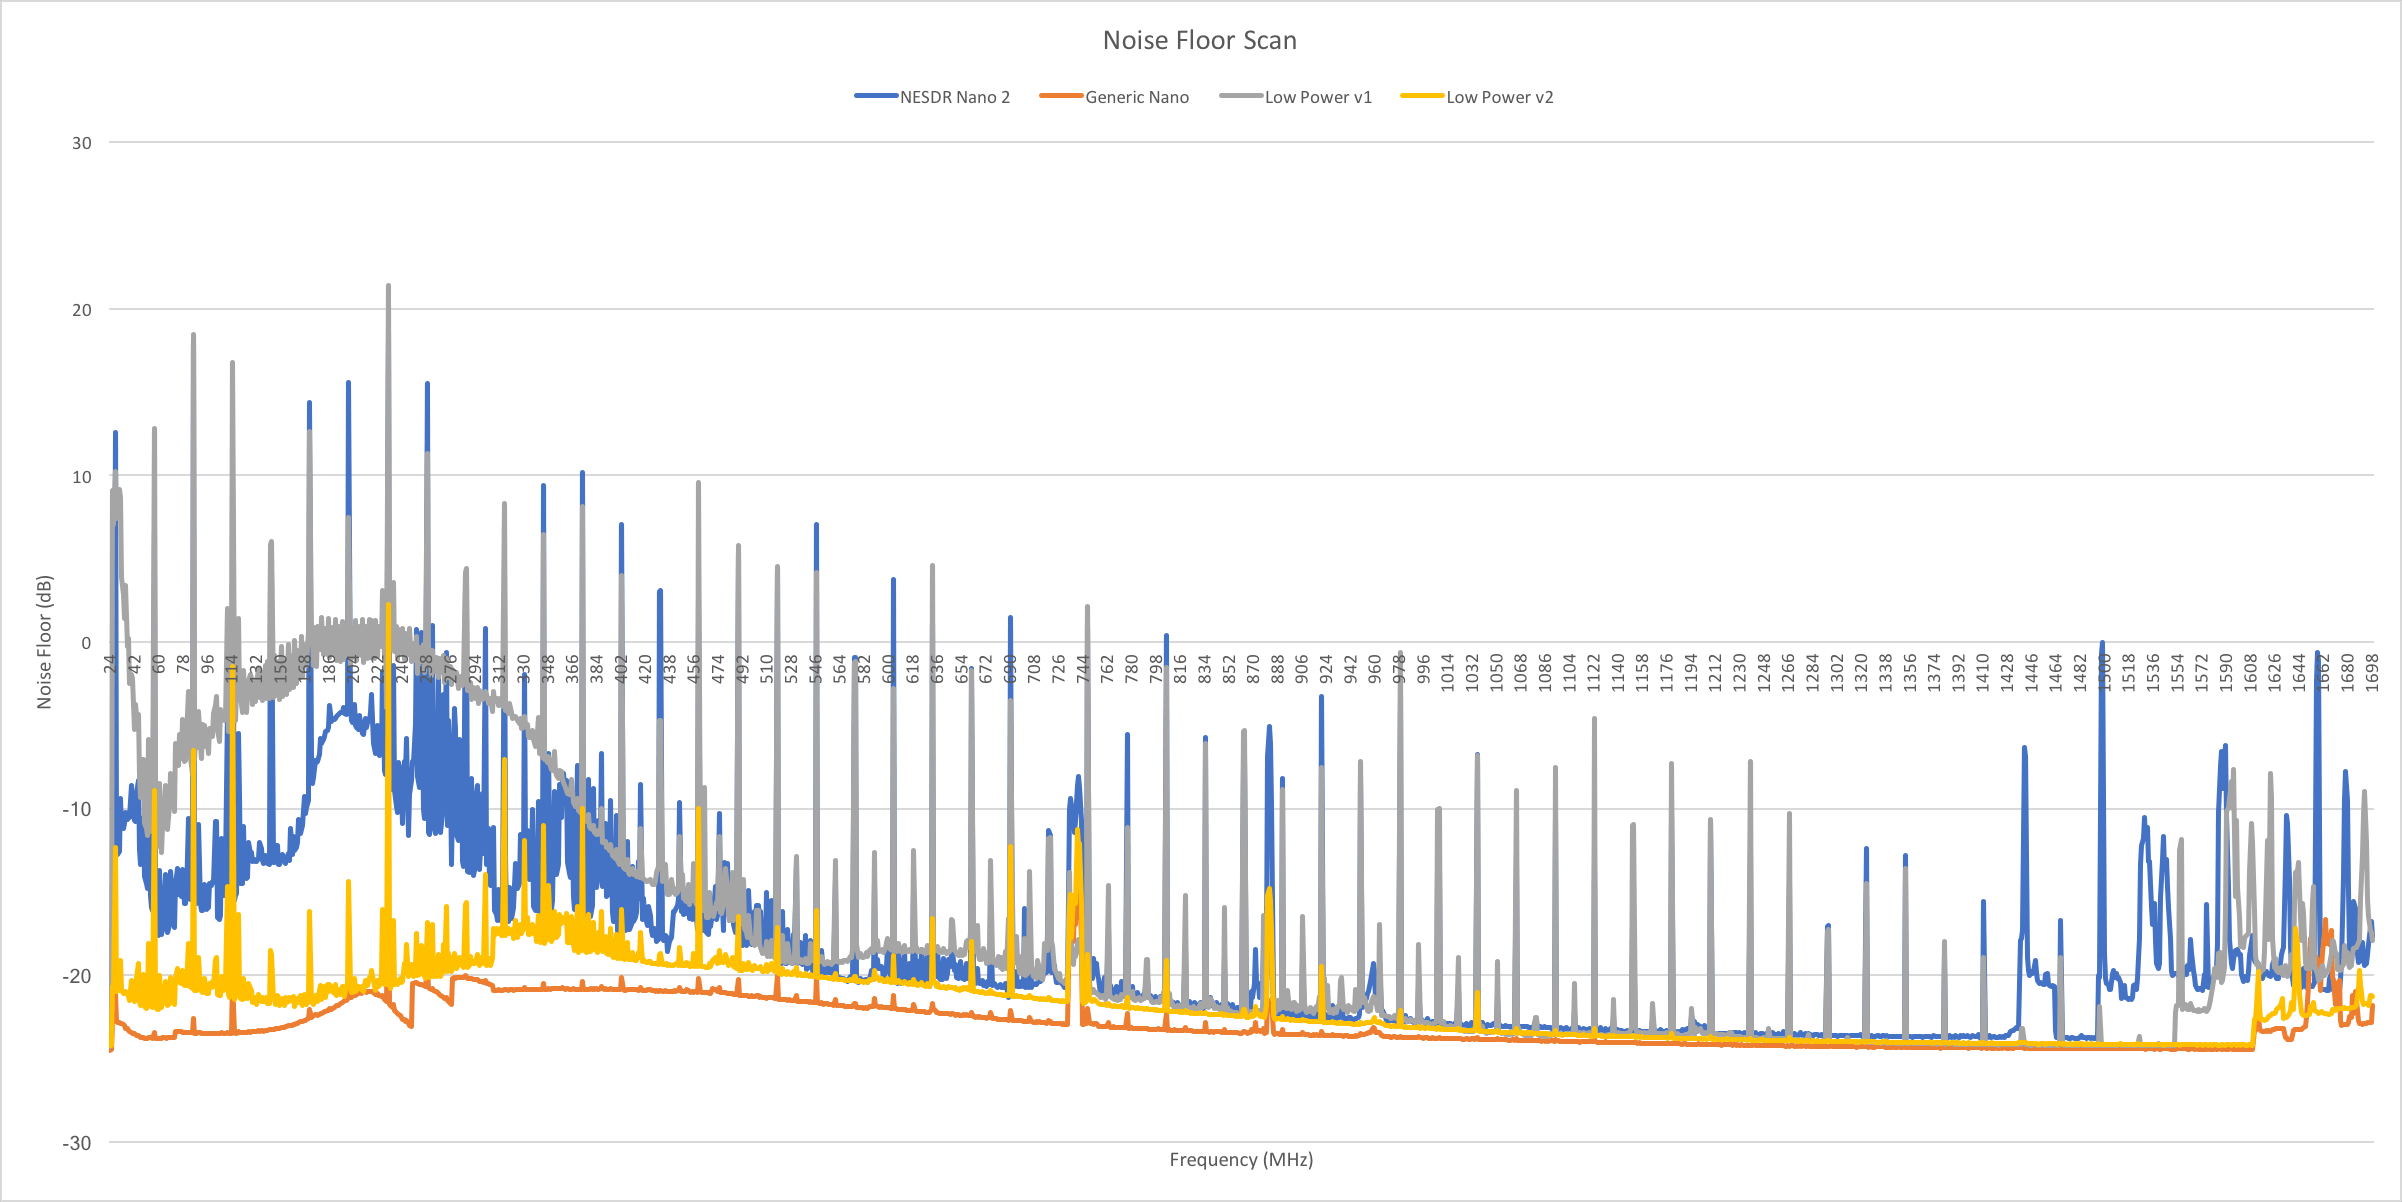
Noise Floor Comparisons between four Nano styled dongles. NESDR Nano 2 (Blue), Generic Nano (Orange), Low Power V1 (Gray), Low Power V2 (Yellow).
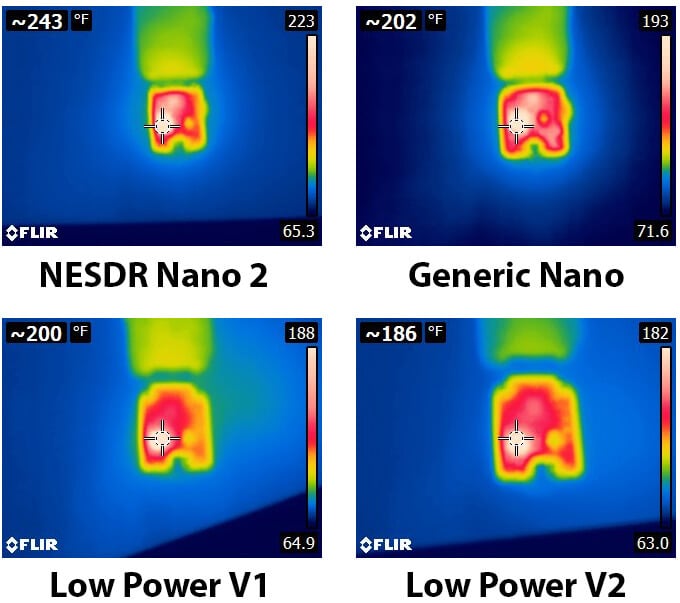
In terms of heat produced and power used, the NESDR Nano 2 is the hottest and most power hungry, followed by the Generic Nano, the Low Power V1 and then the Low Power V2. For comparison the NESDR Nano 2 draws 1.362W of power, the generic nano 1.318W, the Low Power V1 1.003W, and the new Low Power V2 draws only 0.933W.
Last month we posted about Aerial TV, a new Android based DVB-T decoder that works with RTL-SDR dongles. Back then the app was still in beta testing and had a few operational bugs. Now the Aerial TV app has been officially released.
UPDATE: Due to Google policies Aerial TV has been removed from the Google Play Store. It is claimed that Aerial TV could be used for copyright violation. It is now available on the Amazon store. Official information will always be available on the new official website at aerialtv.eu.
The app is based on the new Android DVB-T driver for RTL2832U devices which is written by Martin Marinov who is also the programmer of Aerial TV. The DVB-T driver is open source, and currently supports RTL2832U devices with the R820T, E4000, R828D, FC0012 and FC0013 tuner chips. Of note is that the R828D also has DVB-T2 support.
Aerial TV is free to download and test, but requires a $7.99 licence to use for more than 30 minutes. To use it you will need an OTG (On-the-go) cable adapter and an RTL-SDR dongle with antenna.
Just watch TV – no data plan or wifi connection required. Aerial TV works by picking up digital TV channels off the air with a regular TV antenna.
You will need a low cost USB TV tuner. You can grab one online for less than €10. Make sure to get an RTL2832 tuner. When it arrives, just connect the provided antenna and start watching. You may need a USB OTG cable to plug the tuner in your Android device. USB OTG cables are inexpensive and easy to find.
Note that your Android device must support USB OTG. If unsure, do a quick search online or consult your Android device manual. Also check that there is DVB-T/DVB-T2 service in your local area by doing a quick search online. Signal needs to be strong enough for Aerial TV to pick it up. For best results use an outdoor aerial.
You get free unlimited access to radio forever. You also get to watch all TV channels and experience all features of Aerial TV during the trial period for free. After the trial period ends you can make a one-off purchase and watch as much TV as you want. Remember: you can keep listening to radio even if the trial has ended!
Q: How do I find a supported dongle? A: All major RTL2832 (rtl-sdr) dongles are supported. These dongles can be easily purchased online. Just type in “RTL2832” or “RTL2832U” in the search box of your favourite online store.
Q: What tuner do I need to watch DVB-T2? A: If your country has DVB-T2 broadcasts (such as Freeview HD in UK) you will need a DVB-T2 compatible receiver dongle such as R828D in order to watch DVB-T2 with Aerial TV.
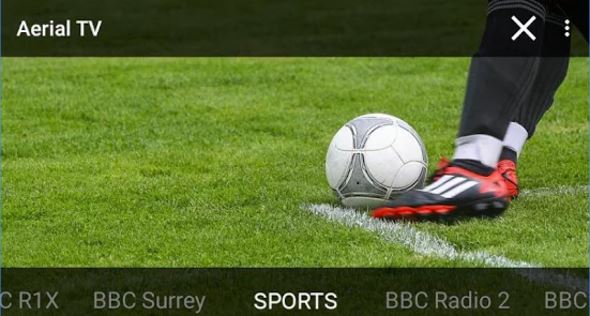
Aerial TV Screenshot
Test a android program "Aerial TV (Unreleased)" ver. 1.1 with usb dongle with R820T2 chip
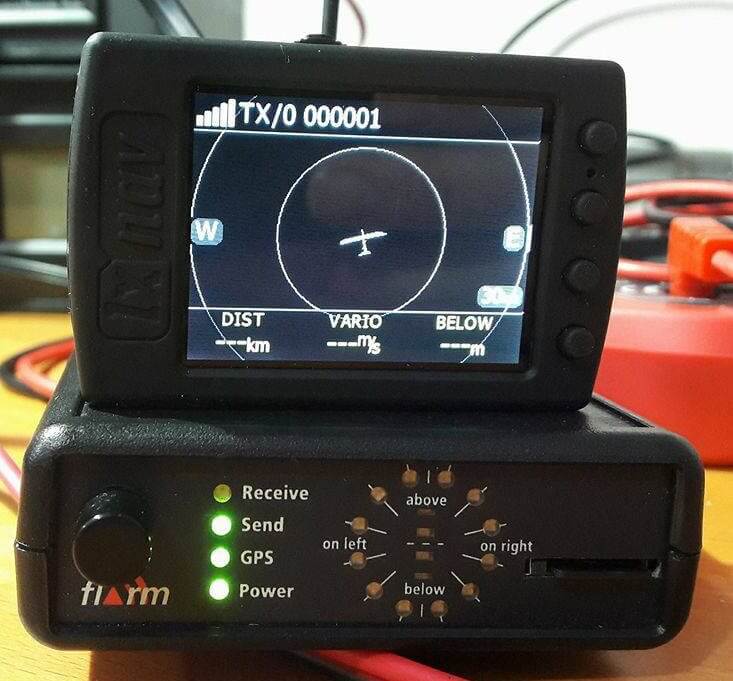
Most people already know about ADS-B aircraft tracking, but few know about FLARM (FLight AlaRM). FLARM is a low cost and low power consumption ADS-B alternative which is often used by small aircraft such as gliders and helicopters for collision avoidance. It is used all over the world, and is especially popular in Europe, however it is almost non-existent within the USA.
Back in 2014 we posted about FLARM reception with the RTL-SDR, and also about the Open Glider Network (OGN). The OGN is an online FLARM aggregator that is similar to sites like flightaware.com and flightradar24.com which aggregate ADS-B data.
Łukasz’s tutorial uses an Orange Pi Zero which is a very cheap (~$7 USD) Raspberry Pi embedded computing device. He also uses an RTL-SDR dongle and an antenna tuned to the FLARM frequency of 868 MHz. The tutorial goes over the Linux commands for installing the decoder, calibrating the RTL-SDR and setting up the Open Glider Network feeder.
Remember that FLARM is typically 10-100 times weaker than ADS-B so a good tuned antenna is required, and the OGN recommend building (pdf) a collinear coax antenna tuned to 868 MHz.
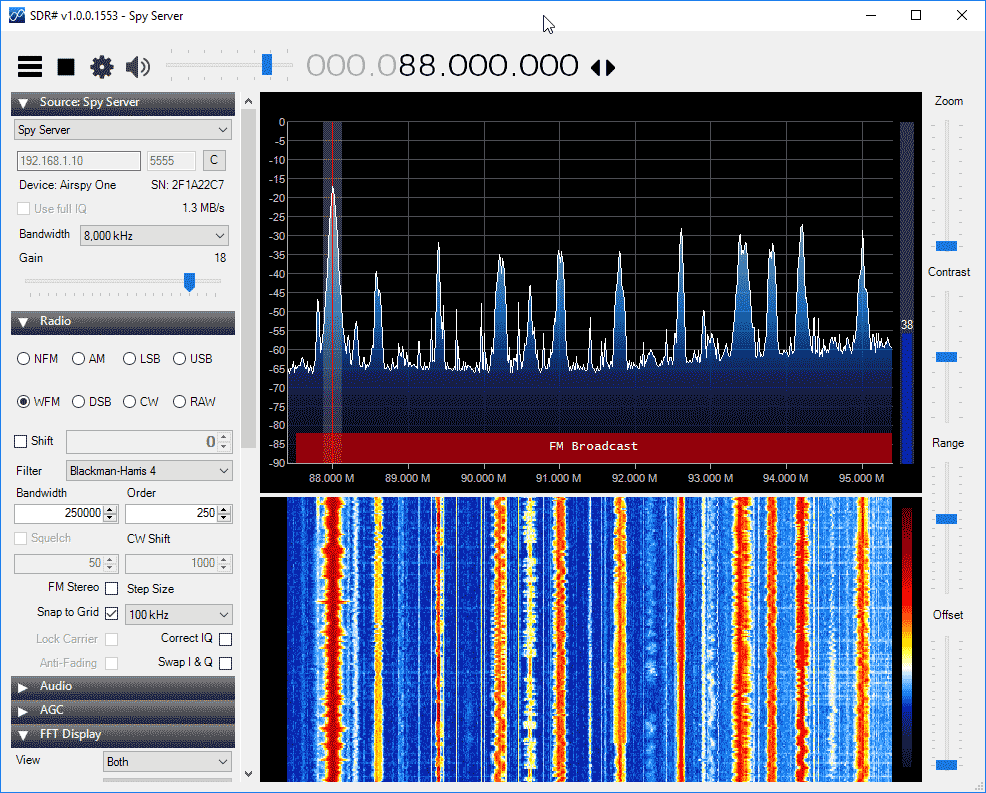
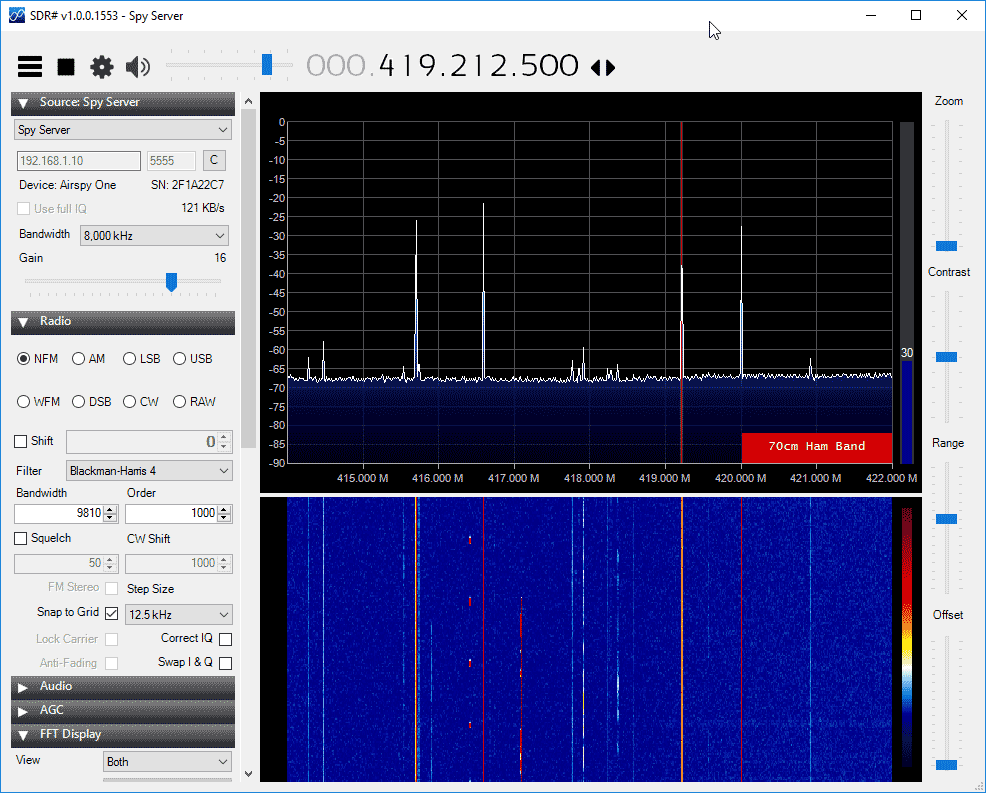
Back in March the team behind the Airspy SDR and SDRSharp software released the SpyServer, a piece of software that allows you to stream radio data from a remote Airspy receiver over a network. Then later in April they added full support for the RTL-SDR dongle as well.
This Easter the Airspy team have released SpyServer 2.0, which improves the streaming efficiency significantly (changelog). Now the full 8 MHz bandwidth of the Airspy should be easily streamable over an internet connection. With SpyServer 1.0 it was difficult to make use of the full bandwidth of the Airspy because the network data usage was very high, since it was streaming the full raw IQ data for the sampling rate/bandwidth selected. In SpyServer 2.0 the server does not stream the full raw data, and instead only streams the wideband FFT data (for displaying the waterfall and FFT graph), and the raw data from the currently selected IF bandwidth. Of course the full IQ data can still be streamed if desired by selecting the ‘Use full IQ’ checkbox.
This new efficiency means that WFM uses only about 1.3 MB/s, and narrow band modes like NFM/AM/SSB only use about 120 kB/s of network data which is easily achievable over a local network and internet. This data usage is almost independent of the sampling rate/bandwidth selected so you can stream the full 8 MHz offered by the Airspy without trouble. Normally streaming the full raw data for 8 MHz would use about 40 MB/s, which is difficult to achieve over a local network, and impossible over the internet.
We tested the new SpyServer over our local network and were able to stream the full 8 MHz of the Airspy with no problems. With the RTL-SDR we were also able to stream 2.4 MHz without issue. WFM and NFM modes worked clearly and no skips or significant lag was noticed over a local WiFi N connection. Hopefully in the future SpyServer will be developed further to enable compressed audio streaming as well for even lower network data usage.
SpyServer WFM Reception. About 1.3 MB/s network usage.SpyServer NFM Reception. About 120 kB/s network usage.
Some Operational Notes:
To run SpyServer on Windows simply double click on spyserver.exe. On Linux extract “spyserver_linux_x86” and the config file, and then run “sudo chmod +x spyserver_linux_x86”. Then run it with “./spyserver_linux_x86”.
Connect to it on the remote PC in SDR# using the servers IP address which can be found by typing “ipconfig /all” in Windows command prompt, or “ifconfig” on Linux.
To select between using the Airspy and RTL-SDR for the SpyServer you will need to edit the spyserver.config file with a text editor and edit the “device_type” string.
SpyServer runs on Windows/Linux as well as small embedded computers such as Raspberry Pi’s and Odroids. Download the Raspberry Pi and Odroid servers separately from SDR# at http://airspy.com/download.
SpyServer is NOT compatible with software that expects an rtl_tcp server such as SDRTouch.
We have also seen Lucas Teske of the OpenSatellite project use the SpyServer for streaming a GOES16 downlink over a network connection with an Odroid C2. He writes that soon the OpenSatellite project software will directly support SpyServer.
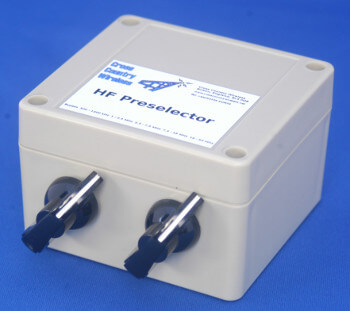
A new reasonably priced 5-band HF preselector has been released by the company Cross Country Wireless, and it looks perfect for use with SDRs. The price is $56.95 GBP, which right now is about $72 USD. They write:
This can be used to provide additional front end selectivity for HF and medium wave receivers protecting the receiver from strong out of band transmissions, wideband noise and other transmitters on multi-station field days.
As the sunspot cycle declines and more listening is done on the lower HF bands with long wire antennas and strong NVIS signals then the HF Preselector is an ideal accessory to aid receiver performance.
It is invaluable when using simple conventional superhet or SDR receivers such as RTL-SDR dongles with upconverters or SDRPlay with large HF antennas.
It is an ideal tool to reduce ADC overload on the Icom IC-7300 with the new second receiver socket modification kit.
It can also be used with other transceivers that have sockets for a separate receiver input and receive antenna output.
It also covers the medium wave broadcast band for MW DXers.
The Preselector is a passive high Q design that does not use an additional amplifier or require external power.
Frequency tuning range: 0.5 to 52 MHz in five bands
The Pi Zero is one of the cheapest single board computers available, costing only $5 USD, and the wireless model with WiFi connectivity only costs $10 USD. It is powerful enough with its 1 GHz CPU and 512 MB of RAM to run an RTL-SDR and run several non CPU intensive applications such as ADS-B decoding.
The tutorial starts from the beginning by installing a fresh Raspbian image onto the Pi Zero. He then goes on to show how to install the PiAware tracking and feeding software from flightaware.com. Later in the tutorial he also shows how to collect data straight from the flightaware.com API, and also how to build and control an RGB matrix which can display live flight numbers.
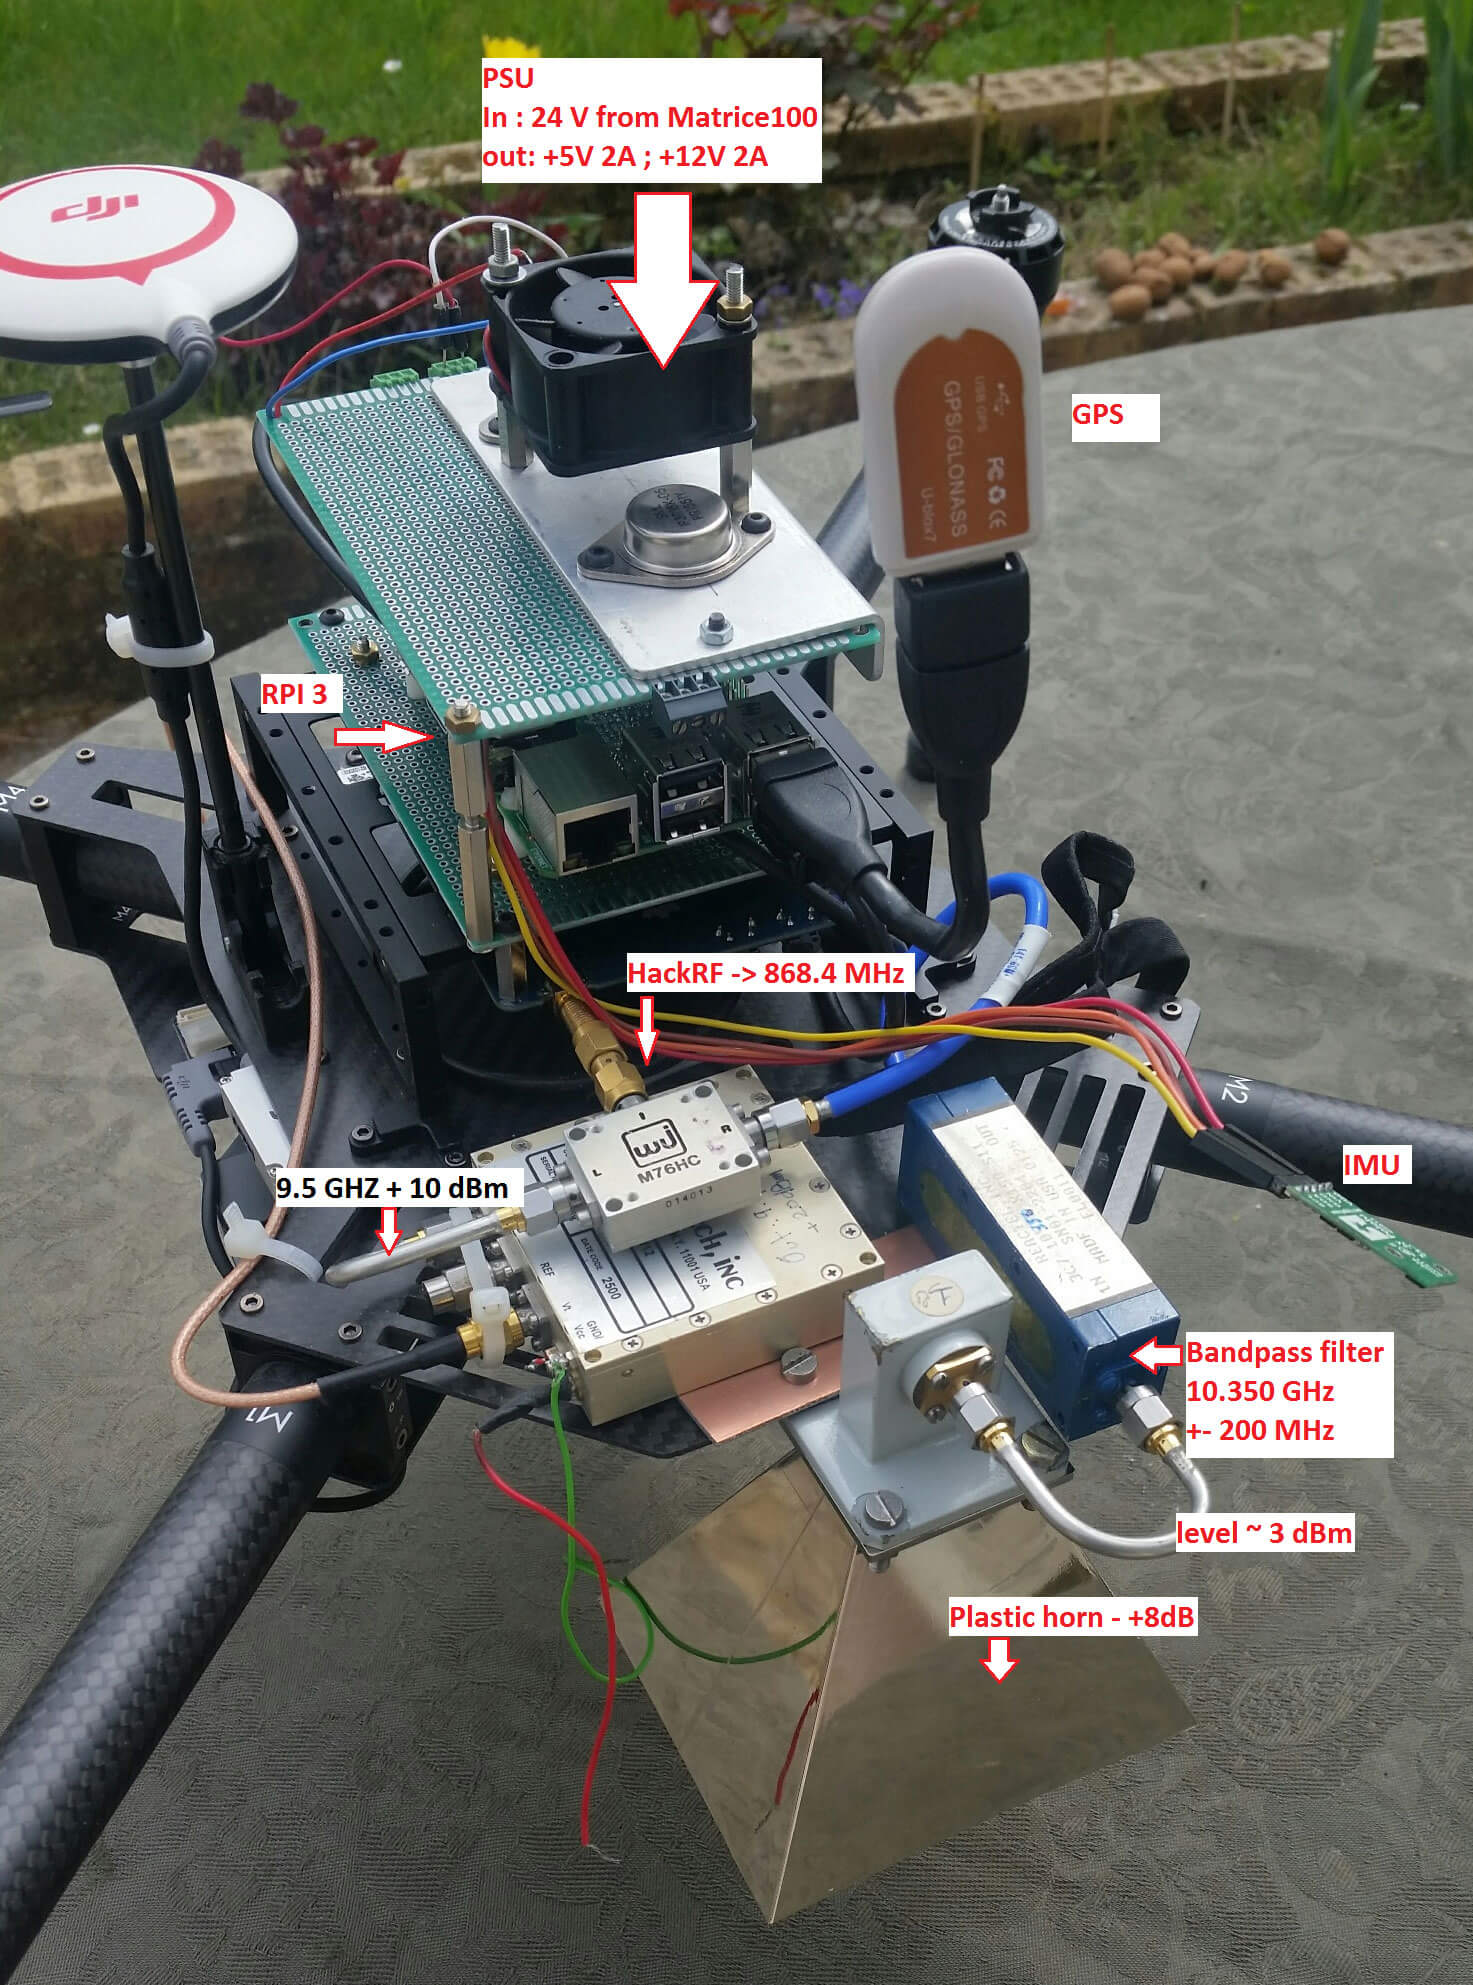
The idea is to use the drone as a remote beacon which can move all around the antenna. As the drone flies around, the HackRF on the drone emits a data chirp containing GPS telemetry of the drones position. The receiver on the ground decodes this data and also determines the SNR of the received signal. By plotting the received SNR together with the drones GPS position, the radiation pattern of the antenna under test could be determined.
The software is called “RadiantBee” and is developed by both F4GKR and F5OEO. It is available over on GitHub. The flying hardware consists of a quadcopter, GPS, Raspberry Pi 3, HackRF, 10 GHz upconverter, band pass filter and horn antenna. The base station consists of an RTL-SDR dongle, 10 GHz downconverter, GPS and the antenna under test.