Thanks to Steve K2GOG of The Hudson Valley Digital Network (HVDN) for submitting his post on how to create a wireless display for Pi-Star. Pi-Star is a pre-built Raspberry Pi image for amateur radio users experimenting with digital voice communications like D-STAR and DMR. They write that it can be used for applications such as a "single mode hotspot running simplex providing you with access to the increasing number of Digital Voice networks, [or a] public duplex multimode repeater".
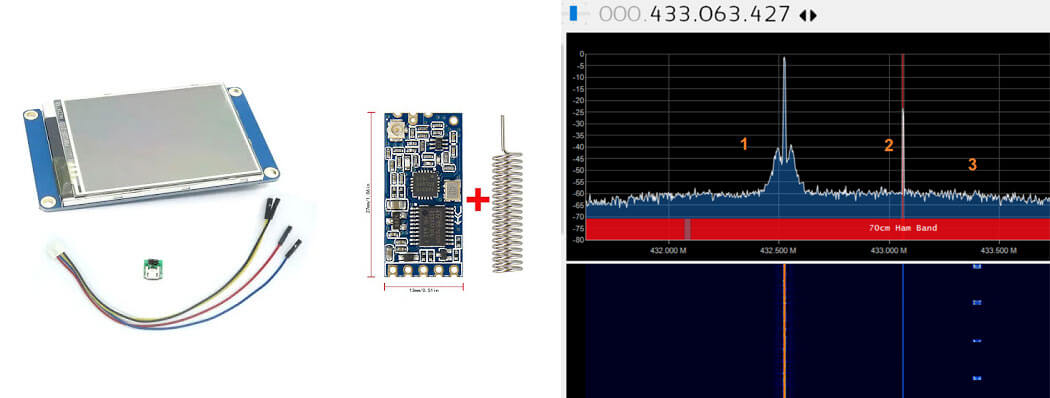
Pi-Star is compatible with serial based LED displays with built in GUIs like the Nextion. The displays are usually connected directly to the Raspberry Pi, but Steve wanted to use the display remotely. To do this he used a simple and inexpensive 70cm band HC-12 wireless serial port adapter. With the wireless adapters connected to the Pi he was able to see the pulses in SDR# via his RTL-SDR to confirm that the wireless serial signal was being sent. He then connected the second wireless adapter to the Nextion display via a few diodes to drop the voltage, and was able to get the display updating as if it was connected directly.
In the post Steve mentions that HVDN are also giving away an HC-12 and RTL-SDR to the first person to submit some progress with this idea.
Over on YouTube user Corrosive has uploaded a video showing how he can use the recently updated DATV Express software to transmit Digital Amateur TV (DATV) with a LimeSDR Mini, and receive it with a cheap US$20 DVB-S satellite set top box that he's modified with a custom firmware update. Corrosives work is excellent as it allows anyone to get started in DATV amateur radio cheaply. He writes:
Last week I noticed the windows DATV express software for windows had been updated to include several SDR platforms [appears to now support the LimeSDR and LimeSDR Mini, as well as the PlutoSDR] https://www.datv-express.com/CustomPage/Downloads
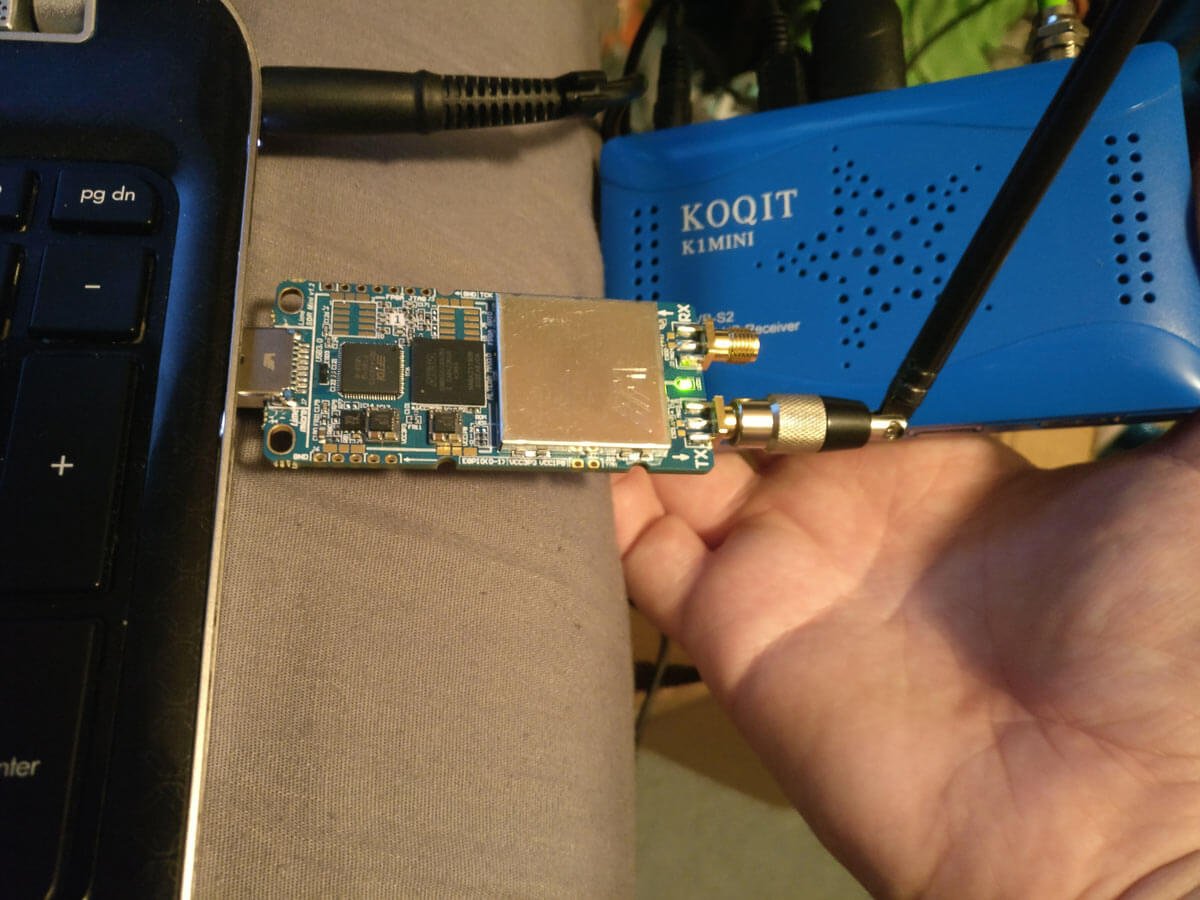
Using my new LimeSDR Mini I wanted to try this out. I went online and purchased a cheap DVB-S Satellite set top box on eBay branded as a KOQIT K1Mini.
In order to allow the KOQIT K1Mini DVB-S set top box to receive DATV frequencies, Corrosive has released a firmware update on GitHub that removes all satellites listed in the receiver, and replaces it with six DATV channels for amateur television use. He writes:
I decided to split the 3 23cm ATV frequencies into 6 at half the bandwidth for digital.
The receiver with my firmware configures the device to see a 9750LO LNB, by placing a simple antenna on the receiver instead of an LNB the 1.2 ghz amateur frequencies are shifted by 9750mhz and can be scanned as if they were a satellite transponder.
If you don't have a TX capable or DATV Express compatible SDR like the LimeSDR or Pluto, then we note that RPiTX (software that allows a Raspberry Pi to transmit RF without any additional hardware) also has DATV transmit capabilities that could in used in their place.
Make Your Own TV Station Using Amateur Radio With LimeSDR Mini and a Satellite Receiver 23CM 1.2GHz
Thanks to Steve K2GOG of The Hudson Valley Digital Network (HVDN) for submitting his post on how to create a wireless display for Pi-Star. Pi-Star is a pre-built Raspberry Pi image for amateur radio users experimenting with digital voice communications like D-STAR and DMR. They write that it can be used for applications such as a "single mode hotspot running simplex providing you with access to the increasing number of Digital Voice networks, [or a] public duplex multimode repeater".
Pi-Star is compatible with serial based LED displays with built in GUIs like the Nextion. The displays are usually connected directly to the Raspberry Pi, but Steve wanted to use the display remotely. To do this he used a simple and inexpensive 70cm band HC-12 wireless serial port adapter. With the wireless adapters connected to the Pi he was able to see the pulses in SDR# via his RTL-SDR to confirm that the wireless serial signal was being sent. He then connected the second wireless adapter to the Nextion display via a few diodes to drop the voltage, and was able to get the display updating as if it was connected directly.
In the post Steve mentions that HVDN are also giving away an HC-12 and RTL-SDR to the first person to submit some progress with this idea.
Over on YouTube user Corrosive has uploaded a video showing how he can use the recently updated DATV Express software to transmit Digital Amateur TV (DATV) with a LimeSDR Mini, and receive it with a cheap US$20 DVB-S satellite set top box that he's modified with a custom firmware update. Corrosives work is excellent as it allows anyone to get started in DATV amateur radio cheaply. He writes:
Last week I noticed the windows DATV express software for windows had been updated to include several SDR platforms [appears to now support the LimeSDR and LimeSDR Mini, as well as the PlutoSDR] https://www.datv-express.com/CustomPage/Downloads
Using my new LimeSDR Mini I wanted to try this out. I went online and purchased a cheap DVB-S Satellite set top box on eBay branded as a KOQIT K1Mini.
In order to allow the KOQIT K1Mini DVB-S set top box to receive DATV frequencies, Corrosive has released a firmware update on GitHub that removes all satellites listed in the receiver, and replaces it with six DATV channels for amateur television use. He writes:
I decided to split the 3 23cm ATV frequencies into 6 at half the bandwidth for digital.
The receiver with my firmware configures the device to see a 9750LO LNB, by placing a simple antenna on the receiver instead of an LNB the 1.2 ghz amateur frequencies are shifted by 9750mhz and can be scanned as if they were a satellite transponder.
If you don't have a TX capable or DATV Express compatible SDR like the LimeSDR or Pluto, then we note that RPiTX (software that allows a Raspberry Pi to transmit RF without any additional hardware) also has DATV transmit capabilities that could in used in their place.
Make Your Own TV Station Using Amateur Radio With LimeSDR Mini and a Satellite Receiver 23CM 1.2GHz
Thanks to DE8MSH for writing in about his project that involves using a Raspberry Pi 3 and cheap 7€ USB sound card connected to an old Grahn GS1 VLF antenna to detect the SAQ VLF station. Standard PC or USB sound cards can be used as a narrowband VLF capable SDR simply by connecting an antenna to the sound inputs. SAQ (aka Grimeton Radio Station) is a heritage VLF transmitter in Sweden that transmits CW at 17.2 kHz, normally only on Alexanderson Day and Christmas Day, but can sometimes unofficially transmit without announcement due to maintenance, training or local events.
In terms of software running on the Pi 3 DE8MSH uses Spectrum Laboratory (speclab) to monitor the sound card waterfall, and has written a Python script that uploads the processed images from speclab to a Twitter account every 20 minutes. This way he hopes to be able to detect any unannounced SAQ transmissions from his station in Sweden.
Spectrum Laboratory is actually a Windows and x86 only program, however as shown in one of our previous posts, it is possible to use a special compatibility emulator called Exagear which allows you to run x86 programs on ARM hardware. Together with Wine you can then run x86 Windows programs on single board computers like the Raspberry Pi 3 which run Linux on ARM hardware.
Speclab Screenshot from DE8MSHs Pi3 soundcard monitoring system
Earlier this month we posted about the KiwiSDR direction finding update, which now allows anyone with internet access to utilize public KiwiSDR's for the purpose of pinpointing the physical location of a transmitter that transmits at a frequency below 30 MHz.
A few people have had trouble understanding how to use the direction finding feature, so KiwiSDR fan Nils Schiffhauer (DK8OK) has written up a KiwiSDR direction finding usage guide. Nils' guide explains the basic technical ideas behind the TDoA (Time Difference of Arrival) direction finding technique used, and highlights some important considerations to take into account in order to get the best results. For example he discusses best practices on how to choose receiver locations, how many receivers to choose, and how to properly take into account the time delaying effects of ionospheric propagation with HF signals.
Finally at the end of the document he shows multiple case studies on HF signals that he's managed to locate using the discussed best practices. Looking through these examples should help make it clear on how receiver locations should be chosen.
The designs include the PCB Gerber files for manufacturing, the components list and assembly and usage guides. Also both through-hole and SMD designs are provided.
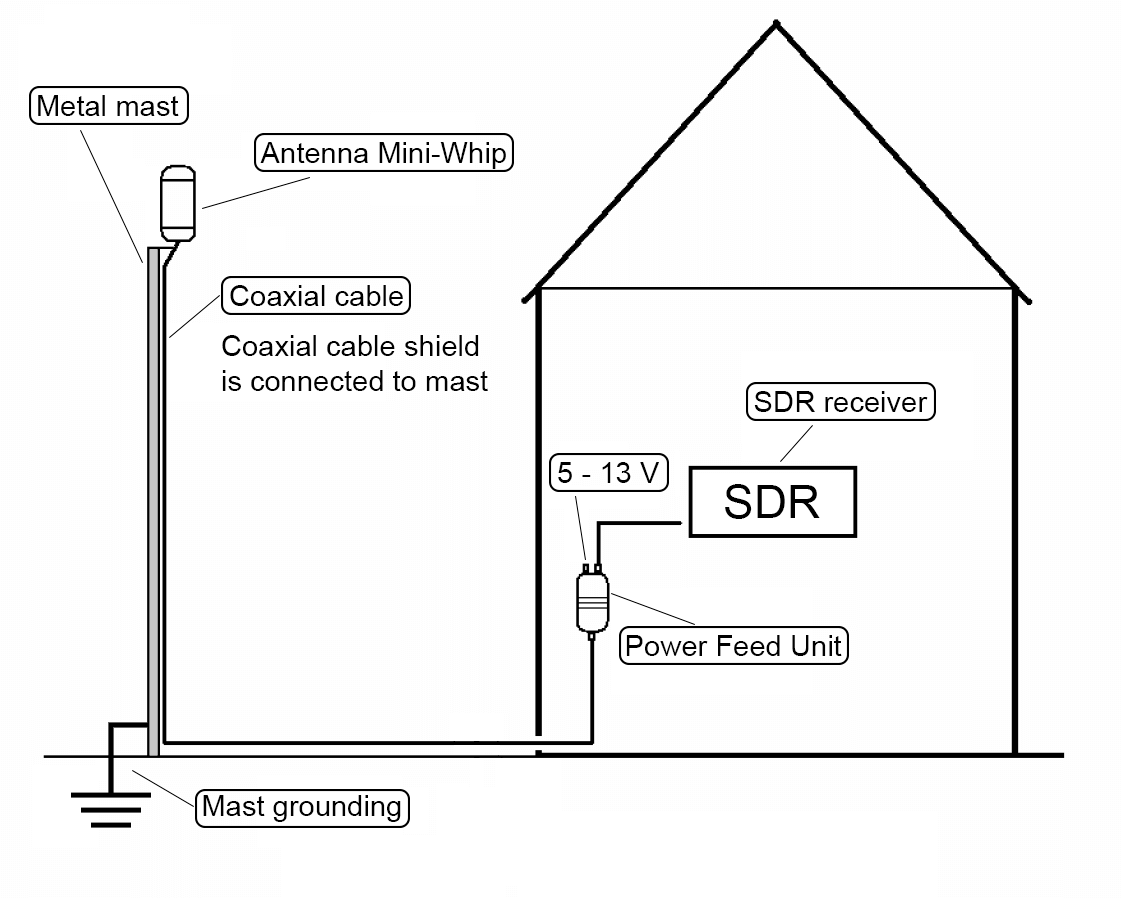
The Mini-Whip design has a frequency range of 10 kHz - 30 MHz and to power it you'll need a 5 - 13V bias tee. You will need to install it up high and preferably away from the house as Mini-Whips are quite susceptible to local noise pickup. Another very important point is that Mini-Whips need to have a good ground connection. The upconverter is based on the ADE-1 mixer, and uses a 125 MHz local oscillator.
Igor's documentation on the project is excellent, and is a good read for getting more information about upconverters and Mini-Whips. He has noted that he is sending us some samples of units that he's built, so when we receive them we'll post again with test results. It looks as if he's put a lot of research into these designs so we're looking forward to seeing how well they work.
Diagram from Igor's documentation about how to properly ground a Mini-Whip connected to a metal mast.
Over on his YouTube channel Crazy Danish Hacker has posted a new video that shows how to pick up amateur radio voice signals from the International Space Station (ISS).
Often astronauts on the ISS will schedule times to chat with schools via amateur radio frequencies. This provides an opportunity to learn about radio whilst at the same time allowing kids to talk directly to an astronaut.
If you live in an area that can 'see' the ISS at the same time as the school then you can easily pick up the downlink (astronaut to ground) portion of the conversation while the ISS passes over. The downlink signal is fairly strong, so only a simple antenna is required. In his video Crazy Danish Hacker uses a telescopic whip attached directly to his RTL-SDR which is placed outside with a view of the sky.
International Space Station - Software Defined Radio Series #29
Over on YouTube channel Rate My Radio has uploaded a set of three videos showing how to use an SDRplay RSP2 as a low cost spectrum analyzer to measure the inter modulation distortion (IMD) performance of lower end hardware TX capable radios. The test can only be performed on radios that have IMD performance less than that of the RSP2, so very high end amateur radios cannot be tested.
The process is to use audacity to play two audio tones into the transmitting radio under test, and then the SDRplay is used to receive the output. On the SDRuno software you're then able to see the third order and higher IMD products. Later he also performs white noise IMD tests as well. Below is the video description:
We cover 2 Tone Testing, White Noise Testing, and how the later can be particularly useful in terms of station monitoring. Naturally, we show the effects of 'all knobs to the right' :)
Jarrad also covers how with just an SDR Play and a 'rubber ducky' antenna, station performance can be monitored in real time.
Why would a Ham want to do this? The answer is simple: To defend their station performance against that on air Expert, who got their ticket when you needed to send CW at 50WPN, who served in the military radio unit for 20 years, has 3 engineering degrees and worked as a professor at both MIT and Havard, not to mention the times they lectured at Cambridge & Oxford.
With an SDR Play and a bit of simple math, any OM can put such experts in their place.
Below we only post the third video of the three part series. Links to Part 1 and Part 2 are available in those links, or on his channel.
If you weren't already aware, the KiwiSDR is a US$299 HF SDR that can monitor the entire 0 - 30 MHz band at once. It is designed to be web-based and shared, meaning that the KiwiSDR owner, or anyone that they've given access, can tune and listen to it via a web browser over the internet. Many public KiwiSDRs can be found and browsed from the list at sdr.hu.
One thing that KiwiSDRs have is a GPS input which allows the KiwiSDR to run from an accurate clock, as well as providing positional data. Time Difference of Arrival (TDoA) is a direction finding technique that relies on measuring the difference in time that a signal is received at over multiple receivers spread out over some distance. In order to do this an accurate clock that is synchronized with each receiver is required. GPS provides this and is able to accurately sync KiwiSDR clocks worldwide.
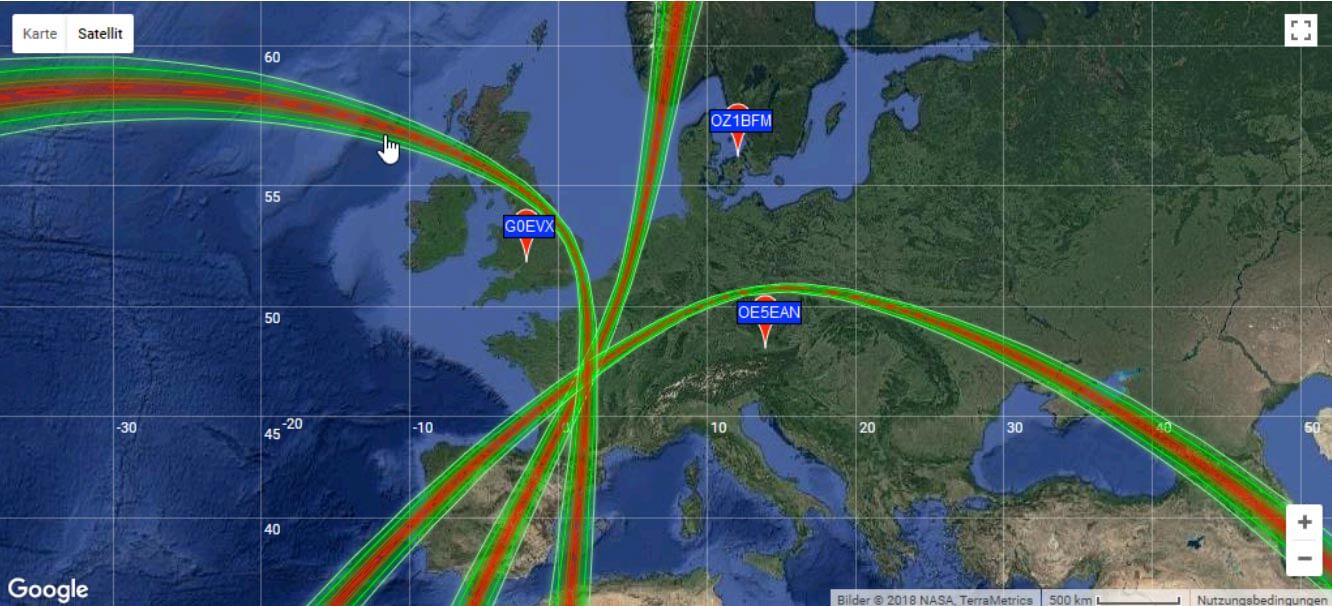
In one post from late last year Christoph shows that he was able to pinpoint the location of the German DCF77 longwave time station by using three KiwiSDRs spread out around Europe. The actual location of DCF77 is already known, so this shows that the technique actually works. Other posts show him locating transmitters for STANAG 4285, some unknown frequency hopping signals, OTH radar from Cyprus, CODAR, DRM, VOLMET and more.
Christophs' code can be found at https://github.com/hcab14/TDoA. According to users gathering the data and running the code is still a fairly elaborate process. But there is talk over on the KiwiSDR forums about eventually creating a server that would allow users to more easily request a location computation for a particular signal.
Pinpointing DCF77 with KiwiSDRs (Bottom right image shows pinpointed location)
Also related to this topic, priyom.org has been using KiwiSDRs to try and locate numbers stations. Numbers stations are mysterious voice stations on the HF bands that when transmitting read out a string of numbers. Most speculate that the numbers are some sort of code intended for international spy agents. Using a simpler method of just noting which KiwiSDRs in the world receive a particular numbers station more strongly, they've been able to determine the likely country of some well known stations.