During the SANS Pen Test HackFest which was held back in 2017, speaker Katie Knowles who is a security consultant at MWR Infosecurity did a very informative talk on how an RTL-SDR can be used to investigate RF signals. The video has recently been uploaded to YouTube and is shown below. In the talk she goes over how to reverse engineer and understand simple RF protocols, like those used by common RF remote controls found in the home. She then goes on to talk about the basics of software like GNU Radio and rtl_433. The talk blurb reads:
Cranes, trains, theme park rides, sirens, and …ceiling fans? Modern RF protocols have made secure wireless communications easier to implement, but there’s still a horde of simpler RF control systems in the wireless world around us.
Lucky for us, the onset of affordable Software Defined Radios (SDRs) means that exploring these devices is easier than ever! In this talk, Katie examines capturing and understanding basic RF control signals from a common household controller with the affordable RTL-SDR so you can start your own investigations.
With a little knowledge of these protocols we can better explain what makes them risky to the environments we assess, practice thinking in the offensive mindset, and have some fun examining the signals around us.
AERO is essentially the satellite based version of aircraft ACARS. AERO's L-band signals contains short ground to air messages with things like weather reports and flight plans. The C-band signals are the air to ground portion of AERO and more difficult to receive as they require an LNB and large dish. However they are much more interesting as they contain flight position data, like ADS-B.
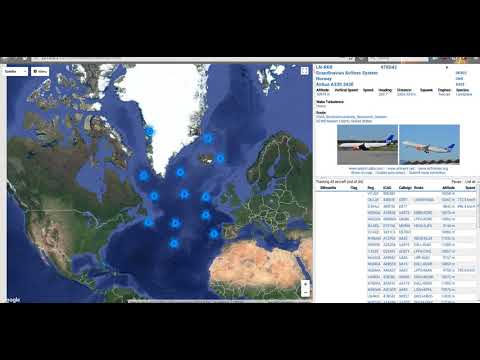
Over on YouTube Tomasz Haddad has uploaded a video of C-band AERO being received from the Inmarsat 3 F2 (Atlantic Ocean Region – East (AOR-E) 15W satellite. He uses a 1.80m motorized satellite dish with Kaonsat KS-N201G C-band LNB, a Prof 7301 PCI satellite card (to power the LNB) and an RTL-SDR V3. The C-band LNB translates the high C-band frequencies down to L-band which is receivable with an RTL-SDR. He notes that the LNB drifts quite a lot as it is not frequency stabilized.
With the signals received by his setup he's able to use the JAERO decoding software together with Virtual Radar Server to plot aircraft positional data using Virtual Radar Server. The plotted aircraft are mostly all in the middle of the ocean or in remote areas, which is where C-band AERO is normally used due to the lack of ground ADS-B stations.
Inmarsat 3 F2 15W C Band AERO Reception Using Jaero And Virtual Radar
A linear transponder is essentially a repeater that works on a range of frequencies instead of a fixed frequency. For example, a normal repeater may receive at 145 MHz, and repeat the signal at 435 MHz. However, a linear transponder would receive a wider bandwidth, and add a set frequency offset to the received signal. For example a signal received by a linear transponder that receives from 145 - 145.5 MHz, may receive a signal at 145.2 MHz and it would translate that up to 435.2 MHz. Another signal received at 145.4 MHz would translate up to 435.4 MHz. Hence the received frequency linearly translates to the transmitted frequency.
Over on YouTube Jack Riley has created a video that documents his system which uses an RTL-SDR to receive POCSAG pager messages and forward messages sent to specific pager addresses to an email address. He uses his RTL-SDR on a Raspberry Pi, together with rtl_fm and multimon-ng to receive and decode the pager messages.
Then using a custom program that is available on his website he filters messages for a particular 'capcode' which indicates the address of a particular pager. When a pager message to the specified capcode address is received, the program turns the message into an email which is instantly sent out.
This is a nice way to forward pager messages on to a more modern device such as a smart phone.
Creating a Pager using a Raspberry Pi and RTL-SDR to send alerts via Email.
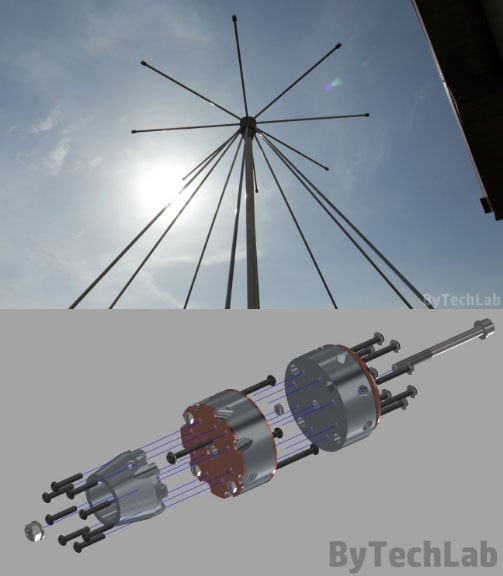
Over on his blog author ByTechLab has posted about his 'mostly 3D printed' discone antenna. A discone is a type of wideband antenna, so it is commonly used with SDRs like the RTL-SDR that have huge frequency ranges. Building a discone can be difficult, but ByTechLab shows that with a 3D printer it is possible to print the aluminum rod mounts, which significantly reduces construction complexity. His post shows the exact directions, and the stl files are available over on Thingiverse.
Note that back in March we saw another 3D printed discone by mkarliner that used a full cone design with the cone being made out of aluminum tape. Discones based on aluminum rods should however be more weather resistant, and more able to withstand wind loads, so ByTechLab's design is more suitable for permanent outdoor mounting.
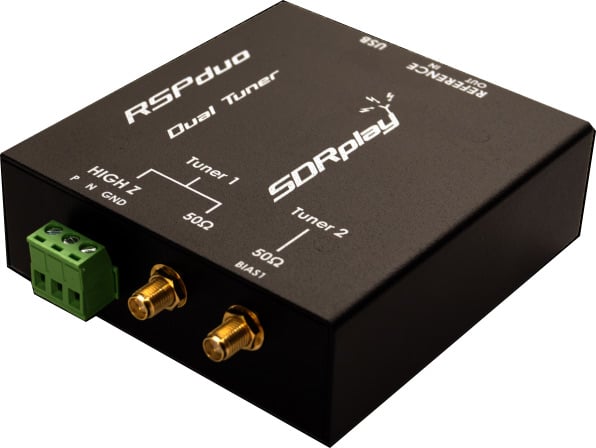
SDRplay have released a new product at this years Hamvention called the "RSPduo". The product uses the same technology as their previous RSP models, but this time includes a phase-coherent dual tuner architecture which allows you to tune to two completely separate 2 MHz bands of spectrum simultaneously. The RSPduo retails for US $279.95 + shipping. Their press release reads:
Today at the Dayton Hamvention, SDRplay is announcing the launch of a new Software Defined Radio product – the RSPduo.
The RSPduo is a radical new addition to the RSP line of SDR receivers from SDRplay. Architecturally, it is different from any previous RSP in that it features dual independent tuners, both piped through a single high-speed USB 2.0 interface.
The SDRplay RSPduo is a dual-tuner wideband full featured 14-bit SDR which covers the entire RF spectrum from 1kHz to 2GHz giving 10MHz of spectrum visibility. Initially using Windows based ‘SDRuno’ supplied by SDRplay, you can simultaneously monitor two completely separate 2MHz bands of spectrum anywhere between 1kHz and 2GHz.
Superficially the RSPduo looks identical to the highly popular RSP2pro and will be able to operate in a very similar way. However, it also allows a completely new and exciting set of usage scenarios such as:
1. Simultaneous monitoring of two widely spaced bands – e.g. 40m (HF) and 2m (VHF) 2. Mixing and matching applications simultaneously – e.g. ADS-B and ATC scanning 3. Phase and time coherent demodulation of two receivers
Scenario 3 is very difficult to achieve with two separate USB devices because of the uncertainty of USB latency. The RSPduo overcomes this limitation because all traffic goes through a single USB interface, thus enabling the possibility of the development of various types of diversity demodulation such as: spatial, frequency and polarisation which can bring huge benefits in terms of improved performance.
As well as adding a second independently controlled tuner, which in itself, offers a whole new set of exciting usage possibilities, the SDRduo features 14bit ADCs and a completely re-designed RF front end. These changes provide better RF selectivity and even more dynamic range, offering outstanding performance under extremely challenging reception conditions. The combination of performance and features makes the RSPduo our highest spec RSP yet and sets a new benchmark in the sub $300 SDR market.
Lots of great new videos are appearing on YouTube showing the Dual Tuner RSPduo in use. Just search for RSPduo in the YouTube Search bar.
While it appears that it will be a useful tool for multi-band monitoring, what we're looking forward to most are the phase coherent applications. Thanks to its phase coherence and predictable USB timing implementation, the unit should be very useful for passive radar and spatial filtering techniques, and we're hoping that SDRplay will be working on software for at least the latter. Multi-channel phase coherent applications are probably going to be one of the the next big developments in the SDR space so it's good to see low cost hardware with this potential coming out now.
We'll be reviewing the unit ourselves within the next month, so keep an eye out for that post!
Thank you to Michael (dg0opk) who wrote in and wanted to share details of his full SDR monitoring system for weak signal HF modes. His setup consists of nine ARM mini PCs (such as Banana Pi's, Raspberry Pi's, and Odroid's), several SDRs including multiple RTL-SDR's, an Airspy Mini, FunCube Dongle and SDR-IQ, as well as some filters and a wideband amp. For software he uses Linrad or GQRX as the receiver, and WSJTx or JTDX as the decoding software, all running on Linux.
Michael also notes that his Bananapi FT8, JT65 and JT9 SDR monitor has been up and stably running continuously for half a year now. Bananapi's are lower cost alternatives to the well known Raspberry Pi single board computers, so it's good to note that a permanent weak signal monitoring system can be set up on a very low budget. Presumably even cheaper Orange Pi's would also work well.
With his setup he is able to continuously monitor FT8, JT65 and JT9 on multiple bands simultaneously without needing to tie up more expensive ham radios. His results can be seen on PSKReporter. A video of his RTL-SDR Raspberry Pi 3 decoding FT8, JT65 and JT9 can be found here.
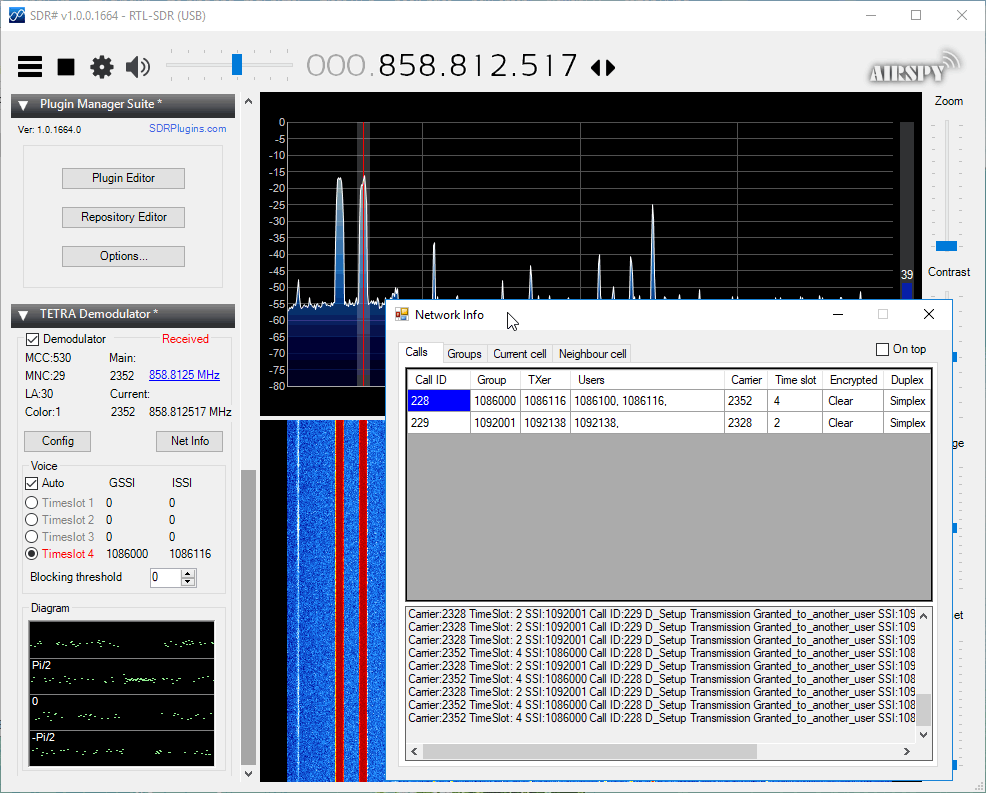
In the new version the 'Net Info' button is now functioning and it is possible to see the current calls, groups, and meta information on the current cell and neighbour cell. It also appears that it has been updated to allow for multiple SDR# TETRA decoder instances to be opened simultaneously now for wider band monitoring.