Over on his YouTube channel Linux Psycho has uploaded a video showing how he was able to listen in on wireless phone calls and recover the dialed phone numbers from within the conversation.
The intercepted signal appears to be unencrypted in the clear NFM at 130 MHz and appears to originate from some sort of wireless telephone service. Heard in the phone call are DTMF dial tones. Later in the video Linux Psycho shows how to retrieve the dialed phone number by recording the DTMF tones and submitting the .wav file to an online DTMF tone detection website. DTMF tones are simply the tones that you hear when you dial a number on a landline phone. Each tone is a different frequency and so it is fairly trivial to recover the dialed numbers.
We’re not sure exactly what the signal that Linux Psycho is listening to actually is as it seems to be a cordless phone, but in the wrong frequency range. Potentially it is a long range wireless phone extension commonly used in the third world or rural areas where actual landline connections are rare.
Over on his YouTube channel Corrosive has uploaded a useful video showing how to modify a standard TV dipole to make it better for general radio use. Many TV dipoles come standard with twin lead, or very poor quality coax cable. Corrosive shows in his video how simple it is to modify and improve one of these by adding high quality coax with a BNC connector.
These TV dipoles are great as general purpose antennas, and are especially useful for making V-dipole antennas for NOAA/Meteor M2 reception.
There is a great advantage to running SDR decoder apps on a single board PC like a Raspberry Pi 3. For example instead of committing a whole PC to become a dedicated decoder, a cheap Pi 3 can be used instead. However, unfortunately many decoder apps are written for the x86 CPU architecture and/or Windows, making them impossible to run on ARM and/or primarily Linux devices like the Raspberry Pi 3.
That is unless you use an emulator combination like Eltechs Exagear and Wine. Exagear is an emulator that emulates an x86 environment on a device like a Raspberry Pi 3 which uses an ARM CPU. Wine is a Windows compatibility layer that allows you to run x86 Windows apps on an x86 Linux installation. So by combining Exagear together with Wine it is possible to run Windows apps on ARM Linux devices.
Exagear is not free (although there is a free trial). It currently costs $22.95 USD for a Pi 3 licence, and $16.95 USD for a Pi 2 licence and $11.45 for a Pi 1/Zero licence. They also have versions for Odroid, Cubieboard, BananaPi, Jetson and many other ARMv7 and ARMv8 devices like the super cheap and powerful Orange Pi’s. There are free alternatives out there like QEMU, however when we tested QEMU it was far too slow on the Pi 3 to even run notepad responsively, let alone a decoder. Exagear on the other hand seems to run apps at near native speeds, without much lag at all. So in this respect the price seems to be worth it.
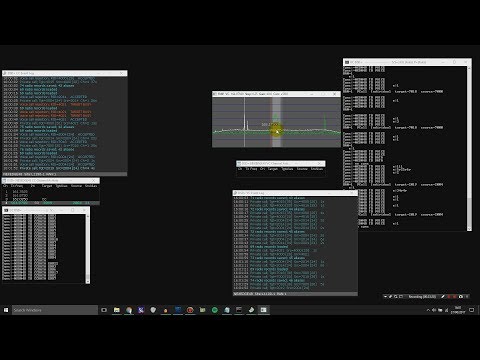
We decided to test the Exagear + Wine combination on a Pi 3 and were successful in running a number of apps including Unitrunker, WinSTD-C, WXtoImg, DSDPlus, PC-HFDL, MultiPSK, Orbitron and Sondemonitor.
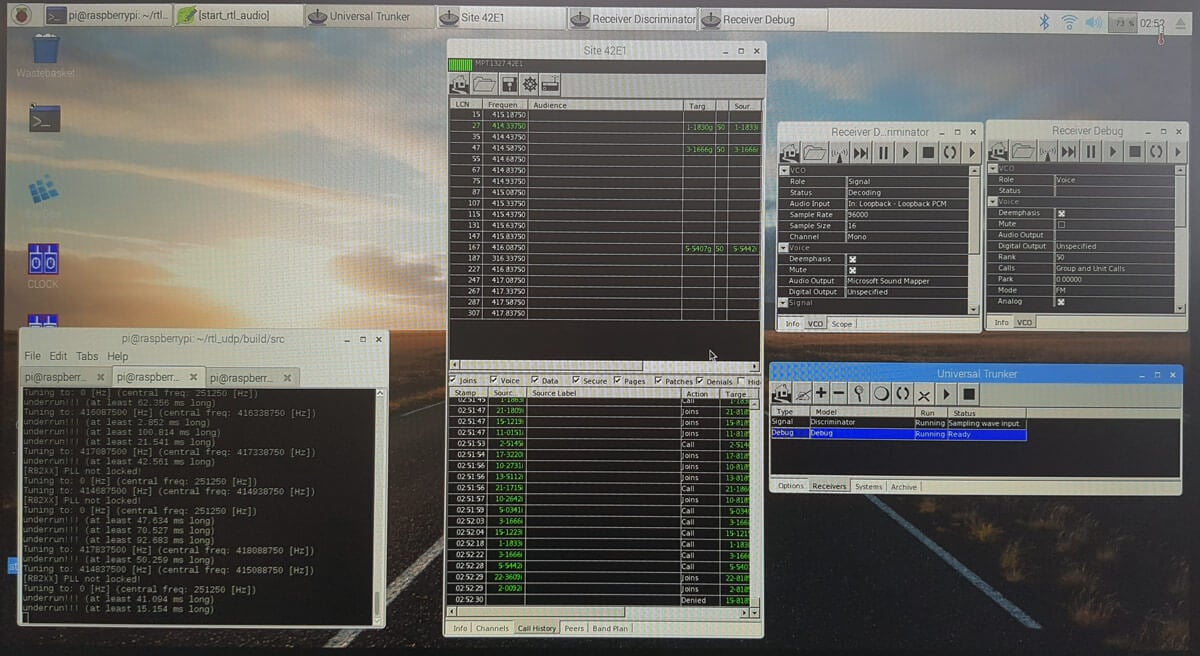
Trunking setup with Unitrunker on a Raspberry Pi 3
With Unitrunker we were able to set up a full trunk tracking system using two RTL-SDR dongles, rtl_fm, rtl_udp and a custom script to control rtl_udp.
Unitrunker running on a Raspberry Pi 3
In the future we may put up a full double checked tutorial with images, but for now a roughly written tutorial is presented below. The tutorial is fairly involved and assumes decent Linux experience. The tutorial starts from a fresh install of Raspbian.
The basic idea of operation is based around the fact that the RTL-SDR cannot be used directly within Wine (or so it seems). So the control signal audio is routed from rtl_fm running on one dongle into Unitrunker on Wine using alsa loopback. Then we use the old Unitrunker remote.dll method to generate a sdrsharptrunking.log file which is a text file that contains the current frequency that the voice receiver should tune to. A simple shell script continuously reads this file and extracts the frequency, and then commands an instance of rtl_udp running with the second dongle to tune to that frequency.
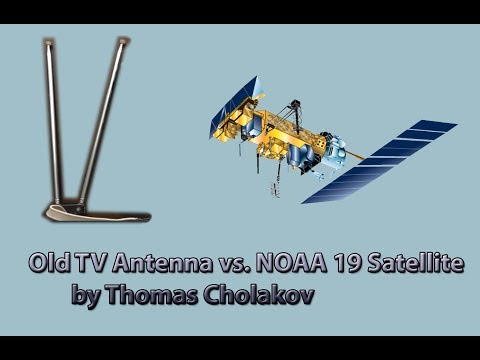
Over on YouTube icholakov has uploaded a video showing how effective a simple old TV bunny ears antenna can be at receiving NOAA satellite images. The old TV antenna is telescoping so it can be adjusted to be resonant for many frequencies, and for NOAA satellites about 20 inches makes it resonant. Using the antenna as a V-Dipole and placing it in a North to South direction optimizes the radiation pattern towards the sky, allowing for good reception of the NOAA satellite. Using it this way also helps to null out strong vertically polarized stations. More information on the V-Dipole can be found on our previous post where we posted about Adam 9A4QV’s idea to use the V-Dipole for satellite reception.
2017: TV Antenna vs. NOAA Satellite
Also related to this post is a sneak preview on our new product: We’ve also caught onto the idea that TV antenna dipoles are extremely versatile, and are in the final stages of releasing a simple telescopic dipole product similar to the TV antenna used in this video. It will be released as an antenna set that comes with some portable mounting solutions like a suction cup and bendy tripod, and 3M of RG174 coax so that the antenna can be used anywhere. Target price is $10 -15 USD incl. shipping from China. This will probably also replace the stock telescopic whip antenna currently used in our dongle sets since the telescopic dipole is simply much more versatile.
About two weeks ago we posted our review of the Dreamcatcher, a new RTL-SDR and full ARM based computing platform built onto a single PCB. Back then the only OS available for it was a standard Armbian build, and no Outernet decoder was available. So we reviewed the Dreamcatcher with the Armbian OS and tested to see how well it worked as a general purpose RTL-SDR and computing platform.
Recently the Outernet team released a new build of ‘Skylark’ for their Dreamcatcher board. Skylark is their customized Outernet signal specific operating system that was available on the C.H.I.P. Skylark is essentially turnkey as it is much easier to setup and use. Just burn the image to an SDcard, insert the card, connect to the automatically generated Outernet WiFi hotspot on a PC or mobile device, and then browse to outernet.is to see the Skylark interface.
Unfortunately it is unclear how long some of the high bandwidth features such as the nice weather app may last. The Outernet Inmarsat L-band signal runs at a bandwidth of almost 20mB a day and appears to cost quite a bit of money to operate, so Outernet appear to be considering moving to a lower bandwidth signal in the near future. This will probably reduce content to data like text articles (news/APRS/Wikipedia/books) only. But even if it is text only it will still continue to be a very useful and interesting service.
Over on his YouTube channel Linux Psycho has uploaded a video showing how he was able to listen in on wireless phone calls and recover the dialed phone numbers from within the conversation.
The intercepted signal appears to be unencrypted in the clear NFM at 130 MHz and appears to originate from some sort of wireless telephone service. Heard in the phone call are DTMF dial tones. Later in the video Linux Psycho shows how to retrieve the dialed phone number by recording the DTMF tones and submitting the .wav file to an online DTMF tone detection website. DTMF tones are simply the tones that you hear when you dial a number on a landline phone. Each tone is a different frequency and so it is fairly trivial to recover the dialed numbers.
We’re not sure exactly what the signal that Linux Psycho is listening to actually is as it seems to be a cordless phone, but in the wrong frequency range. Potentially it is a long range wireless phone extension commonly used in the third world or rural areas where actual landline connections are rare.
Over on his YouTube channel Corrosive has uploaded a useful video showing how to modify a standard TV dipole to make it better for general radio use. Many TV dipoles come standard with twin lead, or very poor quality coax cable. Corrosive shows in his video how simple it is to modify and improve one of these by adding high quality coax with a BNC connector.
These TV dipoles are great as general purpose antennas, and are especially useful for making V-dipole antennas for NOAA/Meteor M2 reception.
There is a great advantage to running SDR decoder apps on a single board PC like a Raspberry Pi 3. For example instead of committing a whole PC to become a dedicated decoder, a cheap Pi 3 can be used instead. However, unfortunately many decoder apps are written for the x86 CPU architecture and/or Windows, making them impossible to run on ARM and/or primarily Linux devices like the Raspberry Pi 3.
That is unless you use an emulator combination like Eltechs Exagear and Wine. Exagear is an emulator that emulates an x86 environment on a device like a Raspberry Pi 3 which uses an ARM CPU. Wine is a Windows compatibility layer that allows you to run x86 Windows apps on an x86 Linux installation. So by combining Exagear together with Wine it is possible to run Windows apps on ARM Linux devices.
Exagear is not free (although there is a free trial). It currently costs $22.95 USD for a Pi 3 licence, and $16.95 USD for a Pi 2 licence and $11.45 for a Pi 1/Zero licence. They also have versions for Odroid, Cubieboard, BananaPi, Jetson and many other ARMv7 and ARMv8 devices like the super cheap and powerful Orange Pi’s. There are free alternatives out there like QEMU, however when we tested QEMU it was far too slow on the Pi 3 to even run notepad responsively, let alone a decoder. Exagear on the other hand seems to run apps at near native speeds, without much lag at all. So in this respect the price seems to be worth it.
We decided to test the Exagear + Wine combination on a Pi 3 and were successful in running a number of apps including Unitrunker, WinSTD-C, WXtoImg, DSDPlus, PC-HFDL, MultiPSK, Orbitron and Sondemonitor.
Trunking setup with Unitrunker on a Raspberry Pi 3
With Unitrunker we were able to set up a full trunk tracking system using two RTL-SDR dongles, rtl_fm, rtl_udp and a custom script to control rtl_udp.
Unitrunker running on a Raspberry Pi 3
In the future we may put up a full double checked tutorial with images, but for now a roughly written tutorial is presented below. The tutorial is fairly involved and assumes decent Linux experience. The tutorial starts from a fresh install of Raspbian.
The basic idea of operation is based around the fact that the RTL-SDR cannot be used directly within Wine (or so it seems). So the control signal audio is routed from rtl_fm running on one dongle into Unitrunker on Wine using alsa loopback. Then we use the old Unitrunker remote.dll method to generate a sdrsharptrunking.log file which is a text file that contains the current frequency that the voice receiver should tune to. A simple shell script continuously reads this file and extracts the frequency, and then commands an instance of rtl_udp running with the second dongle to tune to that frequency.
Over on YouTube icholakov has uploaded a video showing how effective a simple old TV bunny ears antenna can be at receiving NOAA satellite images. The old TV antenna is telescoping so it can be adjusted to be resonant for many frequencies, and for NOAA satellites about 20 inches makes it resonant. Using the antenna as a V-Dipole and placing it in a North to South direction optimizes the radiation pattern towards the sky, allowing for good reception of the NOAA satellite. Using it this way also helps to null out strong vertically polarized stations. More information on the V-Dipole can be found on our previous post where we posted about Adam 9A4QV’s idea to use the V-Dipole for satellite reception.
2017: TV Antenna vs. NOAA Satellite
Also related to this post is a sneak preview on our new product: We’ve also caught onto the idea that TV antenna dipoles are extremely versatile, and are in the final stages of releasing a simple telescopic dipole product similar to the TV antenna used in this video. It will be released as an antenna set that comes with some portable mounting solutions like a suction cup and bendy tripod, and 3M of RG174 coax so that the antenna can be used anywhere. Target price is $10 -15 USD incl. shipping from China. This will probably also replace the stock telescopic whip antenna currently used in our dongle sets since the telescopic dipole is simply much more versatile.
About two weeks ago we posted our review of the Dreamcatcher, a new RTL-SDR and full ARM based computing platform built onto a single PCB. Back then the only OS available for it was a standard Armbian build, and no Outernet decoder was available. So we reviewed the Dreamcatcher with the Armbian OS and tested to see how well it worked as a general purpose RTL-SDR and computing platform.
Recently the Outernet team released a new build of ‘Skylark’ for their Dreamcatcher board. Skylark is their customized Outernet signal specific operating system that was available on the C.H.I.P. Skylark is essentially turnkey as it is much easier to setup and use. Just burn the image to an SDcard, insert the card, connect to the automatically generated Outernet WiFi hotspot on a PC or mobile device, and then browse to outernet.is to see the Skylark interface.
Unfortunately it is unclear how long some of the high bandwidth features such as the nice weather app may last. The Outernet Inmarsat L-band signal runs at a bandwidth of almost 20mB a day and appears to cost quite a bit of money to operate, so Outernet appear to be considering moving to a lower bandwidth signal in the near future. This will probably reduce content to data like text articles (news/APRS/Wikipedia/books) only. But even if it is text only it will still continue to be a very useful and interesting service.
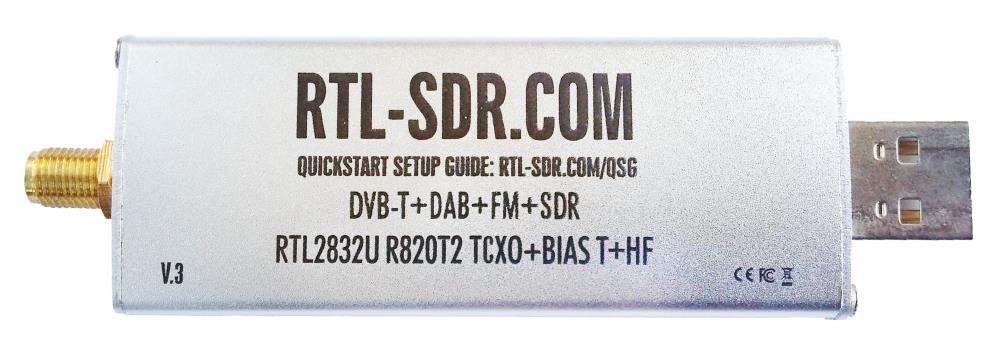
A few people have been asking for a RTL-SDR.com V3 data/info sheet, so we have written one up here (PDF). The datasheet explains the improvements made to the V3, and how to use some of the special features like the direct sampling mode and the bias tee.
Over on YouTube user radiosification has uploaded a video tutorial that shows how to decode, follow and listen to NXDN/IDAS trunking radio signals. NXDN/IDAS is a narrowband digital voice protocol commonly used with handheld radio terminals.
In the tutorial radiosification explains how to set up DSDPlus and its frequencies text file to automatically listen to and track conversations using the control channel. SDR# is initially used to find the NXDN control and voice channels, which are then entered into the text file. Using this method only DSDPlus and its corresponding receiver FMP is used. Trunking software like Unitrunker is not needed.
Radiosification also notes that the method he presents can also be used for other digital trunking systems such as P25 as well.
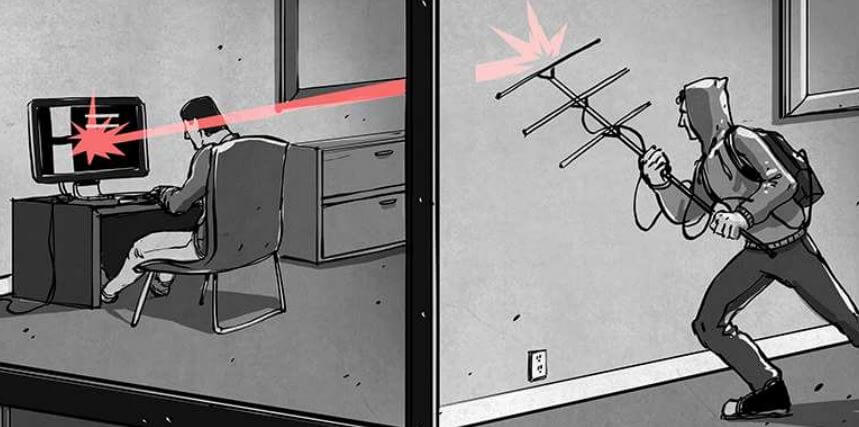
All electronic devices emit some sort of unintentional RF signals which can be received by an eavesdropping radio. These unintentional signals are sometimes referred to as TEMPEST, after the NSA and NATO specification which aims to ensure that electronic devices containing sensitive information cannot be spied upon through unintentional radio emissions, sounds or vibrations. TEMPEST can also refers to the opposite, which is spying on unsecured electronic devices by these means.
In their experiments they set up an AES implementation on an FPGA, and used a simple wire loop antenna and RTL-SDR to measure and record the RF emissions. By then doing some analysis on the recorded signal they are able to fairly easily extract the AES encryption key, thus defeating the encryption.
Further testing in an anechoic chamber showed that with a discone antenna they were able to recover the keys from up to a meter away. A directional antenna could probably reach even further distances.
In the past we’ve seen a similar attack using a Funcube dongle, which is an SDR similar to the RTL-SDR. In that attack they were able to remotely recover encryption keys from a laptop running GnuPC. Also, somewhat related is Disney’s EM Sense which uses an RTL-SDR to identify electronic devices by their RF emissions.