Category: HF

An Introduction to SDR and SDR Applications for Shortwave Listeners

Over on the SWLing Post blog, author Thomas Witherspoon K4SWL has uploaded a new article titled "Software Defined Radio Primer Part 1: Introduction to SDRs and SDR applications". The article originally appeared in the June 2018 issue of The Spectrum Monitor magazine, which can be purchased online for $3 per issue.

The idea behind the article is to introduce people to SDR from a shortwave listening point of view, so high performance HF SDRs like the Airspy HF+, Elad FDM-S2 and WinRadio Excalibur are discussed. Thomas notes that these SDRs can perform as well as traditional DX-grade receivers that can cost two to three times more. He also explains what advantages SDR's bring to the shortwave radio listening hobby. This may be a good article to show those still using older hardware radios that haven't yet converted to the SDR world. 

The article is currently part one of a three part series, with parts two and three to be released in October and November.

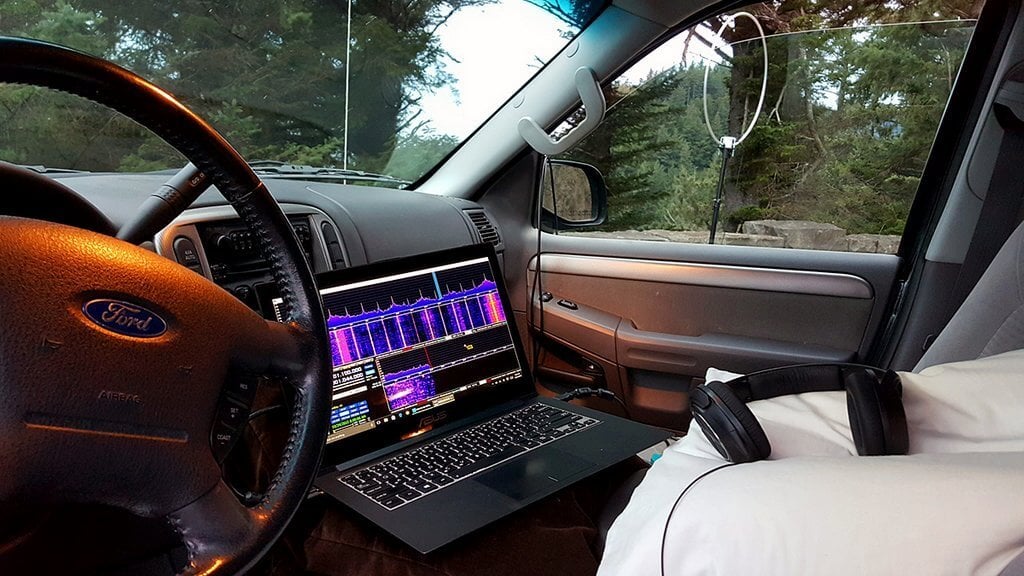
DXing with SDR in a Car
DXing with SDR in a Car (Photo: Guy Atkins)

Japanese RTL-SDR Products Now Available for International Shipping on Amazon.co.jp

Thanks to 'Nobu' for letting us know that his RTL-SDR products sold on Amazon.co.jp are now available for international shipping (in Japanese, please use the Google Translated version if needed). Before Amazon.co.jp offered international shipping you had to use a third party Japanese forwarding service in order to purchase his products.

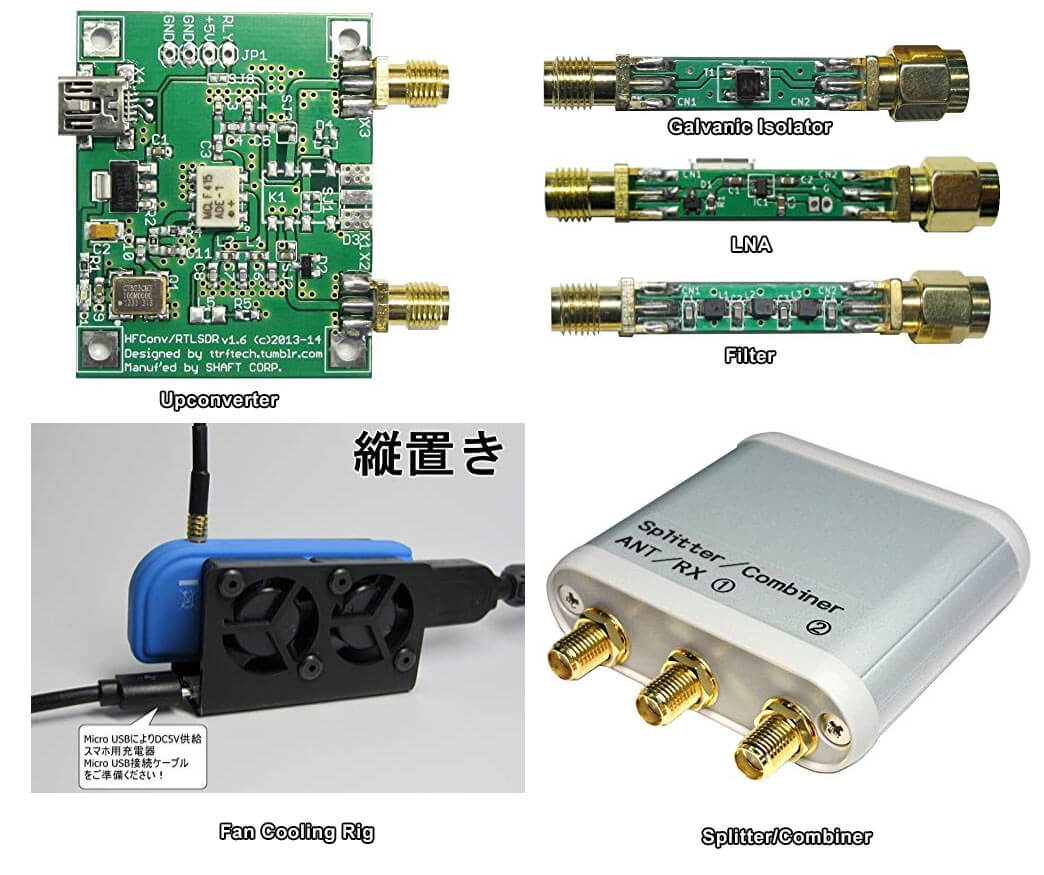
Japan has a strong RTL-SDR scene, with a few small Japanese companies and individuals (including Nobu) selling custom RTL-SDR products on their local Amazon store. Products such as upconverters, galvanic isolators, LNAs, filters, cooling products and more are available. Back in 2015 we reviewed some of these products in a post available here. Since then we've found continued use in particular with the galvanic isolator which helps reduce noise from the computer and nearby electronics at HF frequencies. 

Some Japanese RTL-SDR Products available for International Shipping on Amazon.co.jp
Some Custom Japanese RTL-SDR/RF Products available for International Shipping on Amazon.co.jp

Soft66IP: An OpenWebRX RTL-SDR Internet Server now Crowd Funding on Kickstarter

Over on Kickstarter a retrofit PCB for RTL-SDRs called Soft66IP has appeared for crowd funding. The PCB includes a 50 MHz upconverter and RF amplifier on board and incorporates space to plug in an Orange Pi Zero single board computer, and an RTL-SDR.

The project is by Kazunori Miura who is the creator of the Soft66 range of RTL-SDR retrofit products. The kickstarter appears to be for the "Soft66IP", which has been around since early 2017. The main difference appears to be that now OpenWebRX is preloaded on the SDCard, and that there is a custom script running on the Orange Pi Zero which allows you to choose between OpenWebRX and HDSDR. Presumably clicking on HDSDR runs an rtl_tcp server, which can then be connected over the network.

The idea is that this system will be used together with software like OpenWebRX, which would enable the RTL-SDR and radio stream to be accessed online from anywhere in the world via an Ethernet connection. Examples of OpenWebRX receivers can be found on sdr.hu, just search for "RTL-SDR" on the page to find relevant examples.

There are several support options, with the main board (without Orange Pi Zero or RTL-SDR) starting at US$22, and US$88 for the main board including RTL-SDR, Orange Pi Zero, enclosure and SD card. The system could probably be home built for much cheaper, but there is a convenience in purchasing a ready to use system. Although if you're interested in HF and want an internet connected SDR, then you might be better off shelling out for a $299 KiwiSDR instead, which is also an OpenWebRX based SDR.

Soft66IP: Main board + RTL-SDR + Orange Pi Zero.

Using a Raspberry Pi 3, USB Soundcard, Speclab and Exagear to Detect SAQ VLF Transmissions

Thanks to DE8MSH for writing in about his project that involves using a Raspberry Pi 3 and cheap 7€ USB sound card connected to an old Grahn GS1 VLF antenna to detect the SAQ VLF station. Standard PC or USB sound cards can be used as a narrowband VLF capable SDR simply by connecting an antenna to the sound inputs. SAQ (aka Grimeton Radio Station) is a heritage VLF transmitter in Sweden that transmits CW at 17.2 kHz, normally only on Alexanderson Day and Christmas Day, but can sometimes unofficially transmit without announcement due to maintenance, training or local events.

In terms of software running on the Pi 3 DE8MSH uses Spectrum Laboratory (speclab) to monitor the sound card waterfall, and has written a Python script that uploads the processed images from speclab to a Twitter account every 20 minutes. This way he hopes to be able to detect any unannounced SAQ transmissions from his station in Sweden. 

Spectrum Laboratory is actually a Windows and x86 only program, however as shown in one of our previous posts, it is possible to use a special compatibility emulator called Exagear which allows you to run x86 programs on ARM hardware. Together with Wine you can then run x86 Windows programs on single board computers like the Raspberry Pi 3 which run Linux on ARM hardware.

Speclab Screenshot from DE8MSHs Pi3 soundcard monitoring system

Understanding Direction Finding on the KiwiSDR

Earlier this month we posted about the KiwiSDR direction finding update, which now allows anyone with internet access to utilize public KiwiSDR's for the purpose of pinpointing the physical location of a transmitter that transmits at a frequency below 30 MHz.

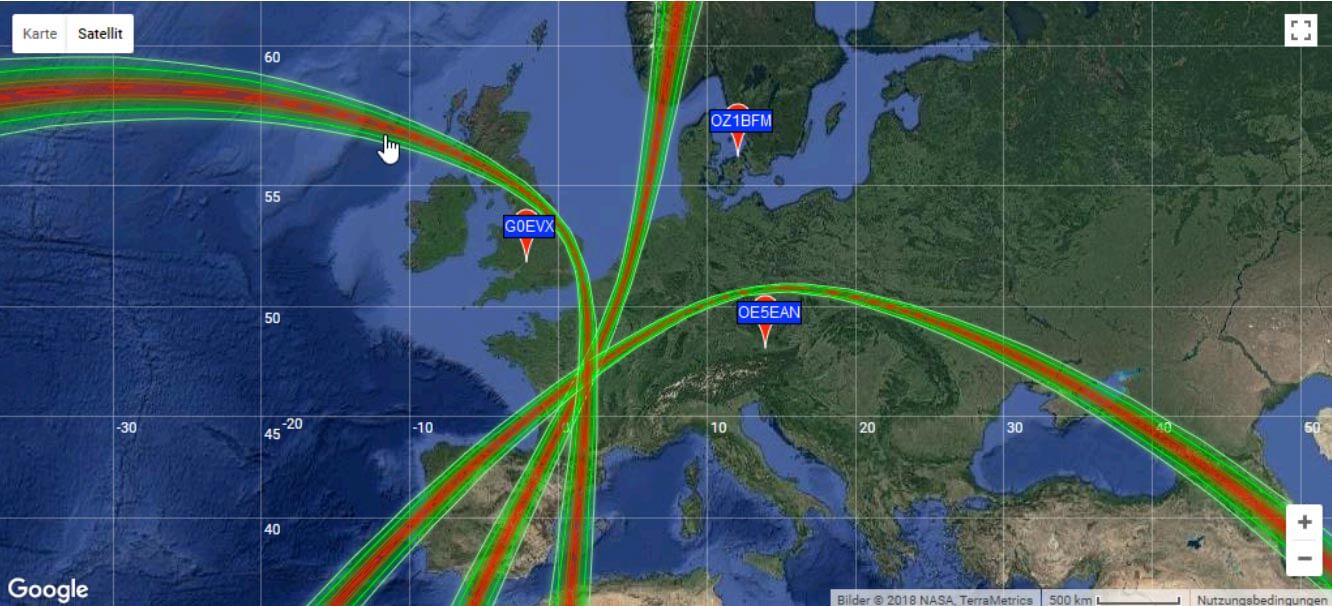
A few people have had trouble understanding how to use the direction finding feature, so KiwiSDR fan Nils Schiffhauer (DK8OK) has written up a KiwiSDR direction finding usage guide. Nils' guide explains the basic technical ideas behind the TDoA (Time Difference of Arrival) direction finding technique used, and highlights some important considerations to take into account in order to get the best results. For example he discusses best practices on how to choose receiver locations, how many receivers to choose, and how to properly take into account the time delaying effects of ionospheric propagation with HF signals.

Finally at the end of the document he shows multiple case studies on HF signals that he's managed to locate using the discussed best practices. Looking through these examples should help make it clear on how receiver locations should be chosen.

DK8OK Locates Radio France at 15320 kHz

Archiving Shortwave History with Software Defined Radio

Broadcast shortwave radio is not always archived for long at the station, so finding sound bites from interesting historical events can be difficult. We know that songs are of course recorded, but talk back radio, discussions in between music, news readings, weather updates, ads and pirate radio are all lost over time. Although these things may seem mundane now, future historians may be interested in listening in on this little slice of life.

At this years HOPE XIII conference, Thomas Witherspoon, owner of the popular SWLing Blog gave a talk titled "Creating a Radio Time Machine: Software-Defined Radios and Time-Shifted Recordings". Currently the talk is available as a full recording of all talks at the conference over on Livestream. Thomas' talk begins at about 9h03m45s (thanks to Aaron Kuhn from the comments for finding the talk. Hackaday also recently ran an article on the content of his talk.

Thomas' idea is to create a database of shortwave radio IQ recordings so that they can be archived for historical purposes. The project is called "The Radio Spectrum Archive" and has a website set up at spectrumarchive.org. To do this modern software defined radios like the RTL-SDR can be used to record a large bandwidth, however the problem is with data storage as IQ recordings can take up extremely large amounts of disk space. 

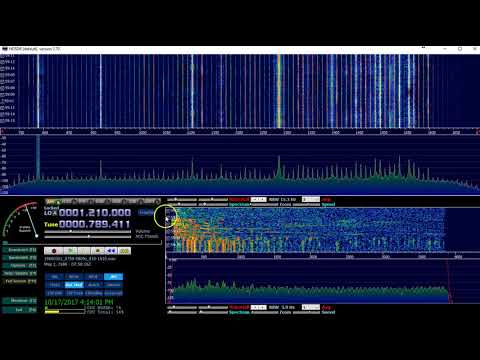
Interestingly, it turns out that people have actually been making IQ recordings since the 1980's by connecting their shortwave radios to VCR tape recorders. In the modern day these VCR recordings can be digitized into an IQ file, and played back in software like HDSDR. In the video below Thomas demonstrates the playback of a digitized VCR radio recording from May 1 1986. You can hear some interesting news tidbits on the soviet cover-up of Chernobyl, the Challenger disaster and the launch of a new hurricane tracking satellite. If recording was more popular it would have been interesting to hear soviet radio during this time too.

In addition to archiving IQ files, Thomas has been releasing a podcast of curated historical audio recordings from VCR tapes, as well as modern recordings that may be of interest over at shortwavearchive.com.

We envision a future where one day these recordings could be automatically turned into text logs via advanced speech to text software, so they could easily be searched through.

[Also seen on Hackaday]
Radio Spectrum Recordings: A short demonstration

An Opensource Mini-Whip Antenna and Upconverter Design for RTL-SDRs

Thank you to Igor Yatsevich for submitting news about an open source Mini-Whip and Upconverter design that he's created and released for free on GitHub. An upconverter converts HF frequencies into VHF frequencies so that they can be received by RTL-SDRs in their quadrature mode, and a Mini-Whip is a small active antenna for receiving HF signals.

The designs include the PCB Gerber files for manufacturing, the components list and assembly and usage guides. Also both through-hole and SMD designs are provided.

The Mini-Whip design has a frequency range of 10 kHz - 30 MHz and to power it you'll need a 5 - 13V bias tee. You will need to install it up high and preferably away from the house as Mini-Whips are quite susceptible to local noise pickup. Another very important point is that Mini-Whips need to have a good ground connection. The upconverter is based on the ADE-1 mixer, and uses a 125 MHz local oscillator.

Igor's documentation on the project is excellent, and is a good read for getting more information about upconverters and Mini-Whips. He has noted that he is sending us some samples of units that he's built, so when we receive them we'll post again with test results. It looks as if he's put a lot of research into these designs so we're looking forward to seeing how well they work. 

Diagram on how to ground a miniwhip connected to a metal mast.
Diagram from Igor's documentation about how to properly ground a Mini-Whip connected to a metal mast.

Testing out the New Airspy HF+ Preselector

The Airspy team have recently been working on a preselector retrofit product for their HF+. The Airspy HF+ already has excellent dynamic range and sensitivity, but by adding a preselector they seek to improve performance enough to claim that the HF+ is as good as or even better than much more pricey SDRs like the Perseus by achieving dynamic range figures of more than 105 dBm.

A preselector is a filter or bank of filters that attenuates out of band signals. This is useful as radios can desensitize if an unwanted signal comes in too strongly. For example, if you are tuned to the 20m band, but there is a very strong MW signal, the SNR of your desired 20m band signal might be reduced. Radios with a natural high dynamic range design like the Airspy HF+ are less affected by this problem, but for the strongest of signals use of a preselector can still help.

The Airspy HF+ preselector needs to be soldered directly onto the HF+'s PCB, and once installed it automatically switches bands using GPIO expansion ports controlled automatically via tuning in SDR#, so no external switching is required.

The expected pricing of the HF+ preselector is US$49, and it will be ready for sale in a few weeks.

Measurements

We received a prototype of the filter a few days ago and have been testing it out. From measurements on a VNA, we found that the preselector features four bands of operation:

  • 0 - 5.2 MHz
  • 5.2 - 10 MHz
  • 10 - 17 MHz
  • 17 - 30 MHz

Airspy have also provided us with a block diagram schematic which we show below.

HF+ Preselector Schematic

Insertion loss appears to be mostly below 3 dB with fairly steep skirts especially on the lower side. The top three filters do an excellent job at blocking out the broadcast AM band. Below are some VNA plots that show the filter responses.

Installation

The preselector comes in a small 3.2 x 1.7 cm sized PCB that is fully covered with a metal shielding can. To install it you need to carefully solder it onto the HF+ PCB. This can be a little tricky since the pads are so small, but if you're experienced with soldering it shouldn't be an issue.

  • First you need to open the HF+ and remove R3 from the HF+ PCB, which is a zero ohm resistor.
  • The preselector PCB can then be positioned and the two IN and OUT pads soldered in place.
  • Then you'll also need to connect the power and 2x GPIO lines to the preselector using wires.
  • Now you need to bridge the two shielding CANs with a thick bit of wire. We simply used two cuts of copper solder braid to do this.
  • Finally is also recommended to update the HF+ firmware to the latest version and download the latest version of SDR#.

Once soldered in place the preselector is ready to use, and the HF+ cover can be put back on. It is expected that the commercially sold versions of the preselector will come with detailed installation instructions. 

In the first photo below we removed the shield to see what was inside, and the second photo shows it installed on the HF+ PCB.

Using it on a RTL-SDR V3

Whilst the preselector is designed for the Airspy HF+, there's no reason why it couldn't also be retrofitted onto other SDRs, such as our RTL-SDR V3, for use in improving direct sampling mode performance.

The V3 has spare GPIO ports that can be used to control the filter, and 5V for powering the filter could be tapped off the PCB as well. Currently we're considering making a breakout PCB for the filter than might aide with this.

We did a quick test with the preselector connected to the RTL-SDR V3 running in direct sampling mode, and as expected performance is much better, especially above 5 MHz once the second filter kicks in. This is because the second, third and fourth filters all heavily attenuate the MW broadcast AM band, which is the main source of overload issues on HF.

The following screenshots show how much the filter was able to reduce the signal strength of AM broadcast when the second 5.2 - 10 MHz filter was turned on. This reduction was enough to prevent overload on all the higher bands.

Preselector OFF
Preselector ON
Preselector OFF
Preselector ON
Preselector OFF Preselector ON Preselector OFF Preselector ON

HF+ Results

For the HF+ we tested by injecting a strong signal into two HF+ SDRs, one with the filter installed and the other without. The HF+ with the filter was routinely able to withstand much higher signal powers without any signs of overload occurring, and no degradation due to insertion loss was observed.

The screenshots below show an experiment with a weak desired signal injected at 14.2 MHz, and a strong unwanted signal being injected at 1.5 MHz. With the unwanted signal at 5 dBm, the filtered HF+ showed no signs of overload, whilst the unfiltered HF+ had the AGC kick in to increase the front end attenuation, reducing the signal strength by about 20 dB and raising the noise floor.

Filtered HF+
Unfiltered HF+
Filtered HF+ Unfiltered HF+

Other Reviews

Other reviewers have also received the preselector and have been testing it. Fenu radio has uploaded a short review, and plans to write more in the future. He's also made his HF+ with preselector available for public use via SpyServer (details in his post). In the video below Leif SM5BSZ reviews the preselector and runs through several tests while comparing it against the Perseus. His results seem to show that the Persues gets a +25 dBm IP3, whilst the HF+ with the latest firmware and preselector is able to obtain a respectable +10 dBm IP3. 

Conclusion

For most people, the dynamic range of the HF+ is probably already more than enough, but if you are receiving very strong signals, the preselector can help get you get more performance out of the HF+. Of course the preselector cannot help if you have strong signals within the filter bands.

If you're looking to get the most out of your HF+ then the filter at only $49 is a pretty good deal. Just take note that you'll need to open the HF+ and be comfortable with soldering onto the PCB. 

An Introduction to SDR and SDR Applications for Shortwave Listeners

Over on the SWLing Post blog, author Thomas Witherspoon K4SWL has uploaded a new article titled "Software Defined Radio Primer Part 1: Introduction to SDRs and SDR applications". The article originally appeared in the June 2018 issue of The Spectrum Monitor magazine, which can be purchased online for $3 per issue.

The idea behind the article is to introduce people to SDR from a shortwave listening point of view, so high performance HF SDRs like the Airspy HF+, Elad FDM-S2 and WinRadio Excalibur are discussed. Thomas notes that these SDRs can perform as well as traditional DX-grade receivers that can cost two to three times more. He also explains what advantages SDR's bring to the shortwave radio listening hobby. This may be a good article to show those still using older hardware radios that haven't yet converted to the SDR world. 

The article is currently part one of a three part series, with parts two and three to be released in October and November.

DXing with SDR in a Car
DXing with SDR in a Car (Photo: Guy Atkins)

Japanese RTL-SDR Products Now Available for International Shipping on Amazon.co.jp

Thanks to 'Nobu' for letting us know that his RTL-SDR products sold on Amazon.co.jp are now available for international shipping (in Japanese, please use the Google Translated version if needed). Before Amazon.co.jp offered international shipping you had to use a third party Japanese forwarding service in order to purchase his products.

Japan has a strong RTL-SDR scene, with a few small Japanese companies and individuals (including Nobu) selling custom RTL-SDR products on their local Amazon store. Products such as upconverters, galvanic isolators, LNAs, filters, cooling products and more are available. Back in 2015 we reviewed some of these products in a post available here. Since then we've found continued use in particular with the galvanic isolator which helps reduce noise from the computer and nearby electronics at HF frequencies. 

Some Japanese RTL-SDR Products available for International Shipping on Amazon.co.jp
Some Custom Japanese RTL-SDR/RF Products available for International Shipping on Amazon.co.jp

Soft66IP: An OpenWebRX RTL-SDR Internet Server now Crowd Funding on Kickstarter

Over on Kickstarter a retrofit PCB for RTL-SDRs called Soft66IP has appeared for crowd funding. The PCB includes a 50 MHz upconverter and RF amplifier on board and incorporates space to plug in an Orange Pi Zero single board computer, and an RTL-SDR.

The project is by Kazunori Miura who is the creator of the Soft66 range of RTL-SDR retrofit products. The kickstarter appears to be for the "Soft66IP", which has been around since early 2017. The main difference appears to be that now OpenWebRX is preloaded on the SDCard, and that there is a custom script running on the Orange Pi Zero which allows you to choose between OpenWebRX and HDSDR. Presumably clicking on HDSDR runs an rtl_tcp server, which can then be connected over the network.

The idea is that this system will be used together with software like OpenWebRX, which would enable the RTL-SDR and radio stream to be accessed online from anywhere in the world via an Ethernet connection. Examples of OpenWebRX receivers can be found on sdr.hu, just search for "RTL-SDR" on the page to find relevant examples.

There are several support options, with the main board (without Orange Pi Zero or RTL-SDR) starting at US$22, and US$88 for the main board including RTL-SDR, Orange Pi Zero, enclosure and SD card. The system could probably be home built for much cheaper, but there is a convenience in purchasing a ready to use system. Although if you're interested in HF and want an internet connected SDR, then you might be better off shelling out for a $299 KiwiSDR instead, which is also an OpenWebRX based SDR.

Soft66IP: Main board + RTL-SDR + Orange Pi Zero.

Using a Raspberry Pi 3, USB Soundcard, Speclab and Exagear to Detect SAQ VLF Transmissions

Thanks to DE8MSH for writing in about his project that involves using a Raspberry Pi 3 and cheap 7€ USB sound card connected to an old Grahn GS1 VLF antenna to detect the SAQ VLF station. Standard PC or USB sound cards can be used as a narrowband VLF capable SDR simply by connecting an antenna to the sound inputs. SAQ (aka Grimeton Radio Station) is a heritage VLF transmitter in Sweden that transmits CW at 17.2 kHz, normally only on Alexanderson Day and Christmas Day, but can sometimes unofficially transmit without announcement due to maintenance, training or local events.

In terms of software running on the Pi 3 DE8MSH uses Spectrum Laboratory (speclab) to monitor the sound card waterfall, and has written a Python script that uploads the processed images from speclab to a Twitter account every 20 minutes. This way he hopes to be able to detect any unannounced SAQ transmissions from his station in Sweden. 

Spectrum Laboratory is actually a Windows and x86 only program, however as shown in one of our previous posts, it is possible to use a special compatibility emulator called Exagear which allows you to run x86 programs on ARM hardware. Together with Wine you can then run x86 Windows programs on single board computers like the Raspberry Pi 3 which run Linux on ARM hardware.

Speclab Screenshot from DE8MSHs Pi3 soundcard monitoring system

Understanding Direction Finding on the KiwiSDR

Earlier this month we posted about the KiwiSDR direction finding update, which now allows anyone with internet access to utilize public KiwiSDR's for the purpose of pinpointing the physical location of a transmitter that transmits at a frequency below 30 MHz.

A few people have had trouble understanding how to use the direction finding feature, so KiwiSDR fan Nils Schiffhauer (DK8OK) has written up a KiwiSDR direction finding usage guide. Nils' guide explains the basic technical ideas behind the TDoA (Time Difference of Arrival) direction finding technique used, and highlights some important considerations to take into account in order to get the best results. For example he discusses best practices on how to choose receiver locations, how many receivers to choose, and how to properly take into account the time delaying effects of ionospheric propagation with HF signals.

Finally at the end of the document he shows multiple case studies on HF signals that he's managed to locate using the discussed best practices. Looking through these examples should help make it clear on how receiver locations should be chosen.

DK8OK Locates Radio France at 15320 kHz

Archiving Shortwave History with Software Defined Radio

Broadcast shortwave radio is not always archived for long at the station, so finding sound bites from interesting historical events can be difficult. We know that songs are of course recorded, but talk back radio, discussions in between music, news readings, weather updates, ads and pirate radio are all lost over time. Although these things may seem mundane now, future historians may be interested in listening in on this little slice of life.

At this years HOPE XIII conference, Thomas Witherspoon, owner of the popular SWLing Blog gave a talk titled "Creating a Radio Time Machine: Software-Defined Radios and Time-Shifted Recordings". Currently the talk is available as a full recording of all talks at the conference over on Livestream. Thomas' talk begins at about 9h03m45s (thanks to Aaron Kuhn from the comments for finding the talk. Hackaday also recently ran an article on the content of his talk.

Thomas' idea is to create a database of shortwave radio IQ recordings so that they can be archived for historical purposes. The project is called "The Radio Spectrum Archive" and has a website set up at spectrumarchive.org. To do this modern software defined radios like the RTL-SDR can be used to record a large bandwidth, however the problem is with data storage as IQ recordings can take up extremely large amounts of disk space. 

Interestingly, it turns out that people have actually been making IQ recordings since the 1980's by connecting their shortwave radios to VCR tape recorders. In the modern day these VCR recordings can be digitized into an IQ file, and played back in software like HDSDR. In the video below Thomas demonstrates the playback of a digitized VCR radio recording from May 1 1986. You can hear some interesting news tidbits on the soviet cover-up of Chernobyl, the Challenger disaster and the launch of a new hurricane tracking satellite. If recording was more popular it would have been interesting to hear soviet radio during this time too.

In addition to archiving IQ files, Thomas has been releasing a podcast of curated historical audio recordings from VCR tapes, as well as modern recordings that may be of interest over at shortwavearchive.com.

We envision a future where one day these recordings could be automatically turned into text logs via advanced speech to text software, so they could easily be searched through.

[Also seen on Hackaday]

Radio Spectrum Recordings: A short demonstration

An Opensource Mini-Whip Antenna and Upconverter Design for RTL-SDRs

Thank you to Igor Yatsevich for submitting news about an open source Mini-Whip and Upconverter design that he's created and released for free on GitHub. An upconverter converts HF frequencies into VHF frequencies so that they can be received by RTL-SDRs in their quadrature mode, and a Mini-Whip is a small active antenna for receiving HF signals.

The designs include the PCB Gerber files for manufacturing, the components list and assembly and usage guides. Also both through-hole and SMD designs are provided.

The Mini-Whip design has a frequency range of 10 kHz - 30 MHz and to power it you'll need a 5 - 13V bias tee. You will need to install it up high and preferably away from the house as Mini-Whips are quite susceptible to local noise pickup. Another very important point is that Mini-Whips need to have a good ground connection. The upconverter is based on the ADE-1 mixer, and uses a 125 MHz local oscillator.

Igor's documentation on the project is excellent, and is a good read for getting more information about upconverters and Mini-Whips. He has noted that he is sending us some samples of units that he's built, so when we receive them we'll post again with test results. It looks as if he's put a lot of research into these designs so we're looking forward to seeing how well they work. 

Diagram on how to ground a miniwhip connected to a metal mast.
Diagram from Igor's documentation about how to properly ground a Mini-Whip connected to a metal mast.

Testing out the New Airspy HF+ Preselector

The Airspy team have recently been working on a preselector retrofit product for their HF+. The Airspy HF+ already has excellent dynamic range and sensitivity, but by adding a preselector they seek to improve performance enough to claim that the HF+ is as good as or even better than much more pricey SDRs like the Perseus by achieving dynamic range figures of more than 105 dBm.

A preselector is a filter or bank of filters that attenuates out of band signals. This is useful as radios can desensitize if an unwanted signal comes in too strongly. For example, if you are tuned to the 20m band, but there is a very strong MW signal, the SNR of your desired 20m band signal might be reduced. Radios with a natural high dynamic range design like the Airspy HF+ are less affected by this problem, but for the strongest of signals use of a preselector can still help.

The Airspy HF+ preselector needs to be soldered directly onto the HF+'s PCB, and once installed it automatically switches bands using GPIO expansion ports controlled automatically via tuning in SDR#, so no external switching is required.

The expected pricing of the HF+ preselector is US$49, and it will be ready for sale in a few weeks.

Measurements

We received a prototype of the filter a few days ago and have been testing it out. From measurements on a VNA, we found that the preselector features four bands of operation:

  • 0 - 5.2 MHz
  • 5.2 - 10 MHz
  • 10 - 17 MHz
  • 17 - 30 MHz

Airspy have also provided us with a block diagram schematic which we show below.

HF+ Preselector Schematic

Insertion loss appears to be mostly below 3 dB with fairly steep skirts especially on the lower side. The top three filters do an excellent job at blocking out the broadcast AM band. Below are some VNA plots that show the filter responses.

Installation

The preselector comes in a small 3.2 x 1.7 cm sized PCB that is fully covered with a metal shielding can. To install it you need to carefully solder it onto the HF+ PCB. This can be a little tricky since the pads are so small, but if you're experienced with soldering it shouldn't be an issue.

  • First you need to open the HF+ and remove R3 from the HF+ PCB, which is a zero ohm resistor.
  • The preselector PCB can then be positioned and the two IN and OUT pads soldered in place.
  • Then you'll also need to connect the power and 2x GPIO lines to the preselector using wires.
  • Now you need to bridge the two shielding CANs with a thick bit of wire. We simply used two cuts of copper solder braid to do this.
  • Finally is also recommended to update the HF+ firmware to the latest version and download the latest version of SDR#.

Once soldered in place the preselector is ready to use, and the HF+ cover can be put back on. It is expected that the commercially sold versions of the preselector will come with detailed installation instructions. 

In the first photo below we removed the shield to see what was inside, and the second photo shows it installed on the HF+ PCB.

Using it on a RTL-SDR V3

Whilst the preselector is designed for the Airspy HF+, there's no reason why it couldn't also be retrofitted onto other SDRs, such as our RTL-SDR V3, for use in improving direct sampling mode performance.

The V3 has spare GPIO ports that can be used to control the filter, and 5V for powering the filter could be tapped off the PCB as well. Currently we're considering making a breakout PCB for the filter than might aide with this.

We did a quick test with the preselector connected to the RTL-SDR V3 running in direct sampling mode, and as expected performance is much better, especially above 5 MHz once the second filter kicks in. This is because the second, third and fourth filters all heavily attenuate the MW broadcast AM band, which is the main source of overload issues on HF.

The following screenshots show how much the filter was able to reduce the signal strength of AM broadcast when the second 5.2 - 10 MHz filter was turned on. This reduction was enough to prevent overload on all the higher bands.

Preselector OFF
Preselector ON
Preselector OFF
Preselector ON
Preselector OFF Preselector ON Preselector OFF Preselector ON

HF+ Results

For the HF+ we tested by injecting a strong signal into two HF+ SDRs, one with the filter installed and the other without. The HF+ with the filter was routinely able to withstand much higher signal powers without any signs of overload occurring, and no degradation due to insertion loss was observed.

The screenshots below show an experiment with a weak desired signal injected at 14.2 MHz, and a strong unwanted signal being injected at 1.5 MHz. With the unwanted signal at 5 dBm, the filtered HF+ showed no signs of overload, whilst the unfiltered HF+ had the AGC kick in to increase the front end attenuation, reducing the signal strength by about 20 dB and raising the noise floor.

Filtered HF+
Unfiltered HF+
Filtered HF+ Unfiltered HF+

Other Reviews

Other reviewers have also received the preselector and have been testing it. Fenu radio has uploaded a short review, and plans to write more in the future. He's also made his HF+ with preselector available for public use via SpyServer (details in his post). In the video below Leif SM5BSZ reviews the preselector and runs through several tests while comparing it against the Perseus. His results seem to show that the Persues gets a +25 dBm IP3, whilst the HF+ with the latest firmware and preselector is able to obtain a respectable +10 dBm IP3. 

Conclusion

For most people, the dynamic range of the HF+ is probably already more than enough, but if you are receiving very strong signals, the preselector can help get you get more performance out of the HF+. Of course the preselector cannot help if you have strong signals within the filter bands.

If you're looking to get the most out of your HF+ then the filter at only $49 is a pretty good deal. Just take note that you'll need to open the HF+ and be comfortable with soldering onto the PCB.