The designs include the PCB Gerber files for manufacturing, the components list and assembly and usage guides. Also both through-hole and SMD designs are provided.
The Mini-Whip design has a frequency range of 10 kHz - 30 MHz and to power it you'll need a 5 - 13V bias tee. You will need to install it up high and preferably away from the house as Mini-Whips are quite susceptible to local noise pickup. Another very important point is that Mini-Whips need to have a good ground connection. The upconverter is based on the ADE-1 mixer, and uses a 125 MHz local oscillator.
Igor's documentation on the project is excellent, and is a good read for getting more information about upconverters and Mini-Whips. He has noted that he is sending us some samples of units that he's built, so when we receive them we'll post again with test results. It looks as if he's put a lot of research into these designs so we're looking forward to seeing how well they work.
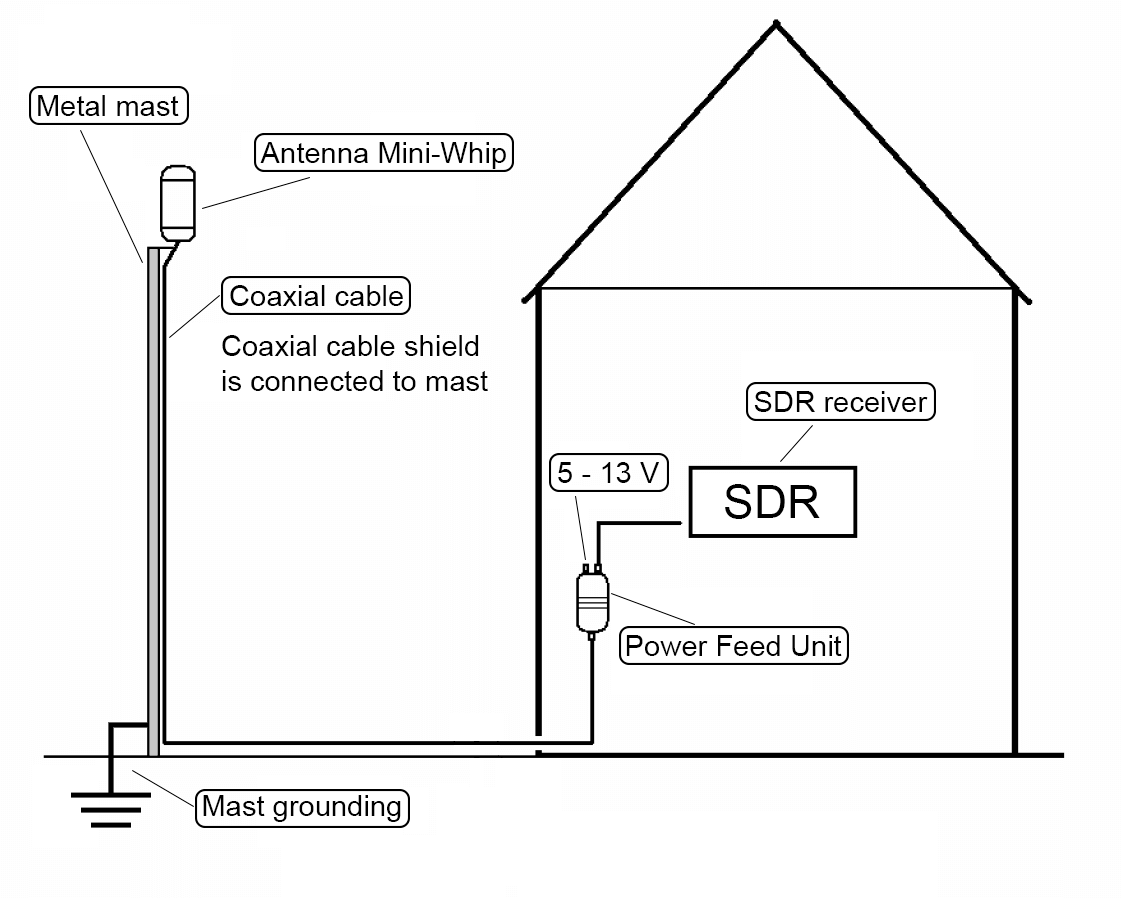
Diagram from Igor's documentation about how to properly ground a Mini-Whip connected to a metal mast.
The Airspy team have recently been working on a preselector retrofit product for their HF+. The Airspy HF+ already has excellent dynamic range and sensitivity, but by adding a preselector they seek to improve performance enough to claim that the HF+ is as good as or even better than much more pricey SDRs like the Perseus by achieving dynamic range figures of more than 105 dBm.
A preselector is a filter or bank of filters that attenuates out of band signals. This is useful as radios can desensitize if an unwanted signal comes in too strongly. For example, if you are tuned to the 20m band, but there is a very strong MW signal, the SNR of your desired 20m band signal might be reduced. Radios with a natural high dynamic range design like the Airspy HF+ are less affected by this problem, but for the strongest of signals use of a preselector can still help.
The Airspy HF+ preselector needs to be soldered directly onto the HF+'s PCB, and once installed it automatically switches bands using GPIO expansion ports controlled automatically via tuning in SDR#, so no external switching is required.
The expected pricing of the HF+ preselector is US$49, and it will be ready for sale in a few weeks.
Measurements
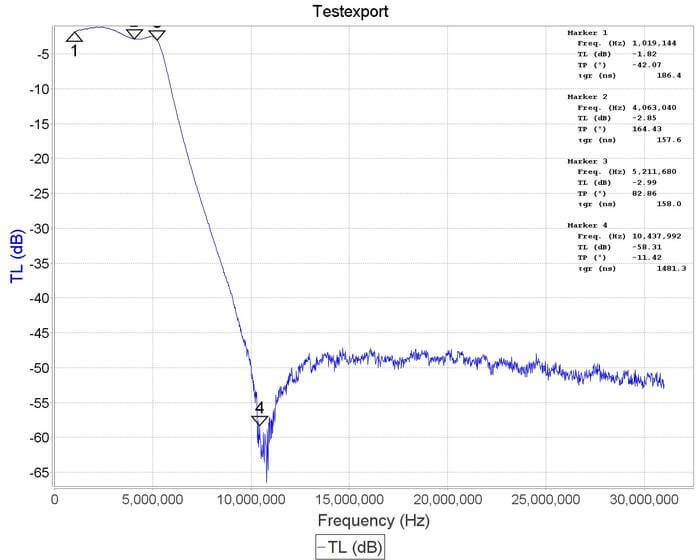
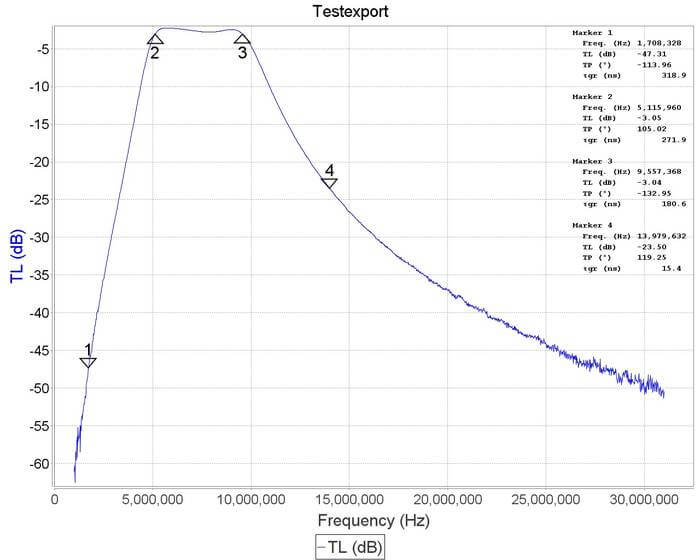
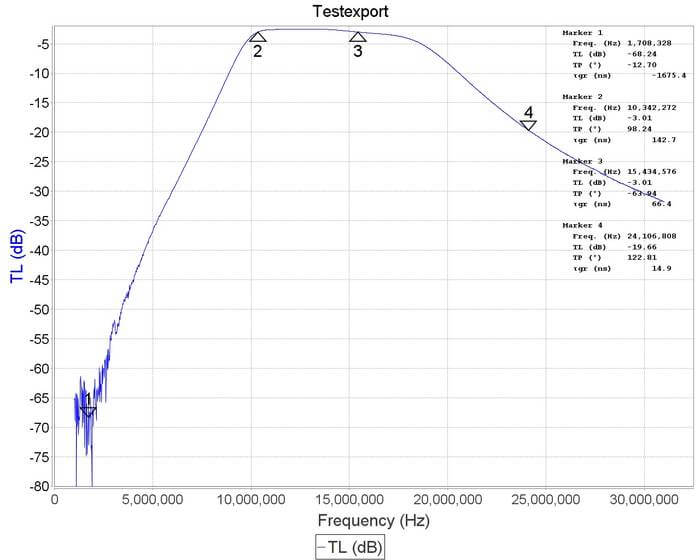
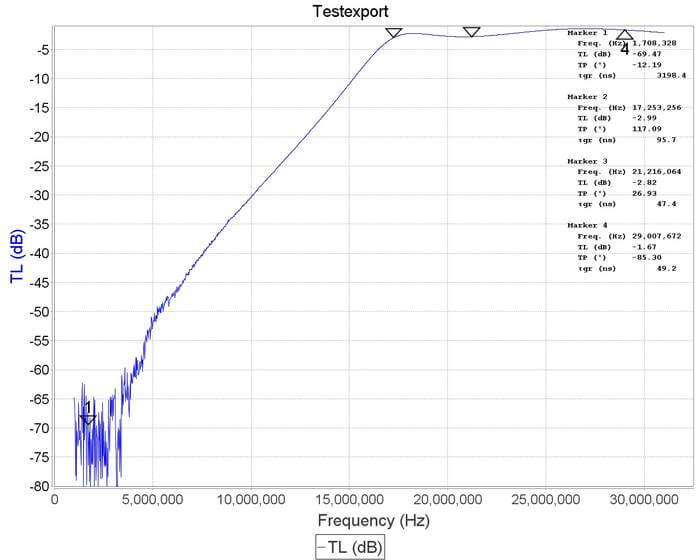
We received a prototype of the filter a few days ago and have been testing it out. From measurements on a VNA, we found that the preselector features four bands of operation:
0 - 5.2 MHz
5.2 - 10 MHz
10 - 17 MHz
17 - 30 MHz
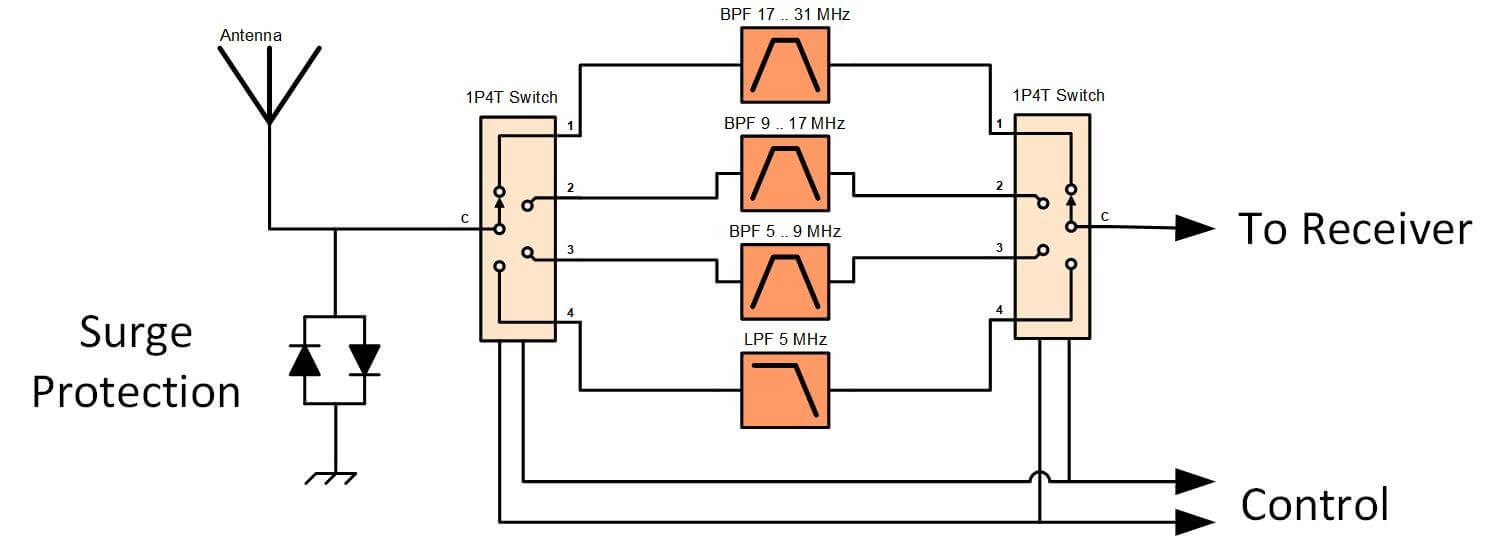
Airspy have also provided us with a block diagram schematic which we show below.
HF+ Preselector Schematic
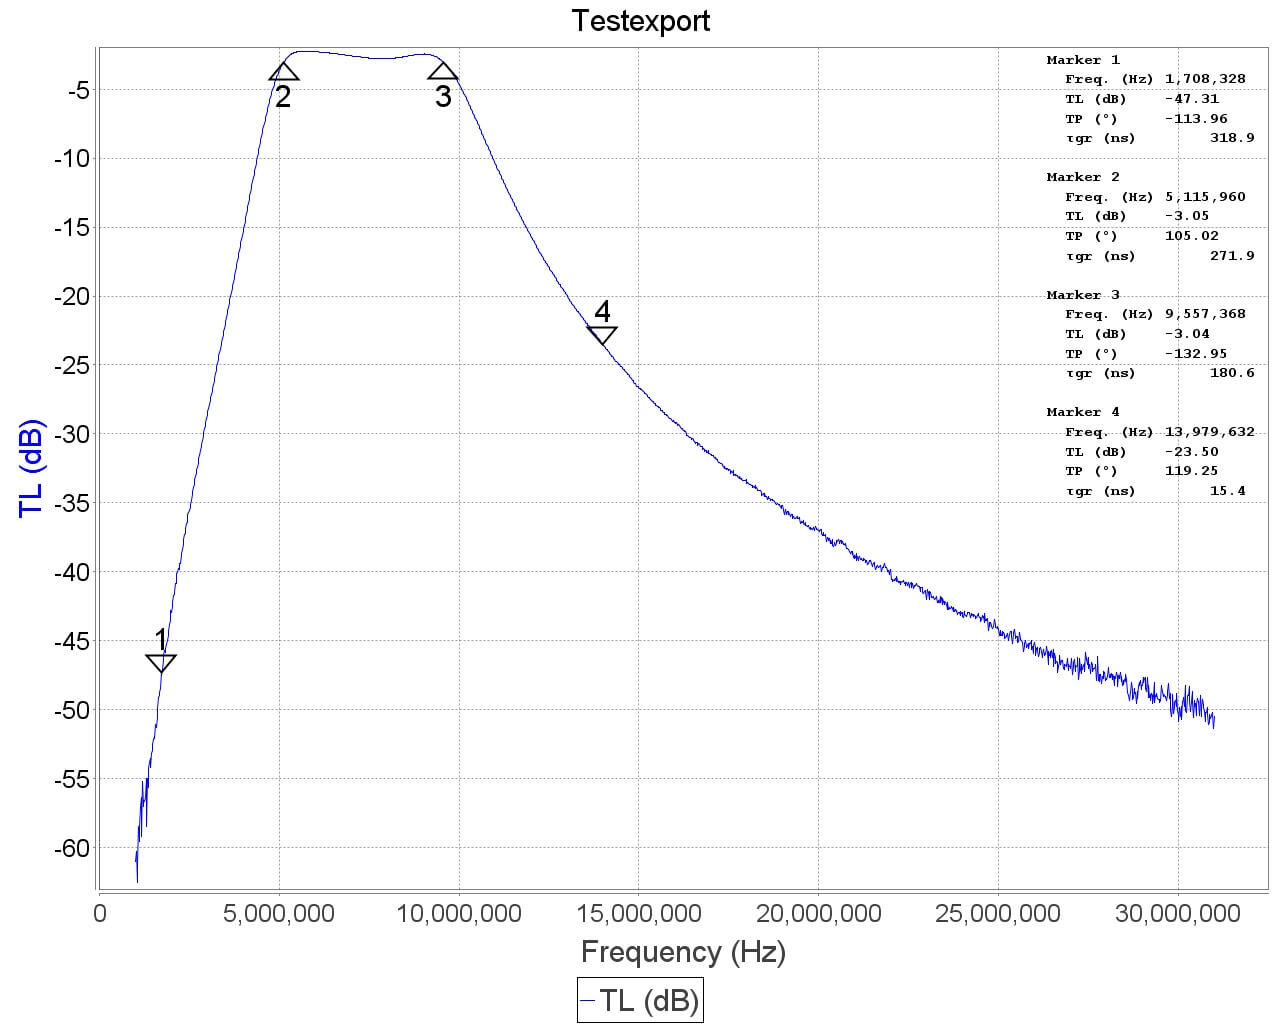
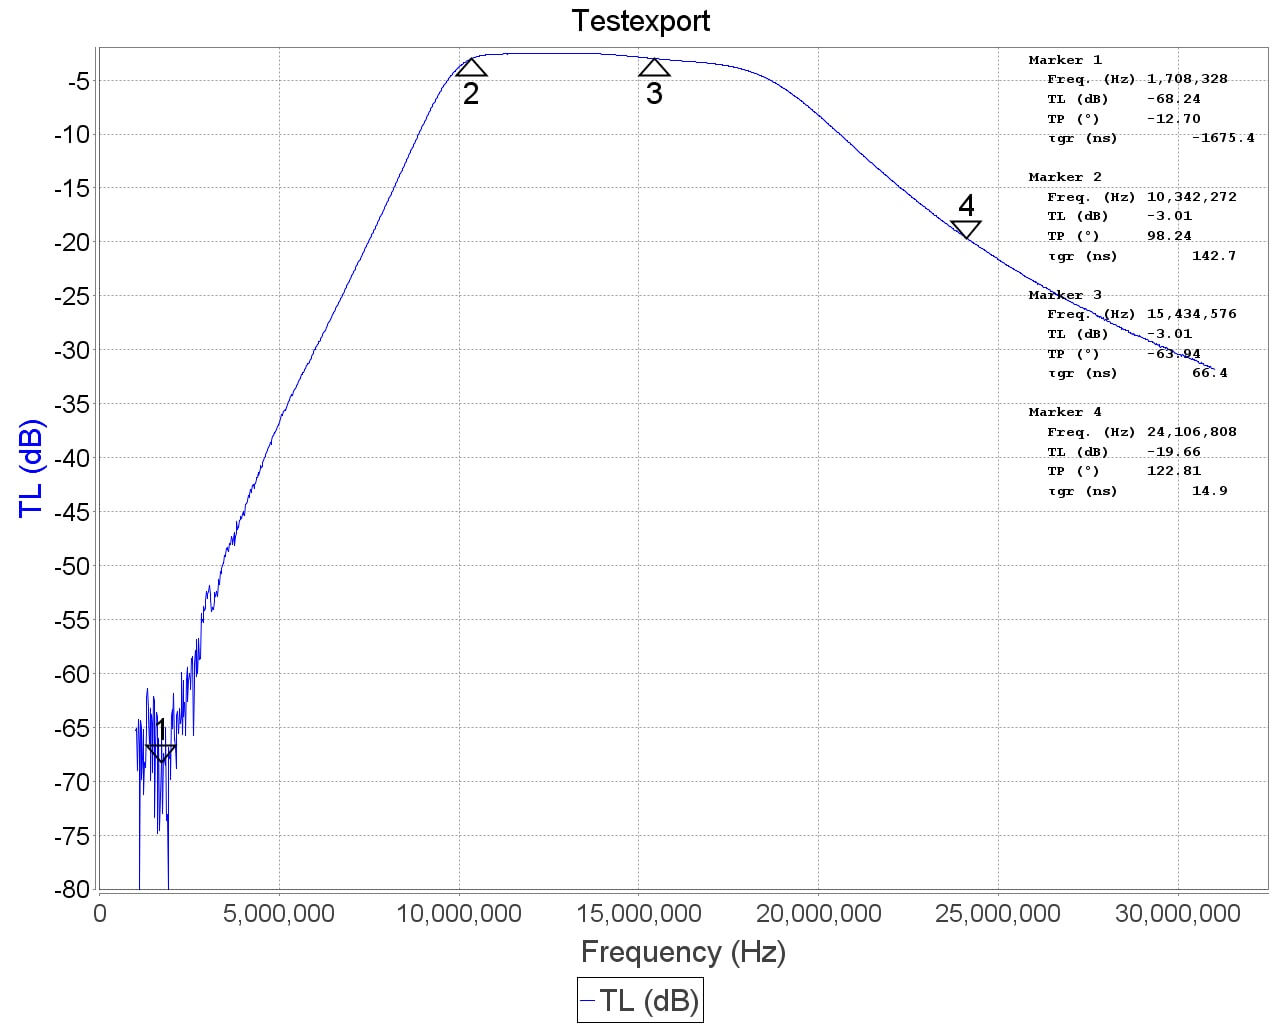
Insertion loss appears to be mostly below 3 dB with fairly steep skirts especially on the lower side. The top three filters do an excellent job at blocking out the broadcast AM band. Below are some VNA plots that show the filter responses.
Installation
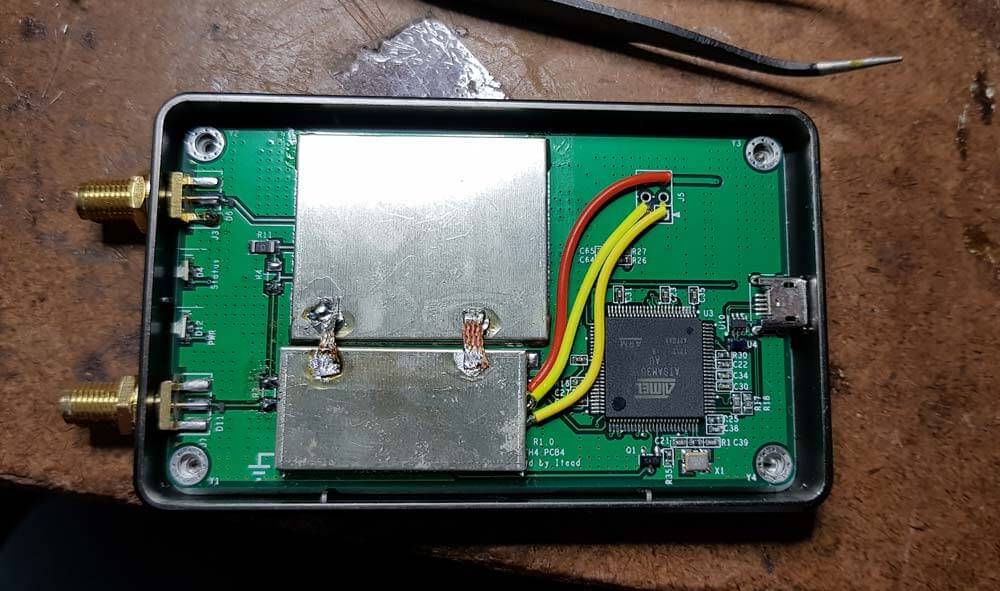
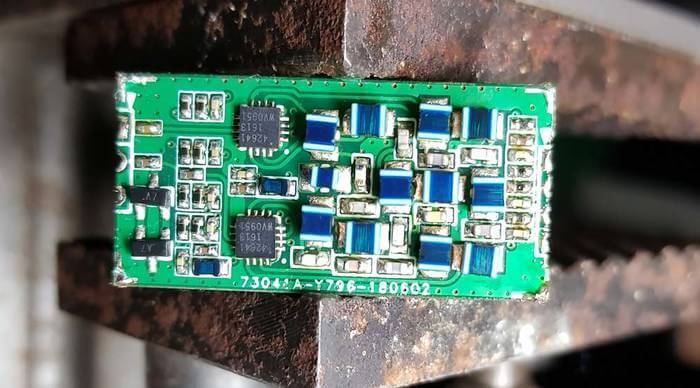
The preselector comes in a small 3.2 x 1.7 cm sized PCB that is fully covered with a metal shielding can. To install it you need to carefully solder it onto the HF+ PCB. This can be a little tricky since the pads are so small, but if you're experienced with soldering it shouldn't be an issue.
First you need to open the HF+ and remove R3 from the HF+ PCB, which is a zero ohm resistor.
The preselector PCB can then be positioned and the two IN and OUT pads soldered in place.
Then you'll also need to connect the power and 2x GPIO lines to the preselector using wires.
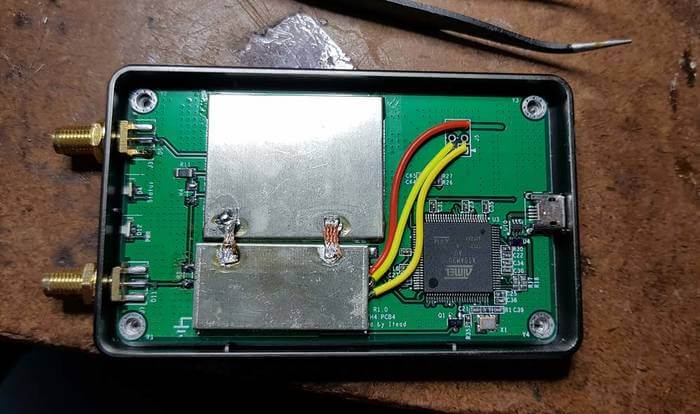
Now you need to bridge the two shielding CANs with a thick bit of wire. We simply used two cuts of copper solder braid to do this.
Finally is also recommended to update the HF+ firmware to the latest version and download the latest version of SDR#.
Once soldered in place the preselector is ready to use, and the HF+ cover can be put back on. It is expected that the commercially sold versions of the preselector will come with detailed installation instructions.
In the first photo below we removed the shield to see what was inside, and the second photo shows it installed on the HF+ PCB.
Using it on a RTL-SDR V3
Whilst the preselector is designed for the Airspy HF+, there's no reason why it couldn't also be retrofitted onto other SDRs, such as our RTL-SDR V3, for use in improving direct sampling mode performance.
The V3 has spare GPIO ports that can be used to control the filter, and 5V for powering the filter could be tapped off the PCB as well. Currently we're considering making a breakout PCB for the filter than might aide with this.
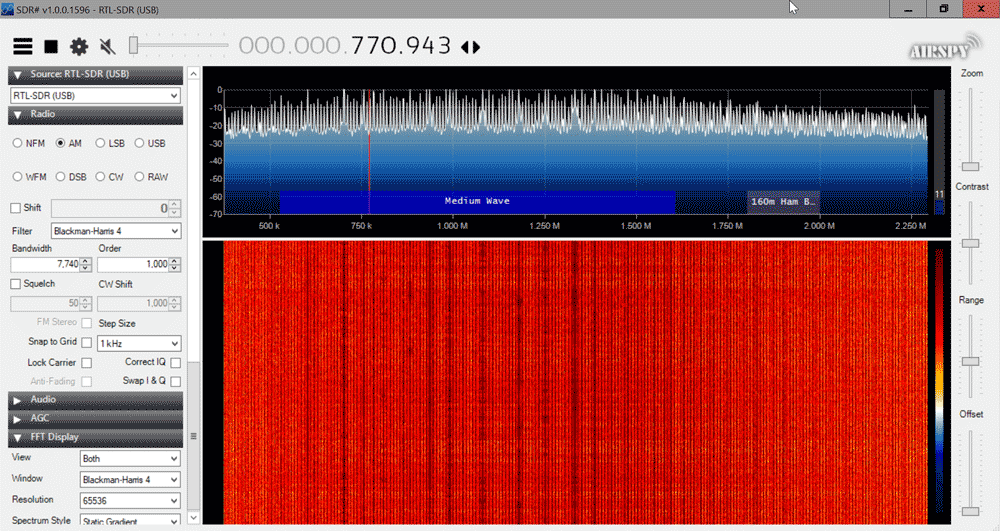
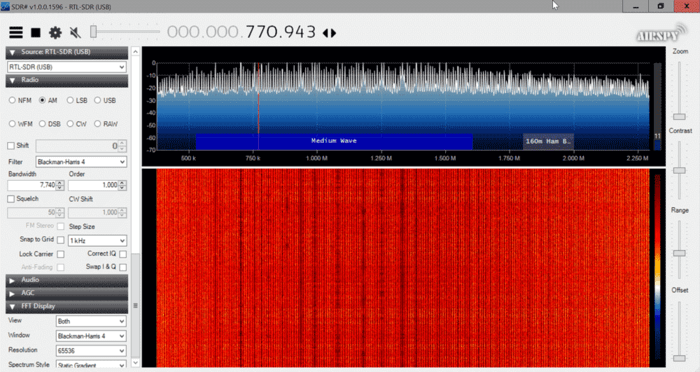
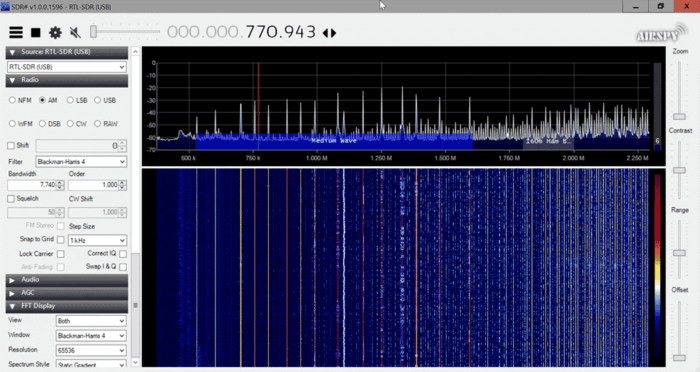
We did a quick test with the preselector connected to the RTL-SDR V3 running in direct sampling mode, and as expected performance is much better, especially above 5 MHz once the second filter kicks in. This is because the second, third and fourth filters all heavily attenuate the MW broadcast AM band, which is the main source of overload issues on HF.
The following screenshots show how much the filter was able to reduce the signal strength of AM broadcast when the second 5.2 - 10 MHz filter was turned on. This reduction was enough to prevent overload on all the higher bands.
HF+ Results
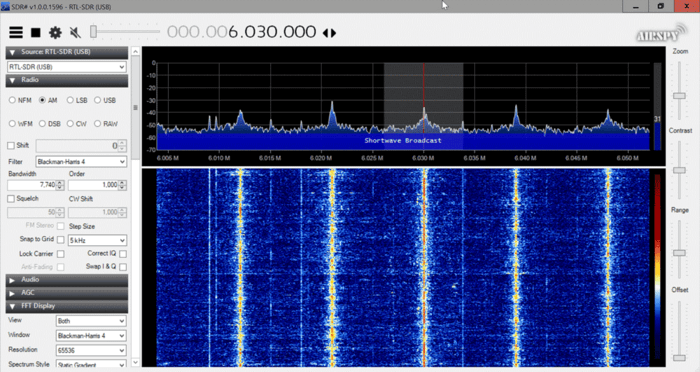
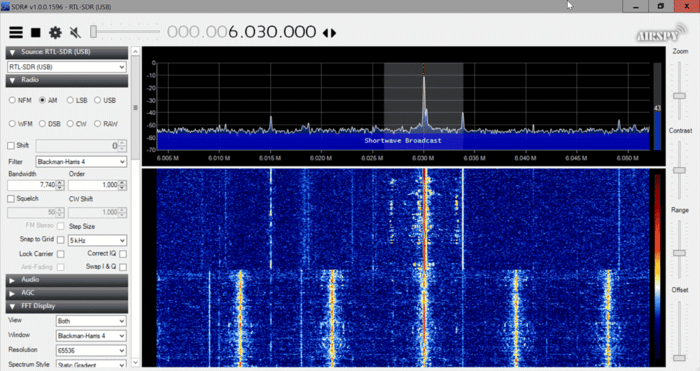
For the HF+ we tested by injecting a strong signal into two HF+ SDRs, one with the filter installed and the other without. The HF+ with the filter was routinely able to withstand much higher signal powers without any signs of overload occurring, and no degradation due to insertion loss was observed.
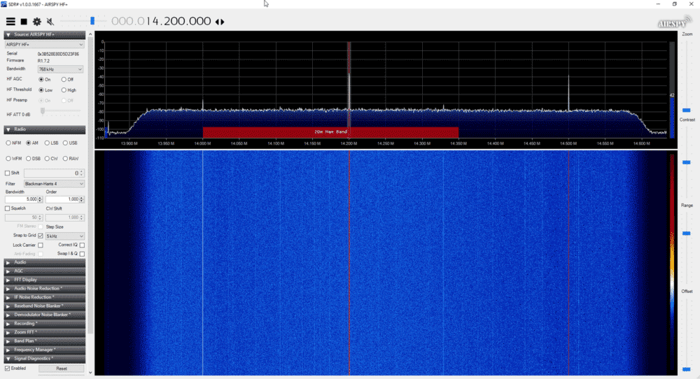
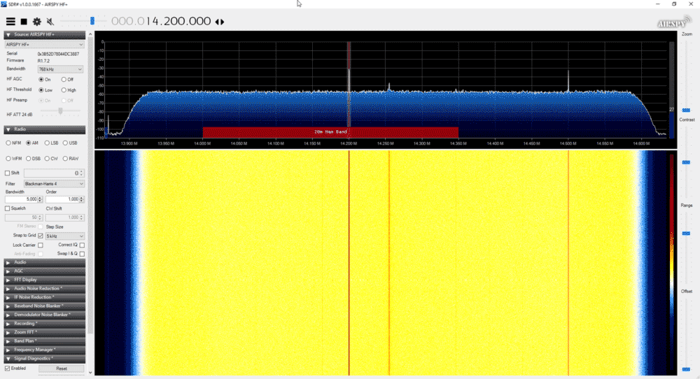
The screenshots below show an experiment with a weak desired signal injected at 14.2 MHz, and a strong unwanted signal being injected at 1.5 MHz. With the unwanted signal at 5 dBm, the filtered HF+ showed no signs of overload, whilst the unfiltered HF+ had the AGC kick in to increase the front end attenuation, reducing the signal strength by about 20 dB and raising the noise floor.
Other Reviews
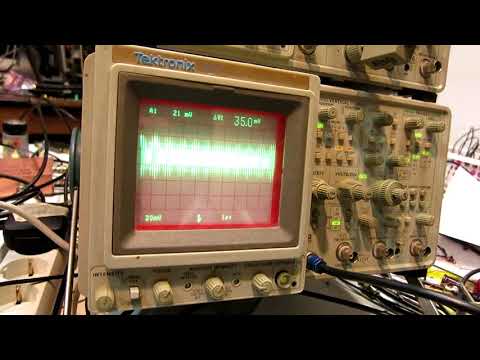
Other reviewers have also received the preselector and have been testing it. Fenu radio has uploaded a short review, and plans to write more in the future. He's also made his HF+ with preselector available for public use via SpyServer (details in his post). In the video below Leif SM5BSZ reviews the preselector and runs through several tests while comparing it against the Perseus. His results seem to show that the Persues gets a +25 dBm IP3, whilst the HF+ with the latest firmware and preselector is able to obtain a respectable +10 dBm IP3.
hfpluspresel2
Conclusion
For most people, the dynamic range of the HF+ is probably already more than enough, but if you are receiving very strong signals, the preselector can help get you get more performance out of the HF+. Of course the preselector cannot help if you have strong signals within the filter bands.
If you're looking to get the most out of your HF+ then the filter at only $49 is a pretty good deal. Just take note that you'll need to open the HF+ and be comfortable with soldering onto the PCB.
The designs include the PCB Gerber files for manufacturing, the components list and assembly and usage guides. Also both through-hole and SMD designs are provided.
The Mini-Whip design has a frequency range of 10 kHz - 30 MHz and to power it you'll need a 5 - 13V bias tee. You will need to install it up high and preferably away from the house as Mini-Whips are quite susceptible to local noise pickup. Another very important point is that Mini-Whips need to have a good ground connection. The upconverter is based on the ADE-1 mixer, and uses a 125 MHz local oscillator.
Igor's documentation on the project is excellent, and is a good read for getting more information about upconverters and Mini-Whips. He has noted that he is sending us some samples of units that he's built, so when we receive them we'll post again with test results. It looks as if he's put a lot of research into these designs so we're looking forward to seeing how well they work.
Diagram from Igor's documentation about how to properly ground a Mini-Whip connected to a metal mast.
The Airspy team have recently been working on a preselector retrofit product for their HF+. The Airspy HF+ already has excellent dynamic range and sensitivity, but by adding a preselector they seek to improve performance enough to claim that the HF+ is as good as or even better than much more pricey SDRs like the Perseus by achieving dynamic range figures of more than 105 dBm.
A preselector is a filter or bank of filters that attenuates out of band signals. This is useful as radios can desensitize if an unwanted signal comes in too strongly. For example, if you are tuned to the 20m band, but there is a very strong MW signal, the SNR of your desired 20m band signal might be reduced. Radios with a natural high dynamic range design like the Airspy HF+ are less affected by this problem, but for the strongest of signals use of a preselector can still help.
The Airspy HF+ preselector needs to be soldered directly onto the HF+'s PCB, and once installed it automatically switches bands using GPIO expansion ports controlled automatically via tuning in SDR#, so no external switching is required.
The expected pricing of the HF+ preselector is US$49, and it will be ready for sale in a few weeks.
Measurements
We received a prototype of the filter a few days ago and have been testing it out. From measurements on a VNA, we found that the preselector features four bands of operation:
0 - 5.2 MHz
5.2 - 10 MHz
10 - 17 MHz
17 - 30 MHz
Airspy have also provided us with a block diagram schematic which we show below.
HF+ Preselector Schematic
Insertion loss appears to be mostly below 3 dB with fairly steep skirts especially on the lower side. The top three filters do an excellent job at blocking out the broadcast AM band. Below are some VNA plots that show the filter responses.
Installation
The preselector comes in a small 3.2 x 1.7 cm sized PCB that is fully covered with a metal shielding can. To install it you need to carefully solder it onto the HF+ PCB. This can be a little tricky since the pads are so small, but if you're experienced with soldering it shouldn't be an issue.
First you need to open the HF+ and remove R3 from the HF+ PCB, which is a zero ohm resistor.
The preselector PCB can then be positioned and the two IN and OUT pads soldered in place.
Then you'll also need to connect the power and 2x GPIO lines to the preselector using wires.
Now you need to bridge the two shielding CANs with a thick bit of wire. We simply used two cuts of copper solder braid to do this.
Finally is also recommended to update the HF+ firmware to the latest version and download the latest version of SDR#.
Once soldered in place the preselector is ready to use, and the HF+ cover can be put back on. It is expected that the commercially sold versions of the preselector will come with detailed installation instructions.
In the first photo below we removed the shield to see what was inside, and the second photo shows it installed on the HF+ PCB.
Using it on a RTL-SDR V3
Whilst the preselector is designed for the Airspy HF+, there's no reason why it couldn't also be retrofitted onto other SDRs, such as our RTL-SDR V3, for use in improving direct sampling mode performance.
The V3 has spare GPIO ports that can be used to control the filter, and 5V for powering the filter could be tapped off the PCB as well. Currently we're considering making a breakout PCB for the filter than might aide with this.
We did a quick test with the preselector connected to the RTL-SDR V3 running in direct sampling mode, and as expected performance is much better, especially above 5 MHz once the second filter kicks in. This is because the second, third and fourth filters all heavily attenuate the MW broadcast AM band, which is the main source of overload issues on HF.
The following screenshots show how much the filter was able to reduce the signal strength of AM broadcast when the second 5.2 - 10 MHz filter was turned on. This reduction was enough to prevent overload on all the higher bands.
HF+ Results
For the HF+ we tested by injecting a strong signal into two HF+ SDRs, one with the filter installed and the other without. The HF+ with the filter was routinely able to withstand much higher signal powers without any signs of overload occurring, and no degradation due to insertion loss was observed.
The screenshots below show an experiment with a weak desired signal injected at 14.2 MHz, and a strong unwanted signal being injected at 1.5 MHz. With the unwanted signal at 5 dBm, the filtered HF+ showed no signs of overload, whilst the unfiltered HF+ had the AGC kick in to increase the front end attenuation, reducing the signal strength by about 20 dB and raising the noise floor.
Other Reviews
Other reviewers have also received the preselector and have been testing it. Fenu radio has uploaded a short review, and plans to write more in the future. He's also made his HF+ with preselector available for public use via SpyServer (details in his post). In the video below Leif SM5BSZ reviews the preselector and runs through several tests while comparing it against the Perseus. His results seem to show that the Persues gets a +25 dBm IP3, whilst the HF+ with the latest firmware and preselector is able to obtain a respectable +10 dBm IP3.
hfpluspresel2
Conclusion
For most people, the dynamic range of the HF+ is probably already more than enough, but if you are receiving very strong signals, the preselector can help get you get more performance out of the HF+. Of course the preselector cannot help if you have strong signals within the filter bands.
If you're looking to get the most out of your HF+ then the filter at only $49 is a pretty good deal. Just take note that you'll need to open the HF+ and be comfortable with soldering onto the PCB.
QRP is amateur radio slang for 'low transmit power'. QRP digital modes such as FT8, JT9, JT65 and WSPR are modes designed to be transmit and received across the world on low transmit powers (although not everyone uses only low power). The special design of these modes allows even weak signals to be decodable by the receiving software. Released in 2017, FT8 has shown itself to now be the most popular mode by far with JT9 and JT65 taking a backseat. WSPR is also not as active as FT8, although WSPR is more of a beacon mode rather one used for making contacts.
Apart from being used by hams to make contacts, these weak signal modes are also valuable indicators of the current HF propagation conditions. Each packet contains information on the location of the transmitter, so you can see where and how far away the packet you've received comes from. You also don't need to be a ham to set up a monitoring station. As an SWL (shortwave listener), it can be quite interesting to simply see how far away you can receive from, and how many countries in the world you can 'collect' signals from.
This tutorial is inspired by dg0opk's videos and blog post on monitoring QRP with single board computers. We'll show you how to set up a super cheap QRP monitoring station using an RTL-SDR V3 and a Raspberry Pi 3. The total cost should be about US $56 ($21 for the RTL-SDR V3, and $35 for the Pi 3).
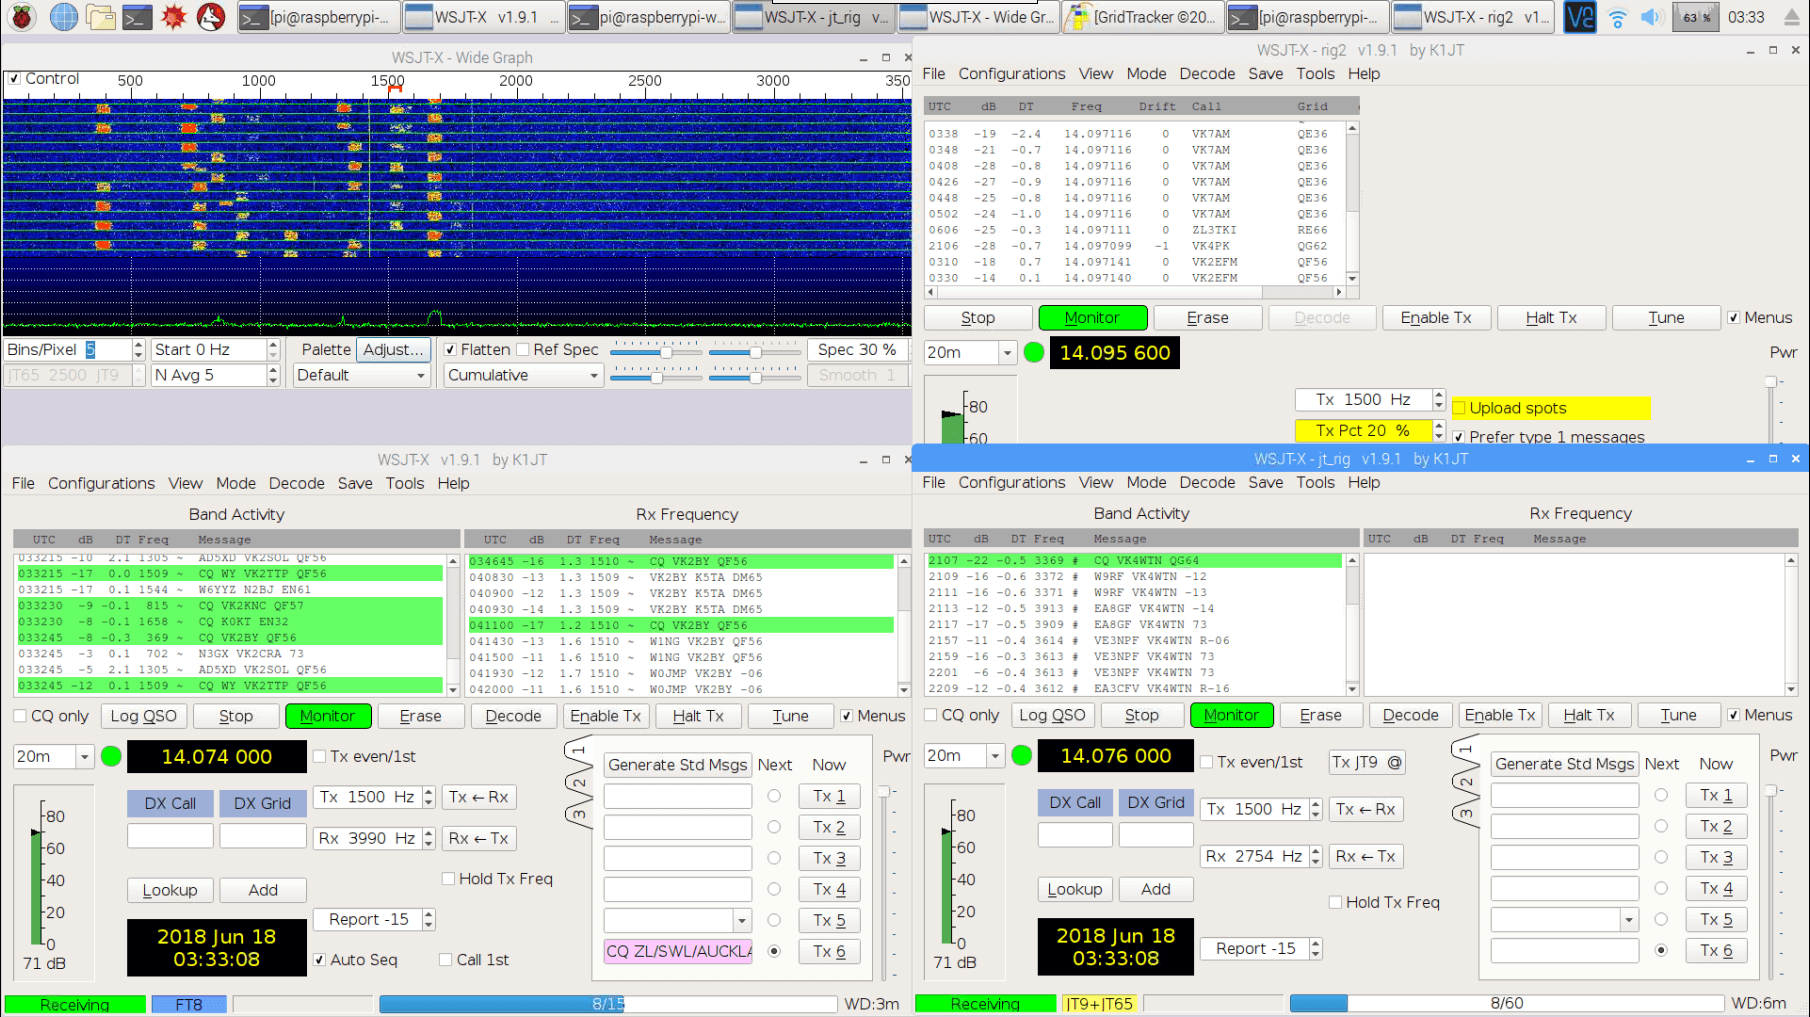
With this setup you'll be able to continuously monitor multiple modes within the same band simultaneously (e.g. monitor 20 meter FT8, JT65+JT9 and WSPR all on one dongle at the same time). The method for creating multiple channels in Linux may also be useful for other applications. If you happen to have an upconverter or a better SDR to dedicate to monitoring such as an SDRplay or an Airspy HF+, then this can substitute for the RTL-SDR V3 as well. The parts you'll need are as follows:
RTL-SDR V3 (or upconverter, or other HF & Linux capable SDR)
Raspberry Pi 3 (or other SBC with similar performance)
Internet connection
Band filter (optional but recommended)
HF antenna (this could be as simple as a long wire)
Examples of QRP Receivers with an RTL-SDR
Monitoring FT8, JT9, JT65 and WSPR simultaneously with an RTL-SDR V3 and Pi 3
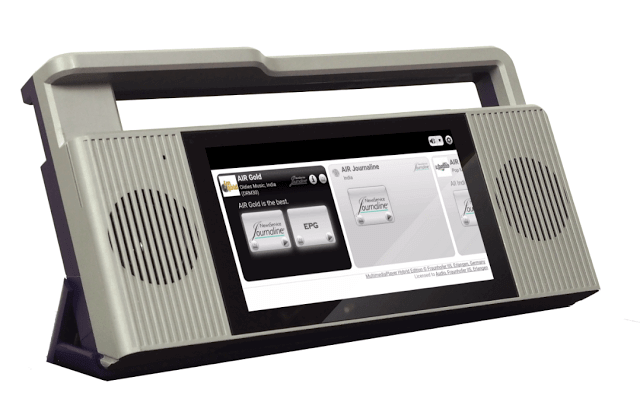
The PantronX Titus II is a yet-to-be-released portable Android tablet based SDR that we've been following since 2016. The device will feature a 100 kHz - 2 GHz tuning range, and software that focuses on HF digital DRM decoding, as well as DAB on VHF.
As you might be aware, we have joined up with Fraunhofer to include their MMPlayer app standard on Titus–what a difference a professional decoder, for both analog, DRM(+), and DAB(+), makes! MMPlayer is full featured even including reliable one way file downloads with DRM.
We are attempting also to license HD to include on the app for North America, making a truly worldwide receiver. Some deficiencies in our version of Android have caused issues as well as MMPlayer. All of which have caused delays leading to some serious business decisions – as you can imagine. You are correct that broadcasters have made large orders that will be fulfilled first. There are units in the field testing and such and continuing resolution of the software issues.
One of the issues that folks seem to have a hard time understanding is that we can not just build a few hundred or even thousands of units. Our minimum run is 10,000pcs! To do that everything has to be 100% – including the software. We simply will not ship units that are not 100%. Titus works, MMPlayer works – its that last 5% that takes the most time to resolve. These facts preclude any incremental production attempts. All that being said, we are very hopeful that the first production run is ready by last quarter of this year.
Thank you to Michael (dg0opk) who wrote in and wanted to share details of his full SDR monitoring system for weak signal HF modes. His setup consists of nine ARM mini PCs (such as Banana Pi's, Raspberry Pi's, and Odroid's), several SDRs including multiple RTL-SDR's, an Airspy Mini, FunCube Dongle and SDR-IQ, as well as some filters and a wideband amp. For software he uses Linrad or GQRX as the receiver, and WSJTx or JTDX as the decoding software, all running on Linux.
Michael also notes that his Bananapi FT8, JT65 and JT9 SDR monitor has been up and stably running continuously for half a year now. Bananapi's are lower cost alternatives to the well known Raspberry Pi single board computers, so it's good to note that a permanent weak signal monitoring system can be set up on a very low budget. Presumably even cheaper Orange Pi's would also work well.
With his setup he is able to continuously monitor FT8, JT65 and JT9 on multiple bands simultaneously without needing to tie up more expensive ham radios. His results can be seen on PSKReporter. A video of his RTL-SDR Raspberry Pi 3 decoding FT8, JT65 and JT9 can be found here.
I bought the RPi to use it as a Spyserver for my Airspy HF+ SDR.
My main radio listening location is a small house located on a hill outside the city and there is no power grid there (it’s a radio heaven!), so everything has to run on batteries and consume as little power as possible.
My first tests showed that the Raspberry Pi works very well as a Spyserver: the CPU usage stays below 40% and the power consumption is low enough to allow it to run for several hours on a regular USB power bank. If I add a 4G internet connection there I could leave the Spyserver running and connect to it remotely from home.
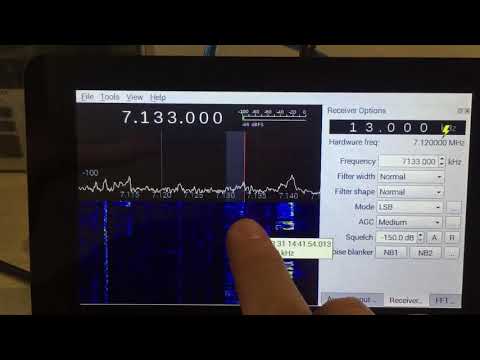
Then I wondered if the Raspberry Pi would be powerful enough to run a SDR client app. All I needed was a portable screen so I bought the official 7” touchscreen for the RPi.
I installed Gqrx, which offers support for the Airspy HF+. I’m happy to say it works better than I expected, even though Gqrx wasn’t designed to work on such a small screen. The CPU usage is higher than in Spyserver mode (70-80%) but the performance is good. Using a 13000 mAh power bank I get about 3.5 hours of radio listening.
On the swling blog post comments Tudor explains some of his challenges including finding a battery that could supply enough current, finding a low voltage drop micro-USB cable, and reducing the noise emanating from the Raspberry USB bus. Check out the post comments for his full notes.
In early February we posted news about the release of a program called GridTracker. GridTracker is a live mapping program for WSJT-X which is a software decoder for low power weak signal ham communications modes such as FT8, JT4, JT9, JT65, QRA64, ISCAT, MSK144 and WSPR. Although these are low power modes, the protocols are designed such that even weak signals can potentially be received from across the world. Mapping the received signals can be interesting as it may give you an idea of current HF propagation conditions.
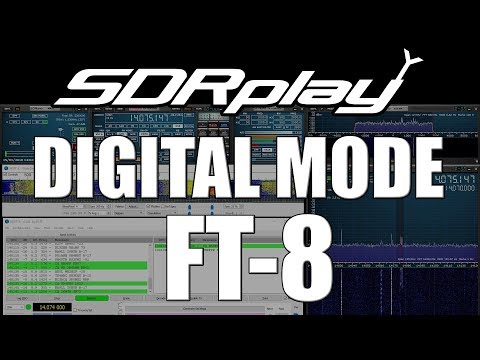
Over on YouTube radio content creator Techminds has recently started a series that shows how to decode various signals using an SDR such as the SDRplay RSP1A. The first video explains what FT-8 is and shows how to decode it using the WSJT-X software. FT-8 is a modern digital HF ham mode that is designed to be receivable even in weak signal reception. However, the amount of information sent in a FT-8 message is small, so it is not possible to have a full conversation, and you can only make contacts.
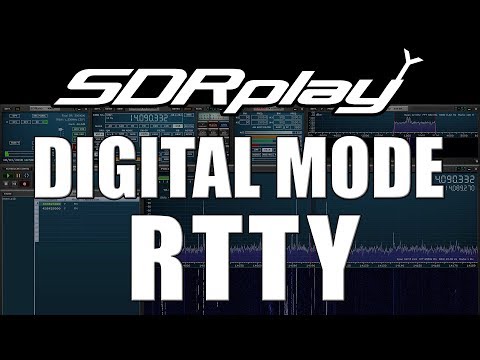
In his second video Tech Minds explains RTTY and also shows how to decode it. RTTY is another much older mode that is used by the military as well as hams. To decode it he uses Digital Master 780 which is a program included in the Ham Radio Deluxe software.
Decoding FT-8 With WSJT-X And A SDRplay RSP1A SDR Receiver
Decoding RTTY With Digital Master And A SDRplay RSP1A SDR Receiver