Titus II SDR Updates

Over on the swling.com blog we’ve seen news of an update regarding the PantronX Titus II SDR. The last update we had was in January. Swling.com contributor Richard Langley writes:

There was a segment on the latest episode of AWR’s Wavescan (9 April 2017) about the Titus II DRM receiver recorded during the recent HFCC meeting in Jordan. In it, it was stated that the shipment of the first 1500 units was expected at the end of March or by the first half of April. Included some discussion of added shielding to prevent digital noise and the high-sensitivity of the receiver compared to other DRM units. 

Head over to the swling.com post to listen to the Wavescan podcast announcement,

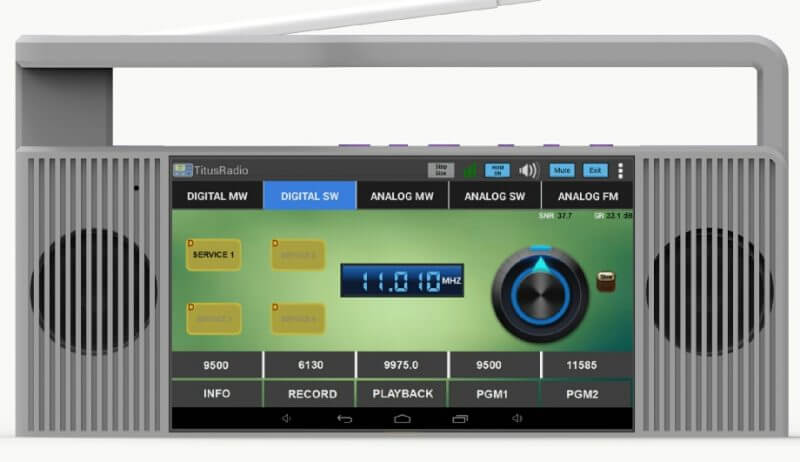
The Titus II is an Android Tablet + SDR combination that is due to be released in the near future. Its main purpose is for reception of Digital Radio Mondiale (DRM) which is a digital broadcasting medium used on the HF frequencies, which somewhat replaces standard short wave AM radio. The Titus II hopes to be one of the first low cost receiver solutions for this market and as a wideband SDR it should work for many other applications too. From the advertised frequency range of 100 kHz – 2 GHz we speculate that it will be using the Mirics SDR chipset, which is the same chipset as used in the SDRplay. The target price is under $100 USD.

The Titus II Portable SDR

Reverse Engineering and Controlling an RC Toy Tank with a HackRF and GNU Radio

Last year during a Russian wireless ‘capture the flag’ (CTF) competition one of the goals was to reverse engineer a remote controlled toy tank, and then to control it with a HackRF. One of the Russian CTF teams has posted a thorough write up on the reverse engineering process that was used on the toy tank (the link is in Russian, but Google Translate works okay).

The write up first shows the reception of the signal from the wireless controller, and then moves on to show how to receive it in GNU Radio and obtain a time domain graph of the digital signal. From the pulses it is simple to visually work out the binary string. Next an instruction decoder is created in GNU Radio which automatically obtains the binary string from the signal directly. Then once the codes for back, forward, left and right were obtained it was possible to write another GNU Radio program to transmit these codes to the RC toy tank from the HackRF.

HackRF used to control an RC toy tank

A Tutorial on Using a Raspberry Pi Zero Wireless for ADS-B Flight Tracking

Allaboutcircuits.com contributing writer Mark Hughes has recently posted a tutorial that shows how to use an RTL-SDR dongle with a Raspberry Pi Zero Wireless to track aircraft with ADS-B. As a bonus he also shows how to program and wire up a 64×64 RGB matrix screen to display currently tracked flight numbers.

The Pi Zero is one of the cheapest single board computers available, costing only $5 USD, and the wireless model with WiFi connectivity only costs $10 USD. It is powerful enough with its 1 GHz CPU and 512 MB of RAM to run an RTL-SDR and run several non CPU intensive applications such as ADS-B decoding.

The tutorial starts from the beginning by installing a fresh Raspbian image onto the Pi Zero. He then goes on to show how to install the PiAware tracking and feeding software from flightaware.com. Later in the tutorial he also shows how to collect data straight from the flightaware.com API, and also how to build and control an RGB matrix which can display live flight numbers.

It also seems that FlightAware themselves have recently released PiAware 3.5, which now directly supports the Raspberry Pi Zero Wireless.

Track Overhead Flights with a Raspberry Pi Zero Wireless, a Software Defined Radio, and FlightAware

Using a HackRF as a Beacon Transmitter on a Drone for Antenna Calibration

Over on his Twitter feed Sylvain Azarian (@sylvain_azarian / F4GKR) has been tweeting about his new antenna calibration method which involves the use of a HackRF SDR and Raspberry Pi mounted on a drone.

The idea is to use the drone as a remote beacon which can move all around the antenna. As the drone flies around, the HackRF on the drone emits a data chirp containing GPS telemetry of the drones position. The receiver on the ground decodes this data and also determines the SNR of the received signal. By plotting the received SNR together with the drones GPS position, the radiation pattern of the antenna under test could be determined.

The software is called “RadiantBee” and is developed by both F4GKR and F5OEO. It is available over on GitHub. The flying hardware consists of a quadcopter, GPS, Raspberry Pi 3, HackRF, 10 GHz upconverter, band pass filter and horn antenna. The base station consists of an RTL-SDR dongle, 10 GHz downconverter, GPS and the antenna under test.

[Also seen on Hackaday]

The RadiantBee Quadcopter.
The RadiantBee Quadcopter

DK8OK Review of the Airspy and SpyVerter

Recently DK8OK wrote in to us and wanted to share his latest review of the Airspy and SpyVerter combo (pdf). His review focuses on HF usage and he shows various examples of HF signals that he has received with the Airspy+SV such as the CHU time station, STANAG, DRM, ALE, HFFAX, VOLMET and HFDL. He also shows some tricks for optimizing HF reception, a tutorial on performing multi-channel audio recording and decoding in SDR-Console, a tutorial on playing and analyzing recorded files as well as some examples of weak signal reception.

Overall DK8OK praises the Airspy+SV combo citing it’s excellent dynamic range as one of the reasons it performs so well.

We should note that for prospective buyers, the Airspy team is currently working on a new complimentary solution for HF monitoring called the Airspy HF+. This will have extremely high dynamic range (even higher than the Airspy+SV combo), but it will have a smaller bandwidth. So the Airspy+SV combo will still be the best for monitoring a wide 9 MHz chunk of the HF band, whilst the HF+ will be the best for getting into those very hard to receive signals.

Update: The paper is now also available in French.

Multi-channel decoding in SDR-Console with the Airspy+SypVerter
Multi-channel decoding in SDR-Console with the Airspy+SpyVerter

A Warning for R820T2 RTL-SDR Purchases on eBay/Aliexpress etc

Just a brief warning for those purchasing the generic dongles on eBay and Aliexpress. We’ve recently heard of a number of customers having ordered generic dongles advertised as having R820T or R820T2 chips, but receiving dongles with FC0012 chips inside instead.

The R820T2 is capable of tuning from around 24 MHz to 1766 MHz, whereas the FC0012 can only tune between 22 – 948 MHz. Compared, the R820T2 is definitely the better chip.

This scam is probably happening because the price of the FC0012 is less than the R820T/2. So these sellers may be trying to cut costs and simply hoping that no one will notice the chip change since both chips are RTL-SDR compatible in the drivers. You can check what tuner chip you have either with rtl_test, or simply by reading the markings on the chip itself.

In addition we have also recently seen several scammer bots on eBay pop up who are selling our own RTL-SDR Blog V3 dongles at very low prices. These sellers are typically automated bots that mass copy popular listings, and undercut their price hoping to grab a few fake sales before disappearing. They usually have zero feedback, or a small amount of feedback from purchases made from the account, and they price the product extremely low, typically even below the manufacturing cost. Most likely you will never see a product from them and they will simply disappear from eBay after a few days. This has already happened to one scam seller that we have been tracking, although before they disappeared they had already made 80+ fake sales.

FlightAware Prostick Plus Now Available in our Store

The FlightAware ProStick Plus is an modified RTL-SDR designed specifically for ADS-B reception. Its main defining feature is that it has a built in low noise figure LNA, and a 1090 MHz SAW filter. The LNA reduces the noise figure of the RTL-SDR, improving ADS-B reception and thus increasing the number of messages received and the receivable range of aircraft. The SAW filter helps remove out of band signals which can cause the RTL-SDR to overload if they are particularly strong. The Prostick Plus also comes with a TCXO, and SMA connector.

If you are mainly interested in ADS-B reception, or are looking to set up an ADS-B station then the Prostick Plus is one of the best choices you can make. See our previous review here.

We are now reselling some of FlightAware’s Prostick Plus dongles in our store now. They cost $24.95 USD including free shipping worldwide. We intend to sell them mainly to customers outside of the USA, as FlightAware already sell them officially on Amazon, but we offer free shipping anywhere in the world.

Click here to visit our store

The Pro Stick Plus RTL-SDR based ADS-B Receiver from FlightAware.

SDRSharp SpyServer Now Supports the RTL-SDR

About a month ago the Airspy and SDRSharp development team released their new ‘SpyServer’ software. SpyServer is a streaming server for Airspy devices, which allows them to be used over a network connection. It is somewhat similar to rtl_tcp which is familiar to RTL-SDR users, although unlike rtl_tcp, SpyServer uses a multiclient architecture which allows several clients to connect to the server at the same time with each being able to choose individual bandwidth settings.

Today SpyServer was updated (changelog), and it now also supports the RTL-SDR dongle. The software can be found in the latest version of SDR# from www.airspy.com. The Airspy download contains the SpyServer for Windows and Linux, and the Raspberry Pi and Odroid server is available here.

To use SpyServer with the RTL-SDR you’ll first need to edit the “spyserver.config” file which is in the SDR# folder. Open this file with a text editor like Notepad, and set the “device_type” to “RTL-SDR”. Now you can run spyserver.exe on your server and it will use your RTL-SDR. Multiple dongles can be used by editing the “device_serial” string in the config file. Next on the client PC run the latest version of SDR#, and choose the Source as “Spy Server”. Here you can enter your networked PC’s IP address to connect to it.

We tested the updated SpyServer with an RTL-SDR dongle and it worked perfectly. On an 802.11n WiFi connection we were able to stream up to 1 MSPS without problems. 2 MSPS was a bit jittery, but on an Ethernet or 802.11ac WiFi connection it should work with no problems. We also tested connecting two PC’s to a single SpyServer and both were able to run at the same time without trouble. The client which connects first gets to keep control of the center frequency and gain, whilst the second client has those options locked.

SpySever Running with an RTL-SDR Dongle.