AntRunner: Testing A Low Cost Satellite Antenna Rotator
Weather satellites that transmit HRPT give you high resolution uncompressed images of the earth. With an SDR, L-band feed, 60 cm or larger satellite dish and LNA+filter these images can be received by anyone. Derek OK9SGC has the definitive HRPT reception tutorial available here. However, as these are low earth orbit satellites, the user is required to find a way to track the satellite as it moves across the sky. With some skill and experience, hand tracking can work, but a motorized solution is really what is desired. Other applications such as ham satellite communications as well as radio astronomy projects may also benefit from motorized tracking .
Antenna rotators that rotate in azimuth and elevation can be used to track satellites moving across the sky. The problem is that antenna rotators are typically very expensive, or are a major task to DIY, involving circuit construction and 3D printing of parts.
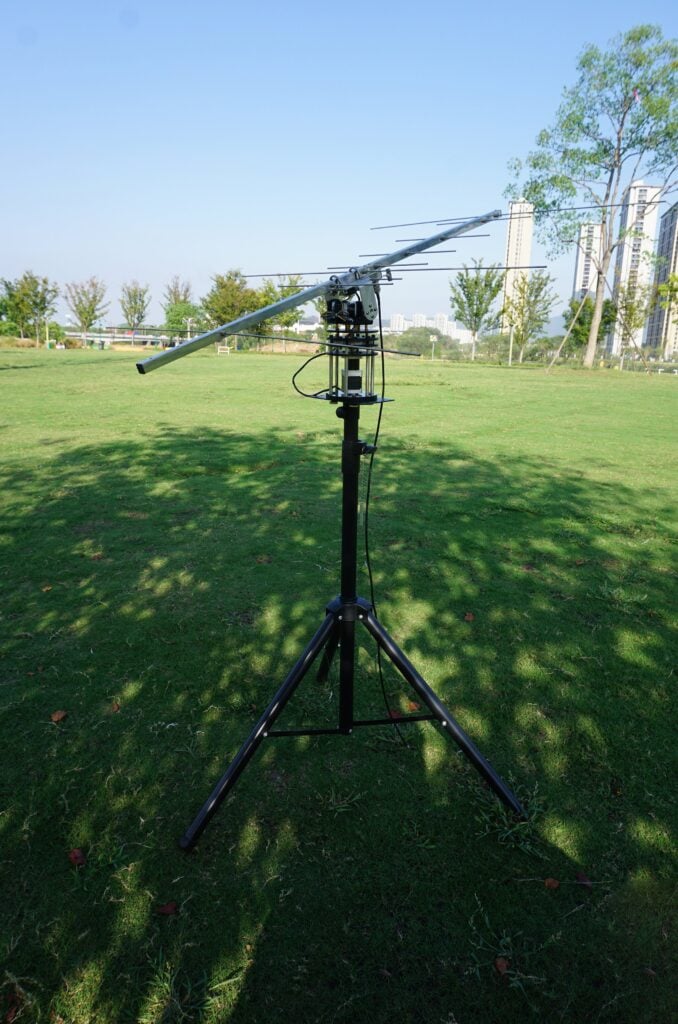
Recently on Tindie we came across the "AntRunner" which is a relatively low cost portable antenna rotator from China coming in at US$325 with free shipping to most countries (VAT is added for the EU as $50 in shipping fees).
AntRunner is based on two geared stepper motors, a motor controller PCB and an open frame. AntRunners code is open source, as well as some partial hardware schematics.
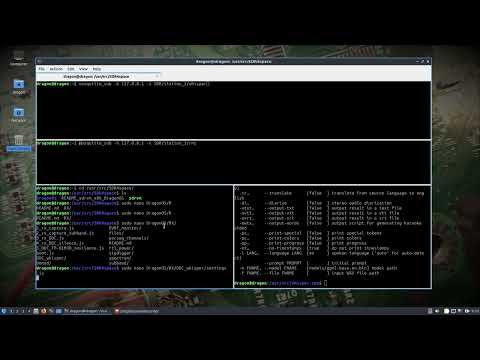
It can be interfaced via a USB serial connection or through WiFi via it's onboard ESP32 chip, and it relies on the Hamlib 'rotctl' software library running on either the controlling PC, or another intermediary device like a Raspberry Pi. Once setup, software like Gpredict on the PC or Look4Sat on Android devices can be used to control the rotator.

AntRunner Tests
We ordered an AntRunner for testing with our own funds. Our setup involved a USB connection from the AntRunner to a Raspberry Pi, 12V plug pack and a 60cm dish. We installed hamlib on the Raspberry Pi, and used Gpredict (PC) and Look4Sat (Android) on networked devices to send the desired elevation and azimuth commands to hamlib on the Raspberry Pi for particular satellites.
(Note that if you are installing hamlib for the AntRunner, you should do so from source as the packages in Ubuntu 22.04 appear to be out of date. And the older version of hamlib installed via Ubuntu does not support the AntRunner).
Overall the AntRunner works as expected and was easily able to follow HRPT satellites across the sky. It was also great for easily pointing and switching between geostationary satellites like GOES and GK-2A. It easily held and moved a 60cm dish and feed which weighs about 3 kg. The specs of the AntRunner indicate 5 kg max load (although the GitHub specs note 10kg), so it should be able to hold larger diameter dishes as well.
However we did have an issue with the advertised WiFi connection which is an alternative to the USB serial connection. When connected to WiFi the connection would always drop after a single movement command was sent, and it would never reconnect unless rebooted twice. For this reason we abandoned WiFi and only used the USB serial connection, and communicated wirelessly via the Raspberry Pi. There is also a WiFi web interface available for testing movement commands and setting up the WiFi connection, but it is only in Chinese.
It's possible that RF noise from the motors was causing the WiFi disconnection, but on the frequencies that L-band satellites operate at, we did not notice any motor interference.
The AntRunner is advertised as a portable rotator, so that means it is not suitable for use in poor weather as it has no cover to protect the motor circuit board and motors themselves from rain. However, it is certainly small and light enough to be portable. You just need a portable 12V power supply as well.
Another issue is that when power is lost, the motors will spin freely, resulting in the antenna coming crashing down fast. So care must be taken when powering down with someone there to hold the antenna. The user is also required to physically hold the antenna level at 0 degrees elevation before powering up the AntRunner, so that it will reference 0 degrees elevation. Once powered the antenna holds in place.
There are also no limit switches on the device, so if an erroneous command is sent, it could send the motors into a position that could damage something.
Conclusion
Overall if you want something cheap and pretty much ready to use out of the box for tracking HRPT or other LEO satellites, the AntRunner is a good budget choice if you intend to only setup temporary stations. It is not suitable for permanent satellite receiver setups, at least not without some modifications.
A similar product is the SATRAN MK3 which was a 3D printed kit costing 175 Euros + shipping, but unfortunately this product appears to no longer be sold.
The ultimate in low cost rotators is probably the SatNOGS V3 rotator, but as mentioned this is a DIY project that requires a significant time commitment as it involves 3D printing multiple parts, sourcing components, building PCBs and constructing everything together. We have found one company offering a SatNOGs hardware kit, containing all of the parts required for US$445.
A commercial option might be the Yaesu G-5500DC which goes for US$759.95 on HRO, however you also need the GS-232 Rotator Computer Controller for computer control which is an additional US$589.95. Update: We've been informed that there are also cheaper third party computer controllers for Yaesu rotators, such as the CSN Technologies S.A.T Rotator Controller which sells for US$278.