Category: Security

SDR and Radio Talks from the 34th Chaos Communication Congress: SatNOGs, Bug Detection, GSM with SDR, Open Source Satellites and WiFi Holography

Every year the Chaos Computer Club hold the Chaos Communication Congress (CCC) which is a conference that aims to discuss various topics related to technology and security. This year was the 34th conference ever held (34C3) and there were several interesting SDR and radio related talks which we post below. Further links and video downloads are available in the YouTube description.

SatNOGS: Crowd-sourced satellite operations

An overview of the SatNOGS project, a network of satellite ground station around the world, optimized for modularity, built from readily available and affordable tools and resources.

We love satellites! And there are thousands of them up there. SatNOGS provides a scalable and modular platform to communicate with them. Low Earth Orbit (LEO) satellites are our priority, and for a good reason. Hundreds of interesting projects worth of tracking and listening are happening in LEO and SatNOGS provides a robust platform for doing so. We support VHF and UHF bands for reception with our default configuration, which is easily extendable for transmission and other bands too.

We designed and created a global management interface to facilitate multiple ground station operations remotely. An observer is able to take advantage of the full network of SatNOGS ground stations around the world.

34C3 - SatNOGS: Crowd-sourced satellite operations

Spy vs. Spy: A Modern Study Of Microphone Bugs Operation And Detection

In 2015, artist Ai Weiwei was bugged in his home, presumably by government actors. This situation raised our awareness on the lack of research in our community about operating and detecting spying microphones. Our biggest concern was that most of the knowledge came from fictional movies. Therefore, we performed a deep study on the state-of-the-art of microphone bugs, their characteristics, features and pitfalls. It included real life experiments trying to bug ourselves and trying to detect the hidden mics. Given the lack of open detection tools, we developed a free software SDR-based program, called Salamandra, to detect and locate hidden microphones in a room. After more than 120 experiments we concluded that placing mics correctly and listening is not an easy task, but it has a huge payoff when it works. Also, most mics can be detected easily with the correct tools (with some exceptions on GSM mics). In our experiments the average time to locate the mics in a room was 15 minutes. Locating mics is the novel feature of Salamandra, which is released to the public with this work. We hope that our study raises awareness on the possibility of being bugged by a powerful actor and the countermeasure tools available for our protection.

34C3 - Spy vs. Spy: A Modern Study Of Microphone Bugs Operation And Detection

Running GSM mobile phone on SDR

Since SDR (Software Defined Radio) becomes more popular and more available for everyone, there is a lot of projects based on this technology. Looking from the mobile telecommunications side, at the moment it's possible to run your own GSM or UMTS network using a transmit capable SDR device and free software like OsmoBTS or OpenBTS. There is also the srsLTE project, which provides open source implementation of LTE base station (eNodeB) and moreover the client side stack (srsUE) for SDR. Our talk is about the R&D process of porting the existing GSM mobile side stack (OsmocomBB) to the SDR based hardware, and about the results we have achieved.

There is a great open source mobile side GSM protocol stack implementation - OsmocomBB project. One could be used for different purposes, including education and research. The problem is that the SDR platforms were out of the hardware the project could work on. The primary supported hardware for now are old Calypso based phones (mostly Motorola C1XX).

Despite they are designed to act as mobile phone, there are still some limitations, such as the usage of proprietary firmware for DSP (Digital Signal Processor), which is being managed by the OsmocomBB software, and lack of GPRS support. Moreover, these phones are not manufactured anymore, so it's not so easy to find them nowadays.

Taking the known problems and limitations into account, and having a strong desire to give everyone the new possibilities for research and education in the telecommunications scope, we decided to write a 'bridge' between OsmocomBB and SDR. Using GNU Radio, a well known environment for signal processing, we have managed to get some interesting results, which we would like to share with community on the upcoming CCC.

34C3 - Running GSM mobile phone on SDR

UPSat - the first open source satellite

During 2016 Libre Space Foundation a non-profit organization developing open source technologies for space, designed, built and delivered UPSat, the first open source software and hardware satellite.

UPSat is the first open source software and hardware satellite. The presentation will be covering the short history of Libre Space Foundation, our previous experience on upstream and midstream space projects, how we got involved in UPSat, the status of the project when we got involved, the design, construction, verification, testing and delivery processes. We will also be covering current status and operations, contribution opportunities and thoughts about next open source projects in space. During the presentation we will be focusing also on the challenges and struggles associated with open source and space industry.

34C3 - UPSat - the first open source satellite

Holography of Wi-Fi radiation

Can we see the stray radiation of wireless devices? And what would the world look like if we could?

When we think of wireless signals such as Wi-Fi or Bluetooth, we usually think of bits and bytes, packets of data and runtimes.

Interestingly, there is a second way to look at them. From a physicist's perspective, wireless radiation is just light, more precisely: coherent electromagnetic radiation. It is virtually the same as the beam of a laser, except that its wavelength is much longer (cm vs µm).

We have developed a way to visualize this radiation, providing a view of the world as it would look like if our eyes could see wireless radiation.

Our scheme is based on holography, a technique to record three-dimensional pictures by a phase-coherent recording of radiation in a two-dimensional plane. This technique is traditionally implemented using laser light. We have adapted it to work with wireless radiation, and recorded holograms of building interiors illuminated by the omnipresent stray field of wireless devices. In the resulting three-dimensional images we can see both emitters (appearing as bright spots) and absorbing objects (appearing as shadows in the beam). Our scheme does not require any knowledge of the data transmitted and works with arbitrary signals, including encrypted communication.

This result has several implications: it could provide a way to track wireless emitters in buildings, it could provide a new way for through-wall imaging of building infrastructure like water and power lines. As these applications are available even with encrypted communication, it opens up new questions about privacy.

34C3 - Holography of Wi-Fi radiation

Art Installation Eavesdrops on Hospital Pagers with a HackRF

HolyPager Art Installation. HackRF One, Antenna and Raspberry Pi seen under the shelf.

For a long time now it has been known that pager data is sent in the clear and in plain text over a strong and easily received RF signal. The signal can easily be intercepted with a standard scanner radio or more recently with an SDR such as the RTL-SDR. Software such as PDW can then be used to decode the signal into plain text. We have a tutorial on this available here.

In these more modern days of cell phones and secure text messaging very few people still use pagers. But one heavy user of pagers is the medical community who still prefer them as they are already widely implemented in hospitals and are very reliable. The lower frequencies and high transmission powers used by pager systems allows for better reception especially in areas prone to poor cellphone reception such as in big buildings like hospitals with many walls underground areas. They are also very reliable as they receive messages instantly, whereas text messages can be delayed in times of high network traffic which is obviously a problem when a doctor is needed urgently. Finally, another advantage is that most pagers only receive, so there are no local transmissions that could interfere with sensitive medical machines. A major downside however is that pager use means that a lot of very private patient data can be easily intercepted by anyone anywhere in the same city as the hospital.

Back in October artist and programmer Brannon Dorsey displayed an art installation at the Radical Networks conference in Brooklyn which he calls Holypager. The idea is to bring attention to the breach of privacy. The installation simply prints out the pager messages as they are sent in real time, accumulating patient data that any visitor can pick up and read. He doesn't mention it on his page, but in one of the photos we see a HackRF One, antenna and Raspberry Pi hiding underneath the installation which is how the pager messages are received. A simple RTL-SDR could also be used as the receiver. Brannon writes:

Holypager is an art installation that intercepts all POCSAG pager messages in the city it resides and forwards them to one (holy) pager. The installation anonymizes all messages and forwards them randomly to one of three pagers on display. Each message is also printed on a contiguous role of receipt paper amassing a large pile of captured pages for gallery goers to peruse.

Pagers use an outdated protocol that requires all messages to be broadcast unencrypted to each pager in the area. It is the role of the individual pager to filter and display only the messages intended for its specific address. The pagers below have been reprogrammed to ignore this filter and receive every message in the city in real time. Today, these devices are primarily used in hospitals to communicate highly sensitive information between doctors and hospital staff.

Given the severity of the HIPPA Privacy Act, one would assume that appropriate measures would be taken to prevent this information from being publicly accessible to the general public. This project serves as a reminder that as the complexity and proliferation of digital systems increase the cultural and technological literacy needed to understand the safe and appropriate use of these systems often do not.

[Also seen on Hackaday and Motherboard]

Exploring Vulnerabilities in Tire Pressure Monitoring Systems (TPMS) with a HackRF

Over on YouTube the channel "Lead Cyber Solutions" has uploaded a video presentation for the Cyber Skills Competition. In the video Christopher Flatley, James Pak and Thomas Vaccaro discuss a man-in-the-middle attack that can be performed on vehicle Tire Pressure Monitoring Systems (TPMS) with a transmit capable SDR such as a HackRF.

A TPMS system consists of small battery powered wireless sensors placed on a vehicles wheels which automatically monitor tire pressure. An LCD basestation usually exists on the dashboard of the car indicating live tire pressure. Most modern cars come with this feature, and it is simple to retrofit an older car with an aftermarket TPMS system.

The idea behind the vulnerability is that a HackRF can be used to reverse engineer the TMPS signal, and then re-transmit a new fake signal that causes the base station to read the tire pressure as low. This can set off an alarm in the car and possibly cause someone to pull over. More alarmingly, they discuss how tractors have automatic tire inflation systems which work using similar sensors. A false low pressure reading could cause the tractor tires to over inflate and be damaged.

Vulnerabilities in Vehicle TPMS (Exploit & Hacking)

In the past we have also posted about Jared Boon's work on TPMS where he shows how privacy could be breached by monitoring and tracking TPMS identifiers.

TempestSDR: An SDR tool for Eavesdropping on Computer Screens via Unintentionally Radiated RF

Thanks to RTL-SDR.com reader 'flatflyfish' for submitting information on how to get Martin Marinov's TempestSDR up and running on a Windows system. If you didn't already know by definition "TEMPEST" refers to techniques used by some spy agencies to eavesdrop on electronic equipment via their unintentional radio emissions (as well as via sounds and vibrations). All electronics emit some sort of unintentional RF signals, and by capturing and processing those signals some data can be recovered. For example the unintentional signals from a computer screen could be captured, and converted back into a live image of what the screen is displaying.

TempestSDR is an open source tool that allows you to use any SDR that has a supporting ExtIO (such as RTL-SDR, Airspy, SDRplay, HackRF) to receive the unintentional signal radiation from a screen, and turn that signal back into a live image. This can let you view what is on a screen without any physical connections. If a high gain directional antenna is used then it may be possible to receive images from several meters away as well.

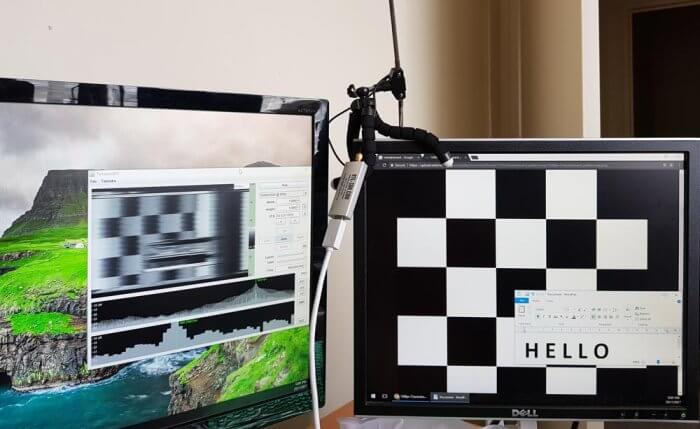
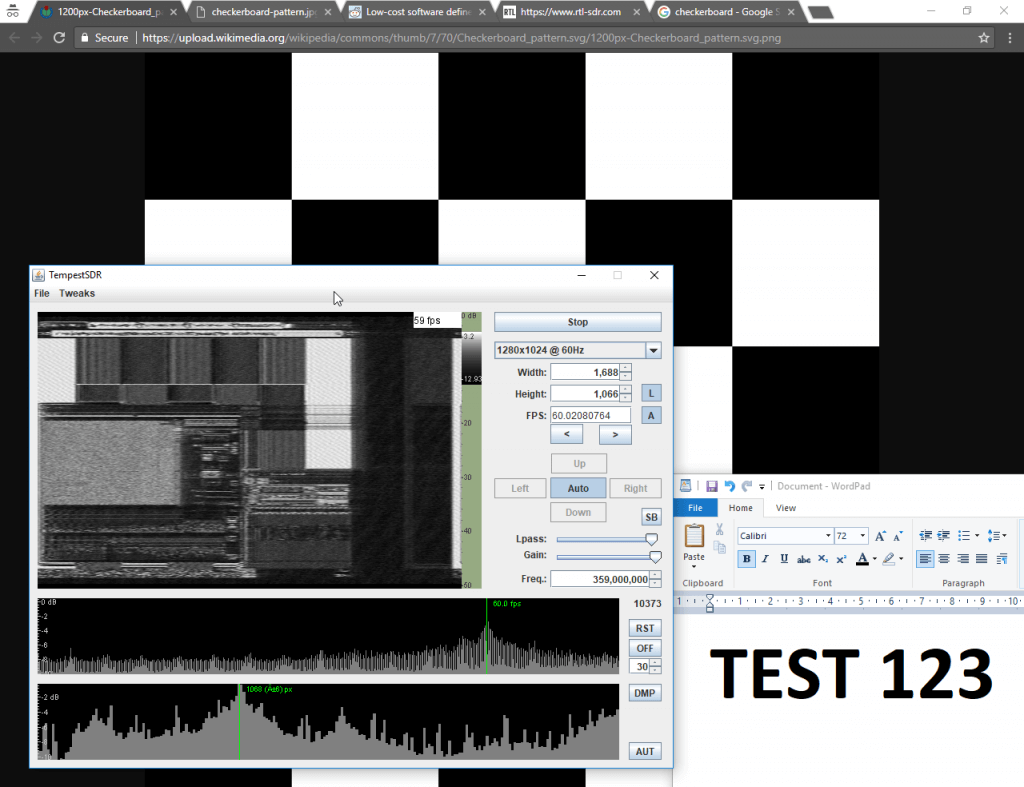
TempestSDR showing what's on the screen via unintentional RF radiation from the monitor.

Although TempestSDR has been released now for a number of years it hasn't worked properly in Windows with ExtIO interfaces. In his email flatflyfish showed us how to compile a new version that does work.

1. You need to install a 32-bit version of the Java runtime. The 64-bit version won't work with extio's possibly because they are all 32-bit. Also install the JDK.

2. You need to install MingW32 and MSYS and put their bin folders in your Windows PATH.

3. Then when compiling I was seeing a lot of CC command unknown errors. To fix that I just added CC=gcc to the top of all makefiles. I also removed the Mirics compilation line from the JavaGUI makefile to make things easier as we're not using that sdr.

4. Originally my JDK folder was in Program Files. The makefile didn't like the spaces in the folder, so I moved it to a folder without spaces and it fixed the errors.

5. Lastly to compile it you need to specify the ARCHNAME as x86 eg "make all JAVA_HOME=F:/Java/jdk1.7.0_45 ARCHNAME=X86"

After doing all that it compiled and I had a working JAR file. The extio's that are used normally with HDSDR work fine now and I get some images from my test monitor with an rtlsdr.

We tested compilation ourselves and were successful at getting a working program. To help others we've just uploaded a fork of the code with the makefile changes done, as well as a precompiled release ZIP available on the releases page so no compilation should be required to just use it. Note that to use the precompiled JAR you still need to install MingW32, and also don't forget to install the MingW /bin and msys /1.0/bin folders into the Windows PATH. You also do need to have the 32-bit Java runtime installed as the 64-bit version doesn't seem to work. On at least one Win 10 machine we also had to manually add a 'Prefs' folder to the Java path in the registry.

We've tested the software with the ExtIO for RTL-SDRs (available on the HDSDR downloads page) and confirmed that it works. Images from one of our older DELL monitors using DVI are received nicely, although they are a bit blurry. We also tried using an Airspy or SDRplay unit and this significantly improved the quality of the images a lot due to the larger bandwidth. The quality was good enough to make out large text on the screens. ExtIO's for the Airspy are available on this page, and for the SDRplay on the official SDRplay website. Note that for the SDRplay we were unable to go above 6 MHz, and on the RTL-SDR 2.8 MHz was the limit - anything higher on these SDRs did not produce an image possibly due to dropped samples.

To use the software you should ideally know the resolution and refresh rate of your target monitor. But if you don't there are auto-correlation graphs which actually help to predict the detected resolution and frame rate. Just click on the peaks. Also, you will need to know the frequency that your monitor unintentionally emits at. If you don't know you can browse around in SDR# looking for interference peaks that change depending on what the image of the screen is showing. For example in the image below we show what the interference might look like. A tip to improving images is to increase the "Lpass" option and to watch that the auto FPS search doesn't deviate too far from your expected frame rate. If it goes too far, reset it by re-selecting your screen resolution.

Unintentionally radiated RF signal from computer screen shown in SDR#

The best results were had with the Airspy listening to an older 19" DELL monitor connected via DVI. A newer Phillips 1080p monitor connected via HDMI had much weaker unintentional signals but images were still able to be recovered. A third AOC 1080p monitor produced no emissions that we could find.

Clear images were obtained with an antenna used in the same room as the monitor. In a neighboring room the images on the DELL monitor could still be received, but they were too blurry to make anything out. Possibly a higher gain directional antenna could improve that.

An example set up with RTL-SDR antenna and monitors

Below we've uploaded a video to YouTube showing our results with TempestSDR.

TempestSDR - Remotely Eavesdropping on Monitors via Unintentionally Radiated RF

If you want to learn more about TEMPEST and TempestSDR Martin Marinovs dissertation on this software might be a good read (pdf).

Defcon 25 SDR and Radio Related Talks

Defcon is a huge yearly conference based on the topics of information security and hacking. Some of the talks relate to wireless and SDR concepts. Recently videos from the last Defcon 25 conference held in July 2017 have been uploaded to YouTube. Below is a selection of some interesting SDR and radio related talks that we have found. If you're interested in exploring the rest of the talks then you can find them on their YouTube page. Most of the radio related talks are in the 'WiFi Village' category.

DEF CON 25 Wifi Village - Balint Seeber - Hacking Some More of the Wireless World

The hacking continues on from last year! Three interesting applications will be demonstrated, and their underlying theory and design explained. The audience will be exposed to some novel GNU Radio tips and DSP tricks. INMARSAT Aero will be revisited to show (in Google Earth) spatial information, such as waypoints and flight plans, that are transmitted from airline ground operations to airborne flights. A good chunk of the VHF band is used for airline communications; plane spotters enjoy listening to tower and cockpit communications.

Modern SDRs can now sample the entire band, and as AM modulation is used, it's possible to use a counterintuitive, but simple, demodulator chain (first shown by Kevin Reid's wideband 'un-selective AM' receiver) to listen to the most powerful transmission. This will be demonstrated with a GNU Radio-based implementation. It is also possible to 'spatialise' the audio for the listener using stereo separation, which can convey a transmission's relative position on the spectrum. FMCW RADAR experiments are enhanced to include Doppler processing.

Plotting this new velocity information, due to the Doppler effect, shows whether a target is heading toward or away from you, and often reveals targets not normally seen in range-only information - this demonstrates the true power of full RADAR signal processing. This technique will be applied to the live audio demo, a new live SDR demo, CODAR ocean current tracking, and passive RADAR exploiting powerful ATSC digital television signals (this was used to track aircraft on approach across the Bay Area).

DEF CON 25 Wifi Village - Balint Seeber - Hacking Some More of the Wireless World

DEF CON 25 - Matt Knight - Radio Exploitation 101

What do the Dallas tornado siren attack, hacked electric skateboards, and insecure smart door locks have in common? Vulnerable wireless protocols. Exploitation of wireless devices is growing increasingly common, thanks to the proliferation of radio frequency protocols driven by mobile and IoT. While non-Wi-Fi and non-Bluetooth RF protocols remain a mystery to many security practitioners, exploiting them is easier than one might think.

Join us as we walk through the fundamentals of radio exploitation. After introducing essential RF concepts and characteristics, we will develop a wireless threat taxonomy by analyzing and classifying different methods of attack. As we introduce each new attack, we will draw parallels to similar wired network exploits, and highlight attack primitives that are unique to RF. To illustrate these concepts, we will show each attack in practice with a series of live demos built on software-defined and hardware radios.

Attendees will come away from this session with an understanding of the mechanics of wireless network exploitation, and an awareness of how they can bridge their IP network exploitation skills to the wireless domain.

DEF CON 25 - Matt Knight - Radio Exploitation 101

Continue reading

Using an RTL-SDR and RPiTX to Defeat the Rolling Code Scheme used on Some Subaru Cars

Over on GitHub Tom Wimmenhove has been experimenting with the car keyfob on his Subaru car, and has discovered that the rolling code scheme used is very weak and so can be easily exploited.

Most modern vehicles use some form of rolling code security on their wireless keyfobs to prevent unauthorized replay attacks. When the car owner presses a button on the keyfob, a unique rolling code is sent to the car. If it matches one of the codes currently stored in the car, the car will unlock and then invalidate that code so it can never be used again, thus preventing a replay attack. On the next press the keyfob sends a new code. In most designs when a code is used up, a new code is added to the list of valid codes via a random number generator based on a secure algorithm only known (presumably) to the engineers.

Essentially Tom found that instead of producing a randomly generated rolling code, the Subaru keyfob simply increments the rolling code number each time. This allows an attacker to perform a second key press simply recording an initial real key press, decoding the packet, increasing the decoded rolling code by one, then re-transmitting. It also means that the attacker could continually raise the rolling code value on the car himself, which would eventually make the real keyfob useless as the codes on the keyfob would be outdated and no longer match the same number range as the car.

The entire exploit was found on a super low budget. Tom used only an RTL-SDR and Raspberry Pi. The receive is obviously handled by the RTL-SDR, but the transmit side is handled by RPiTX which is software that allows the Raspberry Pi to transmit RF signals directly from a GPIO pin without the need for any additional transmitting hardware. Tom writes that the exploit probably affects the 2006 Subaru Baja, 2005 - 2010 Subaru Forester, 2004 - 2011 Subaru Impreza, 2005 - 2010 Subaru Legacy and the 2005 - 2010 Subaru Outback. Tom also writes that various dealers and spokes people have contacted him stating that the exploit probably only affects US models. If you have one of the affected models and are worried the only way to stay safe is to simply not use wireless entry on the keyfob, at least until/if Subaru fixes the issue with a recall. Although so far no statement from Subaru has been released.

Tom has also uploaded a demonstration video to YouTube which is shown below.

[Also seen on Hackaday, Bleeping Computer and The Register]


Subaru fobrob exploit

Reviewing the PandwaRF: CC1111 Based Transceiver for RF Security Analysis

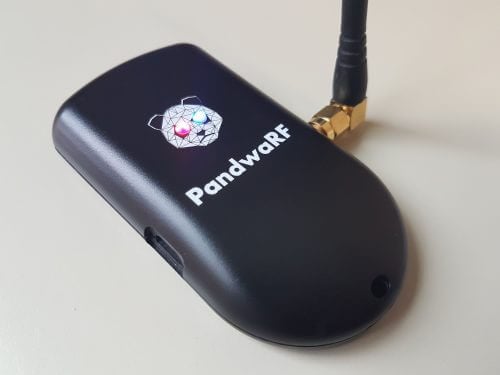
The PandwaRF

The PandwaRF (formerly known as GollumRF) is an RF analysis transceiver tool that can be very useful for investigating ISM band devices that communicate with digitally modulated RF signals. It can be used for applications such as performing replay attacks, brute force attacks, and other analysis. The RX/TX frequency range of the device is from 300 – 928 MHz, with a transmit power of up to +10 dBm.

The PandwaRF is based on the CC1111 chip which is the same chip used in devices like the Yard Stick One from Great Scott Gadgets (creators of the HackRF). Compared to the YS1 the PandwaRF is essentially the same, but designed to be much more portable, with a built in battery and an Android app that you connect to via Bluetooth. This makes it very useful for taking out in the field as no laptop is required to use it, just a phone or tablet. The PandwaRF can be used just like a YardstickOne when plugged into a PC however.

We should also clarify that CC1111 based devices like the PandwaRF and YS1 are not classed as SDRs. Rather they are RF transceiver chips that can demodulate, decode and transmit a fixed set of digital modulation schemes, such as OOK/ASK, 2-FSK, 4-FSK, GFSK, and MSK. While these devices are not able to receive or transmit any arbitrary signal like an SDR, they make reverse engineering, analysis, replay attacks, brute force attacks etc much simpler for common modulation schemes compared to using an SDR for the same purpose.

Early on in the year PandwaRF sent us a sample of their device for review. Unfortunately during that time their Android software was extremely buggy and we were simply unable to use the device properly. Others reported similar troubles on forums and blog comments. However fast forward to today and it now seems that the Android software is stable and functioning properly.

Replay Attack

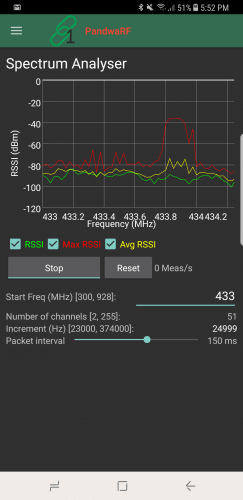
PandwaRF Spectrum Analyzer Tool

We first tested the PandwaRF on a simple task which was a replay attack. The goal was to record the signal of a cheap wireless RF alarm, and see if we could replay it back. The wireless alarm is controlled with a keyfob.

First we used the Spectrum Analyzer tool in the PandwaRF app to try and get the frequency of the keyfob. The Spectrum Analyzer tool allows you to see about 1.2 MHz of bandwidth. We assumed the signal would be around 433 MHz. After pressing the button a few times the peak showed up at about 433.9 MHz on the spectrum analyzer. The refresh rate of the spectrum analyzer is quite low, so if the signal is not continuous it’s possible to miss the signal, which is we why we had to try several presses before the signal showed. A standard SDR like an RTL-SDR might be better for this initial frequency searching. We confirmed the frequency to be at 433.893 MHz on an RTL-SDR blog V3.

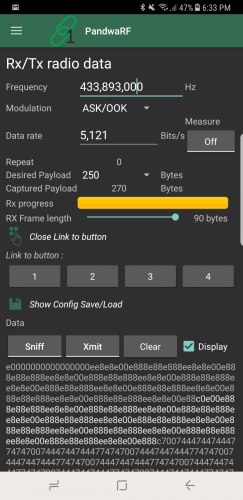
PandwaRF RX/TX Replay Attack Screen

Next we switched to the RX/TX tool. Here you can enter the frequency of interest and set the expected modulation. We know that this device is ASK/OOK modulated, so we chose this setting. You also need to set the data rate. If you don’t know this value then the app has a data rate measuring tool. So we just pressed on the Measure button, and then pressed a button on the remote until it converged to a data rate of 5,121.

Next you need to set the ‘desired payload’. This is how many bytes long the packet is and determines how long the capture is. As we were unsure we simply set it to 250 bytes to ensure that a longer capture was taken. The PandwaRF will keep on receiving until it receives the desired payload of 250 bytes or is stopped manually. Setting it longer allows us to capture a longer signal, and ensure that the replayed signal is received. For this alarm device it is okay if the same signal is played multiple times in a short time frame.

The final setting is the RX Frame length. This determines how many bytes will be captured before transferring the data to Android. So for example, if you set the desired payload to 100 Bytes, and the RX Frame length to 52 bytes, then in total you will capture 104 Bytes of data. The PandwaRF can only transfer in 14, 33, 52, 71 or 90 bytes, so select one that is closest to a multiple of your desired payload.

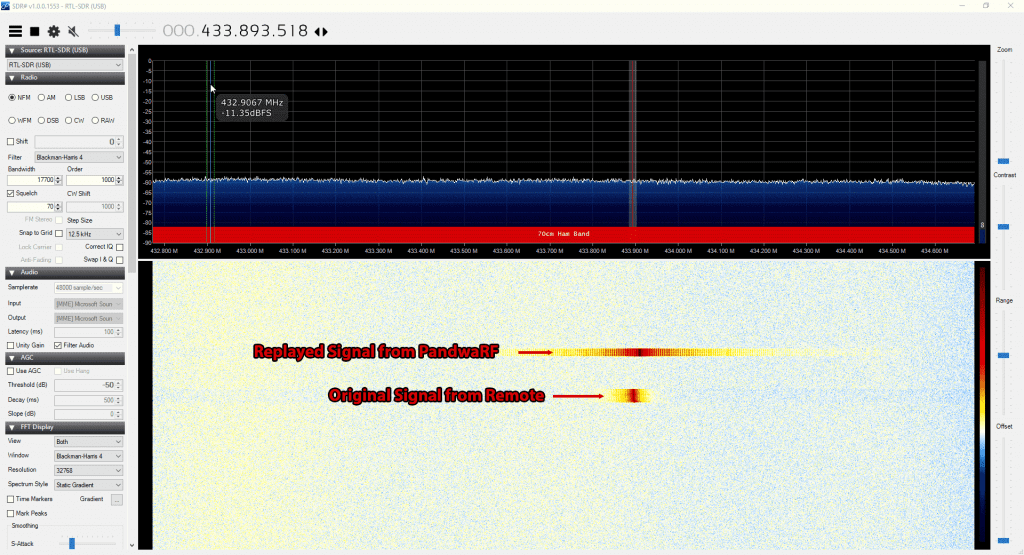
Finally we pressed on ‘Sniff’ and pressed the ‘bell’ button on the remote. The PandwaRF detected the signal and recorded the data. Now pressing Xmit replays the signal successfully causing the alarm bell to sound.

Replayed and Original Signal received with an RTL-SDR

Brute Force Attack

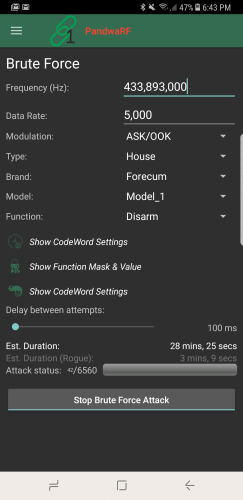
Brute force settings

The PandwaRF can also be used as a brute forcing tool. With cheap alarms the alarm code is relatively short, so can be brute forced in a matter of minutes. The PandwaRF already had a preset mode for our cheap Forecum door alarm, so we simply selected this mode and started the brute force. It gave an estimated brute force time of 28 minutes, which is the time it takes to run through every possible alarm code.

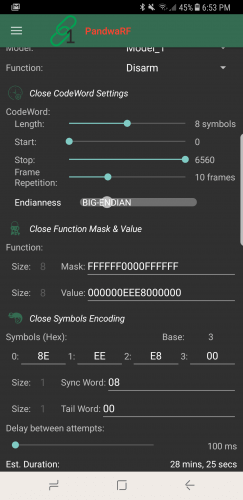
More advanced brute force settings

The PandwaRF app currently supports the Idk and PT2262 chipsets, as well as some models of DIO, Extel and Forecum house alarms. If the device that you want to brute force is not yet in their database, then you’ll probably need to do some analysis first on the PC with an SDR. Software like Universal Radio Hacker and DSpectrumGUI are good tools for this. Once you know the structure of the data, then you can program PandwaRF to perform the brute force attack.

Note that their newer ‘PandwaRF Rogue’ product is supposed to be significantly faster at brute forcing. For example the Android software gives us a estimated duration of 28 minutes with the standard PandwaRF, and only 3 minutes with the Rogue.

The Rogue is also able to brute force 32 bit codewords with zero delay in between transmissions. The standard PandwaRF has a minimum delay of 100 ms which can really slow things down. It also allows for function mask bit skipping, enable more brute force patterns and can split the brute force attempt into several steps. Also as we’ve seen from their videos the Rogue has more pre-set commercial devices built into its app.

So if brute forcing is your main use for the PandwaRF then it seems to make sense to get the Rogue. Unfortunately the Rogue is significantly more costly, coming in at 990 euros, vs 145 euros for the standard PandwaRF. Of course you could still use the standard PandwaRF on a PC with tools like rfcat to perform a faster brute force attack as well, just like you would with a YardstickOne.

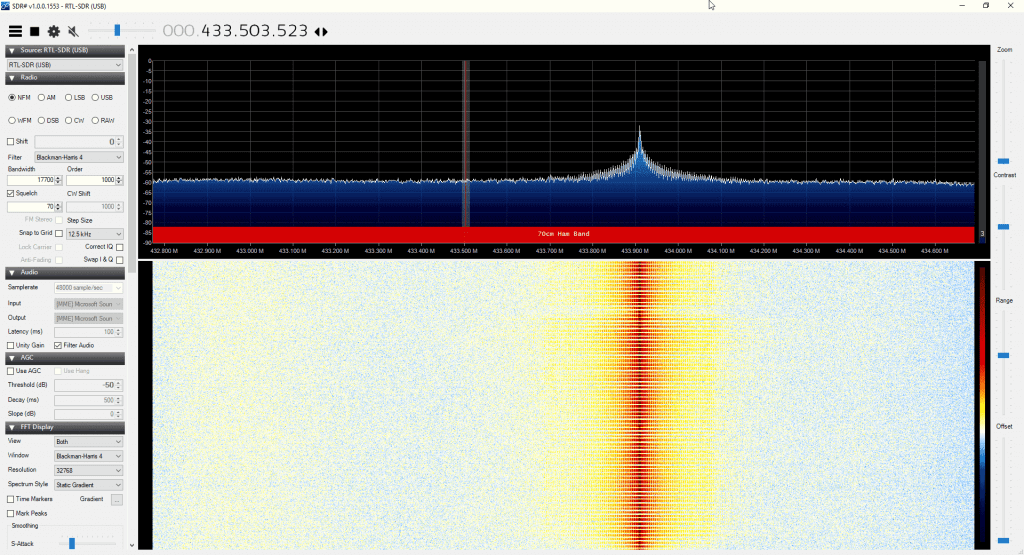
PandwaRF Brute Force attack as seen by an RTL-SDR

Javascripting

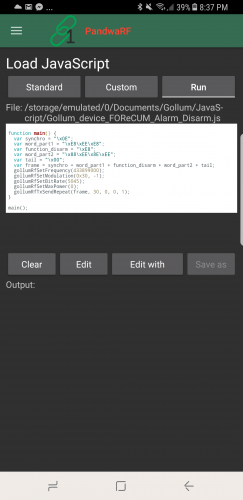
Javascript in PandwaRF

If you need more powerful analysis or TX capabilities, then the PandwaRF can be controlled in Javascript code. For example, you might have already reverse engineered a device, and simply require the PandwaRF to transmit the correct code to replace a remote control. You could also create a jammer with this.

The code runs on the Android device and not on the PandwaRF, so each RF command generates a bluetooth transfer which can be quite slow. They write this is why they have created a specific brute force implementation in the app, so that they can run their native brute force code on the PandwaRF itself, which is must faster than transferring the RF command for every brute force step.

Conclusion

Overall the PandwaRF is a very handy tool for doing replay and brute force attacks while in the field. It can also be converted back into a PC based CC1111 device, like a Yardstick One simply by plugging it into a computer with a USB cable so you’re not missing out on that functionality either.

Compared to the Yardstick One the cost is a bit more, with the Yardstick One costing $99 USD at most outlets, and the PandwaRF costing 145 Euros (~$173 USD). So it is probably only really worth it if you are doing field testing.

That said, now that the PandwaRF software seems stable it is an excellent tool for investigating wireless devices in a simpler way compared to with an SDR. An SDR is still much more powerful, but tools like this simplify the process significantly. The best set of tools for reverse engineering would be a SDR combined with a device like this.

In the future it looks like they plan to implement new features such as De Bruijn (OpenSesame) attack’s and rolling code attacks and we look forward to testing those out.

If you want more information about the PandwaRF you can visit their site, or check out their Wiki, or have a look at the demo videos on their YouTube page.

Disclaimer: The PandwaRF was provided to us for free in exchange for an honest review.

Opening a Car and Garage Door With PlutoSDR

Over on his YouTube channel Tysonpower (aka Manuel) has uploaded a video showing how he was able to use his PlutoSDR to perform some simple replay attacks that open his garage and car doors. To do this he records the signal from the wireless keyfobs with the PlutoSDR, and then uses a GNU Radio program to replay that signal again at a later time. From the tests he concludes that the PlutoSDR can be a great cheaper alternative to a HackRF, with the PlutoSDR coming in at $100 vs $300 for the HackRF.

To get around the rolling code security on his car he records the keyfob with the PlutoSDR while it’s out of the wireless range of his car, so that the rolling code will not be invalidated. Then later closer to the car the PlutoSDR is used to replay the car keyfob signal which opens the door.

Note that Tysonpower’s video is narrated in German, but English subtitles are available through the YouTube interface.

[EN subs] Hacken eines Autos und Garagentors - AdalmPluto Replay Attacke