Category: Amateur Radio

Demodulating DVB-S Digital Amateur TV with SDRAngel on Windows with an SDR

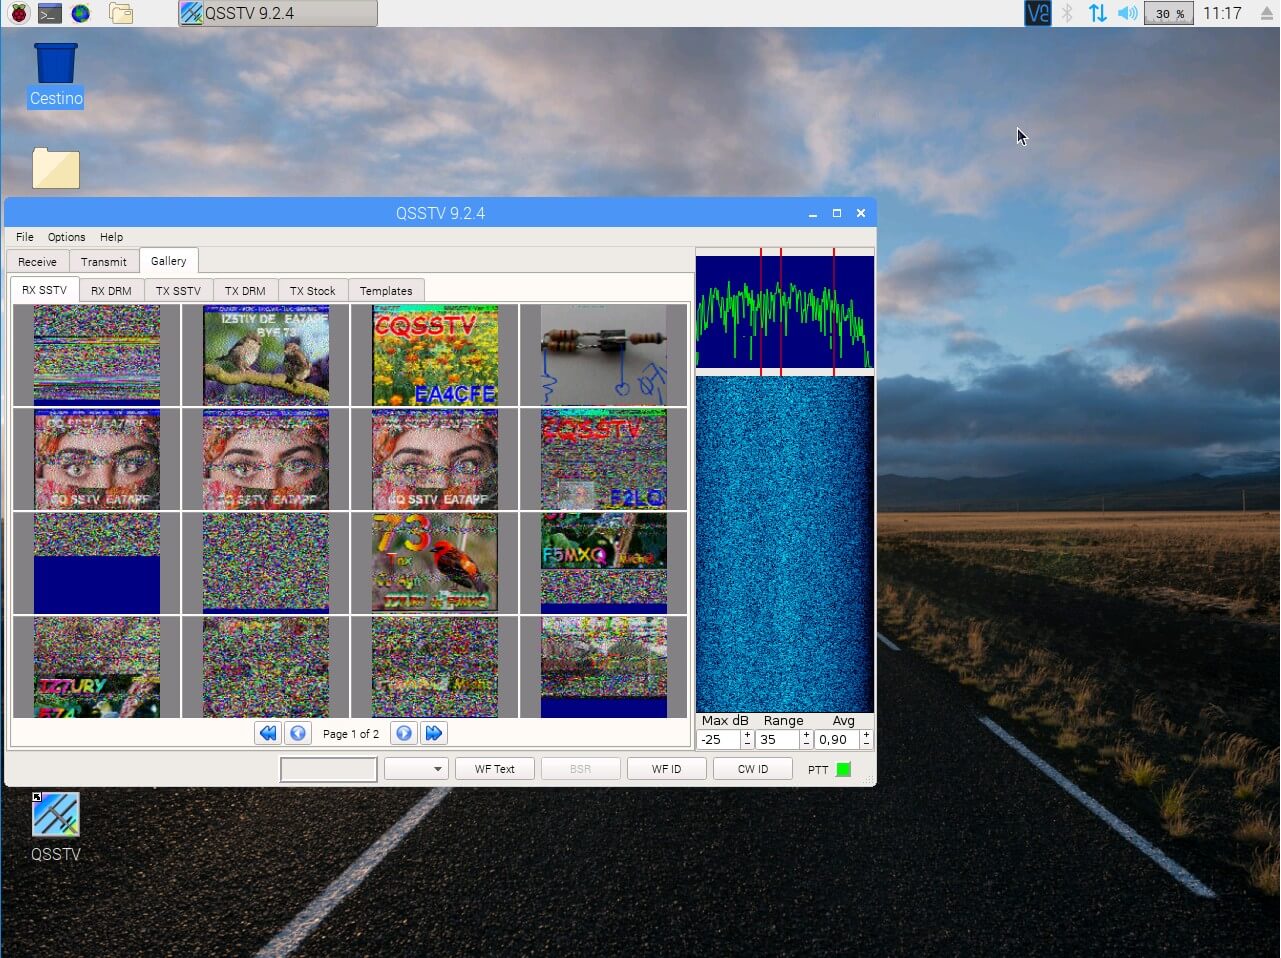
Over on YouTube Corrosive has uploaded a new tutorial video showing us how we can demodulate DVB-S DATV (Digital Amateur TV) on a Windows PC with SDRAngel. DATV is a mode used by hams to transmit and receive digital video, and SDRAngel is a multiplatform SDR software platform that supports multiple SDRs such as the RTL-SDR, HackRF, PlutoSDR, LimeSDR and more.

SDRAngel comes with a built in DATV demodulator, but it is necessary to install the FFMPEG video decoder yourself. Corrosive's tutorial shows where to download the decoder, and how to install it into SDRAngel. He then goes on to show how to use SDRAngel to begin receiving and demodulating a DATV signal.

We note that in a previous post Corrosive also showed in another video how to transmit and receive DATV with a LimeSDR and a modified $20 DVB-S receiver.


Creating a Standalone WSPR Receiver with an RTL-SDR V3 and Raspberry Pi 3

Thank you to Zoltan for submitting his scripts for installing the rtlsdr-wsprd WSPR decoder onto a Raspberry Pi, and showing us how to configure it for an RTL-SDR V3 dongle running in direct sampling mode. This set up allows users to create an extremely low cost and permanent RX WSPR monitor.

WSPR is an amateur radio digital HF mode designed to be decodable even if the signal is transmitted with very low power and is very weak. It can be used to help determine HF radio propagation conditions as WSPR reception reports are typically automatically uploaded to wsprnet. Direct sampling mode on the RTL-SDR V3 allows you to receive HF signals without the need for an upconverter. For best results it is recommended to use a simple bandpass filter for the band of interest.

Zoltan's tutorial comes with a companion YouTube video where he demonstrates his set up. He uses a random wire antenna on his roof directly connected to an RTL-SDR V3, which is connected to a Raspberry Pi 3.  The Pi 3 communicates to his home network via an Ethernet cable.

Making a standalone WSPR receiver with RPi and RTL-SDR V3 using rtlsdr-wsprd

Building a Carbon Fibre Dual Band Yagi Antenna for Amateur Radio Satellites with 3D Printed Parts for 20€

Back in early 2017 we posted about Manuel's (aka DO5TY / Tysonpower) design for a single band 140 MHz 3D printed carbon fibre Yagi antenna. Today he's submitted a new video about creating a dual band 3D printed carbon fibre cross Yagi antenna for only 20€. Note that the video is narrated in German, but there are English subtitles. He's also uploaded an English text tutorial to his blog, which includes links to the 3D printer STL files.

The antenna is designed to be a low cost replacement for the commonly used Arrow dual band 2m/70cm antenna which is designed for receiving and transmitting to amateur radio satellites. Many amateur radio satellites have an uplink frequency set at around 145 MHz, and a downlink frequency around 435 MHz (and some satellites have the frequencies reversed). So a dual band Yagi is ideal for these satellites. Manuel writes that with his 5W Baofeng handheld he's already made several successful contacts with his new antenna.

Manuel's antenna consists of several 3D printed joints, with a carbon fibre rod used as the main boom. Aluminum rods make up the receiving and transmitting elements. The video also discusses impedance matching and how he uses a diplexor so that there is only one connection required to the radio. The advantage of his antenna over the Arrow is that it is significantly cheaper, and also much lighter in weight.

[EN subs]Carbon Arrow Yagi Antenne - leichte Dual Band Yagi für 20€ bauen

RTL-SDRs and the VHF+ Reverse Beacon Network

The Reverse Beacon Network is a project that monitors the amateur radio bands by using volunteer stations to continuously and autonomously collect data on what/when stations are being received, and how good the signal is. The data is made public on the internet and this allows amateur radio operators to easily determine overall propagation conditions. It is currently working mostly with CW (morse code) stations, and mostly on HF, although it is expanding to VHF+ as explained below.

During October, John Ackermann (N8UR) did a talk at the "Microwave Update 2018" conference held in Dayton, Ohio. His talk was about setting up a VHF+ reverse beacon network monitoring station, using multiple RTL-SDR dongles for monitoring. The RTL-SDR dongles run on a Raspberry Pi which runs the rtl_hpsdr software. This allows multiple RTL-SDR dongles to emulate a multi-band HPSDR receiver over Ethernet. They can then be accessed on a PC by the CW Skimmer program which decodes the received CW signals, and then logs it online on the reverse beacon network's website.

The talk slides can be found here, and the video is shown below. More talks from the conference can be found on this YouTube playlist.

Four RTL-SDR.COM V3 dongles used in a VHF+ Reverse Network Setup
John Ackermann, N8UR - The VHF+ Reverse Beacon Network

Amazon AWS Satellite Ground Stations Now Available For Hire

Over on the AWS blog Jeff Barr has blogged about Amazon's new rentable ground station system called "AWS Ground Station". AWS, or Amazon Web Services is the server farm division of Amazon. They allow customers to rent out server capability on demand. In a similar sense, AWS Ground Station is aiming to allow customers to rent out satellite ground stations on demand.

Launching low cost micro/nano satellites has become very affordable in recent years and it's now common to see high schools, colleges, organizations and hobbyists designing, fabricating and launching their own satellites. Once launched, a ground station is required to receive the satellite's radio transmission as it passes over. Most low cost satellite owners will not have the budget to deploy ground stations all around the world for continuous monitoring of the satellite. This is where AWS Ground Station can take over, allowing a ground station on the other side of the world to be rented temporarily during a pass.

Currently the service is just starting, and only has 2 ground stations, but by 2019 they hope to have a total of 12. More information available on the official AWS Ground Station website.

Alternatively, there are other free open source services that could be utilized such as SATNOGS. SATNOGs relies on volunteer ground stations running antenna rotators that can be built with a 3D printer, some low cost motors and electronics, and an RTL-SDR. The antenna rotator carries a Yagi antenna and will automatically track, receive and upload satellite data to the internet for the public to access.

AWS Ground Station Web Site

Es’hail-2: First Geostationary Satellite with Amateur Radio Transponders Successfully Deployed

Today SpaceX have successfully launched and deployed the Es'hail-2 satellite which is now in geostationary orbit. This launch is special for amateur radio enthusiasts because it is the first geostationary satellite that contains an amateur radio transponder on it. The satellite is positioned at 25.5°E which is over Africa. It will cover Africa, Europe, the Middle East, India, eastern Brazil and the west half of Russia/Asia. Unfortunately, North America, Japan, most of South America, Australia and NZ miss out.

Coverage of Es'hail 2

The satellite has a two bandwidth segments, a 250 kHz narrow band for modes like SSB, FreeDV, CW, RTTY etc, and a 8 MHz wide band for digital amateur TV (DATV) modes like DVB-S and DVB-T.

The downlink frequencies are at 10 GHz so a low cost TV LNB could be used as the antenna. For receiving the narrowband modes, an RTL-SDR or similar SDR could be used, and for the 8 MHz DATV modes a standard DVB-S2 set top box can be used to receive and decode the video. For uplink, the transmission frequency is at 2.4 GHz.

According to the commissioning order of the satellite, it is expected that the AMSAT transponders will be activated only after all tests have been passed, and after other higher priority commercial telecommunications systems have been activated. This is expected to take about 1-2 months.

2018: Es'hail-2 and its amateur radio payload - Graham Shirville (G3VZV) & Dave Crump (G8GKQ)

A Tutorial on Receiving HF SSTV with a Raspberry Pi and RTL-SDR V3

Thank you to Giuseppe (IT9YBG) who has written in to share his tutorial about setting up a direct sampling RTL-SDR V3 based SSTV receiver on a Raspberry Pi. He writes that he uses the receiver to continuously receive images at 14.230 MHz, but with a frequency tweak in the command line code the system could also be used to receive the VHF SSTV images sent by the ISS.

In the tutorial he uses the free QSSTV software for decoding. An RTL-SDR together with the CSDR DSP software is used to set up a command line based receiver, which pipes the SSTV audio into a virtual audio sink, and then into QSSTV. The receiver setup procedure is similar to the method used in our RTL-SDR V3 QRP monitoring station tutorial, and is a very nice way of setting up an efficient command line based RTL-SDR audio output.

QSSTV Running on a Raspberry Pi with RTL-SDR V3 Radio

Combining HRPT Images From Germany to Canada

HRPT is a high resolution weather satellite image that is broadcast by the NOAA satellites. Receiving HRPT weather satellite signals is a little different to the more commonly received NOAA APT or Meteor M2 LRPT images which most readers may already be familiar with. HRPT is broadcast by the same NOAA satellites that provide the APT signal at 137 MHz, but is found in the L-band at around 1.7 GHz. The signal is much weaker, so a high gain dish antenna with motorized tracking mount, LNA and high bandwidth SDR like an Airspy is required. The payoff is that HRPT images are much higher in resolution compared to APT.

Manuel aka Tysonpower on YouTube has been successfully receiving these HRPT images for some time now and recently had the idea to try and combine two HRPT images together to create one big image covering the Atlantic ocean.

Manuel lives in Germany and on Twitter he found that he had a follower in Canada who was also receiving HRPT images. So he asked his follower to provide him with HRPT weather images that were received shortly after the pass in Germany. He then stitched the images together, and color corrected them which resulted in a nice large image covering Europe, the Atlantic, Canada and Florida.

[EN subs] HRPT over The Ocean - Ein Bild von Köln nach Kanada