Over on his YouTube channel Tech Minds has uploaded a video introducing and demonstrating the Langstone Project. Langstone is a standalone homebrew SDR transceiver project by Colin Durbridge (G4EML) which at its most basic implementation is based on an Adalm PlutoSDR, Raspberry Pi 4 and 7" LCD touchscreen.
In the video Tech Minds shows how to install the Langstone Pi4 software on the SD card, and then demonstrates it in action. He also notes that the output power of the PlutoSDR is too low for any real communications, however it is possible to add an amplifier and appropriate band filtering. To help with that, the software makes us of the GPIO pins on the Pi4 which can be used to switch in optional band filters.
Langstone Project - SDR Transceiver using an Adalm PlutoSDR
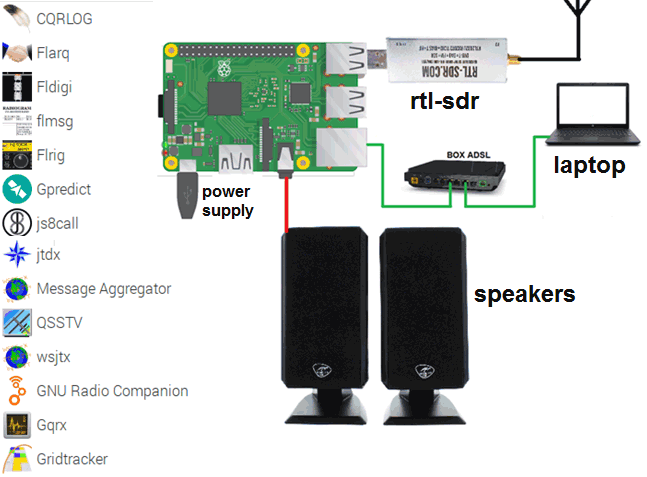
Over on his blog F4GOH has posted a rather comprehensive tutorial consisting of seven PDF documents showing how he's set up his Raspberry Pi for ham radio and other RF projects. The PDF's essentially form a book that starts with the very basics like preparing an OS for the Pi SD Card, powering on the Pi, finding the IP address and connecting to it with SSH or VNC.
The tutorials move on to installing and using various ham radio programs like Fldigi, WSJT-X , GQRX, GNU Radio, before going on to teach some more Linux concepts. The final two PDF tutorials cover the installation and use of OpenWebRX for remote RTL-SDR use, R2Cloud for decoding weather satellites, and finally Radiosonde Auto RX for decoding radiosonde's on weather balloons.
The KerberosSDR is our 4-channel phase coherent capable RTL-SDR unit that we previously successfully crowdfunded back in 2018. With a 4-channel phase coherent RTL-SDR interesting applications like radio direction finding, passive radar and beam forming become possible. It can also be used as 4 separate RTL-SDRs for multichannel monitoring.
In one of our latest tests we've been able to track a weather balloon radiosonde via the direction finding ability of KerberosSDR. These balloons are launched twice daily by meteorological agencies around the world, and the radiosonde carried by the balloon transmits an RS-41 signal continuously throughout it's flight sending back telemetry such as weather information and GPS coordinates. The KerberosSDR tracks the bearing towards the balloon using only the raw signal - it does not decode. Having the actual GPS location from the RS41 data allows us to compare and confirm that the KerberosSDR is indeed tracking the bearing of the balloon.
In this test we used the excellent 4-element dipole array made by Arrow Antennas. In particular we used the 406 MHz element version as the RS-41 signal is broadcast at 403 MHz. The antenna array is mounted on the roof, the KerberosSDR is in the attic connected to a Raspberry Pi 4. Our KerberosSDR Android app is used to plot the bearings. A separate RTL-SDR running on the video recording PC is connected to it's own antenna and is used to receive and decode the RS41 signal. The free software RS41 Tracker is used to decode and map the balloon for location confirmation.
We are currently using the latest beta code in development (unreleased at the time of this post - it will be released within 1 to 2 months) which handles non-continuous intermittent signals better.
Arrow Antennas 4-Element Dipole Array Mounted on Roof
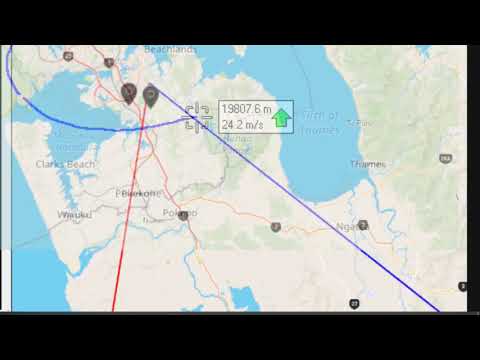
The short video below shows a timelapse of the RS41 decoder tracking a balloon which circled the south of our KerberosSDR. The red line indicates the zero degree direction of the antenna array, while the blue line indicates the estimated direction of the balloon determined via the MUSIC radio direction finding technique.
The GPS balloon map from RS41 tracker is overlayed on top of the KerberosSDR Android app map for clarity via video editing. We can see that it mostly tracks the balloon to within a few degrees. When the blue bearing line diverges this is due to the balloon's line of sight path to the antennas being obscured by terrain, buildings or trees. When this is the case a multipath signal reflecting off surrounding hills tends to become dominant.
In the second short video below the weather balloon tracked northwards. Towards the north, north west and north east we have antenna obstructions in the form of rising terrain, houses and hills, so the overall accuracy is poorer. However, it still tracks within a few degrees most of the time.
Finally the YouTube video below shows the same as the above, but in the second half includes the full screen including the KerberosSDR DoA graphs and SDR# waterfall showing signal strength.
KerberosSDR Tracking a Weather Balloon Radiosonde with Radio Direction Finding
In the future we hope to test with two or more KerberosSDR units producing multiple bearing lines on RDFMapper, hopefully resulting in cross points that can be used to estimate the actual location of the balloon.
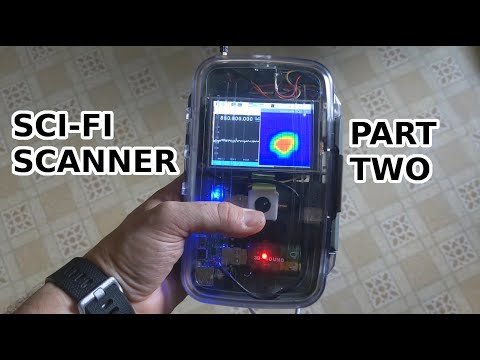
Over on his YouTube channel "saveitforparts" has been working on creating a handheld scanner/sensor box on a budget. This is a simple and fun build which is attempting to create something like a real life Star Trek scifi tricorder that you might imagine taking with you to analyze systems on another planet. The box embeds a Raspberry Pi, USB hub, battery pack, RTL-SDR and thermal camera inside. In the video he shows how everything fits into the box and gives a quick demo of the RTL-SDR and thermal camera in action. In the future he plans to add more sensors as well.
Handheld Scanning Device with Raspberry Pi - Part 2
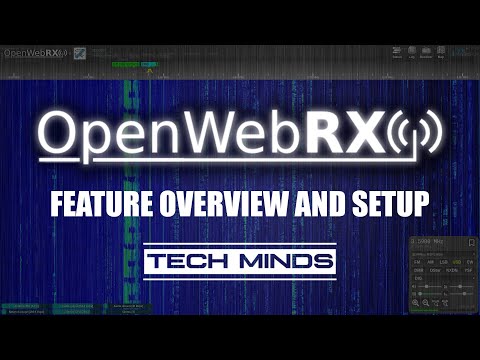
Over on YouTube TechMinds has posted his latest video which shows an overview of the features available in OpenWebRX, and also how to set it up on a Raspberry Pi. OpenWebRX is software which allows you to access your SDR remotely via the internet or local network through a web browser. All major SDRs are supported including RTL-SDRs. The software includes a waterfall display, all the standard demodulators, as well as several digital decoders for DMR, YSF, NXDN, D-Star, POCSAG, APRS, FT8, FT4, WSPR, JT65 and JT9.
In the video TechMinds first demonstrates OpenWebRX in action, showing reception of HF SSB amateur radio signals, decoding FT8 and plotting received grids on a map, decoding and plotting APRS on a map and decoding YSF/DSTAR/DMR digital voice. After this demonstration he goes on to show how to set up the OpenWebRX server on a Raspberry Pi via the installation image.
A Cyberdeck is a portable retro styled computer on the outside, but on the inside they typically consist of modern components like a Raspberry Pi. Having been inspired by the aesthetic of the Reviiser cyberdeck project, Reddit user u/dapperrogue set out to build his own version with a built in RTL-SDR.
In his Imgur post, dapperrogue documents the build process. The build consists of multiple 3D printed parts for the enclosure, as well as a really cool home made mechanical keyboard and dual LCD screens. Inside is a Raspberry Pi 4, with RTL-SDR Blog V3, as well as supporting components like a 12v to 5v step down converter, USB hub and four cooling fans. The RTL-SDR connects to a BNC port which is accessible from the outside.
Over on Hackaday we've seen a post about [mgrouch]'s "boat computer" which consists of a Raspberry Pi 4, HDMI display, and a whole slew of sensors and receivers useful for a marine environment including an RTL-SDR.
The built in equipment includes a GNSS receiver, orientation sensors, AIS receiver, 4G and WiFi, lightning EMI sensor and alarm, optional autopilot integration, rudder angle sensor, connections to boat instruments like wind, depth, speed, temperature, barometric and humidity sensors, an Iridium receiver, and finally an RTL-SDR for receiving weather fax, NavTex, satellite weather, AIS, RTL 433, morse code and more. It really is an "all-in-one" device.
His blog post explains in detail how each of the components work in the system, and in particular for the RTL-SDR he shows how you can use the boat computer to receive FM via GQRX, and NavTex via the Java based Frisnit Navtex decoder. Navtex is a marine radio service that transmits at 518 kHz or 490 kHz. It provides text data regarding weather forecasts, weather warnings, navigational information, and urgent maritime safety messages. For his antenna he writes that he uses a 10 kHz - 30 MHz Mini Whip antenna that he purchased on Aliexpress.
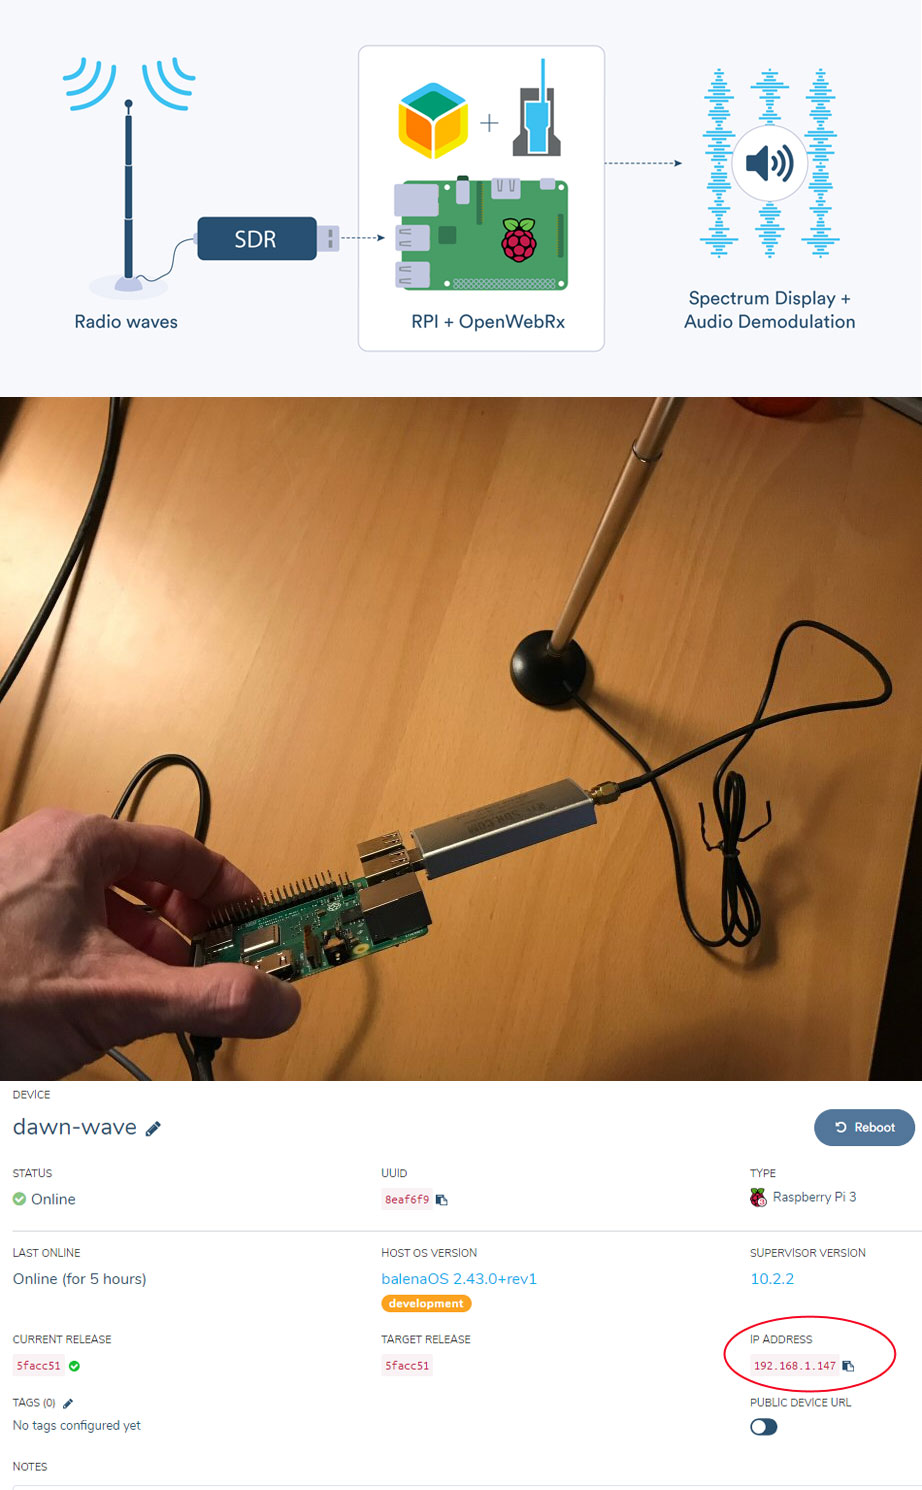
In the blog post, they show how it's possible to use a RTL-SDR and Raspberry Pi running OpenWebRX to remotely monitor the radio spectrum over the internet. This of course has been done many times before, however, the novel thing here is the use of the Balena cloud platform which makes installing and managing the Raspberry Pi running OpenWebRX much easier.
Balena has a has a special balenaOS image that is first burned on the Raspberry Pi's SD card. The OS image is pre-generated with your home WiFi details, so upon boot it automatically connects to the internet and can be accessed on the balenaCloud dashboard. At that point you can easily remotely push the pre-made Balena "sdr-spectrum-monitor" docker image to the Pi from the Balena online dashboard. This docker image has OpenWebRX and the RTL-SDR drivers already installed on it. It's then a simple matter of connecting to OpenWebRX via the local IP address as you would normally.
This is quite a nice system as it avoids needing to perform the "fiddly" steps of setting up WiFi, connecting to the Pi, determining the Pi's IP address, and installing the RTL-SDR drivers and OpenWebRX software manually.
Balena also has a very simple way to make the OpenWebRX server accessible from outside your network. The only steps required are to set a port variable in the Balena cloud dashboard, and enable the "public device URL" option. No need to fiddle around with unblocking ports or dynamic DNS services.
Balena.io appears to be free for personal use, allowing you to add and manage up to 10 devices before needing to pay.
RTL-SDR & OpenWebRX Installed and Managed via Balena Cloud.