Tagged: rtl2832u

GNU Radio Code for Android Now Released

Back in November 2019 we posted how Bastian Bloessl (@bastibl) had teased us with his ability to get GNU Radio running on an Android phone. Now he has officially released his code to the public on GitHub. This is quite a remarkable development as you can now carry a full DSP processing suite in your pocket. In addition to the code, he's put up a short blog post explaining a bit about the port. He notes some highlights of the release:

  • Supports the most recent version of GNU Radio (v3.8).
  • Supports 32-bit and 64-bit ARM architectures (i.e., armeabi-v7a and arm64-v8a).
  • Supports popular hardware frontends (RTL-SDR, HackRF, and Ettus B2XX). Others can be added if there is interest.
  • Supports interfacing Android hardware (mic, speaker, accelerometer, …) through gr-grand.
  • Does not require to root the device.
  • All signal processing happens in C++ domain.
  • Provides various means to interact with a flowgraph from Java-domain (e.g., Control Port, PMTs, ZeroMQ, TCP/UDP).
  • Comes with a custom GNU Radio double-mapped circular buffer implementation, using Android shared memory.
  • Benefits from SIMD extensions through VOLK and comes with a profiling app for Android.
  • Benefits from OpenCL through gr-clenabled.
  • Includes an Android app to benchmark GNU Radio runtime, VOLK, and OpenCL.
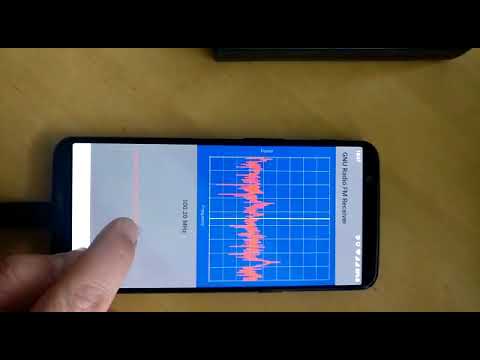
  • Includes example applications for WLAN and FM.

He's even included demonstration code that turns a USRP B200 SDR connected to an Android phone into a WLAN transceiver which can run in real time on faster devices.

Installing it may not be easy for most, but Bastian has included full build instructions on the GitHub page, and makes use of a Docker file which should simplify the installation a bit.

GNU Radio running on an Android phone, usinga USRP B200 SDR as a WLAN transceiver.
GNU Radio 3.8 on un-rooted Android receiving FM w/ HackRF (take 2)

Performing a Side Channel TEMPEST Attack on a PC

TEMPEST refers to a technique that is used to eavesdrop on electronic equipment via their unintentional radio emissions (as well as via sounds and vibrations). All electronics emit some sort of unintentional RF signals, and by capturing and processing those signals some data can be recovered. For example the unintentional signals from a computer screen could be captured, and converted back into a live image of what the screen is displaying. We have tutorials on how to do this with a program called TempestSDR available on a previous post of ours.

Recently Mikhail Davidov and Baron Oldenburg from duo.com have uploaded a write up about their TEMPEST experiments. The write up introduces the science behind TEMPEST eavesdropping first, then moves on to topics like software defined radios and antennas.

At the end of their post they perform some experiments like constantly writing data to memory on a PC, and putting the PCs GPU under varying load states. These experiments result in clear RFI bursts and pulsing carriers being visible in the spectrum, indicating that the PC is indeed unintentionally transmitting RF. They note that machine learning could be used to gather some information from these signals.

Their write up reminds us of previous TEMPEST related posts that we've uploaded in the past. One example is where an RTL-SDR was used to successfully attack AES encryption wirelessly via the unintentional RF emitted by an FPGA performing an encryption algorithm. Another interesting post was where we saw how a HackRF was used to obtain the PIN of a cyprocurrency hardware wallet via TEMPEST. Search TEMPEST on our blog for more posts like that.

TEMPEST PC Side Channel Setup: RF pulses from writing to memory and a GPU.

DragonOS KerberosSDR Tutorials: Setting up Networked Direction Finding, Monitoring Multiple Signals Simultaneously

DragonOS is a ready to use Linux OS that includes various SDR programs preinstalled. The creator Aaron also runs a YouTube channel that contains multiple tutorial videos for DragonOS. One of the latest videos he's released is a tutorial that shows how to use one of our KerberosSDR (4x Coherent RTL-SDR) units to set up networked direction finding. To do this he uses our core KerberosSDR DSP software, along with RDFMapper, a third party bearing visualization tool with the ability to display bearing from multiple networked direction finding units.

The tutorial goes through the KerberosSDR software install procedure, shows how to set up the various parameters in the software, and then demonstrates it providing data to the RDFMapper software via our open source pyRDFMapper-KSDR-Adapter program. With this setup, you could run multiple KerberosSDR units around a city and use them to locate a signal source rapidly.

KerberosSDR Uploading Bearing data to RDFMapper
DragonOS LTS/10 Direction Finding Bearing Server (KerberosSDR, RDFMapper)

In addition to the direction finding video he's got another video that shows how to use a KerberosSDR and HackRF to simultaneously monitor various signals like home gas meters, ADS-B data, and 433 MHz ISM band devices using programs like rtlamr, rtladsb and rtl_433. What's particularly interesting is how he uses a program called Kismet to manage each radio on the device.

DragonOS LTS/10 KerberosSDR + HackRF One (qspectrumanalyzer, kismet, rtl_433, rtlamr, rtladsb)

YouTube Guide: Installing GQRX on Windows 10

GQRX is a general purpose GUI based SDR program that is typically used most often on Linux and Mac computers, however it is still possible to install and use it on Windows. Over on YouTube M Khanfar has uploaded a tutorial video that shows a step by step guide on how to get GQRX running on Windows 10.

The process is a little long as it involves an install of Windows GNU Radio, Python, pip and various Python dependencies required by GQRX, as well as setting up the Windows PATH. If you prefer a text guide, the full tutorial is also typed out in the YouTube video description.

GNU Radio , GQRX in Win10 installation Guide

SignalsEverywhere: How to set up an RTL-SDR SpyServer on Windows

Over on YouTube SignalsEverywhere/Harold is back with a new video tutorial that shows users how to set up a SDR# SpyServer with an RTL-SDR dongle. SpyServer is a program included with SDR# that allows you to access your Airspy or RTL-SDR dongle remotely through the internet or local network connection. Thanks to it's compression techniques and that it does most processing on the server side, it requires significantly less network bandwidth compared to a raw IQ server like rtl_tcp.

In the video Harold first shows how to access the SpyServer network in SDR# which consists of many remote SpyServers that have been made accessible to the public for free. He then goes on to explain how you can set up your own SpyServer by simply editing a text config file. He notes that you may need to perform port forwarding on your router if you wish to make the server publicly accessible.

RTL SDR Spyserver Remote SDR Setup Tutorial (on Windows)

PiSDR Ready to use SDR Raspbian Image Updated to V4.0

It's been a good time for ready to use SDR Linux OS images recently, as we've seen the release of two new images, DragonOS and gorizont-rtlsdr over this lock down period. And now the already popular and mature PiSDR image has also been updated. 

PiSDR is a ready to use Raspbian based operating system for Raspberry Pi's which comes pre-loaded with many programs for software defined radios. It currently supports the RTL-SDR, LimeSDR, PlutoSDR, Airspy, and Airspy HF+ and has preinstalled software such as SDR Angel, Soapy Remote, GQRX, GNURadio, LimeUtil, and LimeVNA.

The latest update includes various bug fixes as well the following new features:

  • Three times smaller.
  • HackRF Support.
  • Verified Compilation on GitHub Actions.
  • New Software: Quisk, CygnusRFI, rpitx, rtl_433, acarsdec, gpredict, multimon-ng, and leansdr
PiSDR Running a SDRAngel with a LimeSDR

TechMinds: Demonstrating the QT-DAB Digital Audio Broadcast Decoder

Over on YouTube TechMinds has uploaded a video where he explores the QT-DAB software (formerly known as SDR-J), which is a program capable of decoding Digital Audio Broadcast (DAB) signals. QT-DAB is compatible with several SDRs including the RTL-SDR, HackRF, Airspy and SDRplay units. 

DAB stands for Digital Audio Broadcast and is a digital broadcast radio signal that is available in many countries outside of the USA. The digital signal encodes several radio stations, and it is considered a modern alternative or future replacement for standard analog broadcast FM.

In the video TechMinds explains how to download, install and use the software on a Windows machine. He goes on to demonstrate some DAB decoding in action with various SDRs and then shows how to connect QT-DAB to a remote RTL-SDR via rtl_tcp.

DAB Radio Decoder For SDR (RTL_SDR - HACKRF - AIRSPY)

YouTube Series on Inmarsat Decoding with Scytale-C

Paul (microp11) is the programmer behind the Scytale-C Inmarsat decoder which has become very popular with RTL-SDR owners. With Scytale-C, and RTL-SDR and an appropriate L-band antenna and amplifier it is possible to receive STD-C NCS data from Inmarsat satellites. This is a public broadcast which contains information like search and rescue (SAR) and coast guard messages as well as news, weather, pirate activity and other incident reports. If you're interested, we have a tutorial available here which uses different software.

Paul has recently created a 6-part video series explaining Scytale-C and all it's features. As well as showing how to setup a Scytale-C decoder with the SDR# plugin in order to receive the STD-C text data via the UI, Paul's series goes into more depth showing how to review and inspect the raw data packets, how to monitor multiple Inmarsat channels at once using SDR# Spyservers and how to use the map feature for plotting coordinate and region data.