Explaining and Demonstrating Jam and Replay Attacks on Keyless Entry Systems with RTL-SDR, RPiTX and a Yardstick One

Thank you to Christopher for submitting to us an article that he's written for a project of his that demonstrates how vulnerable vehicle keyless entry systems are to jam and replay attacks. In the article he explains what a jam and replay attack is, the different types of keyless entry security protocols, and how an attack can be performed with low cost off the shelf hardware. He explains a jam and replay attack as follows:

The attacker utilises a device with full-duplex RF capabilities (simultaneous transmit and receive) to produce a jamming signal, in order to prevent the car from receiving the valid code from the key fob. This is possible as RKEs are often designed with a receive band that is wider than the bandwidth of the key fob signal (refer Figure 3, right). The device simultaneously intercepts the rolling code by using a tighter receive band, and stores it for later use. When the user presses the key fob again, the device captures the second code, and transmits the first code, so that the user’s required action is performed (lock or unlock) (Kamkar, 2015). This results in the attacker possessing the next valid rolling code, providing them with access to the vehicle. The process can be repeated indefinitely by placing the device in the vicinity of the car. Note that if the user unlocks the car using the mechanical key after the first try, the second code capture is not required, and the first code can be used to unlock the vehicle.

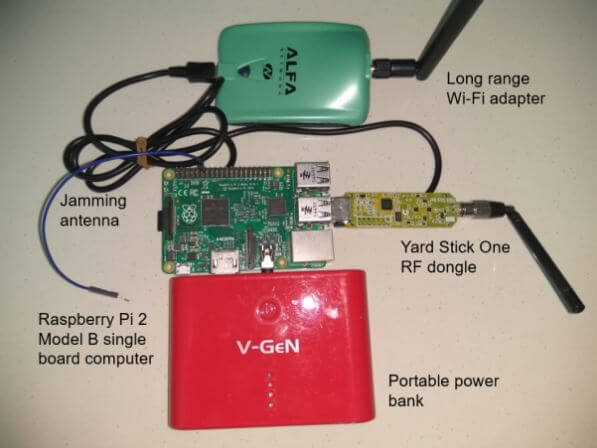
In his demonstrating the attack he uses the RTL-SDR to initially find the frequency that they keyfob operates at and to analyze the signal and determine some of it's properties. He then uses a Raspberry Pi running RPiTX to generate a jamming signal, and the YardStick One to capture and replay the car keyfob signal.

Jam and Replay Hardware: Raspberry Pi running RpiTX for the Jamming and a Yardstick One for Capture and Replay.

An Intro to RTL-SDR: Technical DSP Concepts Explained

Over on his blog Ajoo has posted a very comprehensive introduction to the technical concepts behind RTL-SDR, as well as any other SDR in existence. His post first goes through the basic communications theory and mathematical concepts required to understand the technical concepts behind software defined radio. He then goes on to specifically discuss the RTL-SDR and how it works internally, mentioning what the major components do and providing useful block diagrams.

In part II of his introduction he moves on to the software. Here he starts to explain a bit about librtlsdr and how the RTL-SDR drivers and codebase is put together. Further on he explains higher level software such as rtl_test, rtl_fm, rtl_sdr, the pyrtlsdr wrapper and how it could be used to demodulate FM.

If you're looking at diving deeper into SDR theory then Ajoo's posts are excellent starting points. Note that the theory explanations come at about an undergraduate University level of complexity, and thus these posts are mostly for people wanting a deeper understanding of SDR. To simply use an RTL-SDR to receive signals such a deep level of understanding is not required.

In a future post which is not yet available, Ajoo will introduce GNU Radio and show how to demodulate FM signals. It appears his goal is to work his way to an understanding of how GPS L1 signals work.

One of Ajoo's block diagrams explaining the RTL-SDR behavioral model.

New SDR# Plugin: Toolbar Menu Plugin

Eddie Mac has just released another useful plugin for SDR# called "Toolbar Plugin". This is an accessibility improvement plugin that simply puts many of the plugin controls on the SDR# toolbar. This eliminates the need to constantly open and close plugin panels on the left.

The plugin includes controls for setting the demodulation mode, changing the FFT display settings, a direct frequency entry text box, frequency stepper buttons, an SNR level meter, squelch controls, analog/digital preset buttons, screen grabber controls, and time slot selectors for the TETRA decoder plugin. The analog/digital preset buttons are quite interesting as they allow you to set presets for either analog or digital signals. For example for a digital signal you could set the preset to use NFM demodulation, and to launch the DSD+ application automatically.

More information about this and Eddie's other plugins can be found on his site, and on this forum post.

Some toolbar plugin selections.
Analog/Digital Preset Settings

PiAware Radar – A Traditional Radar-Like Display for ADS-B, and Setting up an ADS-B Cockpit Flight Display

PiAware Radar is a Python script that connects to your PiAware server and uses the received ADS-B data to display a familiar radar-like display (green circle with rotating radius, and aircraft displayed as blips). PiAware is the software used to take ADS-B data from an RTL-SDR dongle running on a Raspberry Pi and feed flightaware.com. A radar-like display is probably not very useful, but it could be used to set up an interesting display that might impress friends. Over on his blog IT9YBG has uploaded a tutorial that shows how to set PiAware Radar up on a Raspberry Pi.

Also on his blog IT9YBG has uploaded another tutorial that shows how to set up 1090XHSI, which is a program that displays an 737 aircraft cockpit simulation using live ADS-B data. The ADS-B data updates the instrument displays in real time, giving you a view of exactly what the pilots might be seeing on their dashboard of their aircraft. We posted about this software in the past, but IT9YBG's tutorial helps make it much easier to set up.

PiAware Radar
PiAware Radar
1090 XHSI 737 Cockpit Simulation from ADS-B Data

GridTracker Now Available on Windows, Mac and Ubuntu (Debian)

In early February we posted news about the release of a program called GridTracker. GridTracker is a live mapping program for WSJT-X which is a software decoder for low power weak signal ham communications modes such as FT8, JT4, JT9, JT65, QRA64, ISCAT, MSK144 and WSPR. Although these are low power modes, the protocols are designed such that even weak signals can potentially be received from across the world. Mapping the received signals can be interesting as it may give you an idea of current HF propagation conditions.

Previously GridTracker was Windows only software. However recently GridTracker was updated to now include support for Mac and Ubuntu (Debian) operating systems as well. This is great news as it makes it much easier to set up a portable GridTracker screen on a portable computer like a Raspberry Pi.

GridTracker Mapping out Weak Signal Communications.

Video Tutorial on Decoding FT-8 and RTTY with an SDRplay RSP1A

Over on YouTube radio content creator Techminds has recently started a series that shows how to decode various signals using an SDR such as the SDRplay RSP1A. The first video explains what FT-8 is and shows how to decode it using the WSJT-X software. FT-8 is a modern digital HF ham mode that is designed to be receivable even in weak signal reception. However, the amount of information sent in a FT-8 message is small, so it is not possible to have a full conversation, and you can only make contacts.

In his second video Tech Minds explains RTTY and also shows how to decode it. RTTY is another much older mode that is used by the military as well as hams. To decode it he uses Digital Master 780 which is a program included in the Ham Radio Deluxe software.

Decoding FT-8 With WSJT-X And A SDRplay RSP1A SDR Receiver

Decoding RTTY With Digital Master And A SDRplay RSP1A SDR Receiver

Radio For Everyone: Testing the RTL-SDR.com Triple Filtered ADS-B LNA, Amplified Coketenna

Akos, author of his blog 'Radio for Everyone' has recently reviewed our new RTL-SDR.com Triple Filtered ADS-B LNA. In the review he compares our ADS-B LNA against another external ADS-B LNA by Uputronics and against the FlightAware Prostick and Prostick+. The tests use the external LNA's plugged directly into the dongle in order to more fairly compare against the FlightAware dongles which have LNA's built in to the dongles themselves. From his results the RTL-SDR.com ADS-B LNA appears to have near identical results with the Uputronics LNA, and slightly better results compared to the FlightAware dongles. Akos has not yet tested the main use-case of the LNA, which is to use it at the end of a run of coax cable, however he plans to do this in a future test. Also in his second post Akos shows how to build a simple amplified Coketenna using our ADS-B LNA.

On the subject of ADS-B performance we note that there are two ways to set up a system for optimal reception (apart from the antenna). The first is to place the computing and radio devices (such as a Raspberry Pi and RTL-SDR) as close to the antenna as possible (leaving a ~1m coax run to avoid local interference from the Pi). For this type of setup it is cheaper to use a FlightAware Prostick Plus RTL-SDR dongle since this has an ADS-B LNA built into it. However, the disadvantage is that you may need to set up a Power over Ethernet system, or find a remote power source, and possibly place the Pi in a difficult to service location such as in an attic or up a mast.

The second option is to use an external ADS-B LNA close to the antenna, and run coax down to the computing device which is positioned in a more accessible location. The LNA will negate any losses in the coax cable, and with high enough gain on the LNA, using quality coax is not such a high requirement since those losses are negated by sufficient LNA gain. Both methods will yield similar excellent performance.

Tested ADS-B LNA's and ADS-B RTL-SDR Dongles

Uniden Announce the SDS100: A Software Defined Handheld Scanner

The Uniden SDS100 Handheld SDR Based Scanner

Radio manufacturer Uniden have just released news about their latest product called the SDS100 which is a handheld software defined radio scanner specifically for digital voice and trunking modes. The scanner will retail for USD699, and aims to be released in the 2nd quarter of 2018 pending FCC approval. Note that certain software decoders will require paid upgrades, but it will be capable of all the major digital voice modes such as P25 Phase I and II, DMR, NXDN and trunking modes. It doesn't seem to support TETRA since it's marketed at the American consumer, however, it seems plausible that simple software update could enable this feature in the future.

As far as we know this is the first handheld scanner to incorporate SDR and is probably one of the bigger leaps in scanner technology to date. Compared to hardware based scanners, the SDS100 should provide significantly better decoding capabilities, even in weak signal and simulcast conditions. Simulcast is when multiple overlapping base stations transmit a signal at the same frequency. This can cause multi-path distortion problems, but an IQ based radio like an SDR is able to overcome these issues.

Uniden creates another first with the SDS100 True I/Q Scanner, the first scanner to incorporate Software Defined Radio technology to provide incredible digital performance in even the most challenging RF environments. The SDS100’s digital performance is better than any other scanner in both simulcast and weak-signal environments.

The SDS100 is also the first scanner that allows you to decide what to display, where, and in what color. Custom fields put the information important to you right where you need it.

And, one more first, the SDS100 meets JIS4 (IPX4) standards for water resistance.

For more information you can check out this discussion thread on Radio Reference. In the future there should also be some videos of it in action available on the Uniden YouTube channel. The owners manual is also available here and all their promo material including many more demonstration videos can be found on their Google Drive.