Thanks to Stefan Dambeck for letting us know that there is now a fork of libairspyhf made by DL9RDZ which contains an adapted version of airspyhf_rx (the raw IQ generator). This enables the Airspy HF+ to be easily integrated into OpenWebRX.
If you weren't aware, OpenWebRX is a browser based SDR interface and server software that allows an SDR to be used by multiple people at the same time over the internet. It performs audio demodulation and compression on the server side allowing for very low and efficient network usage. In this way it is different to Airspy official server solution SpyServer which sends the IQ data over the network. So an OpenWebRX server uses significantly less network bandwidth and might be more suitable for those on slower or capped internet connections.
At the moment we're not seeing any public HF+ servers available on the OpenWebRX database at sdr.hu, but this may change in the future.
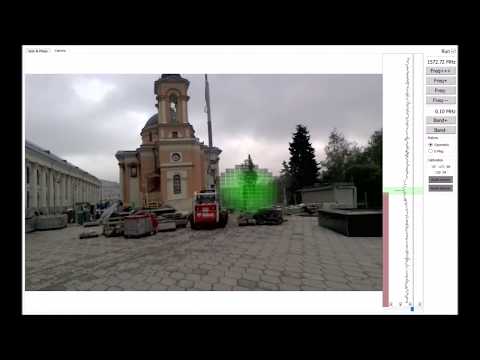
Airspy HF+ Running on the OpenWebRX Web Browser Interface
He uses a handicap door button with wireless transmitter that transmits at 300 - 390 MHz, and uses the RTL-SDR on the Raspberry Pi Zero to detect whenever the button is pressed. The button detection algorithm simply looks for an increase in RF energy via an FFT transform. Once a button press is detected by the RTL-SDR and Raspberry Pi the camera and facial recognition software on the Pi activate, and a text to speech algorithm asks the button presser to face the camera for identification. If the face is recognized in the database the speech to text welcomes the user.
In the experiment a laser is fiber optically coupled to an eletro-optic phase modulator, which modulates a 400 MHz FM signal onto the light. The light is then passed into a Carbon monoxide absorption cell with a photodiode used to take the spectroscopic measurements. The signal from the photodiode is passed into a LNA and then into the Airspy where the signal can then be processed on the PC.
The paper is very technical, but describes the setup, and how they characterized and calibrated the Airspy for their measurements. They conclude with the following:
A successful demonstration of a commercially available software defined radio as a lock-in amplifier was performed. For this purpose, the tuner front end and back end were characterized. The sensitivity and non-linearity of the receiver circuit was measured and analyzed. Acquisition of a CO spectral line was demonstrated using FM-spectroscopy with a repetition rate of 1 kHz. This proves the usability of an off-the-shelf SDR as a cheap but powerful lock-in amplifier by adding PLL driven frequency generators. The drawback of the arbitrary initial phase of the used phase locked loops can be either solved by software or hardware measures.
This experiment is somewhat similar to one we posted about earlier in the month where an RTL-SDR was used in an optical interferometer lab experiment.
FM Spectroscopy with an Airspy Software Defined Radio.
Last week we posted about Micheal Ossmann and Schuyler St. Leger's talk on Pseudo-Doppler direction finding with the HackRF. The talk was streamed live from Schmoocon 18, but there doesn't seem to be an recorded version of the talk available as of yet. However, Hackaday have written up a decent summary of their talk.
In their direction finding experiments they use the 'Opera Cake' add-on board for the HackRF, which is essentially an antenna switcher board. It allows you to connect multiple antennas to it, and choose which antenna you want to listen to. By connecting several of the same type of antennas to the Opera Cake and spacing them out in a square, pseudo-doppler measurements can be taken by quickly switching between each antenna. During the presentation they were able to demonstrate their setup by finding the direction of the microphone used in the talk.
If/when the talk is released for viewing we will be sure to post it on the blog for those who are interested.
OperaCake running with four antennasSchyler's Poster on Pseudo Doppler from GNU Radio Con 17.
Back in 2016 cURLy bOi released a Windows port of the Linux based "Telive" TETRA decoder. Now the latest development in TETRA decoders is that a TETRA decoder plugin for the SDR# software has been released. This makes setting up a TETRA decoder significantly simpler than before.
The plugin doesn't seem to be officially released anywhere, but we did find it thanks to @aborgnino's tweets on Twitter, and he found it on a Russian language radio scanner forum. The plugin is available as a direct download zip from here, but we suggest browsing to the last few posts in the forum thread to find the latest version.
Installing the plugin is a little more difficult that usual, as you first need to install MSYS2 which is a compatibility layer for Linux programs. The full installation instructions are included in the README.TXT in the zip file. One clarification from us: you need to copy the files in the msys_root/usr/bin folder from the zip file into the /usr/bin folder that is in your MSYS2 installation directory.
We tested the plugin and found it to work well without any problems. With the plugin turned on you just need to simply tune to a TETRA signal in WFM mode, and you will instantly be decoding the audio.
TETRA is a type of digital voice and trunked radio communications system that stands for “Terrestrial Trunked Radio”. It is used heavily in many parts of the world, except for the USA. If you have unencrypted TETRA signals available in your area then you can listen in on them with an appropriate SDR like an RTL-SDR and decoder software like the aforementioned plugin.
Johannes Smit wanted to be able to view the live data from his SWR WH2303 weather station and send it to a database. Whilst the weather data acquisition software that he paid for worked well, he thought that there must be a cheaper and more fun way to grab the data. But unfortunately the manufacturers would not respond to his request for the RF protocol specifications. So Johannes decided to reverse engineer the protocol using his RTL-SDR instead.
Next he fired up Universal Radio Hacker (URH) and captured a sample of the weather station signal. Using URH he was able to determine the modulation type (FSK) and the bit length parameter (150us). Johannes' next step was to open the weather station, find the RF chip, look up the RF chip information on the web and find the spec sheet. From the spec sheet and internet forum searches he was able to determine the properties of the packet including the sync word and preamble. With this data he was able to determine the packet structure.
Finally he captured a packet and recorded the exact data shown on the weather station at the time of the packet. With this he was able to search the binary data string for the data shown on the weather station, indicating the location of a particular piece of data within the string.
Johannes' tutorial shows just how powerful tools like Universal Radio Hacker can be, and his tutorial is an excellent start for those looking at reverse engineering any of their own local RF protocols.
Recently we've come into knowledge of a program on GitHub called "System Bus Radio" which lets you transmit RF directly from your computer, laptop or phone without any transmitting hardware at all. It works on the principle of manipulating the unintentional RF radiation produced by a computers system bus by sending instructions that can produce different AM tones. An SDR like the RTL-SDR V3 or RTL-SDR with upconverter, or any portable AM radio that can tune down to 1580 kHz can be used to receive the tones. To run the software don't even need to download or compile anything, as there is now a web based app that you can instantly run which will play a simple song.
However, the RF emissions don't seem to occur on every PC, or are perhaps at another frequency. We tested a Windows desktop and Dell laptop and found that no were signals produced. A list of field reports indicates that it is mostly MacBook Pro and Air computers that produce the signal, with some transmitting signals strong enough to be received from a few centimeters to up to 2m away. This could obviously be a security risk if a sophisticated attacker was able to sniff these tones and recover data.
This program runs instructions on the computer that cause electromagnetic radiation. The emissions are of a broad frequency range. To be accepted by the radio, those frequencies must:
Be emitted by the computer processor and other subsystems
Escape the computer shielding
Pass through the air or other obstructions
Be accepted by the antenna
Be selected by the receiver
By trial and error, the above frequency was found to be ideal for that equipment. If somebody would like to send me a SDR that is capable of receiving 100 kHz and up then I could test other frequencies.
There is also an interesting related piece of software based on System Bus Radio called 'musicplayer', which takes a .wav file and allows you to transmit the modulated music directly via the system bus.
If you're interested in unintentionally emitted signals from PCs, have a look at this previous post showing how to recover images from the unintentional signals emitted by computer monitors. This is also similar to RPiTX which is a similar concept for Raspberry Pi's.
Over on his site rtl-sdr.ru, Vasilli has been back at work creating new plugins for SDR#. The latest plugin is a TCP server that takes the demodulated mono audio stream from SDR# and sends it over TCP (note that the site is in Russian but the Google translate button on the right can be used). This can be used to easily stream audio over the internet or a network, or even locally on the same PC to another program. If enough programs support TCP audio streams, then the plugin could potentially replace the need for software like Virtual Audio Cable or VBCable by allowing another method for piping the audio from SDR# into a decoding program.
Installing the plugin is the same as usual. Just extract the SDRSharp.TcpServer.dll file to the SDRSharp folder, open plugins.xml with a text editor and paste in the 'magic line' specified in MagicLine.txt.
To test the server you can connect to it with VLC media player. Some special commands need to be specified to VLC in order for it to understand the audio format. To enter them go to Media->Open Network Stream and make sure 'Show more options' is checked. Enter the network URL as 'TCP://127.0.0.1:20022' (without quotes), and enter the Edit Options field as ':demux=rawaud :rawaud-channels=1 :rawaud-samplerate=48000 :rawaud-fourcc=s16l' (without quotes). Ensure the first colon in the line is copied over properly. Then enable the TCP server in the SDR# plugin, and click Play in VLC. Ensure the SDR# is muted, and the volume in VLC turned up. Audio should now begin streaming through TCP.
Hopefully in the future we can see some audio compression algorithms and more decoding software supporting TCP audio connections.
Vasilli has also updated many of his other plugins too, including creating a DSD_TCP plugin which allows you to transmit the digital audio directly to DSD+ via a TCP connection.