YouTube user NeedSec has posted a good tutorial video showing how to use Kalibriate-RTL, a program used to determine the frequency offset error of your RTL-SDR dongle. Every RTL-SDR dongle will have a small frequency error as it is cheaply mass produced and not tested for accuracy. This frequency error is linear across the spectrum, and can be adjusted in most SDR programs by entering a PPM (parts per million) offset value.
Kalibrate is a Linux program that uses GSM mobile cell phone base stations to determine the PPM offset, by using the GSM signals own frequency correction bursts. See the tutorial video below.
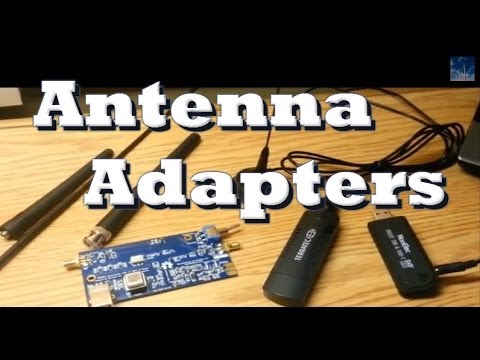
YouTube user Eric William has posted a useful video explaining the different types of antenna adapters he had to buy (all for under $10) to connect his RTL-SDR (E4000 and R820T) and Ham-it-up upconverter to his antennas.
Version 1.5 of the popular Android based RTL-SDR software, SDRTouch has been released.
This new version adds presets, which is useful if you intend to use SDR Touch as an in car Android based radio.
The DMCA claims made on the software earlier also seem to have been resolved, meaning that SDR Touch can be obtained from the Google Play market once again.
Previously we showed a post on how John Wiseman was able to get ADS-B decoding with dump1090 running on his AR.Drone with an RTL-SDR stick so that he could track the locations of other aircraft. He has now gone further and implemented an Augmented Reality style ADS-B aircraft radar display on his AR.Drone. Check out the video he posted showing it in action below.
AR.Drone with air traffic (ADS-B) overlaid on camera feed
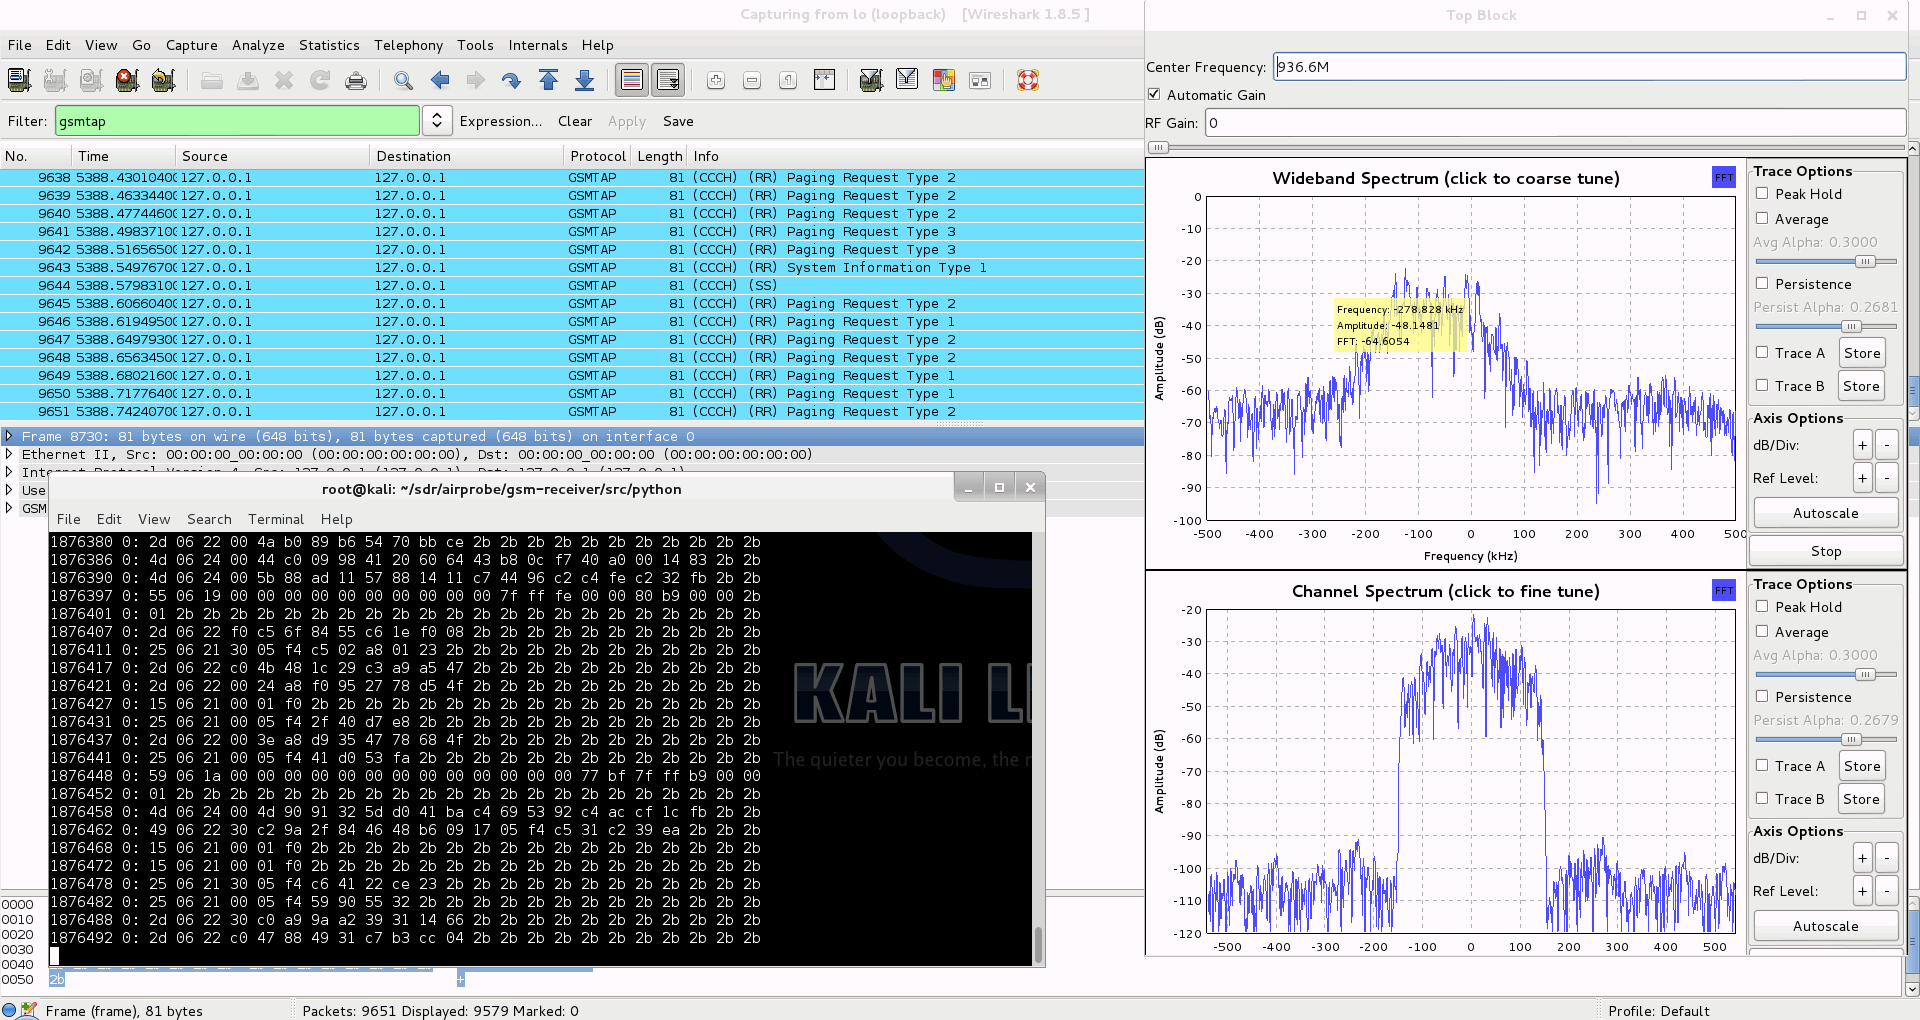
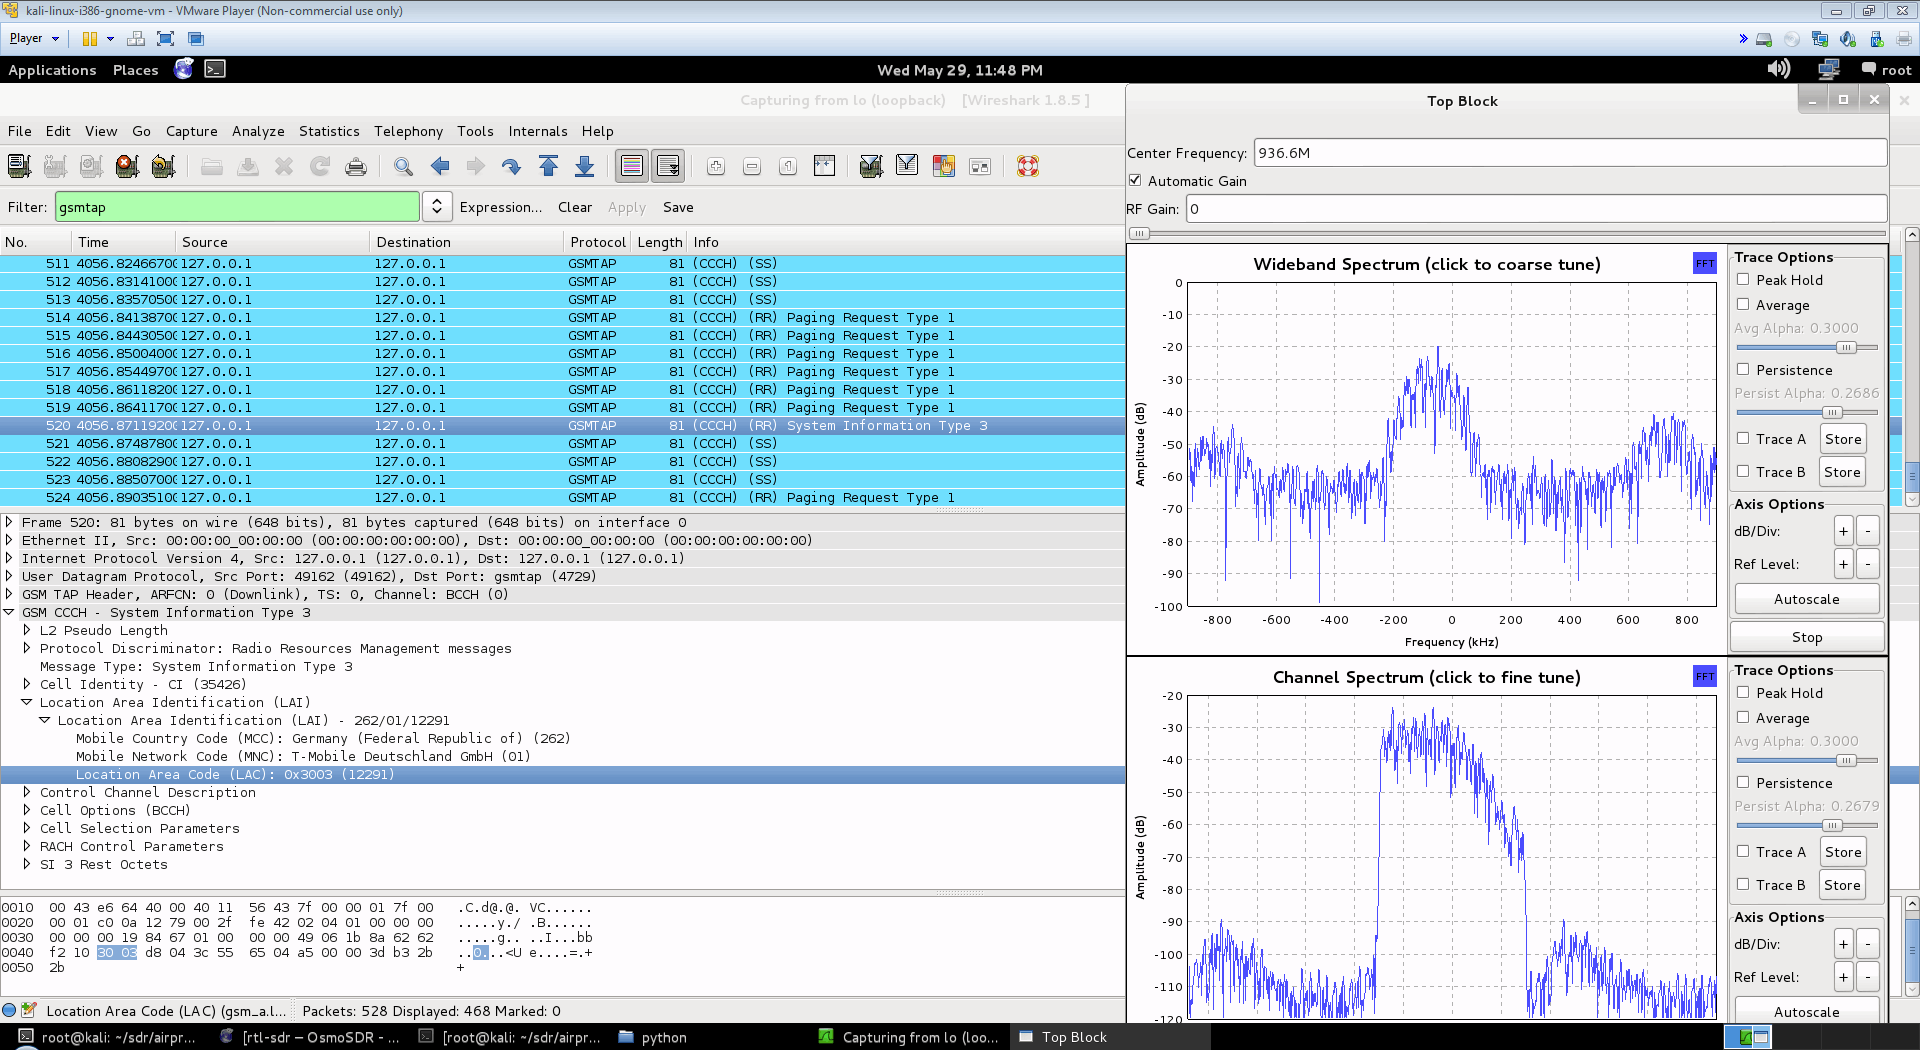
The RTL-SDR software defined radio can be used to analyze cellular phone GSM signals, using Linux based tools GR-GSM (or Airprobe) and Wireshark. This tutorial shows how to set up these tools for use with the RTL-SDR.
Example - Analysing GSM with RTL-SDR Software Defined Radio
Here is a screenshot and video showing an example of the type of data you can receive. You can see the unencrypted GSM packet information. You will not be able to see any sensitive information like voice or text message data since that part is encrypted. Decryption of messages that are not your own is very difficult, illegal and is not covered in this tutorial.
Analyzing Cellular GSM with RTL-SDR (RTL2832), Airprobe and Wireshark
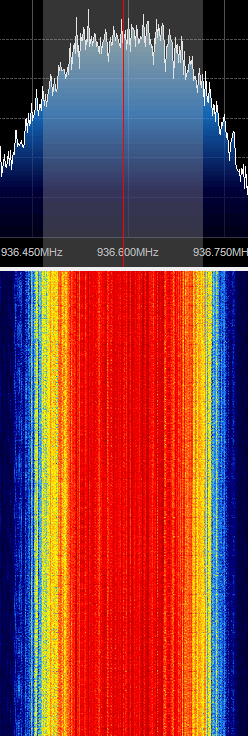
First, you will need to find out at what frequencies you have GSM signals in your area. For most of the world, the primary GSM band is 900 MHz, in the USA it starts from 850 MHz. If you have an E4000 RTL-SDR, you may also find GSM signals in the 1800 MHz band for most of the world, and 1900 MHz band for the USA. Open up SDRSharp, and scan around the 900 MHz (or 850 MHz) band for a signal that looks like the waterfall image below. This is a non-hopping GSM downlink signal. Using NFM, it will sound something like the example audio provided below. Note down the strongest GSM frequencies you can find.
The rest of the tutorial is performed in Linux and we assume that you have basic Linux skills in using the terminal. For this tutorial we used Ubuntu 14.04 in a VMWare session. You can download the various ready to go Ubuntu VMWare images from here, and the free VMWare player from here. Note that virtual box is reported not to work well with the RTL-SDR, as its USB bandwidth capabilities are poor, so VMWare player should be used.
Plug in your RTL-SDR and connect it to your VM if necessary. Run grgsm_livemon by typing grgsm_livemon at the terminal. A new window should open.
In the new window tune to a GSM downlink frequency which you determined while browsing in SDR# and set the gain appropriately.
Start Wireshark by using sudo wireshark -k -Y '!icmp && gsmtap' -i lo which will automatically start wireshark in the loopback mode with the gsmtap filter activated. You may get an error when opening Wireshark but this can be ignored.
You should now see the GSM data scrolling along in Wireshark.
[expand title = "Old Method using Airprobe (Click to Expand)"]
Install GNU Radio
You will need to install GNU Radio first in order to get RTL-SDR to work. An excellent video tutorial showing how to install GNU Radio in Kali Linux can be found in this video shown below. Note that I had to run apt-get update in terminal first, before running the build script, as I got 404 not found errors otherwise. You can also use March Leech's install script to install the latest version of GNU Radio on any Linux OS. Installation instructions can be found here. I recommend installing from source to get the latest version. http://www.youtube.com/watch?v=B8Acp6_3DA0
Update: The new version 3.7 GNU Radio is not compatible with AirProbe. You will need to install GNU Radio 3.6. However, neeo from the comments section of this post has created a patch which makes AirProbe compatible with GNU Radio 3.7. To run it, place the patch file in your airprobe folder and then run patch -p1 < zmiana3.patch.
Install Airprobe
Airprobe is the tool that will decode the GSM signal. I used multiple tutorials to get airprobe to install. First from this University of Freiberg tutorial, I used their instructions to ensure that the needed dependencies that airprobe requires were installed.
Update: Thanks to shyam jos from the comments section who has let us know that some extra dependencies are required when using the new Kali Linux (1.0.5) for airprobe to compile. If you've skipped installing GNURadio because you're using the new Kali 1.0.5 with SDR tools preinstalled, use the following command to install the extra required dependencies.
git clone git://git.osmocom.org/libosmocore.git
cd libosmocore
autoreconf –i
./configure
make
sudo make install
sudo ldconfig
Clone Airprobe
Now, I discovered that the airprobe git repository used in the University tutorial (berlin.ccc.de) was out of date, and would not compile. From this reddit thread I discovered a more up to date airprobe git repository that does compile. Clone airprobe using the following git command.
git clone git://git.gnumonks.org/airprobe.git
Now install gsmdecode and gsm-receiver.
Install gsmdecode
cd airprobe/gsmdecode
./bootstrap
./configure
make
Install gsm-receiver
cd airprobe/gsm-receiver
./bootstrap
./configure
make
Testing Airprobe
Now, cd into to the airprobe/gsm-receiver/src/python directory. First we will test Airprobe on a sample GSM cfile. Get the sample cfile which I found from this tutorial by typing into terminal.
cd airprobe/gsm-receiver/src/python
wget https://svn.berlin.ccc.de/projects/airprobe/raw-attachment/wiki/DeModulation/capture_941.8M_112.cfile
Note: The tutorial and cfile link is sometimes dead. I have mirrored the cfile on megaupload at this link. Place the cfile in the airprobe/gsm-receiver/src/python folder. Now open wireshark, by typing wireshark into a second terminal window. Wireshark is already installed in Kali Linux, but may not be in other Linux distributions. Since Airprobe dumps data to a UDP port, we must set Wireshark to listen to this. Under Start in Wireshark, first set the capture interface to lo (loopback), and then press Start. Then in the filter box, type in gsmtap. This will ensure only airprobe GSM data is displayed. Back in the first terminal that is in the python directory, type in
./go.sh capture_941.8M_112.cfile
If everything installed correctly, you should now be able to see the sample GSM data in wireshark.
Receive a Live Channel
To decode a live channel using RTL-SDR type in terminal
./gsm_receive_rtl.py -s 1e6
A new window will pop up. Tune to a known non-hopping GSM channel that you found earlier using SDRSharp by entering the Center Frequency. Then, click in the middle of the GSM channel in the Wideband Spectrum window. Within a few seconds some GSM data should begin to show constantly in wireshark. Type ./gsm_receive_rtl.py -h for information on more options. The -s flag is used here to set the sample rate to 1.0 MSPS, which seems to work much better than the default of 1.8 MSPS as it seems that there should be only one GSM peak in the wideband spectrum window.
Capturing a cfile with the RTL-SDR (Added: 13/06/13)
I wasn't able to find a way to use airprobe to capture my own cfile. I did find a way to capture one using ./rtl_sdr and GNU Radio however. First save a rtl_sdr .bin data file using where -s is the sample rate, -f is the GSM signal frequency and -g is the gain setting. (rtl_sdr is stored in 'gnuradio-src/rtl-sdr/src')
Next, download this GNU Radio Companion (GRC) flow graph (scroll all the way down for the link), which will convert the rtl_sdr .bin file into a .cfile. Set the file source to the capture.bin file, and set the file output for a file called capture.cfile which should be located in the 'airprobe/gsm-receiver/src/python' folder. Also, make sure that 'Repeat' in the File Source block is set to 'No'. Now execute the GRC flow graph by clicking on the icon that looks like grey cogs. This will create the capture.cfile. The flow chart will not stop by itself when it's done, so once the file has been written press the red X icon in GRC to stop the flow chart running. The capture.cfile can now be used in airprobe. However, to use this cfile, I found that I had to use ./gsm_receive.py, rather than ./go.sh as a custom decimation rate is required. I'm not sure why, but a decimation rate of 64 worked for me, which is set with the -d flag.
./gsm_receive.py -I rtl_sdr_capture.cfile -d 64
[/expand]
Going Further with Decryption
We don't cover how to decode the actual encrypted GSM data here, but this is possible to do with messages going to your own phone once you extract the encryption code for your sim card. But note that if you want to do this you'll need to put in some good study and research into understanding how GSM actually works before you can even think about trying it. Disclaimer: Only decrypt signals that you are legally allowed to (such as from/to your own cell phone) to avoid breaching privacy.
A reader wrote in to let us know some information on obtaining the TMSI and Kc numbers, which are useful if you wish to go further and actually decode messages coming from your own phone. He writes:
For some reason, most of posts on the Internet concerning GSM sniffing provide very few examples of how to get our own TMSI and Kc numbers. These rely either on the BlackBerry engineering screen or the use of a SIM-card reader (see for example http://domonkos.tomcsanyi.net/?p=369). I know there are other methods like the one you describe in www.rtl-sdr.com/rtl-sdr-cell-phone-imsi-tmsi-key-sniffer/.
However, I have rarely seen anything related to the Android IMSI-Catcher Detector app. This can be easily installed via the standard repositories and it allows us to send AT commands to the modem provided we root the MS. This procedure works on many devices (I checked it on a Motorola Moto E).
Just a quick reminder of the basic AT+commands:
1. Extraction of IMSI -> AT+CRSM=176,28423,0,0,3.
2. Extraction of Ciphering Key Kc -> AT+CRSM=176,28448,0,0,9 (for SIM), AT+CRSM=176,20256,0,0,9 (for USIM). First 16 entries.
3. Extraction of TMSI -> AT+CRSM=176,28542,0,0,11. First 8 entries.
The Android IMSI-Catcher Detector provides some additional interesting data, like the cell ID the device is connected to, the LAI, etc.
We note that software such as SimSpyII together with a Sim Card reader can also be used to easily acquire the Kc value.
If you enjoyed this tutorial you may like our book available on Amazon. Available in eBook and paperback formats.
In this video YouTube user nerdsville shows decoding of Autocabmobile data terminal (MDT) signals. He also shows an example of the not yet decodable Auriga MDT signals at about 3:20 into the video. MDT’s are displays attached to taxis which are used to help taxis find transport jobs.
He uses SDRSharp, an rtl-sdr dongle and the Taxi MDT Decoder java program. More information about Taxi MDT Decoder can be found here.
In this video YouTube user Superphish shows decoding of the French Navy STANAG 4285 test signal. He used an rtl-sdr, Ham-it-up upconverter, SDRSharp and a decoding program called Sorcerer. Watch in HD to read the text, though the text basically just repeats the French equivalent to the quick brown fox, “VOYEZ VOUS LE BRICK GEANT QUE J EXAMINE PRES DU GRAND WHARF” and some test symbols over and over.
Fair warning with the Sorcerer download: Some people report that their virus scanner detects a trojan on some Sorcerer download links. The Sorcerer link above seems to be clean though, as far as my virus scanner reports. An alternative decoder is Sigmira.
STANAG 4285 is the NATO standard for HF communication, and signals can be found all over the HF spectrum.
Stanag 4285 Decoding with RTL-SDR (RTL2832), Sorcerer and SDR Sharp
The RTL-SDR software defined radio combined with SDRSharp, and a POCSAG/Flex capable decoding application can be used to decode pager messages. With this setup you can receive pager messages from all pager users on the system. If you don't know what a pager is, since they are now uncommon, here is a brief explanation from Wikipedia:
A pager is a wireless telecommunications device that receives and displays numeric or text messages, or receives and announces voice messages.
Not many people use pagers these days with mobile phone text messaging being used more, but pagers are still popular with doctors, hospitals in general, some fire and ambulance agencies and various IT companies, as they tend to be more reliable and have greater coverage.
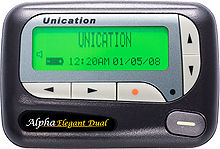
A Pager
Privacy and Security
Obviously a lot of messages sent through pagers are plain text and contain personal data. Especially messages from hospitals. This is a concern as it is a major breach of patient privacy.
Security concerns also stem from the fact that many IT companies set up systems that forward notices of emails being received with the subject line visible, and system messages that contain IP addresses, email addresses and names, database error messages, and URLs.
Previously an art installation in New York was set up with an SDR to try and highlight some of the privacy and security concerns that pager use brings.
We note that in most countries it is perfectly legal to receive pager messages, as they are plain text unencrypted, but it is illegal to share or act on the information received. In some countries it may be illegal to even set up a receiver. Please research and respect your local laws before attempting this project.
Examples
Here YouTube user nerdymark shows 18 minutes of pager decoding using SDRSharp, PDW and an RTL-SDR.
18 Minutes of Pager Traffic 2012 July 12 San Jose rtlsdr sdr# pdw flex
Tutorial
While directed at the RTL-SDR, this tutorial may also be useful for use with other software defined radios such as the Funcube dongle, Airspy and HackRF, or even traditional hardware radios with a discriminator tap.
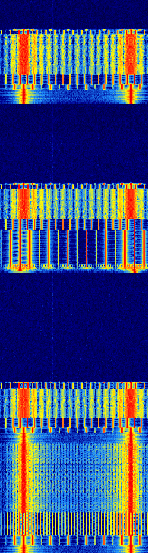
Since pager signals are usually transmitted at a very strong power, usually almost any antenna will work to receive them, even the stock antenna that comes with the dongle. Pager frequencies differ among different countries. Usually they will be anywhere from 137 - 160 MHz, around ~450 MHz, or around 900 MHz. Check radioreference.com or Google for frequencies in your area, or just search for them manually - they are usually quite easy to spot. Pagers normally use either the POCSAG or FLEX protocols, and the signals will look on a waterfall something like the signal shown below. They also have a distinctive sound when played with NFM mode. A sound sample is also shown below.
POCSAG Waterfall Image
For this tutorial, you will need to have an RTL-SDR dongle set up and working with SDRSharp. We will assume you have this much done already. If you do not, visit the Buy RTL-SDR page, and then the Quickstart guide. You will also need to have an audio piping method installed and set up. Audio piping will allow the audio from SDRSharp to be passed to a decoding program. You can use either windows stereo mix, VB-cable (free) or Virtual Audio Cable (paid with trial version).
Now, to decode the POCSAG or Flex signals, you need need to download and install a free program called PDW, which can be downloaded from this page, then follow these steps.
Open SDRSharp and set the audio piping method to the one you will use under the Audio Output drop down box and then press Play.
Tune to a pager POCSAG/Flex signal. Set the receive mode to NFM, filter bandwidth to 12500 Hz, filter order to 10, turn squelch OFF and filter audio OFF. Adjust the RF gain settings under the configure menu until good reception is achieved.
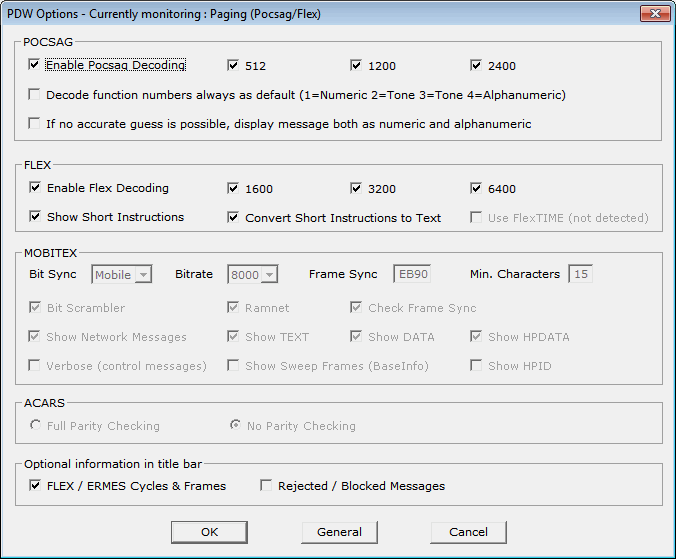
Open PDW. You may initially receive some errors upon first opening it, but they can be safely ignored. Go to Options -> Options and Click Enable Pocsag Decoding, and ensure the 512, 1200 and 2400 boxes are all checked. Also, ensure Enable Flex Decoding is enabled and that the 1600, 3200 and 6400 boxes are all checked. Press OK.
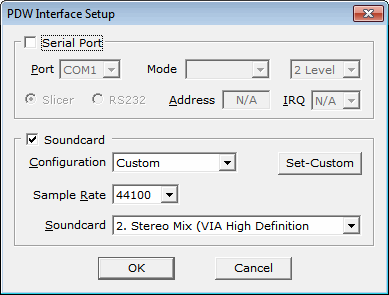
Go to Interface -> Setup. Enable the Soundcard checkbox, set the Configuration to Custom, and choose your audio piping method in the Soundcard drop down box. If you only have one audio piping method enabled in the Windows recording properties, it will automatically choose that method. Press OK.
Go to Monitor, and ensure POCSAG/FLEX is ticked.
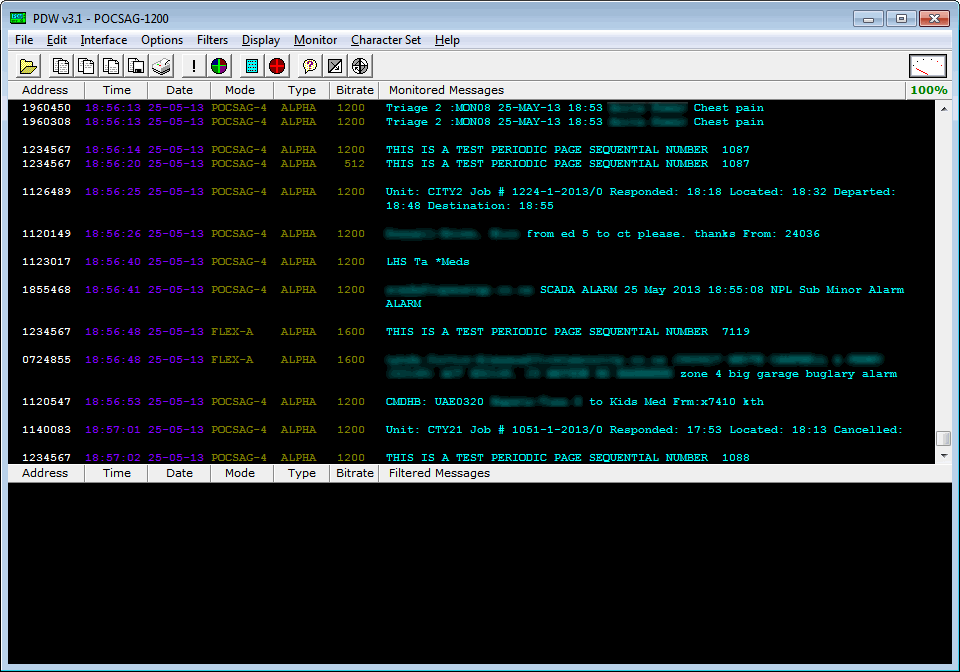
Now, if everything is set up correctly, the pager audio from SDRSharp should be being sent to PDW. In the top right hand corner of PDW, there should be a volume gauge. You will need to adjust the volume settings in SDRSharp, and/or the Windows volume settings so that the volume meter goes up when a pager signal is sent. The percentage shown below the gauge shows the decode error rate. If you are receiving good signals the error rate should be very low and the percentage should be at or near 100%.
PagerMon is a app that records and displays all messages from MultimonNG in a nice web page.
Some Tips
Pager signals are generally very strong, and so almost any antenna can pick them up - even the stock antenna included with many dongle packages. However, if you live far away from the transmitter a better antenna matched to the pager frequency you want to monitor may be required.
If reception is very poor, you may get some garbled messages in the PDW window.
Since pagers can be so strong, you may actually need to reduce the RF gain to clearly discern between a real pager and an image. Reducing the gain may also help decoding if it is so strong that it begins overloading in the RF spectrum.
Sometimes setting the volume too loud can cause the pager audio signal to become distorted. Make sure you do not have the audio set too loud.
If you enjoyed this tutorial you may like our book available on Amazon. Available in eBook and physical formats.


 First, you will need to find out at what frequencies you have GSM signals in your area. For most of the world, the primary GSM band is 900 MHz, in the USA it starts from 850 MHz. If you have an E4000 RTL-SDR, you may also find GSM signals in the 1800 MHz band for most of the world, and 1900 MHz band for the USA. Open up SDRSharp, and scan around the 900 MHz (or 850 MHz) band for a signal that looks like the waterfall image below. This is a non-hopping GSM downlink signal. Using NFM, it will sound something like the example audio provided below. Note down the strongest GSM frequencies you can find.